The topic of poor rear door opening is a very painful one for Grant/Kalina owners. It did not bypass almost any owner of the above-mentioned cars.
And so we will try for the hundredth time to understand the causes of this disease. You can find a lot of information on the Internet about how to make the rear doors work. We will try to list the main operations that are recommended to be performed for better opening of doors: 1) Adjusting the lock, or rather the response “ear”. This needs to be done first, but it will not give a strong result, although it is very important. 2) Bending the door in one way or another. Many people achieve very good results, but some consider this method too barbaric or are simply afraid to do it, and there are no known masters. 3) Grinding the tooth in the lock. There is an effect, but not great. And if you overdo it, the locks will unlock spontaneously.
However, I almost never came across any information about why this actually happens. The front doors have exactly the same locks and they open perfectly, so why is it not so with the rear ones? It’s enough just to understand the design of the front and rear door opening mechanisms and understand what their differences are. It turns out that these differences exist and the whole “root of evil” is found in them. I came across this video. In it, the author describes well the design of the rear locks and makes a VERY important remark that easily explains what the difference is and why the rear doors are so difficult to open.
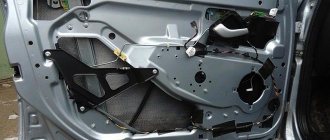
And so the whole essence of the problem is that in the rear doors, behind the place of traction, they simply made a bracket on which the handle lever rubs. And at this moment the main effort arises, because The silumin hook of the handle moves very tightly on the metal platform of the lock bracket. At first I didn’t even believe it, but when I removed the handle and pressed the lock lever with my finger on the closed door, I was very surprised at how easily the door opened. As I found out later, AVTOVAZ also knew very well about this and supposedly even corrected this ailment with new grants, this is written about in detail here. And so we see: a rod has finally been installed on the rear doors
I haven’t yet figured out how best to remake the mechanism, so I just sanded the surfaces of the bracket and handle hook, and then lubricated everything well. By the way, the handle itself had a very tight movement, i.e. when it is already removed from the door it is still not easy to open. Accordingly, I cleaned it and lubricated it in the same way, and it became much better. The effect of what was done turned out to be higher than expected, so my doors have not opened even once in 3 years of operation. But it turned out to be so simple.
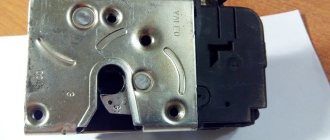
How to replace the central locking unit
Required
: remove the mounting block (put it aside without disconnecting the connectors with wires), a new central locking control unit (article 21900651201000, price about 1100 rubles).
- Remove the two screws securing the block.
- Disconnect the block with wires (pull it towards you).
The most difficult thing: unscrew the screw securing the mounting block, unscrew the bolts securing the central locking unit, remove the connector from the central locking unit and install it in its place. If it is not possible to tighten the bolts of the central locking unit in the reverse order, use plastic ties.
The process of removing and installing the central locking control unit on the Lada Granta is also shown in the video:
By the way, do you know that LADA cars can be equipped with sensors? This update will change the way you think about lock management.
The VAZ 2190 car is initially equipped with an alarm system. Unfortunately, in the Lada Granta the door switch is installed only near the driver. This creates inconvenience when boarding and disembarking passengers at night, since the interior lighting does not turn on. Also, the absence of an additional signal will not allow you to detect a car thief or thief when trying to open the back door of the Lada.
Adjusting the front left (right) door lock on the Lada Granta
In the process of systematic use of the door, its frequent opening and closing, the lock and adjacent elements wear out. As a result, the door closes with a distinct knocking sound.
Often knocking occurs after an accident due to changes in body geometry. The functionality of the lock can be restored by partially repairing it, and in case of deformation, by completely replacing it with a new one.
- screwdrivers, set of auto tools;
- lubricant;
- liquid WD-40.
Sequencing
- We inspect the gaps around the entire perimeter of the door. We mark areas with deviations. The factory standard is 2–3 mm, anything higher or lower is a defect.
- Using a screwdriver, unscrew the screws securing the hinge to the body. If necessary, use an impact screwdriver.
- Move the hinge a few millimeters up and down and check the tight fit of the door to the body. If you hear a rumble when closing, lower the hinge; if you hear a dull knock, raise it.
- We carry out a control measurement and tighten the bolts.
By analogy, we adjust the lock on the opposite side.
Vehicle configuration
Many Lada car owners are faced with factory defects. The modern Granta model was no exception. After purchasing a vehicle, the owner discovers flaws in the alarm system and interior lighting. At the first inspection of the Lada Grant, it turns out that either there is no standard wiring to the door limit switches, or there are no buttons at all.
Electromechanical devices complete a circuit when the door is opened. In this case, power is supplied to the interior lamp. At the same time, a pulse is sent to the signaling circuit. But AvtoVAZ decided to save on such “little things” as limit switches. Owners of a new car need to eliminate these shortcomings themselves.
There are differences in the alarm connection diagrams between different configurations of the VAZ 2190:
- Standard. Instead of buttons, plastic plugs are inserted into the seats. There is no wiring in this modification.
- Lada is normal. The limit switch is on the driver's door, and the remaining mounting holes have plugs, but wiring is installed.
- VAZ 2190 luxury. There is a complete set of end elements in all doors. But only the driver's limit switch turns on the lighting lamp and the door open indicator on the dashboard. When the passenger door is opened, only the lights will come on.
Adjustment process
If the gap is smaller, lower the glass all the way down. Then close it with one click, take it by the top edge and push it towards you a couple of times with a little effort. And if the gap on the front door turns out to be wider, then you need to open it with the window down and, resting your foot on the trim, pull the door to the inside several times. Then it will be possible to move on to the main problem associated with the poor functioning of the lock.
- special screwdriver;
- Silicone Grease;
- limiters.
When there is a slight bulging outward, you need to put a soft and durable gasket in the opening and on the central post, in the place where the hinges are, and then try to close the door. If the door is slightly recessed relative to the body itself, then you need to support the outside with your knee in the hinge area and pull the open door towards you. By making such adjustments to the rear doors, you can achieve soft operation without various side effects.
You can install them either on the opening or on the door itself. Due to the presence of springs, closing/opening will be smooth and the sound will not be too loud. Basically, those who are faced with a similar problem most often try to solve it with the help of lubricant. In a way it helps, but only for a short time. And it can only get worse in the future.
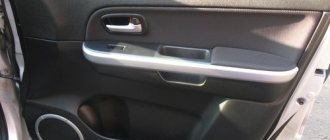
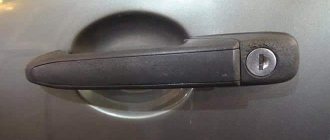
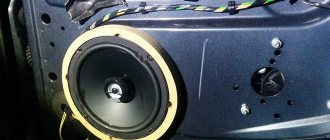
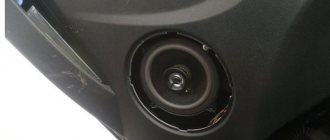
The article describes the process of removing the exterior door handle of a car. The handle is removed when replacing it, as well as for the convenience of replacing the lock cylinder.
Finalization of the scheme
Work on modifying the door end elements can be delegated to service station specialists. In this case, the owner will be charged an installation fee. You can do everything yourself, then installing limit switches will require plumbing tools and a device for checking the electrical circuit:
- Tester.
- Soldering iron.
- Phillips screwdriver.
- The wire.
- Solder POS-40.
- Corrugated hose.
- Insulating tape.
- Limit switch.
The owner must decide on a further plan of action based on the features of the layout of his Lada Granta car. It can activate the button in the threshold or the door lock contacts.
Both options involve parallel connection of unused elements to the working terminals of the door on the driver's side. The switches for opening the doorway of a Lada car are powered using a two-wire circuit. To simplify the choice, we will consider both options.
Reviews
| № | Positive |
| 1. | Vasily: after two years of active use of the car, there are no complaints about the body or its elements. The doors close easily and the locks are also in good working order. I try to treat equipment with care and carry out diagnostics in a timely manner. |
| 2. | Kirill: at 65,000 km I adjusted the hinge once on the right side. Obviously there was a bad fixation from the factory. There are no more complaints, I am satisfied with the build quality of the domestic car. |
| 3. | Ivan: for the first time, a Russian car turned out great. Of course, there are complaints about the technology, but they are insignificant. Those who are familiar with a screwdriver can easily eliminate defects on their own. |
| 4. | Gennady: I haven’t noticed anything like this in a year and a half of driving. All mechanisms are operating normally, lubricated and secured. |
| 5. | Dmitry: after buying the car, I immediately re-tightened all the moving elements myself, lubricated them additionally, and adjusted the gaps. I haven't had any worries for more than a year. |
| 6. | Alexander: I bought the car two years ago from a dealership, drove more than 80,000 km, no comments. There were minor breakdowns, but I fixed them myself. There were no major breakdowns. |
| 7. | Ignat: in a year and a half of active operation of the machine, I adjusted the hinges twice and lubricated them additionally. In general, there were no serious breakdowns. |
| Negative | |
| 1. | Kirill: I’ve only driven 75,000 km, but I’ve already adjusted the hinges, changed the seals, and ordered soundproofing for the interior. |
| 2. | Gennady: the dashboard is systematically fastened on the paving stones, I can’t do anything. I contacted specialists and repaired it myself, but it didn’t help. |
| 3. | Vladlen: there are more shortcomings in Grant than advantages; the manufacturer is in no hurry to eliminate defects. |
Conclusion The door lock is replaced only if it is damaged, deformed, or defective. The design of the mechanism is not complicated, and the operating principle is intuitive.
We replace the body element ourselves. At the preparatory stage, we check the availability of tools, lubricants, and rags.
The average service life of the locking mechanism is 120–150 thousand km.
Source
Design solution to the problem
Experts recommend going with the first option. Installing a button in the door sill is used on all cars of this class. This path is easier and faster to follow. The driver will only restore the originally designed circuit for connecting the limit switches. With this choice, there is no need to disassemble the locking mechanism. The owner will not have to wander around looking for additional plugs, wires, and insulating materials. He only purchases standard switches for the Lada Granta. Let's look at the most labor-intensive configuration for remodeling - the standard one.
- Open the car hood. Loosen the bolted connections with an open-end wrench. First unscrew the negative terminal, and then the positive one. Carefully disconnect the wires from the battery so as not to accidentally short-circuit the power source.
- Remove the limit switch from the hole. To do this, you need to grab the protruding cap. Pull out the switch, overcoming the resistance of the fixing whiskers.
- Connect two wires to the outermost (used) contacts of the plug.
- Remove the plug from the rear door mounting hole.
- Stretch two wires from the driver's door limit switch to the threshold to the installation site. Bring the ends out through the hole, 10 cm each.
- Strip the wires and connect them to the connector of the new device.
- Set the interior lighting switch to the operating position.
- By analogy, the keys located in the openings of the remaining doors of the Lada Grant are changed.
- The driver's door button is put back last.
When installing each pair of contacts, it is advisable to check their functionality. Measure the circuit resistance with a tester by alternately pressing and releasing the spherical protrusion.
Review of spare parts prices
| Name/article | Price, rub.) |
| 00001003833121 Bolt M5x10 with serrated shoulder | From 100 |
| 00001003831801 M5 nut with serrated shoulder | From 100 |
| 00001002624101 Washer 5 mm | From 50 |
| 00001003275901 Screw M6x10 | From 50 |
| 00001002605371 Lock washer 6 mm | From 50 |
| 21230610542000 Lock cylinder | From 550 |
| 11180610515000 External front right handle | From 650 |
| 11180610515100 External front left handle | From 650 |
| 21900610518000 Inner front right handle assembly | From 950 |
| 21900610518100 Inner front left handle assembly | From 950 |
*prices are current as of November 27, 2018.
Recommendations for choosing and replacing door handles
When choosing spare parts, always give preference to original ones. Good, high-quality parts are always 10 - 15% more expensive than analogues. At the same time, by purchasing a factory part, you can count on a long service life of the mechanism.
A cheap counterfeit does not provide even a third of the required resource. The final choice is up to the owner of the technical device. The deciding factor is the budget.
Installation in a lock
With the second option, the part will be placed not in the threshold, but at the top of the door. The wires are redirected to the lock. In this case, the function of the switch is taken over by the lock contacts. There are practically no difficulties in installation. Refining the circuit involves installing additional wiring and plugs for connections. During installation, it is necessary to protect the wires from abrasion using a corrugated hose or insulating tape. To implement this method, it is necessary to disassemble the lock and remove the locking bracket. The work is carried out in the following sequence:
- Remove the lock.
- Pull out the protective bracket.
- Open the connector plugs.
- Insert terminals.
- Connect the wires on the driver's door side.
It should be remembered that installing and connecting switches on the Lada does not guarantee their stable operation. To eliminate possible problems, you need to know their causes and solutions.
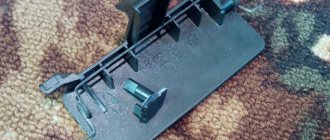
# 15 Locks & limiters - new model (liftback / Kalina 2)
Accordingly, the handle is now different, I took a Chevrolet from the Niva, purely because of the eye, it doesn’t fit in the seats**.)) Therefore, I had to knock out this fastener and rearrange it on the Grant handle, there were no Kalina 2 and Grant liftbacks in stock =(
Tightness :DD Oddly enough, they were found at the same analysis.)
__ I also purchased limiters from the liftback:
Actually, that’s the problem with them, these white plastic caps wear off and the spring starts to work inappropriately:DD _
Articles: left rear lock 21900-6205013-30 right rear lock 21900-6205012-30 rod 21900-6105248-10 Rear handles: 21920-6205150-20 - right 21920-6205151-20 left Limiters: Front: No. 2 1920-6106082-00 Rear: No. 21920-6206082-00 __
Source
Connecting the signaling to the central locking system
Now we get to the most interesting part. The contacts of the signaling relay must be connected to the gap in the brown wire (see diagram in Chapter 1). Moreover, this will be required regardless of the configuration. Oddly enough, we won’t need power cables at all. And the task now looks like this: you need a two-wire signal cable connected to the break in the brown cord.
- If you were able to remove the central lock control unit, connect the cable to the break in the wire connected to pin “7” of the control unit;
- If you have removed the door trim, then pull the cable out of it (from the point where the brown cord breaks).
It is clear that the second side of the cable must reach the relay connector of your alarm.
Option for the “Lux” package
So, this means that there is a button on the armrest in the cabin that allows you to lock the locks. From one of the contacts of the button, to which a “plus” is applied when pressed, you need to stretch the cord to the signaling unit. Nothing else is required, and you can connect the alarm according to the following scheme:
According to reviews, this option is suitable if we are talking specifically about the “luxury” configuration. By the way, the resistor can be connected to the gap in the wire designated “blue” (the common contacts are then connected with a jumper).
It must be remembered that when working with any electrical equipment, you must first remove the negative terminal from the battery.
Each cord that is re-laid must not touch metal surfaces. Otherwise, in places of contact, the wire is protected with a tube that can withstand temperatures of 250 degrees. This is how you can protect yourself from unforeseen consequences.
Option for the “Norma” configuration
Let's say there is no button in the cabin that allows you to perform emergency closing. Then you need to connect the signaling to the central locking system according to the following scheme:
As you can see, unlike the first option, there are no resistors here, and positive voltage is not used at all. But in the luxury configuration the effect that is characteristic of this scheme will not be observed:
- We perform closing from the key fob - all locks are locked;
- We try to open the locks with the key fob - only the driver's lock unlocks.
Granta and Starline - all options
I do it whenever I have free time. Therefore, I can’t install everything at once. Yesterday I connected the electric drive in the driver's door lock. I don’t remember where I got the connector from, from which we will need female terminals. The connector was purchased at auto parts for VAZ. The price is 97 rubles, some kind of cooperative.
We pull the wiring through the post-door connector. If there are no terminals for the block, then you will have to make a hole and pull the wires through it.
Price: 97 ₽ Mileage: 11,700 km