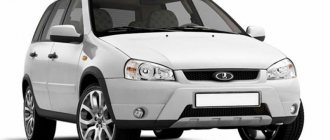
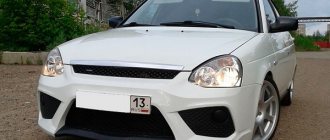
Priora is available in three versions: sedan, hatchback, station wagon. The VAZ-2170 replaced the well-known “ten” family with a modified exterior that corresponds to modern cars. But among car owners there are those who are constantly irritated by extraneous noise and the sound of the suspension. Others simply want to stand out from the crowd. And they cope with this task by tuning the car. In order to carry out tuning of the interior, you can contact a studio or do inexpensive tuning yourself in a garage. All parts of the car can be improved: body, engine, suspension, transmission and interior. In this article we will talk about tuning the interior of the Lada Priora.
Refinement with Alcantara
Alcantara is a non-woven ultramicrofiber. It is made from super-thin polyester fiber, which is coated with polyurethane. With its help you can completely change the appearance of the interior of a simple Lada or Priora hatchback. Tuning with this material is quite simple, and all modifications can be done with your own hands. Alcantara resembles suede, and is often called faux suede. The material is convenient for tuning the interior of the Lada Priora, as it is self-adhesive.
The main thing is to take the correct measurements and draw on the back of the fabric the elements that will be pasted over. Difficulties may arise due to the fact that some elements are not straight, but have corners or roundings. It is convenient to measure such elements, for example, the glove compartment lid, with a fabric meter.
If you need to cut out small parts, you can use a stationery or construction knife. Make sure it is sharp and break off the tip in time. If you try to make a cut with a dull blade, burrs will remain, and the fabric itself will bend and tear. The knife must be perfectly sharp.
Tuning the interior of a Priora with your own hands using self-adhesive Alcantara can completely change the interior. To enhance the effect, you can make a velvet cover for the speed lever and cover the steering wheel with a material that suits the style.
This is the easiest way to tune the Priora's interior.
Updating the appearance
How to do tuning of the instrument panel of a VAZ-2107 with your own hands
The field for tuning in relation to this model is quite voluminous. The car is subject to both external and internal tuning.
In terms of external tuning, the following is most often installed in a car:
- Wheels of increased diameter and a different pattern. The manufacturer has provided the possibility of installing larger disks (up to 16 inches). Most often, the owner improves the car by purchasing light alloy wheels - their cost is quite affordable, and the choice of wheel designs is huge. Forged wheels are less common, since the number of patterns is limited, and the price is almost twice that of alloy wheels;
- Installation of additional linings, spoilers, bumpers for the car. Many auto component manufacturers produce special kits for external tuning of the Priora hatchback. The average cost of a complete set is about 15,000 rubles;
- Installation of new optics. To radically change the appearance, owners install bi-xenon units and change the color of the reflectors;
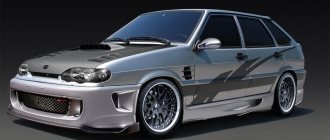
In the photo, tuning Priors hatchback:
Some car enthusiasts change the headlight units to LED ones and tint the taillights. All of the tuning examples given are suitable for both black and white cars, however, to achieve the best effect, the color scheme of innovations (spoiler, bumper, wheel color) must be in harmony with the body color.
In the video - tuning the interior of a Priora hatchback:
But the information from the article will help you understand what reviews about chip tuning Lada Vesta currently exist.
It will also be interesting to learn about what kind of tuning you can do with your own hands for a Lada Granta car in a liftback body.
Hinged roof rack
For lovers of outdoor activities and avid summer residents, a hinged roof rack will be of great help in completing their tasks. There are many models available for purchase, both from famous manufacturers and low-quality Chinese products.
Hanging roof racks are divided into several types:
Products from heaven. The most budget option (2000 rubles), a universal trunk. Installed using cross bars. The workmanship and durability leave much to be desired (although there are exceptions). The load capacity does not exceed 60 kg, and installation often involves fine-tuning the part for the car;
High quality Chinese products. The cost starts from 3500 rubles. Unlike their cheap counterparts, they are made of higher quality material, in compliance with production technology. Their load capacity reaches 75-80 kg, and installation is simple and convenient;
Expensive luggage racks from famous manufacturers. They are distinguished by their high cost (from 7,000 rubles), excellent quality and ease of installation. The maximum load capacity reaches 100 kg.
Installation of the hanging roof rack is simple and not particularly difficult.
You can do everything yourself:
- Cross bars are installed on the roof of the car.
- Using special fastening devices on the arches, they are securely attached to the body.
- Then the roof rack itself is installed on top. Typically, the arch mounts are locked with a locking device to prevent theft.
On video tuning Lada Priora hatchback:
https://youtube.com/watch?v=_V3_80T7L_M
Body kits
Installing body kits for this model is a common method of external tuning. Installation of body kits will require the owner to have a simple set of tools - a screwdriver, a meter, a level, a drill with a set of drills, double-sided tape, and degreaser.
On video 3D tuning of Lada Priora hatchback:
But how tuning the interior of a Lada Kalina is done, and what you can do with your own hands, is described in great detail in this article.
It will also be interesting to learn more about how tuning a Kalina sedan car is done with your own hands.
The installation process of body kits occurs in several stages:
- First, you need to try on the part at the installation site (side body kit - trim) and mark the attachment points to the body;
- Then the place of contact with the body must be degreased;
- Using a drill, make additional holes (if molding is being mounted, using double-sided tape will suffice);
- Using self-tapping screws, secure the new part to the body.
- When installing the bumper, it is necessary to dismantle the factory part and if all the holes match the tuning one, then install the new one on the standard mounts.
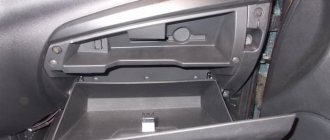
Work on the glove compartment and armrests
Work on the glove compartment can go in several directions:
- You can cover the glove compartment with self-adhesive film or other material.
- You can use electrical tape to remove the rattling of the glove compartment, which sooner or later appears in any car after prolonged use.
- Improving the glove compartment lighting is also a common option for tuning the Priora's interior.
Armrests
Armrests are usually covered with leather or leatherette. The interior space can be covered with carpet. The material, despite the fact that in terms of softness is very good, is inexpensive, its price per linear meter is about 150–200 rubles. Thanks to this, those little things that are stored in the armrest will no longer rattle when the car moves, as was the case with bare plastic.
The carpet adheres perfectly to regular Moment glue. The armrest cover knocks against the armrest insert when closed. To avoid unpleasant sound, we glue strips of soft self-adhesive tape on both sides where the armrest cover comes into contact with the insert.
Glove box
The same material (carpet) can be used to cover the inner surfaces of the glove compartment. You can also place a strip of soft self-adhesive tape along the top edge of the glove compartment lid, which softens the impact when the glove compartment is abruptly closed.
Since there is no lighting in the Priora, tuning corrects this problem. Light is supplied in two ways:
- Through the lampshade, which cuts into the back wall of the glove compartment.
- Through an LED strip that is glued inside.
- LED module with connector kit.
The easiest way is to take the third path, using six LEDs from the module and connector set. On the left side of the glove compartment, when you open it, you will notice a small hole. You can bore it a little and insert our diodes into it. To remove the glove compartment, we press two stops and unclip them.
Installation of LEDs
The LED is installed from the inside after boring a small hole on the left and sits on the glue.
You will also need a limit switch with a soft spring. We fix it so that when closed it is supported by the lid. Check if you have enough distance, and if not, increase the place where the end switch will sit a little.
The backlight can be powered from the emergency lights. Since diodes have very thin wires and can fall off at any time, to extend the life of the LEDs, it is worth taking the time to unsolder the old ones and solder the wires with a cross-section of 0.75.
To get to the alarm wires, you need to remove your beard (after unscrewing the radio and all sensors). Under the beard there will be a white chip with wires (top). The positive wire goes to the emergency button - this is the red wire.
By this point, the LEDs should already be installed, and the end cap (tip) should be installed in the hole made by the drill. The end cap is screwed on with self-tapping screws. We throw a mass onto the end switch itself, using a wire with two washers soldered at the edges. We throw this wire onto the screw from the reverse side. Thus, the body of the button will be a mass. As a result, we will ensure that when the button is pressed, the circuit will be broken and the light will go out.
Appearance
Currently, tuning for VAZ cars has a wide range of choices. Since Russian-made cars are quite inexpensive, this attracts their buyers. Tuning for Lada cars is also available and can be found in almost any city.
Tinted glass
To give your car a beautiful appearance, the first step is to tint it. Car tinting is relatively inexpensive, ranging from 2,000 to 3,000 rubles. But after tinting, your car will shine with new colors. It is legally possible to tint car windows only from the rear. Since the light transmittance of the film is not so high, viewing in the evening will be difficult.
Lip installation
To give the car a stylish look, you can install a lip on the front instead of the standard fangs under the bumper. There are several types of lips. The rubber lip “Samurai” and the plastic lip from the Chevrolet Cruze fit perfectly on the Priora bumper. The lip should be secured under the bumper with self-tapping screws. The price of the lip is from 500 to 1000 rubles.
Guba Cruz Guba Samurai
Lipspoiler
In the days of the nines, when our fathers raised the rear of the car by installing spacers under the rear shock absorbers and installing huge spoilers like in Need For Speed. Nowadays, it is stylish to lower a car; by the way, you can read how to properly lower a car on our website, and install a small spoiler that is glued to double-sided tape. The price of such a spoiler varies within 1000 rubles.
Alloy wheels
Everyone knows that the wheels of a car are the floor of the car, so the wheels of your car should be beautiful and you like them. On the Lada Priora you can install wheels with a radius ranging from R14 to R17. When installing R16 and R17 wheels, you will have to buy low-profile tires, which is very expensive and not practical, but at least beautiful. When installing disks with a large radius, comfort is lost and the chassis begins to work rougher since the rubber does not “eat up” minor road irregularities.
It is best to install R14 and R15 wheels. Such wheels are relatively inexpensive and the tires for such a radius are high profile. It follows that the comfort of driving a car will not be lost.
SE caps and mirror repeaters
In order to give your car a little luxury, you can install turn signal indicators in the prior mirrors and turn signal plugs in the wings on the SE. This modification is relatively expensive, but it significantly changes the appearance of the car and gives it a certain “richness”.
Sabers and bars
This is an amateur modification and is most often suitable for cars with a dark body color. The rear chrome-plated trunk saber and the front chrome-plated hood saber are painted matte black. This modification is very cheap and simple, but it has its own zest and is relevant when the chrome on sabers begins to swell, which is very common on Priors.
Antishildik
This modification consists of removing all nameplates from the car, but it also falls under the category of amateurs. Some car enthusiasts like their cars to look like they came from the factory. The nameplates must be removed using a hairdryer; they are glued with double-sided tape. After removing the nameplate, the remaining tape must be removed with gasoline or solvent.
Interior tuning of Lada Priora sedan in the photo: main directions
Many motorists already have an idea of how to organize the modernization of the chassis or power plant. For example, some owners successfully installed daytime running lights on the VAZ-2170, which increased not only the level of exterior appearance, but also safety.
There are many opinions regarding interior design. Some particularly “spiritualized” individuals manage to change their internal environment beyond recognition. Such Priora and do-it-yourself interior tuning in the photo look, in their opinion, like the dream of an Arab sheikh. However, there are quite reasonable options, including:
- Replacement of covers and trim.
- Modernization of seats and dashboard.
- Acoustic noise insulation and installation of a powerful audio system.
- Interior lighting tuning and painting of standard plastic elements.
When looking through the options, we must not forget that even for a substantial amount of money, the VAZ environment cannot turn into a Mercedes one. Therefore, you should plan modernization without much fanaticism; do everything modestly, but with taste.
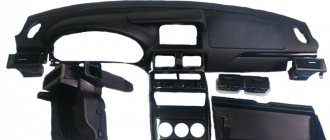
Options for upgrading the VAZ-2170 dashboard
The dashboard of the Lada Priora sedan and the tuning in the photo looks quite decent, and even moreover, it is justified, since the factory lighting of the devices is not enough for many. There are several implementation options:
- Disassemble the panel and remove the standard coating from the lining numbers. After this, the signs on the shield will acquire a bright white glow.
- Stick red or any other inserts on the back of the glass for certain numbers. This focuses attention on the temperature scale and speedometer.
- Attach pieces of LED strip of certain sizes to the back side of the glass on the dashboard board. It is important to observe polarity when connecting the circuit to standard wiring.
What else can be done? VAZ 2170 owners can only dream of a full-fledged HUD projection screen, but something can be done. If you don’t like the green color of the display, you should disassemble it and remove the filter. This will make the backlight bright white, but you can install any other filter.
Some fans of tuning, at the same time as the general illumination of the instruments, also change the illumination of the speedometer needle. To implement this project, 10 SMD LEDs are sufficient: four to illuminate the tachometer and speedometer, and three each for the fuel consumption and coolant temperature scales.
How to soundproof the interior ceiling?
Another useful upgrade, because the acoustic comfort of the VAZ-2170 leaves much to be desired. High-quality sound insulation on the Lada Priora in the form of tuning the interior with your own hands may not be visible in the photo, so we will consider the issue in more detail. Craftsmen recommend starting from the ceiling; for work you will need 4-5 hours of free time and materials:
- Two sheets of splen 1.20 x 1.0 m, 4 mm thick.
- Two sheets of bitoplast.
- Three sheets of vibration damper.
- Mounting roller.
- Stationery knife and scissors.
The procedure begins with the dismantling of the ceiling cladding and standard sound insulation, after which the roof surface is degreased and vibrating material is laid as the first layer. The second stage is the installation of splen sheets, and only then – laying the bitoplast. The convenience lies in the fact that the sheets of material have an adhesive base, which needs to be heated with a hair dryer and “rolled out” with a roller.
Soundproofing the glove compartment and doors would be a good idea. The materials you will need are the same as for working with the ceiling; the technology is simple and quite accessible to anyone. It should be noted not only the improvement in acoustic comfort, but also the thermal insulation characteristics of the car.
Refinement of the interior lamp
Almost all available reviews from Lada Priora owners indicate that the standard navigation lamp does not provide good interior illumination. There are several practice-tested methods:
- Installation of a self-made platform according to the size of the lampshade, onto which the LED strip is glued. The wires are connected to the standard wiring.
- Replacing the stock ceiling lamp with an LED one.
- Replacing the standard lamp of a lamp with a module of LEDs, the brightness depends on the type and number of light elements in the block.
The last two tuning options for the domestic Lada Priora sedan are not noticeable in the photo, but this does not mean that they are ineffective. Modernization is simple, since you do not need to completely remove the lampshade, and does not require special devices and tools.
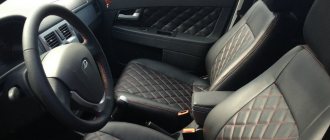
Upgrading seats
It is possible to radically transform the interior at minimal cost by changing car covers, which are sold in huge quantities. Leather products will cost a little more, but whether they make sense is up to the owner to decide. An alternative can be eco-leather, which has good breathability.
Recently, seat heating has been popular; kits are installed and connected independently. An additional button is usually installed to control the option.
Dashboard upgrade
The main problem with the Priora dashboard is that it creaks a lot. The entire panel is made of fragile plastic. This is the source of creaking and rattling. Car enthusiasts who are tired of listening to these sounds glue all the joints on the dashboard with bitoplast (an alternative material is modelin, but the sound-absorbing properties of bitoplast are still better).
How to do
Before gluing, the panel will have to be removed from the car. To remove it, you only need a Phillips screwdriver.
To remove the entire panel, you only need a screwdriver
- All joints and places of contact of plastic parts are covered with a layer of bitoplast. Any universal glue will be suitable for this operation.
Bitoplast is ideal for gluing panels
- Particular attention should be paid to the edges of the air ducts. Practice shows that it is the air ducts that make the loudest noise, especially when the air conditioner is turned on.
The edge of the air duct should be glued especially carefully
- In some cases, electrical wiring harnesses are also wrapped in bitoplast (during movement they often shake and knock on the panel and walls of the air ducts).
- After gluing, the panel is reassembled.
Do-it-yourself technical tuning of the Lada Priora car interior and photos of implemented options
A large field for experiments in the field of individual auto tuning is provided by RGB strips complete with drivers. The bright footlights for the front passenger and driver look good. Due to the control driver, the lighting intensity and color are adjusted. Is there any rational grain in this revision? Without fanaticism, such illumination will help you get out in the dark, but otherwise...
Audio tuning VAZ-2170
The standard VAZ audio system, as our audiophiles assure, does not meet high sound standards. Seriously, this is the case, and it would be nice to increase the diameter and install branded speakers by 16 cm. In some photos of tuning the interior of a Priora car with your own hands, you can see that the seat for the speakers in the doors will have to be cut. It is imperative to perform noise and vibration insulation of the door walls to avoid resonance phenomena in the future.
In addition to wideband speakers, experts also recommend installing tweeters. They are located on the dashboard or at the top of the door card. Broadband speakers are also installed for rear passengers, and to emphasize low frequencies, space for a subwoofer can be arranged in the luggage compartment.
Other technical options
If you are going to start upgrading your audio system, then it is advisable to turn your attention to some kind of full-fledged multimedia center with monitor outputs. This will already be a guarantee of high-quality playback of music tracks.
To all that has been said, it’s a good idea to add a good monitor that will not let you get bored in traffic jams and will allow you to relax in the parking lot during long trips. It wouldn't hurt to take a closer look at the range of on-board computers for Lada Priora.
Audio system
The standard VAZ audio system does not meet high requirements. Therefore, you should think about purchasing a high-quality multimedia system with monitor output. For surround and clear sound, sixteen-inch speakers are added in the doors, a tweeter and a subwoofer in the trunk. To install speakers in the doors, you need to carefully cut out holes for them.
As can be seen from the description, you can do inexpensive tuning of the Lada Priora’s interior with your own hands, without overpayments or going to a car workshop. You can purchase modified interior and body parts from both official dealers and private sellers. VAZ-2170 is a whole field for experiments.
https://xn—-8sbabr6ahc3e.xn--p1ai/tuning-priora/tuning-priora-interier.htmlhttps://bumper.guru/klassicheskie-modeli-vaz/tyuning/priora-tyuning-hetchbek.htmlhttps:// enginehack.ru/dorabotki-i-tjuning-priory/https://autobann.su/tuning-salona-lada-priora.htmlhttps://ladaautos.ru/lada-priora/kak-sdelat-tyuning-salona-lady- priora-svoimi-rukami.html
Priora 1 salon – pros and cons
- The interior of the VAZ-2170 received several basic details from its predecessor, the VAZ-2110, but the old car can only be recognized by its similar seat. Also, Priora pleased the driver and his passengers with softer seats. They were still not provided with lateral support, but a certain “breakthrough” was already felt.
- The internal design was radically different from the “ten”. The buttons on the instrument cluster housing have disappeared, and the center console has become brighter. If the instrument panel of the dozen was made in the style of the eighties, the Priora received a modern look - four scales standing next to each other were decorated with indicators on top, and there was a green display below.
- The interior of the Lada Priora is made in gray and black colors. If the steering column, dashboard and even the steering wheel were completely black, they decided to make the center console gray. On top it was decorated with an analog clock, which many owners changed to digital after purchase. Later, audio preparation and heater switches were installed.
- The interior of the first car turned out to be strict and ascetic - there are several pockets to put something you need, a spacious glove compartment, and there was only enough space in the back for three children or two adults. At the same time, it was difficult for an adult to fit his knees while sitting on the back sofa. After the start of operation, creaks appeared in the panel.
- The mileage winds up, and after 100,000 it begins to rattle - all this became a consequence of the fact that the fastenings of the casing began to loosen, the gaps between its individual parts increased, and narrowed. But we should be upset about one important parameter of comfort - there is no sound insulation, so any rumble can be heard.
Lada Priora 2: the interior has pros and cons
The interior of the Priora 2 with its entire appearance indicated that AvtoVAZ was changing. There was no longer the monotony of parts that were installed on older car models. Everything that was presented to the general public was then added to more recent AvtoVAZ models, the production of which began later than the restyling of the VAZ-2170.
The new interior is brighter. Firstly, the new gray steering wheel with an updated shiny badge is larger, and the instrument panel is almost digital. Of course, the instrument panel turned out to be more interesting than the first version, but the quality of the material is still worse, harder, tougher.
AvtoVAZ has prepared a “trump card” - this is a multimedia system, which was installed in the maximum configuration. It was installed on the center console in two blocks: below the multimedia control unit, above, at eye level, there was a screen. And the dashboard of the maximum configuration was equipped with an elongated display, onto which the navigator’s instructions could be transmitted. The new multimedia is slower even than modern smartphones - this is a clear disadvantage.
The new panel was a significant advancement - no big gray inserts, just a harmonious combination of several shades of black from different materials. Inserts appeared in the doors, which became the basis for the flight of imagination of the craftsmen. The interesting ergonomics of the new car are truly comfortable - everything you need is in front of your eyes.
What can be done with the interior as tuning
When tuning a car, you can consider different options and choose the one you like best. There is even a separate direction of tuning, when the first Priora is equipped with parts from the restyled one, less often they do the opposite.
The first point of modernization of the interior of the VAZ-2170 can be called lighting and light:
- The interior light above the gearshift lever. It can be made a little brighter so that even the small print on documents can be seen at night.
- LED illumination of the ignition switch. In order to always hit the target without scratching the steering column, the target can be illuminated. It will not look “collective farm” - modern ready-made kits are made quite competently.
- Leg lighting. It looks impressive, and also helps you navigate the pedals the first time.
- The lighting installed inside the door card is directed downwards. You will need it when you open the door at night and put your foot on the ground. There may be a puddle below, and if it is illuminated, you will notice it in time, even if you are tired.
- Ashtray lighting. This is done, again, for yourself - to make it more convenient to turn on charging or powering the DVR.
- Changing the dashboard backlight or replacing it is possible.
Another favorite part of tuning the interior of a car is adding new, decorative seat covers. This is often done to add lateral support, which the car does not have, as well as enhanced lumbar support. In addition to the usual textile, throw-on and fastening covers, you can make custom upholstery - give it to a master atelier, who will work on each seat manually.
For reasons of practicality, Lada Priora owners add sound insulation everywhere. It’s much calmer to drive this way, especially over long distances – there’s no constant hum in the background. It is added under the door trim, as well as in the ceiling - all in order to ensure silence inside the cabin.
The last thing, one of my favorite things, is music. The sky is the limit: from the subwoofer under the trunk lid to the speakers inside the door card. The best sounding music in a car is a source of pride for the owner. Preference is given not to multimedia, but to the best custom radios.
Decor of plastic components
The sedan is equipped with a lot of plastic parts in the interior; fortunately, many of them have light colors and can be easily repainted. The process of painting plastic from an aerosol can requires not only a respirator and gloves, but also a degreasing liquid and a primer. During operation, it is important to prevent the formation of drips.
Another way to improve the appearance of plastic elements is to cover them with carbon film. According to many car enthusiasts, this material is durable and looks impressive. The blanks are cut with a margin of 20-25 mm at the edges, after which the film is glued to a degreased surface. Edges and curves are blow-dried to prevent kinks and kinks.
Refinement of doors
To add brightness and uniqueness to the Lada Priora, some fans cover the doors, and specifically the handles, with Diamond Chip vinyl film. This material is durable and shiny, which is especially noticeable in the sun.
To cover interior elements with diamond chips, you need to outline and cut out the required piece of material. Glue it using Moment glue. Carefully smooth it out with your fingers, working through each protrusion.
As a result, the appearance of the tuned interior will change under the influence of sunlight. On a cloudy day, diamond chips look like an ordinary matte surface, but on sunny days they will shimmer with light and light up with a million lights.
Ceiling reupholstery
The ceiling is one of the weak points in a Priora car. It is easy to damage, scratch, burn and smudge. As a result, when tuning the interior of a Priora hatchback with your own hands, you must redo the ceiling.
The simplest way is to cover it with artificial suede - a self-adhesive velvet non-woven film. Tuning includes several stages:
- We disassemble the interior, remove all rubber bands, seals and interior elements. To remove the ceiling, it is necessary to dismantle all racks, clips, passenger handles, visors, and other fasteners. It is necessary to disconnect the power supply to the backlights.
- We pull out the ceiling that is sagging. We need to be careful, so we lower all the chairs.
- We paste the plastic ceiling using self-adhesive tape.
- We install the ceiling in place.
Thus, our efforts in tuning the car will not be in vain. We will update the interior and give the car its own character.
Engine change
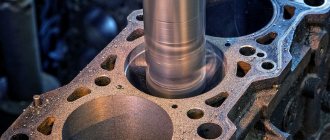
The Priora engine provides ample opportunities for tuning. Most often, car enthusiasts bore the cylinder block and install shortened pistons in the engine. Such pistons, in turn, require replacing the crankshaft. As a result, the characteristics of the engine are completely changed, and its power can increase by 35%. But there is a minus: fuel consumption will also increase. Therefore, not all car enthusiasts decide to undertake such radical engine tuning. Many people limit themselves to installing mechanical compressors in the engine, which can increase engine power by 10–15%.
Cylinder boring is one of the most labor-intensive engine tuning options.
Another inexpensive way to increase the dynamic parameters of the Priora is to work with a carburetor. In this device, the jets and acceleration pump are changed (most often, parts manufactured by BOSCH are installed in place of standard spare parts). Then fine adjustment of the fuel level is performed. As a result, the car accelerates twice as fast.
Salon of Lada Priora 1st generation
Priora in 2007 received a modified, but rather boring gray interior with a few modifications. But it should be noted that already in the first Priora, the interior has moved significantly ahead from its predecessor, the VAZ 2110.
The first Priora received a four-spoke steering wheel with separate buttons for the horn.
Unlike the VAZ 2110, the 2170 began to have an armrest installed from the factory, and the power window buttons were transferred to the door cards.
Priora was produced with this interior until mid-2012.
Salon Lada Priora restyling
In mid-2012, the VAZ 2170 received an updated front bumper and interior. The main changes in the interior were the colors; now some cars began to have a dark interior with black seats. Most people liked this color, and many owners of older cars began to chase this kind of interior, looking for it at auto showrooms.
Inside, the steering wheel and center console have changed. The steering wheel has become more voluminous and three-spoke, and individual horn buttons have been abandoned. Now the sound signal can be turned on by pressing the entire central part of the steering wheel.
Photo gallery: tuned Priors
The low landing of this Priora immediately catches your eye.
The bumpers and sills of this hatchback are one of the “I am a robot” kits
This hatchback sits very low and has a small plastic spoiler at the rear.
The combination of orange and black colors creates a very bright contrast that emphasizes the individuality of the car.
Some hatchback owners install an additional spoiler above the rear window
On sedans, the design of the front doors is often changed so that they move up
The color of the spoiler matches the color of the sedan, so the spoiler is perceived as a single whole with the car
Another contrasting two-tone low-slung sedan
Sometimes very high spoilers made of carbon fiber are installed on sedans
This sedan has a massive plastic spoiler and the doors open upwards.
So, the car owner is quite capable of changing the appearance of the Priora and making the car more beautiful. This rule applies to both sedans and hatchbacks. The main thing in this matter is a sense of proportion. Without it, the car can turn into a misunderstanding on wheels.
Salon Lada Priora 2
Probably one of the most beautiful interiors of VAZ cars. This is the latest modification of the Priora, with which it came off the assembly line. In this modification, almost everything has changed, starting from the buttons and the pumping of the seats and dashboard.
Luxury car models received a touch screen for multimedia control, while simpler models received an LCD display with on-board computer functions.
Salon from Priora on VAZ 2110
Many people wonder whether the Salon from Priora 2 will fit the VAZ 2110. There is only one answer to this question - YES! All interior parts are interchangeable between the tenth model and the Priora. The interior of the Priora can be purchased at a car dismantling shop and installed on your VAZ 2110 without any significant modifications, with the exception of modifications in the engine compartment, since the Priora’s stove is different from the 2110’s.
Front of the car
To make a car bumper, you can use your own project, or find something suitable on the Internet. The manufacturing material is fiberglass with epoxy resin, or polyurethane foam, or polystyrene foam - working with them, you can achieve very impressive results. The photo below shows an example of what any car owner can do with his own hands.
There is one more important detail that catches your eye when viewing this picture - cars look much better with tuning the Priora radiator grille. Complete engine cooling is achieved due to the increased grille area, and protection from dust and dirt is effective due to the small cells. You can buy such a mesh on the market and use it to make a grille for a car radiator.
Radiator grilles currently come in many types and shapes.
Below are a few more ideas for designing a radiator grille – each of them is interesting in its own way. Of course, the possibilities in this regard do not exhaust them - these are just a few options from an infinite variety.
Using ordinary LEDs, you can install “angel eyes” on a car’s headlights, which significantly change its “facial expression”, giving some individuality.
Improvements to the Priora Salon
The Priora's interior can be modified and given an even more stylish appearance, which will give positive emotions when driving the car.
Panel noise
Whatever one may say, the Priora is a noisy car, but if you insulate its panel, the comfort in the car will rise to another level. Sound insulation allows you to get rid of extraneous creaks and knocks.
Panel cover
To prevent the panel from being exposed to direct sunlight, which can severely damage it, you can install a special velor cape on the panel. It will give an aesthetic appearance to the panel and will perform a protective function.
EVA mats
Standard Priora mats are made of rubber and moisture often accumulates in them, especially in winter when the snow begins to melt. An excellent replacement for standard floor mats are EVA car mats. They are made of a special material that maintains the same temperature both in summer and winter and the presence of many cells in the mat prevents moisture from spilling when the mat is removed from the car.
Cases
Car seat covers not only make the car look nicer inside, but also preserve the original appearance of the seats. Often in a car you have to move around in clothes that may be dirty, and this can lead to the appearance of stains on the seats, which can then be difficult to remove. In the case of covers and stains appearing on them, you can simply remove them from the car and wash them in a regular washing machine.
Replacing the steering wheel
Some car owners do not like the standard Priora steering wheel and they prefer to get rid of it, replacing it with something more acceptable. This could be a “sports” steering wheel of small diameter, or a steering wheel of some non-standard shape. To remove the standard steering wheel from a Priora, you need the following tools:
- flat screwdriver;
- crosshead screwdriver;
- set of hexagons;
- 24mm socket and long ratchet driver;
- new steering wheel.
Sequence of operations
The Priora's steering wheel has an airbag. So first you have to get rid of it. And only then remove the steering wheel itself.
- The negative terminal is removed from the car battery. Now you need to wait until the protective system capacitor discharges (usually this happens after 45–50 minutes).
- The steering wheel is turned so that the wheels are straight.
- The cover is removed from the steering wheel, under which there is an airbag. It is held on by 7 screws, which are unscrewed with a screwdriver.
The cushion cover is held on by 7 screws
- The pillow itself is attached to two screws; they can only be unscrewed using a hexagon.
- The airbag is removed. Provides access to the steering wheel nut.
- The nut is unscrewed using a socket head. As a rule, such nuts are tightened very tightly, so you will have to apply serious force to unscrew it.
After unscrewing the central nut, the steering wheel can be removed
- After unscrewing the central nut, the steering wheel can be removed and replaced with a new one. The airbag then returns to its normal position.