Signal and central locking, VAZ-2110
This review discusses how to connect an alarm system to the central locking of the following cars: VAZ-21099, as well as 2110 and 2115. There are three standard connection schemes: for central locking controlled by negative polarity, positive and variable. But different cars have their own nuances. Sometimes it is necessary to add a fuse to the “+12 Volt” wire, sometimes, on the contrary, this is not required. VAZ locks, in turn, belong to the simplest type, the first. But the standard scheme published on the Internet is not suitable for them.
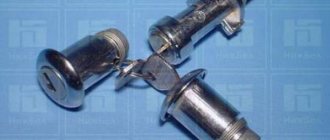
Features of the VAZ central lock
Everyone knows that the Lada models listed here use central locking controlled by negative polarity. This literally means the following: we apply “0 Volt” to one wire - all locks close. We apply the same voltage to the other wire (second) - they unlock. This is done in many European cars. What does it mean to “supply “0 Volt”? This means connecting the wire to ground.
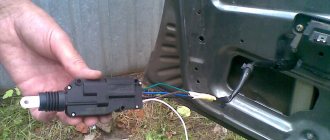
Central locking control unit connector
The central locking control unit has the following wiring:
- Black wire – ground (connected all the time);
- Pink – power supply “+12V” (built-in fuse is used);
- Yellow, red - connected to the actuators in the doors (these wires are not connected to the signaling system!);
- Brown, white - control wires, just those that have already been mentioned.
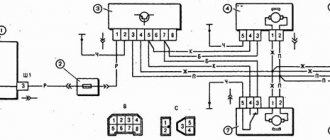
Let's look at the central locking connection diagram, which is implemented “from the factory”:
Standard connection diagram for central locking
First, we may decide that the triangular connector (labeled “C”) is suitable for our purposes, since it contains control contacts. But please note that the standard circuit uses a microswitch located in the driver's door. We will break two wires coming from this switch, and the relays built into the alarm unit will be connected to the breaks. Other options are excluded.
Practical connection operations
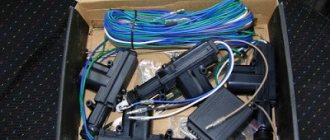
To install a car anti-theft alarm you will need simple tools and materials:
- screwdrivers, wrenches (special pullers are not needed to dismantle interior elements of VAZ models);
- soldering iron and soldering accessories (solder, acid);
- multi-colored single-core cables (selected according to the colors of the standard electrical wiring or the pinout of a specific electrical circuit);
- linear meters and multimeter;
- insulating materials;
- fastening elements (special plastic clips are preferred).
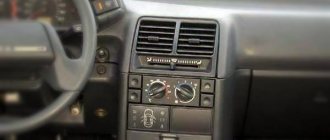
The easiest way to find the central locking control unit is when installing the main car alarm control unit. For example, on the VAZ 2110 it is located rather inconveniently.
Most often, for the convenience of installing alarm elements, you have to completely disassemble the dashboard, door cards, remove the trunk upholstery, and disassemble electrical devices of lighting systems.
Having disassembled the door card, you can connect the control wires directly to the electric drive of the lock.
It depends on the car alarm model whether you need to purchase additional relays. Sometimes standard fuses and power switches may not withstand the additional load.
The easiest way to connect a car alarm to the central locks of VAZ models is to solder into the wire breaks (usually white and brown). To do this, you need to lay a four-wire cable from the two internal relays of the alarm unit to the eight-pin connector for controlling the door microswitches.
To avoid oxidation and damage to the integrity of the wires (this leads to false alarms), you must follow simple rules:
- carry out electrical installation work with the battery disconnected;
- connect electrical wiring only by soldering or terminals, insulate connections;
- use cables with a small margin in length, lay them in bundles, and securely fasten them to body elements;
- Observe the color of the cables for easy identification during alterations or repairs.
After completing the electrical installation work, do not rush to reinstall the removed parts. The final assembly of interior elements, doors, trim is carried out only after installing all elements of the anti-theft alarm system, making adjustments, and checking the functionality of the security system.
Let's make the alarm system and central locking together
Any modern alarm unit is equipped with two relays connected to the central locking control unit. One relay is opening, the second is locking, and the circuit in the general case looks like this:
Control of central locking by supply of “mass”
In our case, the green and white cords coming from the signaling unit will be required, as indicated in the diagram. However, they will not be the only ones needed. We will connect the relay contacts to breaks in the standard wiring. This means there will be not 2, but 4 cords.
The cause of the malfunction of the central locking VAZ 2110
How quickly a person gets used to everything good. It would seem like a central lock
, such a small thing, but to what extent...
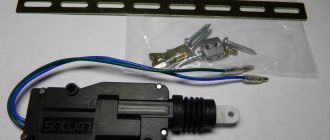
Operation of the central locking relay VAZ 2110
This relay can be used in any car, the advantages are ease of installation, as well as low cost of components.
Connection diagram for VAZ central locker
Take another look at the diagram published in the first chapter. We will connect the relay to the gap in the white and brown wires going from the microswitch to the central lock control unit. And it is obvious that it is easier to break these wires near the 8-pin connector. The same one shown at the beginning.
To avoid any questions, we will show you what should happen as a result:
Connection diagram, central lock VAZ
The common contacts are connected to the wires coming out of the microphone. The white cord continues with the brown wire coming from the door, and so on. Normally closed contacts are also used, along with normally open ones. These are the features of connecting to the VAZ central locking system.
An approximate sequence of actions performed by the installer:
- Make and lay a 4-core cable running from the signaling unit to the 8-pin connector;
We have given this sequence to emphasize once again that the relays are switched on between the microphone and the central lock control unit. There is no need to connect any additional devices. As a result, the alarm system will be able to control the state of the locks.
Remember that installation is performed by removing the negative terminal from the battery.
All wires added to the car structure must be protected (use heat-resistant tubes or electrical tape). Twisting is not the worst method to connect two wires. But it's even better to use soldering.
An interesting nuance from practice
It would seem that if a person has experience working with electrical equipment, he can do everything according to the instructions given. As a result, if no mistakes are made, you may encounter an interesting phenomenon. Instead of closing, there will be a short-term locking followed by opening. And vice versa. What to do in this case?
We disassemble the block and look for defects
Let us note once again that a significant amount of current can flow through the cords connected to the unit. We are talking about two supply wires, as well as leads connected to the motors. The approximate current value is 20 A (in a European socket there is a maximum of 15). And with such values, all parts are mounted on PCB, which cannot but lead to the destruction of the “tracks”.
Control unit, printed circuit board
To increase its cross-section, the foil track is covered with a layer of solder. But, as you can see from the photo, sometimes ring cracks form as a result, breaking the connection between the track and the terminal. Such a defect can be quickly corrected by soldering, but this is only the beginning.
Checking diodes protecting transistors
A DC relay cannot be used unless a diode is connected in parallel with the electromagnet winding. This element, that is, the safety diode, is usually located next to the relay body. So, it won't be difficult to find it.
Printed installation of BU CZ
The specified details recommend that you “ring” first: one of the “legs” is unsoldered from the board and checked with a tester. The tester itself, of course, must be turned on in the “Diode” mode:
Semiconductor testing mode
When checking in one of the connection options, the display should show “1”, in the other – from 200 to 500 mV.
Then, in 99% of cases, you can do this: unsolder the relay and, with a clear conscience, throw away the block, or rather, what’s left of it. The fact is that in the event of a breakdown or rupture of the diode, all transistors fail. However, you can give the unit one last chance: having installed serviceable parts to replace the old ones, you can test it by connecting the unit “on site”. The value of the element called “diode” is not important in this case. The main thing is not to make a mistake with the polarity (it is indicated on the board).
Replacing faulty electrolytic capacitors
The part called “capacitor” is a cylinder with two taps on one side. You can simply check the functionality of the capacitor: just look at its cover and make sure that it has not lost its plane shape (not “swollen”). If the last condition is not met, the capacitor is replaced, observing the polarity of the connection.
Two parts need to be replaced
There are positive and negative terminals, and on the imported part the “minus” is indicated by a stripe on the body.
When choosing new capacitors to replace faulty ones, the following requirements must not be violated:
- The nominal voltage should be 16 Volts or more.
- Installing a part with a larger capacity than provided is strictly prohibited: you will receive a response time increased several times (instead of 0.8 seconds it will become 1.6). This will negatively affect the durability of the actuators mounted in the doors.
- The size of the new part must match the printed circuit board. This requirement, oddly enough, is the most difficult to fulfill.
If you have made repairs based on the tips outlined here, check the unit for shorts. Connect to the “Krona” supply terminal from the tester (positive terminal), and to the “ground” - negative terminal. Try applying a negative signal to each control wire - the relay should click. However, the last property is not typical for all blocks, but only for the most “primitive” ones. Typically, a control unit requires a lot of control voltages to operate.
Connection diagram for BU "Grant"
Recommendations for installing the unit in a car are standard: before performing any actions, even if it involves dismantling, you need to disconnect the negative terminal of the battery.
This is how you can protect yourself from unpleasant consequences. Any control unit, even a faulty one, acts as a “buffer” between the battery and electric motors. If the repair is carried out incorrectly, you will get a non-functional central locking (and even then, not always). And the actuators themselves, as is easy to understand, will remain unharmed in any case.
What kind of malfunctions can there be?
When closing the lock on the door, no other actions are noted. But if you even slightly need to try to open it with the key, the door can open immediately. The presence of malfunctions is immediately visible here. The main ones can be highlighted. The central lock opens and closes itself on a VAZ - this is a normal state of affairs, but if it is faulty
The contact does not open in the central locking drive
The contacts do not open in a timely manner, and this occurs due to the following reasons:
- Traction control. Structurally, it works like this: the lock button and the drive are connected together. In this case, the rod acquires the wrong position, and there is no contact with the electric drive.
- When the button touches part of the casing. The element is not lowered to the required depth in order to contact the electric drive and the traction. There are no signals to other doors.
If there are problems of this kind, you need to make sure that the position of the button is fixed at the very end. If this is not observed, then it is worth checking the casing and making sure that there are no scuffs, only then pay attention to the ideal, even and accurate position of the rod.
Fuse failure
If the central locking on a VAZ does not work, then the cause of this circumstance may be a blown fuse. If the driver tried to open the door, but this did not lead to the desired result, then you need to look at how the electrical circuit works, and more specifically, the fuse. This element can quickly fail and the cause will be not only a short circuit, but also even the smallest load.
Fuse failure
The location of the thrust when operating a car in winter results in an overload on the engine elements.
Violation of the integrity of the central locking wires
If the central locking on a VAZ does not work, this may occur as a result of a broken section of wires. This is the main reason, since the fracture is observed in those places where the load on the node is greatest. This place is the passage of the corrugation from the side of the door and the counter. When opening a car door, the main part of the load occurs in this mechanism.
Violation of the integrity of the central locking wires
- It is easy to determine the location of the fault; you need to release one of the ends of the corrugated element in which the wires are concentrated inside the door, and then tighten one of the central locking wires. Their constructive connection is into a single bundle, and also next to each other.
- After doing some simple work, a damaged wire due to damage or interruption will be easy to repair.
- Once a fault within the circuit is confirmed, replacement will be easy. To do this, it is enough to cut out the faulty section and replace it with a new one; just twist the ends of the wires together and then insulate them.
- If it is difficult to visually determine where the wires are broken, you can always use a multimeter. The device will accurately indicate the location of the fault and the owner will carry out repairs without any problems.
When the central locking unit burns out
On the VAZ 2110 the buzzer stopped working, the reason for this may be a break in the central lock, or more specifically, a burnout of its separate unit. To carry out troubleshooting work, you need to use a multimeter. In this way, it will be possible to determine the presence of voltage at the contacts.
preparation of the site and description of the procedure connection diagram AutoNovator
Removal and installation of the fuel rail and fuel regulator VAZ 2110, VAZ 2111, VAZ 2112, Lada DesyatkaRemoval and installation of the fuel rail and fuel regulator VAZ 2110, VAZ 2111, VAZ Lada, 2112 Ten
Central locking is usually considered an additional option for cars, but nowadays most cars are equipped with it even in the basic configuration.
Preparing a site for installing a central lock
The main purpose of the central lock is to automatically open and close several doors in a car at the same time. Structurally, it is a mechanism connecting switches, sensors, and wires. The lock can be controlled either by a key or by an alarm key fob.
You can get invaluable benefits from central locking when you carry children in the back seat of a car. We all know what pranksters they can be sometimes, imagine the situation if they open the door while walking. We think there is no point in talking about the consequences, since they are obvious. Drivers often encounter the tricks of thieves who steal valuables from the back seats of cars stuck in traffic. Thus, central locking is not just a useful, but the most necessary option. As has already been said, most cars are equipped with it even in the basic configuration, however, there are the lion’s share of cars where this option is missing, so we decided today to correct this situation and install the central locking ourselves, besides, if we have the necessary tools, desire and time, this everyone can do it.
At the very beginning of the work, you need to remove the door trim, so do not forget to buy in advance a set of plastic latches with which it is secured, since they are disposable, and at the end of the procedure you will have to change them. It would also be a good idea to disconnect the terminals from the battery, since working with electrical wiring requires compliance with safety precautions.
After the trim and dust curtain have been removed, you need to choose a place to install the mechanism, taking into account the location of the insides of the window regulator and the movement of the glass. It is possible that you will have to make an additional bracket for attaching the central lock.
Installation of central locking
Well, the place for the lock mechanism has been chosen, you can attach it, for this you will need self-tapping screws. For correct operation, after installation, you must pair the central lock with the lock rod, which is responsible for lowering and raising the door lock button. For the most accurate fit, it is not forbidden to bend the rod. Now you need to check the movement of the mating parts, it should be light and smooth.
The next step in installing the central locking system is the wiring - pull the necessary wires through the corrugated pipe located between the door and the body pillar, which protects the wires from chafing. Following the attached instructions, connect the wires to the alarm unit.
Almost everything is ready! Now you need to check the functionality of both the mechanical and electrical parts of the installed mechanism; before doing this, do not forget to connect the battery. After making sure that everything is working properly, you should restore the casing in the reverse order indicated above and enjoy the result.
Central locking will make your driving life easier, more comfortable and safer. However, in order to avoid troubles, you should know that some such gadgets are equipped with additional options, for example, sometimes after 10 minutes the lock automatically closes all the doors, this is good if you forgot to lock the car, but bad if you also left the keys in the car. Sometimes the central locking closes the doors as soon as the driver starts the engine and presses the brake (this is more common in cars with automatic transmission).
In any case, no matter what new thing you bring to the car, be it installing an alarm system, installing parking sensors or other pleasant needs, remember about safety precautions, this will not only add comfort, but also protect you from troubles.
About the operation of the central lock
Where is the central lock on the VAZ 2110 and how does it work? The purpose of the drive is not only for the lock, but also for transmitting a signal to the installed unit. Afterwards the commands are transmitted to other doors.
The multifunctional drive must have five wires, and additional contacts are needed to communicate with the car control. How to connect the central locking on a VAZ 2110, just use a simple diagram.
You begin to appreciate many things after they are gone. The same applies to the additional options of the VAZ 2110. Central locking (CL), for example, you can not notice as long as it works properly or you can do without it altogether. But you quickly get used to good things, don’t you? Therefore, when something that provides us with a comfortable ride fails, you immediately begin to rush around in search of answers “how to fix it.”
Central locking device VAZ 2110
VAZ cars are not least good for their high maintainability. Whenever something happens to your iron horse, you can almost certainly solve the problem yourself without the help of specialists at a service station. “Ten” was no exception in this regard.
As for the central locking system specifically on Lada 110 cars, this is really a rich topic for discussion. Ignorance of elementary circuits and the operating principle of the unit can confuse many motorists. However, servicing the mechanism is quite simple. And given the enviable frequency of its failure, it turns out that knowing “how” is simply vital.
Installation recommendations
When purchasing a VAZ 2110 at a specialized car dealership, there is a possibility that the functionality of the basic security system will be limited. That is, only doors (sometimes not even all) can be locked with a remote control or key. For car safety, drivers install alarms on all opening parts of the car.
To do this, you can use the services of specialists from a service station, or you can do the installation yourself. If you know the circuits of the central locking and the operation of the electronic device itself, then you can easily install a lock on any part of the car. Specialists of various levels use instructions when installing an alarm system on a car.
The VAZ 2110 central locking diagrams and the rules for installing the security system are included with the alarm system. Despite the fact that such a simple but important system as central locking can fail, you will not meet a driver who would not praise it. When purchasing a car, everyone looks at the package, which should include an electric alarm system (or central locking).
Many cars do not have an alarm system, but have central locking, which was installed at the factory. There is no big difference, but the convenience of the presence of a centralized blocking system is appreciated. This is better than waiting for passengers to get out of the car, then closing all the doors from the inside and closing your own when exiting. It is convenient to press one button on the control panel so that all doors close/open at once.
A problem with the system is possible when the battery in the key is dead. But this is not a very serious “trouble”, which can be solved by simply replacing the power source. The central locking diagram clearly proves the simplicity and uniqueness of the device.
Signal and central locking, VAZ-2110
This review discusses how to connect an alarm system to the central locking of the following cars: VAZ-21099, as well as 2110 and 2115. There are three standard connection schemes: for central locking controlled by negative polarity, positive and variable. But different cars have their own nuances. Sometimes it is necessary to add a fuse to the “+12 Volt” wire, sometimes, on the contrary, this is not required. VAZ locks, in turn, belong to the simplest type, the first. But the standard scheme published on the Internet is not suitable for them.
What is the central locking on the VAZ 2110?
The purpose of this type of device is to centrally control the automatic mechanism for opening and closing all doors in the car at once. This is especially convenient for working in conjunction with an alarm system and when operating a car in general. However, the reliability of the operation of the central locking system should definitely be checked every time by moving the handles of all four doors before going about your business for a long time, since the actuator can often fail and one of the doors may remain unlocked.
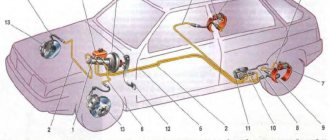
Structurally, the VAZ 2110 central lock consists of the following elements:
- electronic transistor control unit;
- gearmotor actuators, also known as activators (one for each door);
- a limit switch that determines the current state of the door (open or closed);
- electrical wiring and other installation elements.
Central locking diagram for VAZ 2110
Electronics
Central locking in a car: how it works and installation
In addition to the reasons described above, the problem may lie in small electronics. The check should begin with the key fob. First of all, the battery and the condition of the buttons are checked. Perhaps they stick and do not work at the right time. If the board itself is faulty, the key fob simply will not respond to external stimuli. The LED on its body will not light up. It's good if you have a spare key fob. Otherwise, you will have to change the alarm, or find exactly the same key fob.
Next, the alarm control unit is checked. The verification method is usually indicated in the instructions. Lastly, they check the microboard located on the central locking drive motor. At the same time, they look at the condition of the drive itself. All failed parts are replaced. The most difficult thing is with the control unit. It is practically beyond repair. Therefore, it is much easier to install a new alarm. Sometimes the key fob loses synchronization with the unit, then it will have to be reprogrammed.
Why the central locking on the VAZ 2110 does not work correctly
The problem of improper operation of the actuator is not at all uncommon for cars in the domestic automobile industry. Despite the fact that there are a number of reasons for the failure of mechanism parts, the principle of operation of the automatic door closing system is quite simple, and the malfunctions are very typical in their entirety. This means that any motorist can deal with them.
You don’t have to grab your head and run to the workshop in search of a qualified specialist. Thanks to the diagnostic recommendations below, you yourself are very likely to become one. If, for some reason, you don’t want to get your hands dirty, at least no one else will dare to mess with you. And this, you see, also costs a lot.
Problems in the operation of the activator electric drive
The central locking actuator is quite fragile and does not tolerate overload. The activator body, made of plastic, can easily melt if the frequency of door closing is excessively high. The duration of the control pulse also plays an equally important role. Try to always remember about the extreme fragility of the activator and not to load it during operation.
It is easy to guess that the activator is located in each individual door of the car. If the body of one of them melts due to overheating of the electric drive commutator, this becomes the cause of many problems:
- the activator on individual doors stops functioning;
- Constant overloads in a jammed electric drive cause the fuse to fail.
The actuator mechanism is entirely made of plastic. Gears can easily wear out and break during operation, or melt when the commutator overheats. As a result, when the central locking operates, characteristic creaking sounds are heard - a sure sign of imminent failure of the activators. Likewise, if the gearbox of the mechanism is humming, but the doors do not open or close.
Problem in the operation of the central locking electrical circuit on VAZ cars
The first possible problem follows smoothly from those mentioned in the previous section. Overload in the operation of activators leads to an increase in the operating current in the supply circuit above the rated value. As a result, the fuse blows and the central locking of the VAZ 2110 simply “dies”.
It is by checking the fuse that the diagnosis of central locking malfunctions begins. By the way, it is located in a very specific place and it is not easy to find it right away even if you know where to look. In order to get to it, you will need to fold back the central panel with the fuses and dig into the entire wiring harness in the niche that opens behind it. The “comrade” you need is packaged in a special plastic cup and connected to the pink wire.
Central locking unit VAZ 2110
Another very common and obvious problem is the central locking connector. It is located in the most unfavorable place for this in the interior body, under the foot mat. A large amount of moisture and dirt inevitably gets there. Electrical contacts are intensively oxidized. As a result, the power supply circuit involuntarily breaks at the point where the plug connector is connected.
Problem with the operation of the VAZ-2110 central locking control unit
Electronics, of course, are reliable things. Modern control modules for the central locking VAZ 2110 are assembled using a transistor control circuit. This eliminates their mechanical wear. The shelf life of key components is measured in tens of years. The control unit is located under the plastic dashboard cover on the right side of the driver's seat.
However, power transistors can easily fail when the activators are overloaded and the collector is short-circuited. It may even happen that the signal from the control unit will constantly be sent to the lock drive if the transistor is broken. Otherwise, it will simply not turn on.
Checking the control unit is extremely simple. The voltage from the negative terminal of the battery, or directly from the pink wire supplying the control unit, is supplied to the contacts of the gearmotor (activator) in series to the red and yellow conductors. All of the above contacts can be found directly on the eight-pin connector of the control unit.
Thanks for subscribing!
Also, the control unit may issue erroneous control commands due to incorrect operation of the limit sensor. Being a mechanical device, the main door switch can simply wear out. As a result, the control unit simply will not be able to function correctly, since it will not know in what position the car doors are currently located, whether the driver's door lock is closed or open.
How well do central locking and alarm systems work together in VAZ-2110 cars?
As you know, a modern alarm system involves autonomous control of all opening parts of the car. For this reason, it is possible to connect the VAZ 2110 central locking system to the alarm system. The connection diagram for the signaling device is included in the operating instructions for the device. The central locking control circuit also seems to have an additional unused connector for this purpose.
However, in reality it is not so simple. Control signals from the alarm system to the central locking system will conflict with the information received from the limit switch installed in the driver's door. For this reason, the standard central locking control circuit with which VAZ 2110 cars are supplied from the factory should be slightly altered.
The essence of the modification is extremely simple. According to the circuit diagram, the limit switch is connected to the eight-pin connector of the central locking control unit via two wires: brown and white. These wires from the unit should be disconnected.
Now the limit switch will be connected to the alarm control circuit, and the alarm will set control signals to the electronic unit of the central locking. Perhaps the diagram described “on fingers” may seem somewhat incomprehensible to you. But it will be very easy to understand the above by studying the diagram proposed below.
Central lock VAZ 2110
To better understand the idea of connecting an alarm, it is still worth studying the instructions included with it. Thanks to this, you will have a clear idea of how to implement this idea in practice. But the essence of the connection will remain the same. The work requires minimal effort and is generally very simple.
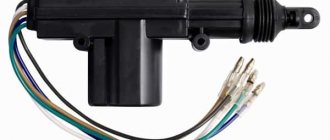
Main components
The central lock (VAZ-2110) has the following components in its design:
- Semiconductor control unit for electric drives.
- The actuators are geared motors (4 in total - one for each lock, but if there is a drive to unlock the trunk, then five). These are small electric motors with gearboxes on the rotors.
- Limit switch that allows you to determine the state of the lock (installed in the gear motor mounted in the driver's door).
- Wires, connections, fuse.
The VAZ-2110 central lock can operate in several modes:
- All locks are activated when the driver's door is unlocked/locked.
- When arming and disarming a car alarm. Provided that the alarm and central locking control units have been connected.
- If there is a function for remote control of the central locking from the key fob. Such control systems have a fairly low cost and can be used on cars without an alarm system.