The diode bridge of the generator on VAZ 2110 cars very often fails. Its malfunction can be indicated by rapid and strong heating of the car generator.
Today we will talk about how to check a diode bridge with your own hands, while saving money and time on a trip to specialists at a car service center. I once wrote about why the generator heats up on VAZ cars , this time we will talk specifically about the diode bridge, or more precisely about how to check and replace it at home.
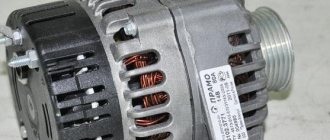
It’s probably not worth talking about the role of a generator in a car; everyone knows that this is a very important part, without which one cannot imagine an engine. The service life of the battery, which receives charging from the generator, largely depends on the performance of the generator.
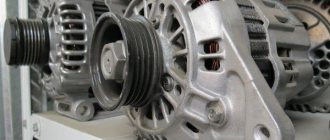
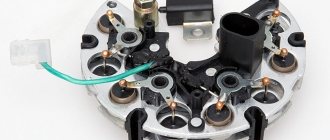
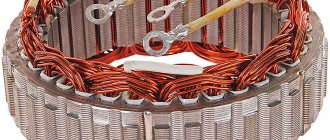
A diode bridge consists of four or six diodes that convert alternating current into direct current according to the principle of a bipolar rectification method. The rectifier diodes of the generator play the role of a gateway that allows current to flow in only one direction, preventing current from the vehicle’s on-board electrical network from passing to the stator windings. The diodes are located on the generator body and tend to burn out, there are several reasons for this.
Signs of a burnt diode bridge
The battery was fully charged the day before, you came to the garage - there was no charge, you charged the battery again, started the car, the battery was discharged after a few minutes, and the generator was so hot that it was impossible to touch it.
A terrible howl/whistle is heard from under the hood, which changes tone when the engine speed changes; the whistle can appear suddenly while driving.
The headlights dim while driving, the speakers turn off spontaneously, and the air conditioning stops working.
In order to confirm your opinion that it is the diode bridge that has failed, you need to check it. The following factors indicate a malfunction of the diode bridge:
· voltage at the generator output is less than 13.5 V;
· the signal indicator lights up when the engine starts;
· when testing the generator with a multimeter, the plus terminal “rings” along with the windings.
We made sure that the fault lies precisely in the diode bridge. Now we need to find and determine which diode has failed.
Checking the diode - how to do it right
Based on the fact that a diode is a semiconductor device that passes current only in one direction, let’s begin the test.
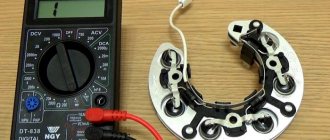
· The diode bridge must be removed. Diodes need to be checked individually, disconnected from the general circuit. The test must be performed in the “diode check” position.
· We touch the bottom of the diode with one of the probes, and its terminal with the other. The amount of resistance depends on the power of the semiconductor. The resistance should be in the range of 400 - 800 Ohms, that is, the diode passes current in this direction.
· Swap the probes. A unit on the multimeter screen is evidence that there is no conductivity in this direction. This means the diode is locked and intact.
· Otherwise, if the tester shows the presence of resistance (current flow) in both directions during testing, this indicates a diode malfunction.
Important to remember. When checking diodes located on the same plate, the resistance should not differ. The permissible maximum is 5 Ohms, no more. The presence of a diode with a large difference in readings indicates its poor performance and subsequent charging problems. Therefore, it is advisable to change the diode.
Checking diodes with a tester is very conditional; you can more accurately verify the integrity of the diode only under load, for example, by connecting a lamp to the circuit or on a diagnostic test bench at a service station.
What causes the need to replace diodes
Someone will say that it is much easier to take and replace the diode bridge completely. However, the cost of a diode bridge for a foreign car varies from 1000 to 4000 rubles, sometimes the price is even higher. Depends on the brand of the car, the type of generator, whether it is an analogue or an original. New diode bridge or under contract. You ordered a diode bridge online, you thought it was new and original, but an unscrupulous storekeeper put a Chinese equivalent in your package. Go figure it out right away.
Many, having replaced the diode bridge on their generator, prefer not to throw away the old one, but to repair it and leave it in their stash.
The question is that not everyone can independently remove a bad diode and press in a new one. It is best to turn to the services of professional craftsmen at a service station. The diode bridge repair process is streamlined and will not take much time.
Source
Signs of a diode bridge malfunction
First of all, you need to remember that the diode bridge on the VAZ-2114 is no different from the same unit on the VAZ-2109, VAZ-2110 and other models. Therefore, if you figure out how to determine the malfunction, it will not be difficult to identify it on any of the cars. There are several main symptoms; they can appear together or separately. Any of them requires an immediate check of the generator:
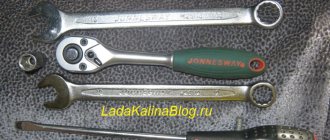
These are the main signs of a diode bridge breakdown, but it is worth remembering that they may indicate other generator failures. Therefore, first of all, you need to accurately identify the faulty unit. It is not necessary to take the car to a service center for diagnostics; the car owner can do the work; a minimum set of tools is needed.
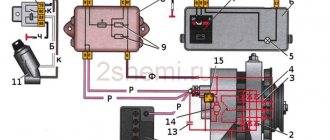
If the control light on the panel lights up or, conversely, does not work, first of all you need to check it and the control relay. Often it is these elements that are faulty, and not the generator.
How to determine the health of the generator
Information about the operating status of the main unit responsible for generating electrical energy in the car is displayed on the dashboard for the convenience of motorists. The icon on the instrument panel that resembles a battery should go out after starting the vehicle’s power unit. This means that the power to the main electrical components has been switched from the battery to the generator. If the indicator does not go out, this indicates a breakdown in the electrical circuit. Problems may also be indicated by insufficient battery charge due to the lack of normal current rating.
Diagnostic methods
There are two main methods that will allow you to determine the malfunction of the generator diode bridge. You need to choose based on what you have at hand. The first option requires the presence of a multimeter, and the most entry-level option, which is inexpensive, is suitable. The second is a regular 12V light bulb with three long wires so you can connect them to the right pins.
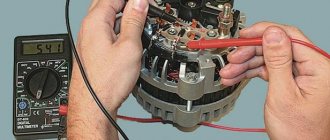
Diagnostics using a multimeter
Let's look at the option without removing the diode bridge, since it requires less time. The test is easy to carry out on an installed unit if you know the main features. The process is simple; you first need to provide access to the generator contacts. After this, carry out the following checks:
Do not forget to first switch the device to ohmmeter mode.
Using simple recommendations, you can literally check in a few minutes and find out whether the diode bridge has burned out or the reason lies in another unit. You can use not only a multimeter, but also any other device if it has an ohmmeter mode.
Checking the bridge with a light bulb
This option is especially good on the road, because it only requires a 12-volt light bulb and three long wires with bare ends. Or you can use a ready-made warning lamp, they are sold in car dealerships. In this case, proceed like this:
This option, due to its simplicity, allows for quick diagnosis. However, it will not require much time and will allow you to identify the problem within a few minutes. But it is better to work with an assistant to hold the wires.
Why does the diode bridge burn out?
There are several reasons for the failure of the diode bridge on VAZ cars. To prevent the breakdown from occurring again, you need to check the machine for one of the options described below. Only by eliminating the problem can normal operation be ensured.
Most often, a bridge burns down due to the following:
The diode bridge, like any spare part, has its own service life. It usually lasts about 10 years, after which the unit may fail due to normal wear and tear.
It is best to periodically diagnose the car, check the serviceability of the main components and conduct an inspection to identify problems when they are not yet fatal. It is recommended to check the battery annually and measure the charge level to monitor the condition of the generator.
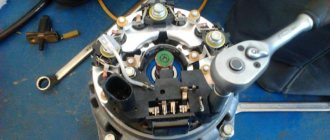
DIY replacement instructions
In the event of a breakdown, the repair of the DM consists of its replacement, which is done as follows:
- First you need to turn off the ignition, open the hood and turn off the power to the on-board network; to do this, disconnect the battery.
- Once the battery terminal is reset, you will need to disconnect the pink cable responsible for activating the generator assembly. The wire itself is fixed with a bolt and nut; the nut itself will need to be unscrewed.
- Now you need to slightly loosen the tension on the top as well as the bottom nuts. Unscrew the tension screws and remove the strap. Inspect it - if the belt shows signs of damage - cracks, delamination - then it is better to change it immediately. If the strap is intact, set it aside.
- After completing these steps, you need to rotate the generator mechanism 90 degrees, this is done so that you can access the lower mounting screw. Unscrew it.
- Next, carefully inspect the body of the dismantled unit. If necessary, clean - there should be no dirt, especially on the connections. Dirt getting inside the generator housing can also lead to its incorrect operation and even failure. Bend the fasteners and remove the cover.
- Next, you need to clean the inside of the rings as carefully, but most effectively as possible.
- After this, all you have to do is dismantle the failed DM and replace it with a working part. When the installation is completed, the structure is assembled in the reverse order. Do not forget to tighten the strap, just make sure that it is not too tight, this is important. Having done this, you will need to start the engine of your car and diagnose the operation of the new DM.
Trouble-shooting
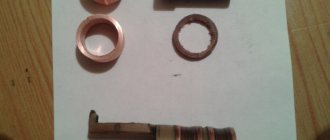
There are two main options for solving the problem. The first is accurate diagnostics on the bench: after detecting signs of burnt-out diodes, a check is carried out and it is determined which elements have failed. After this, the faulty diodes are soldered off, and new ones are soldered in their place. It is very important to take exactly the same brand; any analogues will not last long.
It is much easier to change the assembly, it is faster and of better quality, since you can be sure that the spare part will last for some time. The price of the part is low, for example, on a VAZ 2110 it is about 650 rubles. Replacement is not difficult and can be done independently.
Identifying a faulty diode bridge and replacing it is not difficult for any car enthusiast with a minimum set of tools. If the check shows a breakdown, it is best to remove the generator and carry out repairs. The process is simple and takes no more than an hour.
Source
Lada 2112 White Bird › Logbook › Gene faults and their elimination (article from the Internet)
Malfunctions of vehicle electrical equipment are very common and occupy one of the leading places in the list of breakdowns. They can be roughly divided into faults of power sources (batteries, generators) and faults of consumers (optics, ignition, climate, etc.). The main sources of power for a vehicle are batteries and generators. The malfunction of each of them leads to a general malfunction of the car and its operation in abnormal modes, or even immobilization of the car.
In the electrical equipment of a car, the battery and generator work in an inextricable tandem. If one fails, after a while the other will also fail. For example, a damaged battery leads to an increase in the charging current of the generator. And this entails a malfunction of the rectifier (diode bridge). In turn, if the voltage regulator supplied from the generator malfunctions, the charging current may increase, which will inevitably lead to systematic recharging of the battery, “boil-off” of the electrolyte and rapid destruction.
Common battery problems:
short circuit of battery electrodes/plates; mechanical or chemical damage to the battery plates; violation of the tightness of battery cans - cracks in the battery case as a result of impacts or improper installation; chemical oxidation of battery terminals. The main causes of these malfunctions are: gross violations of operating rules; expiration of the product's service life; various manufacturing defects. Of course, the design of a generator is more complex than a battery. It is quite reasonable that there are many times more generator malfunctions, and their diagnosis is much more difficult. Common generator problems include:
▶ wear or damage to the pulley; ▶ wear of current collecting brushes; ▶ wear of the commutator (slip rings); ▶ damage to the voltage regulator; ▶ short circuit of the stator winding turns; ▶ wear or destruction of the bearing; ▶ damage to the rectifier (diode bridge); ▶ damage to the charging circuit wires.
It is very desirable for a motorist to know the main causes of generator malfunctions, how to eliminate them, as well as preventive measures to prevent breakdowns.
All generators are divided into alternating and direct current generators. Modern passenger vehicles are equipped with alternating current generators with a built-in diode bridge (rectifier). The latter is necessary to convert current into direct current, on which the vehicle's electrical consumers operate. The rectifier, as a rule, is located in the cover or housing of the generator and is integral with the latter. All electrical appliances of the car are designed for a strictly defined operating voltage range. As a rule, operating voltages are in the range of 13.8–14.7 V. Due to the fact that the generator is “tied” with a belt to the engine crankshaft, it will work differently depending on the speed and speed of the vehicle. It is for smoothing and regulating the output current that the relay-voltage regulator is designed, playing the role of a stabilizer and preventing both surges and dips in the operating voltage. Modern generators are equipped with built-in integrated voltage regulators, colloquially referred to as “chocolate” or “tablet”.
It is already clear that any generator is a rather complex unit, extremely important for any car.