In the summer of 1995, the first production copies of the VAZ 2110, popularly known as the “ten,” rolled off the assembly line of the Volzhsky Automobile Plant. Based on this model, two more cars were later developed: the VAZ 2111 station wagon and the VAZ 2112 hatchback. When tuning the VAZ 2110 and its modifications, you need to know the features of upgrading this car yourself.
Replacing the H1 lamp in Bosch headlights model 2110 with H7
Many VAZ 2110 owners are faced with the fact that the Bosch lights on their car do not illuminate the road well enough at night. They have a standard H1 lamp installed.
The process of replacing a standard H1 lamp with an H7 in VAZ 2110 lighting sources is quite simple - it consists of the following steps:
- Disconnect all headlight connections.
- We remove the radiator grille - to do this you need to unscrew the bolts that secure it.
- We disconnect the blocks with wires from the turn signals.
- We remove the hydraulic corrector - to do this, press the latch and turn it ninety degrees.
- We unscrew the 3 bolts that secure the flashlight and move it back. We move the eyelash to the center, getting rid of the engagement with the wing.
- Loosen the 2 bolts securing the buffer and remove the eyelash.
- Unscrew another nut and remove the light source.
- We heat the sealant and use a knife to open the headlight.
- The hole for the H1 lamp will need to be drilled. It is smaller in diameter than needed for H
- You will also need to remove the terminals and install those that are suitable for the lamps that we installed - there will be 4 of them.
- After drilling, insert the lamp into the hole and fix it with standard fasteners.
- The fixation of the reflector will need to be adjusted so that it stays in place properly.
- Instead of lamps, we can install LEDs in side lights.
- Next, we assemble the lights back, install them on the car and adjust them.
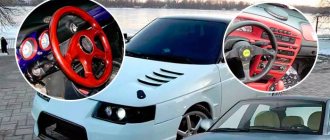
Headlight tuning
Since the lamps of domestic cars provide unattractive and even poor-quality lighting on the road, many people tune the VAZ 2110 with their own hands. Today, there are three options for replacing electric headlight bulbs:
- Electric halogen lamps. Automotive stores offer a wide selection of such lamps to improve the light of headlights. All kinds of standard sizes.
- Xenon electric lamps. This 2110 tuning is quite popular and is considered the best in our time. But it also has some disadvantages. The most basic of them is the high price of products, regardless of the manufacturer.
- GT type lamps. For tuning the VAZ 2110, this lamp option is considered the most relevant. Their design is best suited to improve the domestic car. Many also note the excellent combination of price and quality.
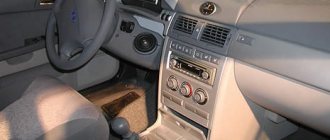
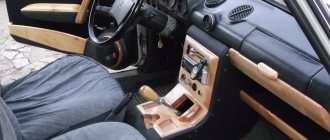
Interior decoration
The original tuning of the VAZ 2111 interior includes several stages.
- Modernization of the dashboard.
- Interior finishing.
- Replacing seat covers.
- Replacing or processing the steering wheel.
- Noise insulation.
First, we make the dashboard look more modern. It is not necessary to change the numbers and arrows, because the design of the Lada 2111 instruments is not that old. It will be enough to improve the illumination of the panel elements. To do this we use LED strip. We dismantle the panel, cut the tape to form a circuit, and connect the diodes.
Next you need to do the exterior finishing of the dashboard, doors and ceiling. For the best effect, first perform soundproofing of the interior. It is necessary to dismantle the entire front panel and cover the space under it with a layer of vibroplast. Then we install everything back and cover the interior with new material. The most common types of materials today are leather substitute or carbon or vinyl films. The latter are available in different colors and textures.
Improving instrument lighting
The dashboard lighting on the VAZ 2110 has never been bright, since it uses ordinary incandescent light bulbs. Therefore, drivers often replace them with LEDs. They are brighter. And they last longer.
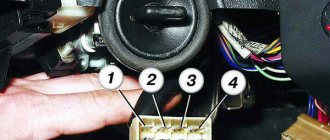
Sequence of operations
To install the LEDs, you will first have to remove the instrument cluster from the panel. The light bulb sockets are located on the back wall of this unit, and there is no other way to reach them.
- The steering wheel of the car is set to its lowest position.
- Use a Phillips screwdriver to unscrew two self-tapping screws located above the devices.
- After this, the decorative trim can be pulled out by pulling it towards you.
- Below it there are 3 more screws that hold the instrument unit with light bulbs. The screws are unscrewed with the same Phillips screwdriver.
- The instrument unit is removed. All wires are disconnected from the rear panel. The incandescent light bulbs are removed and replaced with LEDs.
The arrows show the location of the backlight bulbs, which are replaced by LEDs - The block is installed in place, then the instrument panel is reassembled.
LED backlit instrument panel looks much brighter
What to do next if adjustment does not help?
There are situations when a car owner knows how to tighten the handbrake on a VAZ-2110 and strictly follows the algorithm, however, the manipulations he has carried out do not change the situation and the handbrake also works poorly. Most often, this problem occurs when the parking brake lever cable breaks. As practice shows, owners of old VAZ-2110 cars find themselves in this situation more often than others. You should not assume that under intense load the cable will function for too long even on newer domestic models.
The cable in a VAZ-2110 car should be changed if the tips are significantly weakened, its threads are strongly stretched and this part is difficult to move in its shell. It is worth noting that the car owner can do the work of replacing the cable on his own; you just need to have an assistant and some free time. It is very difficult to replace the cable alone.
About replacing seats
The standard seats on the VAZ 2110 have never been comfortable. Therefore, car enthusiasts replace them with seats from the following cars: Skoda Octavia A5, Hyundai i30 or BMW E60.
Domestic car enthusiasts often bet on the “tens” of seats with the Hyundai i30
All these chairs are distinguished by their thoughtful design, comfort and compactness. It is not possible to install them in a garage, since the fastenings will have to be seriously modified and reworked. So the car owner has only one option: take the car to the appropriate car service center, having previously agreed with the specialists. The price of such a service is from 40 to 80 thousand rubles.
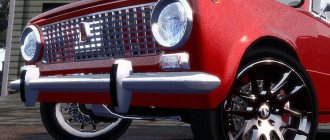
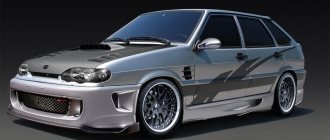
Manufacturing of body kits
Let's look at how you can change the bumper on a 2110. You can do this tuning yourself, then they become individual and unique in their own way. But this is not at all easy to do, as it seems at first glance. There are several options for designing a tuned bumper for the “ten”.
Method one - making a part from polyurethane foam - is the most common option for Lada cars. The old surface of the standard buffer is cleaned and degreased. The frame of the future product is made from a profile for plasterboard or suspended ceilings. It is needed so that the part holds its shape and it is easy to apply foam. The frame is attached to the old bumper with screws or self-tapping screws.
Now you can apply the foam. When it dries, use a stationery or sharp knife with a thin blade to cut off the remaining material. The surface is leveled, after which a thin layer of putty is applied. The bumper is polished and leveled using a grinding machine. The VAZ-2110, the tuning of which usually begins with the exterior, is often subject to modifications.
Let's go back to the bumper that needs painting. The colorist uses computer selection to determine and mix the paint. Since the paintwork fades during operation, this is taken into account in the composition. The paint is applied in two layers, then the varnish. Everything is dried using special lamps.
The part is now ready for installation. When making a customized bumper with your own hands, it is worth considering that the standard fasteners must remain so that you do not have to make them separately. If this nuance was missed, then you can secure the part inside with double-sided tape and screws.
A little about adjusting locks and hinges
So, it’s immediately worth noting that adjustment of the VAZ-2110 doors is required for absolutely all cars that have traveled about 40,000 kilometers. The same applies to cars whose doors have been removed and then installed incorrectly. As you may have already noticed, adjusting the VAZ-2110 rack is quite simple and quick. The same applies to locks with hinges. Let's get straight to the point.
I would like to note that it is extremely easy to adjust the lock. This does not require the participation of a specialist. There is no need to use silicone, as it only helps for a short time. First you need to remove the door card, after which you will see several plastic nuts, which we remove from the stud and screw back on. We put on the door map. To ensure that the doors close as quietly as possible, you can use litol.
It is recommended to pay attention to the gaps in closed doors. They should be exactly the same everywhere. If this is not the case, then we need to remove the door and then reinstall it. To do this, it is completely opened and supported from below with special racks. After this, the wiring is disconnected. To do this, remove the latch and turn the locking ring. Sometimes you can find petal caps. In this case, the axles are knocked out using a hammer and chisel or drift. Installation is in the reverse order. It is advisable to lubricate all rubbing surfaces.
Other accessories
In the list of pleasant little things for tuning the interior of the 2110 with your own hands, you will find many parts that are sold in literally every car store:
- Pedal covers are an inexpensive and nice addition. In addition to their attractive appearance, they improve pedaling comfort.
- If you want to improve the entire front panel, you need to be a real sculptor. That’s why many people advise purchasing a pre-improved dashboard to match your design.
- Acoustics. This issue deserves special attention - acoustics do not add comfort when moving and do not improve appearance. Acoustics improves sound quality, which is an undeniable advantage of tuning.
- A non-original steering wheel on a VAZ-2110 is a fairly common occurrence. Today you can choose literally any version of the steering wheel, which you can buy at any auto store.
The above-mentioned accessories are not all that can be used in such a matter as tuning a VAZ 2110. Try to make your car a little better by replacing at least some little things. After the first improvements, you will already feel the need for future improvement of your “iron horse”.
Add a comment
Go out
Steering wheel cover
Without braiding, the steering wheel on the VAZ 2110 seems thin and slippery, which does not have the best effect on driving safety. So after buying a car, car owners usually install a braid on the steering wheel. You should choose size “M”, intended for steering wheels with a diameter of up to 39 cm (this is the standard wheel for the VAZ 2110).
The braid is sewn together with a clamp needle and nylon thread
The purchased braid is put on the steering wheel, its edges are tightly sewn together using a clamp needle and strong nylon thread.
Tuning of VAZ 2110 interior elements: painting, ceiling covering
Over time, the ceiling in the VAZ 2110, and frankly speaking, in any other car, gets dirty, damaged, and generally becomes unsightly and spoils the appearance of the interior. Reupholstery or restoration costs a lot of money, and it must be admitted that it is quite labor-intensive.
The photo shows the process of painting the ceiling
Therefore, now many drivers decide on such tuning as painting the ceiling, especially since you can choose a color and tone to suit every taste. What are the options for ceiling paints?
- Universal paint in aerosol cans (you will need about five pieces). You can choose matte paint or shimmer. The only thing you need to remember is that the top may “crumble” a little, plus the interior must be ventilated for several days.
- Universal and water-based paint. They are mixed to soften and better adhere the paint to the soft ceiling material.
- Paints for velor, suede, textiles in the form of aerosols. These types are best used for the ceiling, since painting with them will not make it hard, and the paint will apply more evenly and without stains.
Painting result
Door trim
Tuning the VAZ 2110 interior also includes replacing the door trim. Think carefully about your design before you begin. Draw new elements on paper in advance and select a color scheme. This will help avoid ridicule from passengers. If we talk about the door trim, then you will need to remove all the decorative elements and cover them with fabric.
We will replace
— Overhaul of the engine - overhaul of the removed engine - removal and installation - oil in the hydraulic booster - oil in the engine VAZ 2110-2111-2112, Lada Priora, Largus - engine valves - brake piston ring pads - gearbox mechanical repair - steering knuckle assembly - sump - engine crankcase - Spark wheel bearing - exhaust pipe Alexander Kalyuzhin, 2022. - cylinder head gaskets VAZ 2110-2111-2112, Lada Priora, Largus - valve cover gaskets - rear or front springs - radiator VAZ 2110-2111-2112, Lada Priora, Largus - camshaft - steering rack mechanism - steering tip left or right - steering rod right or left - lower front suspension arm right or left - rear hub - starter VAZ 2110-2111-2112, Lada Priora, Largus - front hub with knuckle and brake disc assembly - clutch - fuel pump - fuel filter - ball joint VAZ 2110-2111-2112, Lada Priora, Largus - ball joint with rivets - Daewoo internal CV joint - CV joint, Spark external - CV joint, external boot - cabin filter, oil Alexander Kalyuzhin, 2022.
PAINTING THE CEILING
Over time, the ceiling of any car gets dirty and changes color. Spots may appear on it. All this looks very unsightly. Some drivers order ceiling reupholstery. It is not so easy to do it in a garage. And specialist services are expensive. This is why many drivers prefer to paint the car ceiling rather than reupholster it. Here's what's required:
- universal paint. Sold in cans (5 pieces are required for the interior of a VAZ 2110). The disadvantage of this paint is that after a few years it begins to crumble. In addition, the interior of the car after such painting has to be ventilated for several days;
- a mixture of water-based and universal paint. This option is used as an alternative to the previous one. This mixture holds up better on the ceiling.
SEQUENCING
Before painting begins, the ceiling covering will have to be removed from the car.
- Use a Phillips screwdriver to unscrew all the screws that hold the ceiling covering in place. There are several plastic clips around the perimeter; they open manually. The ceiling covering is removed from the interior.
- If the driver has chosen the option with mixed paints, then water-based paint is mixed with universal paint in approximately equal proportions until the consistency of the mixture becomes like water.
- The resulting paint is applied to the ceiling with a regular paint roller. The paint layer should not be too thick so that the material is not soaked through.
- The painted ceiling covering is dried in the open air, then installed back into the interior.
Dashboard upgrade
The main problem of the dashboard on the VAZ 2110 is that it is very soft and can be deformed even when poked with a finger. Therefore, car owners strive to strengthen it. Here's what you need for this:
- screwdriver with a set of open-end wrenches;
- sandpaper;
- epoxy resin;
- polyurethane foam;
- fiberglass.
Sequencing
The main thing that the driver must understand is that you need to work with the panel very carefully. It's easy to break.
- Since it is impossible to work with the panel inside the cabin, it will have to be removed by unscrewing the fasteners with a Phillips screwdriver.
To modernize the dashboard it will have to be removed from the “ten” - The removed panel is thoroughly cleaned of dust and dirt. This is done using a piece of dry rag.
- A thin layer of polyurethane foam is applied to the cleaned outer surface of the panel.
- When the foam hardens, it is given the desired shape using sandpaper.
The polyurethane foam on the surface of the panel hardened and was treated with sandpaper - The resulting surface must be strengthened. To do this, fiberglass is laid on it in several layers, which is fixed with epoxy resin. After the glue has dried, the surface is sanded again.
- Now all that remains is to cover the panel with high-quality vinyl film. Its choice depends on the driver’s preferences. Many people choose film painted to look like carbon.
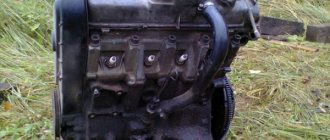
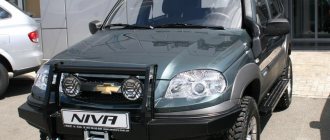
VAZ 2110 engine repair
More precisely, engine repair, since at different times completely different engines were installed on the car. Both carburetor ones, very close to eight and nine, and injection ones. With timely engine maintenance and compliance with regulatory maintenance standards, the engine can easily show the speedometer what 500 thousand mileage is. Not without surgical intervention, but even such figures are almost a feat for him, considering the kind of gasoline he has to pour into the tank. The Ford Focus starts to warp already at the 50th thousand mileage, and it requires a sanatorium-resort examination. The Ten can easily do without this, although it is still better to take care of the fuel system, especially the injection system.
VAZ 2110 comes with both carburetor and injection engines
Repairing the fuel system, as a rule, does not require any special expenses. Maintenance of the injector, fuel pump, timely replacement of the fuel filter and cleaning of the mass air flow sensor (MAF) are carried out in a garage without any particular problems. To carry out all maintenance and repair work on the VAZ 2110 fuel system, a special tool will rarely be required, and the only thing worth taking care of is a high-quality product for cleaning fuel system elements. They are inexpensive and can be useful when washing injectors, cleaning the air flow sensor, and on carburetor engines - when working with the carburetor, as well as when washing the lock and other hard-to-reach places. It should be borne in mind that the use of solvents and aggressive chemicals is extremely undesirable. If you handle them carelessly, you can destroy some rubber seals and cuffs, which are sufficient in both carburetor and injection systems.
Repair of the ignition module, ECU, and on-board computer can, in principle, be entrusted to services if necessary. Nowadays, it is not at all uncommon to find improved injection system control modules and ignition modules with prompt changes to their settings. Therefore, there is no need to carry out chip tuning of the 2110 on a full scale. Thus, the January injection system controller of the latest releases can provide the greatest opportunities for making changes to the operation of the fuel system and ignition system.
This is a very convenient thing. The January controls are located in the cabin, and in order to make changes to the settings mode, you just need to press the corresponding button, and the system will reprogram the injection and ignition algorithm, which will allow you to change the dynamic and operational characteristics of the engine in real time without any surgery or digging in the brains of the car. A module has been developed specifically for the tenth family, which allows you to simply switch the injection system to economy mode or sports mode on the go. And at any time you can reset the settings to standard factory settings.
Repair of the VAZ 2110 fuel system can be carried out within your garage
Repairing electrical equipment and power electrical devices - starter, generator and the relays that serve them, also does not present any difficulties. The main thing here is to know the location of the relays and fuses. In 2110 they are already more or less systematized and collected almost in one place, so there is no need to spend a long time searching for this or that relay. There are, of course, some oddities in their systematization, especially since the plant made changes throughout the entire production of the car. But there is still a certain logic in their placement.
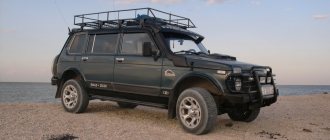
Increasing engine power
If the owner of a Lada 2111 wants to make his “horse” more playful, engine tuning will help with this. The most important procedures: boring the cylinders, installing a sports camshaft. Worn cylinder walls are restored, and the vehicle returns to normal piston stroke. If necessary, it is advisable to replace the piston rings for better sealing of the combustion chamber.
The sports camshaft has modified cams. The modified shape allows them to rotate differently. Thanks to this, the valves open and close more intensively. The gasoline-air mixture fills the cylinders more quickly, and the exhaust gases leave the chamber faster. Thus, more torque is provided, the VAZ 2111 car will become more powerful and gain momentum.
Replacing the camshaft entails reconfiguring the injection controller and throttle pipe. For better air supply to the main line, we replace the air filter with a direct-flow filter cylinder. The quality of exhaust gases is improved by installing an additional turbine. So the number of “horses” increases by 5–10 units.
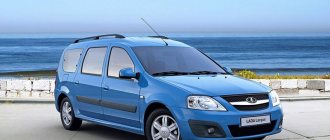
At the end of the 20th century, a new VAZ 2111 car with a universal body type saw the light of day. This update made the car even more attractive. The station wagon looks more elegant than the sedan body. Thanks to the greater mass, this model has become smoother in handling and movement. The VAZ 2111 turned out to be a comfortable and higher quality car compared to previous models.
This car is an excellent choice for those who prefer a comfortable ride around the city with many functions. If we talk about tuning the VAZ 2111, then it has similar aspects to the tuning of the 2110 (but not in all respects). It is thanks to the station wagon body that the styling of this car model turns out to be more interesting and original.
Engine Machining
A significant modernization can be called mechanical processing of the internal environment of the motor.
There are several principles used when tuning an engine:
1. An increase in the volume of the internal combustion engine leads to more mixture entering the engine. The more mixture, the higher the power. That is why the cylinder block is bored, increasing the time when the valve is open. This kind of work is quite difficult to perform and requires certain skills. 2. You should also take into account the fact that any resistance in the system leads to a drop in power. An example is a situation where the inner side of the cylinders has an irregular shape, the mixture swirls and the piston moves with force - all this causes a decrease in power. That is why another method of increasing the power of a vehicle is to level all surfaces. 3. Other elements of the system can also cause increased resistance to the stroke of the rod and cylinder. An example is the ribbed surface of the exhaust manifold, which determines the occurrence of resistance during the removal of exhaust gases. The gases that are removed from the piston retard the movement of the cylinder block, that is, significant resistance arises, which means the power is reduced. 4. If the mixture is not sufficiently saturated with fuel, the power drops significantly. VAZ 2110 engine tuning may involve installing a modern fuel and oil filter. You can also find other components that are installed on sports cars.
The above points should be taken into account when considering what methods can be used when tuning an engine.
| Engine | 1.6 l, 8kl (Euro-2) | 1.6 l, 16cl (Euro-2) | 1.6 l, 16cl (Euro-3) |
| engine's type | injection gasoline, four-stroke | ||
| Engine displacement, cm3 | 1596 | 1596 | 1596 |
| Supply system | distributed injection with electronic control | ||
| Number and arrangement of cylinders | 4, in-line | ||
| Maximum power, kW (hp) / rev. min. | 59 (80) / 5200 | 65,5 (89) / 5000 | 65,5 (89) / 5000 |
Features of the event
Before tuning, you need to determine for which part it is needed. Of course, you can improve the entire vehicle at once, but in some cases one part of it, for example, the interior, is enough.
This option will allow you to show your imagination to the maximum. Bring to life the most interesting and original ideas. This way you can create your own world inside the machine. It will be unique and individual. You can also use ready-made templates. The main thing is to determine what goals you are pursuing and what you want to get in the end.
Tuning the interior allows you to experiment in full. In this case, you can install new seat covers. Choose your own design and color for them. Custom made products are an excellent option.
Pay attention to other elements of the car that are located in the cabin. For example, door handles, gearshift levers, etc. One of the most common is to use covers
You can also use special inserts for this. They are not difficult to find. They are presented in a large assortment in stores that specialize in selling accessories and other things for cars. In addition, you can make them yourself. A piece of leather or leather substitute, scissors and glue will help with this. You can also easily replace different buttons by upgrading them in this way
One of the most common is to use covers. You can also use special inserts for this. They are not difficult to find. They are presented in a large assortment in stores that specialize in selling accessories and other things for cars. In addition, you can make them yourself. A piece of leather or leather substitute, scissors and glue will help with this. You can also easily replace different buttons by upgrading them in this way.
Installing additional keys
Please note that additional control units may be required when installing additional accessories. It is possible to install keys on the central panel. This can be done quickly and easily. The procedure for performing the work is as follows:
1. The front panel is disassembled. 2. Excess plastic is cut off. 3. The edges of the frame are processed to a minimum size. 4. To place the keys, you should create a special base made of plastic. 5. In order for the structure to be sufficiently rigid, stiffening ribs should be created. 6. Buttons can be taken from any car. It is worth noting that, if necessary, you can make the buttons backlit as an indication. 7. If necessary, you can repaint the color of the key to match the interior design.
The result of the above changes is a significant increase in the functionality of the car interior. The keys can be responsible for various additional functions. If necessary, you can create a niche for a multimedia system, which will be responsible for many functions in the car: playing music, watching videos, navigation, and so on. You can purchase various multimedia systems, the cost of which varies from several tens to hundreds of dollars. If necessary, you can modify the front panel almost beyond recognition.
In conclusion, we note that before carrying out work you should always create a work plan. It will eliminate the possibility of problems and errors during tuning.