Comments: no Published: 12/30/2015
Rating:
Tags:VAZ 2110/2111/2112
If you are one of those drivers who have repeatedly thought about increasing the cargo-carrying capabilities of your vehicle, purchasing a trailer would be a great decision for you. But before you think about purchasing it, you must first install a towbar on the VAZ 2110/2112. You can do this yourself by carefully understanding all the intricacies of choosing and directly installing a traction device.
Types of towbars and their advantages
Conventionally, towbars are divided into several types:
- a model that can be installed in the holes provided by the manufacturer;
- a model that is attached to technological holes;
- A model that requires you to drill holes yourself to install.
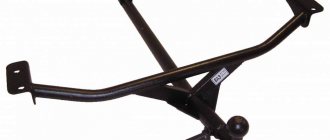
Types of towbars
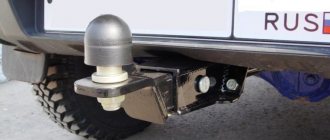
It’s easy to guess that the first model is easiest to install on the VAZ 2110/2112. You will only need to clean the holes from dirt, install the tow bar and tighten the bolts. You should not save money by deciding to make the device yourself. Buy a branded towbar that is designed for your car. Over its service life, it will have time to pay for itself more than once.
If, according to the second technology, you mount the device into technological holes that are already provided in the car, they will only need to be slightly drilled. This method of installing a tow bar is similar to the next one, but it is less laborious.
Indeed, in the third case, you will have to do all the markings and holes yourself. The towbar will serve as a template for you, based on which you can drill the cracks, clean them and install the structure.
When purchasing a high-quality model, instructions will be attached to it. Based on this, the installation will be easy.
What to choose?
To connect a trailer, you first need to acquire the towbar itself. Today, VAZ 2110 owners are offered two options:
- Use a homemade device;
- Purchase a certified factory-made unit.
It is noteworthy that both options are worthy of each other, they have positive and negative sides. Let's look at them.
Homemade tow bar
To manufacture it, you will need the appropriate drawings, according to which the unit is assembled. Often their level of reliability is in no way inferior to their factory counterparts, and sometimes even surpasses them. Homemade does not mean you will assemble it yourself. Although some are capable of this. There are many workshops where you can order the production of a tow bar. The price depends entirely on your requirements and the manufacturer's conditions.
Drawing
This is due to the use of higher quality materials by craftsmen than those provided at the factory. But at the same time, the overall weight of the structure increases.
But the makeshift towbar has a weak point - the seams. They are not subject to control similar to the factory control. Therefore, in appearance the design may be reliable, but in reality the seam barely holds the towbar elements together.
Installation work
You can install it on a VAZ without removing the bumper. But then you will need to drill holes in the floor to get the wires out. But this can be completely avoided by simply removing the bumper from the car.
After this you can start drilling holes:
- Make two holes for the brackets with your own hands, treat them with anticorrosive;
- Install the towbar, securing it with bolts and nuts;
- Drill four more holes: two in the lower part of the side member and two more in the trunk;
- Attach the device to them using special nuts.
The difference between VAZ 2110 and 2112 when installing a towbar
Despite the versatility of towbars for the Lada family, models for the VAZ 2112 have some differences. The towbar platform can be monolithic or bolted together. The length of the trailer hitch for the VAZ 2110 and 2112 is different, so during installation a problem may arise with a mismatch between the holes for fasteners and the position of the clutch hook. It should also be taken into account that the VAZ 2112 muffler mount covers one of the four holes for attaching the tow bar. If you want to install a tow bar for the “ten” on a hatchback, you will have to somehow adjust it using improvised tools and an angle grinder. Conclusion - the design of the trailer hitch for the VAZ-2110 differs from the same product for the VAZ-2112 in that the VAZ-2112 has a shorter rear overhang, which is why the muffler is located closer to the rear bumper, i.e. the VAZ-2110 has a towbar mount devices on the left side are longer. The connection of the electrical component of the VAZ 2110 and VAZ 2112 towbars is identical.
Tow bar installation technology
The first thing I would like to note in this section is “Read the instructions!”, it is always attached to certified trailer hitches, it is clear and written in understandable language. As an example, instructions from a tow hitch for a VAZ 2110.
Usually the instructions say about installing the tow bar without removing the bumper, but then you will have to drill an additional hole in the floor to bring out the electrical wiring. To avoid this, it is better to remove the bumper from the car. It is advisable to carry out installation work in a garage with an inspection hole and an assistant, or trust professionals at a service station, as recommended in the instructions.
Take the choice of a towbar for your car seriously and responsibly
To install a tow bar in holes you made yourself, you will need the following tools:
- drill;
- drills Æ12.5 and 13 mm;
- anti-corrosion lubricant;
- a set of car keys;
- screwdrivers;
- knife;
- insulating tape.
Installation should be carried out as follows:
- remove the rear bumper (the need for this step is described above);
- remove the upholstery from the threshold for ease of marking and installation;
- disconnect the wire from the negative terminal of the battery;
- attach the hitch to the place of its planned attachment;
- through the holes in the towbar mounting bracket, drill 2 holes on the left and right Æ12.5 and 13 mm;
- remove burrs from drilling and treat the surface of the holes with anti-corrosion lubricant;
- fix the trailer hitch with two bolts through the reinforcement plate;
- We also do the same with the holes at the bottom of the spar;
A durable, high-quality towbar is a guarantee of safety on the road
- make holes from the trunk through the reinforcing plate towards;
- Install bolts and washers into the matching holes;
- tighten the towbar mounting bolts with nuts, without unnecessary force, so as not to damage the metal of the side members;
- remove the middle plug to route the wiring and connect the trailer to power;
- The wiring must be led from the connector to the rear left lamp;
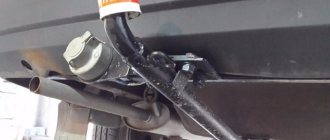
- fix the electrical connector on the platform provided on the towbar;
- connect the electrical wires according to the diagram from the instructions (cut into the car wiring, insulate and put in place);
- return all dismantled elements to their places.
Towing hitch connection
If you removed the bumper during installation yourself, you should have noticed three rubber plugs in the body. You will need to replace the middle one so that you can pass wires through it later. They are laid under the threshold and lead to the left headlight.
The wires are connected by color, that is, they are inserted into the harness with the rear lights. And then the socket is installed, which is mounted on the bracket.
Please remember that wiring connections may differ in each individual case. Therefore, you should read the instructions for your car.
Installing a tow bar on a VAZ
Electrical connection
After installing the towbar on the VAZ 2110 and attaching it to the body parts using the above method, you need to connect the towbar socket to duplicate important road signals behind the towbar during traffic and stopping the composite vehicle (car + trailer). In order to connect the wires correctly and safely, the car owner should always follow the diagram that comes with the factory-made tow bar. The towbar electrical socket on a VAZ suggests that it has seven places for connecting contacts.
After the wires from the car lights are threaded through the technological hole, which became accessible after removing the bumper, you can start connecting the corresponding wires. Connection diagram with decoding of the meaning of the signals and indicating the color of the wire:
- L — left turn signal, wire color — yellow.
- 54-G — rear fog light 12 V (this option may not be available), color — white.
- “31” – ground (earth, grounding, “—”, minus), wire color – black.
- R - right turn signal, wire color - green-yellow.
- 58 R - rear lights for illuminating the license plate, as well as the right side light, brown wire.
- “54” - stops (brake lights), red wire.
- 58 L - left side marker light, blue wire.
Requirements for the minimum thickness of each core, in square millimeters - from 1.5 mm2, for the ground wire - from 2.5 mm2.
When connecting the towbar-electrics, the terminals are counted in a circle, clockwise, starting from the top and ending with the central one (seventh).
Tips for choosing a towbar
Any model of towing device for VAZ 2012 has its own characteristics.
For example, the towbar platform can be connected to each other using bolts or be solid. The latter option is much more convenient, since you will only need to install it once and will not have to constantly ensure that the elements are securely fastened together.
But it also has its drawback. Over time, when the metal “gets old” and the welds become weak, the entire device will have to be thrown away. In the case of a collapsible model, it will be enough to replace the bolts or one of the elements of the device.
After installing the towbar on the VAZ 2110, all you have to do is buy a trailer and fill out the necessary documents for its registration. In general, knowing about all the features of installing a towbar, you will be able to adequately assess your abilities and decide whether you want to install it yourself or whether it’s better to go to a workshop. The choice is yours!
Author: Ekaterina
How to make a tow bar yourself
If not a single factory towbar fits your VAZ, try making it yourself. To do this you need to prepare:
- square steel pipe (about 1 m in length);
- several sheets of steel of the same thickness (width - 7 cm, length - 20 and 30 cm) or shorter pieces of pipe;
- bolts (M 10 - 2 pcs., M 12 - 6 pcs.), four-centimeter screws with nuts;
- socket;
- file and sandpaper;
- a metal hook, preferably with the same ball (the latter is used as a cap, retainer or towbar plug);
- wires (cores), insulating tape;
- primer and paint.
If you need to make a tow bar for your VAZ yourself so that the product looks beautiful, you should stock up on ready-made drawings or draw at least a simple diagram on paper or in a computer program. The simplest version of a homemade towbar is a horizontal bar, to which a pipe with a hook is firmly attached in the middle. For greater strength, it is also advisable to make sidewalls that are installed strictly perpendicular to the main beam.
Step-by-step description of the work
✓ First you need to remove the bumper. ✓ Next – cut off the eyes. ✓ Here you need to take a drill and make holes.
✓ We take a welding machine and weld the fasteners. ✓ Now you need to weld the second tube in the center to make a right angle connection. ✓ You need to take a grinding wheel and coarse sandpaper and clean the seam and edges of the tubes. ✓ The manufactured structure is coated with a primer. ✓ Now the structure is covered with paint.
To strengthen the spar, we install a small angle with nuts. This will create a tow bar with a removable structure. You can use headlights to power the towbar, and use a connector to power the socket. Ready! Now you have a full-fledged homemade tow bar.
When making a homemade towbar, you need to try it on all the time, controlling where it is placed on the car.
Selection and installation instructions for a towbar on a VAZ 2110
The towbar on the VAZ 2110 is indispensable for those car owners who do not have enough trunk space to transport the necessary things. For this reason, a trailer hitch is installed to attach a trailer or carriage, a device for transporting other cars, to your vehicle.
In this case, the first group includes those holes that are provided specifically for installing a traction device or those that were technologically conceived for other purposes, but were adapted for towbar installation by skillful car enthusiasts. Depending on the method of installation/removal of the traction device, the towbar for VAZ 2110, 2111, 2112 is a stationary (not removable) or removable device, monolithic or dismountable (parts are replaceable). Also, the differences between towbars concern their sizes.
Preparatory work
Take the necessary tools and materials:
- adjustable electric drill with drills,
- a set of keys,
- knife,
- punch for marking,
- hammer,
- rag,
- anti-corrosion lubricant,
- insulating tape,
- reinforcement plates,
- bolts and nuts,
- screws,
- washers.
Remove the rear bumper and trim. As practice shows, if you do not remove the bumper, in this case you will have to additionally drill the bottom to wire the trailer-device socket. It is also necessary to de-energize the vehicle by removing the terminal from the battery.
Installation technology
Instructions “How to install a tow bar on a VAZ 2110”:
- Attach the towbar to the lower rear of the car where it is intended to be attached.
- After the towbar for the VAZ 2110-2112 is firmly pressed to the body and centered, drill holes at the level of the finished holes in the upper brackets (you need to make all four upper holes - 12.5 and 13 mm on each side). After treating the notches at the drilling site, do not forget to coat the edges with an anti-corrosion agent.
- Insert the spacer bushings and, with a couple of movements, lightly screw the towbar onto the VAZ 2110/2111/2112.
- In the same way, you need to attach the towbar to the lower brackets to the side member. To do this, press the other two holes located on the tow bar in the middle of the mount to the desired location and drill through the spar from below. In this case, you first need to hold the drill from above, and after that you will also need to go from below, towards the inside of the trunk. Insert the bolts, but tighten them gradually, without applying excessive force, using bushings to avoid deformation of the side member being tightened during this process.
