Safe driving directly depends on the condition of the car itself, since a serviceable vehicle requires the coordinated operation of all components and mechanisms. In this case, headlights are a source of light that serves to identify a vehicle, as well as to illuminate a large area of the road surface in front of the car while driving in the dark, under different weather conditions, etc.
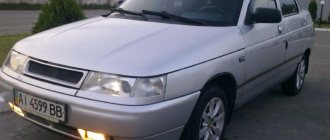
It is important that the headlights (this applies to low and high beam headlights) not only shine, but are also correctly adjusted. It is through adjustment that you can achieve the most correct illumination of the road surface and the space in front of the car, as well as avoid dazzling oncoming drivers. Next, we will look at how to adjust the headlights and improve their light quality yourself, using the example of a VAZ 2110 car.
When adjustment is needed
Adjustment of the reflector position is required in the following cases:
- the beam of high and low beam is directed too low or high;
- the main spot is directed towards the side of the road or oncoming traffic.
Checking and adjusting the lights will be necessary after replacing light bulbs, a long trip along a broken section of the road, or a minor accident.
Preparatory work
There are several ways to correctly set the VAZ 2110 reflector:
- At a service station using a special device.
- Independently according to the scheme recommended in the VAZ operating instructions.
To adjust the headlights in a car service, you need to pay at least 1000-2000 rubles for the work. If you work independently, you can achieve good results and save money.
First you need to find a flat area and a wall. Suitable surfaces include a garage door, a fence, or a small building. The headlight adjustment diagram is drawn using chalk or a marker. Height data and the distance between points are measured with a tape measure and are the main ones in the process of adjusting VAZ headlights.
To obtain maximum accuracy in angle adjustment, you need to prepare the machine:
- Wash the body in a car wash.
- Inflate the tires according to the instructions on the driver's pillar or door.
- Clear the luggage compartment of excess cargo and stow the spare tire, wheel wrench and jack.
- Fill the tank full with fuel.
- Take with you an assistant or an additional load weighing 50-70 kilograms.
- Prepare the necessary tools.
When placing the VAZ on a flat surface, you should use wheel chocks or special shoes. Installing a handbrake changes the angle of the body and negatively affects the adjustment of optics.
Nuances of domestic cars
Owners of modern foreign cars are in many ways happy people. Of course, their cars are “stuffed” with electronics and automation, so a huge part of the settings is performed by the car automatically or using a computer.
Adjustment screws
Domestic cars, including the VAZ 2110, are deprived of these advantages. Light adjustments have to be done manually. If this is not done, problems will be difficult to avoid.
Frankly speaking, it is still better to perform the settings at specialized service stations. But if you don’t have the money for this, or car service services are too expensive for your budget? In this situation, you can resort to the help of your own hands, as well as a pair of hands of a friend. You won't be able to do it without an assistant.
Which headlights for VAZ 2110 are better and easier to adjust?
On VAZ 2110 cars, two types of front optics were installed from the factory:
- domestic production, the so-called Kirzhach headlights;
- imported components made by Bosch.
The diagrams and design of the parts are somewhat different, but the methods for adjusting the angle of inclination are no different. Spare parts are often supplied from Chinese or handicraft products, which are not of high quality. Such headlights often cannot be adjusted to work together within the limits allowed by the standard.
Headlights Kirzhach
The design of products manufactured by Avtosvet JSC (Kirzhach) uses lens optics for low beam lamps. In theory, such a solution should provide a directed and intense beam of light that is easily adjustable. In practice, light is distorted by an external diffuser, as well as by weather phenomena (rain, snow, fog).
The high beam lamps are installed in a standard reflector located closer to the radiator grille. The reflective element is small in size and unreliably mounted. Because of this, the effect of light shaking when moving is observed.
Today, the Avtosvet enterprise is bankrupt, part of the equipment has been transferred. Spare parts sold under the Kirzhach brand are fakes and have nothing to do with the original products.
headlight
German Bosch headlights
German optics are equipped with conventional reflectors, but due to the high quality of components they allow you to obtain an intense and stable beam of light. According to owner reviews, the headlights provide better illumination in any weather than domestic products.
The production of headlights was carried out in Ryazan. Currently, the Automotiv Lighting enterprise, which is a structural division of Magnetti Marelli (Italy), is located there. It is these products that are supplied to the plant and for spare parts. The name “German Bosch” is used by car owners from old memory.
Headlight Bosch for VAZ 2110
Light VAZ2110, what lighting devices are installed on the VAZ2110
The following lighting devices are installed on cars of this generation:
- Parking lights.
- Fog lights. Such optics are only available on the latest versions of VAZ 2110 cars, however, fog lights can be installed independently.
- Direction indicators.
- Block lights. The control components on the instrument panel can be used to switch between low and high beam.
Why is headlight adjustment important?
The importance of adjusting headlights is explained by the following safety nuances:
- Incorrectly adjusted headlights create a wide beam of light in front of the car, which actually creates a curtain that limits visibility. This effect is especially noticeable in rainy or foggy weather, as well as during snowfall.
- An unregulated beam of light in the low beam mode blinds oncoming drivers, increasing the risk of traffic accidents. When the light is switched to high beam, the trees will be illuminated, but not the road in front of the car.
How to properly adjust headlights without removing them?
Car headlights are adjustable without removing them from the car. For setup, a special stand is used, with individual markings for each model. For self-adjustment, use a portable template made of plywood or drawn on the wall. In a car service center, special adjustable instruments are used that provide increased measurement accuracy.
The adjustment procedure in garage conditions consists of the following steps:
- Applying a marking template on the wall or installing a ready-made one.
- Designation of lamp center points.
- Directly adjust the light.
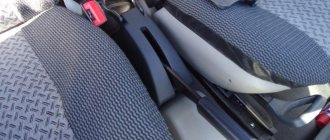
To adjust the light beam, two regulators installed at the rear of the housing are used. The one closest to the turn signal is responsible for changing the direction vertically, the second - horizontally. Access to the regulators is free and is not blocked by engine compartment units.
Preparatory work before adjustment without disassembly
Requirements before starting adjustment:
- Wash the outer surface of the headlights. There should be no dust deposits, insect residues or oil on the glass.
- Check the operation of the correction device, which can be hydraulically or electrically driven.
- Conduct a visual inspection of the lens glass. If any clouding or scratches are found, polishing is recommended. It is better to carry out the procedure in a specialized service that has tools and materials.
- Check the external condition of the lenses and reflector surfaces. If there are peelings, cracks, or chipping, the part or headlight will have to be replaced.
- It is recommended to replace the low and high beam lamps, especially in cases where the light sources are used for a long time. High-power lamps should not be installed in headlights, as they cause overheating and destruction of the unit.
- Analyze the technical requirements for adjustment. Bring the vehicle load to the required level, set the appropriate tire pressure.
The main difficulty when adjusting the headlights yourself is finding a level area that allows you to freely place the car and the control screen.
Algorithm of actions when setting up
Instructions for adjusting headlights with your own hands:
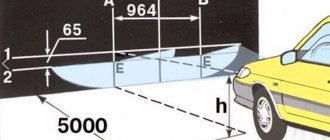
- Place the VAZ 2110 on a level area at a distance of 5 m from the installed measuring template. There should be a right angle between the machine and the template.
- Load the driver's seat with 75 kg ballast. Often there is an assistant in the driver's seat.
- Rock the car by the front fender to install the shock absorbers and suspension springs in their working position.
- Draw a vertical line on the template or wall corresponding to the axis of the car (indicated as “O” in the diagram).
- Draw parallel lines A and B corresponding to the centers of the lamps. The distance between centers is 1108 mm.
- Hit two horizontal lines. The line marked 1 in the diagram is located at a distance of 600 mm from the floor and corresponds to the center of the headlights. Line 2 is located 75 below and serves to display the center of the headlight's light spot.
- Turn the hydraulic headlight adjustment control to the position corresponding to the minimum load.
- Open the hood.
- Cover one of the headlights with a thick material, such as a piece of cardboard.
- Rotate the adjusting rods to set the beam of light on the open headlight. The upper limit of the light spot should lie on line 2. The connection point of the horizontal and inclined segment of the light spot coincides with point E.
- Carry out a similar procedure with the other headlight.
Visualization of the adjustment process
If, during the process of adjusting the headlights on a VAZ 2110, it is not possible to bring the beam into the specified parameters, then it is necessary to dismantle the lighting device for repair or replacement.
Let's sum it up
When operating a car, it is important to understand that properly adjusted headlights are the key to the safety of not only the driver and his passengers, but also the safety of other road users. For this reason, it is necessary to monitor the condition of the optics, as well as the quality of the car headlight adjustment.
We also recommend reading the article on how to choose fog lights for a VAZ 2110. From this you will learn about the features of selecting fog lights for a VAZ, as well as nuances that must be taken into account separately when selecting.
In turn, adjusting the headlights of the VAZ 2110 can be done either independently or at a service station (using a special stand-screen). If the work is carried out independently, it is necessary to take into account that in general the procedure for carrying out adjustment work is not complicated, but requires accurate measurements.
One way or another, by reading the above instructions, you can achieve correct adjustment of the VAZ 2110 headlights. This will improve the quality of road lighting, reduce eye strain when driving at night, and also increase overall safety, etc.
How to remove the headlights yourself and adjust them if the device has defects?
In some cases, the VAZ 2110 headlights cannot be adjusted. This is due to damage to the hydraulic corrector or defects on the reflectors or glass. In this case, you can try to disassemble the unit and replace unusable parts.
How to disassemble the headlight?
Sequence of disassembling the VAZ 2110 headlight:
- Remove the part from the car, remove all lamps from the housing.
- Heat the glass evenly with a hair dryer, melting the sealant layer. Separate the lens from the headlight housing using a flat object. When disassembling a Bosch headlight, you need to unfasten the glass mounting brackets.
- Unscrew the three reflector mounting points.
- Remove the corrector spring through the hole for installing the actuator.
- Remove the reflector from the housing by turning the angle adjusters.
- Wash the headlight components, replace faulty parts and reassemble the assembly. The sealant used is a silicone compound used for installing car windows.
Removed headlight Cleaned reflector Assembly components Reflector guide Headlight assembly Sealant applied
Features of removing and adjusting the headlight
Headlight removal procedure:
- Disconnect the battery terminal.
- Remove the upper decorative radiator grille, which is mounted on two bolts.
- Remove the power supply plugs for the headlight.
- Remove the actuators of the correctors. The part is secured with a latch and a rotary lock.
- Unscrew the three bolts securing the headlight and recess it a little deeper.
- Slide the decorative strip (“eyelash”) and remove it from its seat on the bumper. To facilitate dismantling, loosen the upper bumper mount located between the headlights.
- Unscrew the fourth mounting point of the headlight and remove it from the socket.
- Install a new part (the procedure is performed in reverse order).
A removed VAZ 2110 headlight can be cleaned of dirt and repaired; the design does not provide for any adjustments.
What to do if the headlight unit is faulty?
A common defect of “Kirzhach” parts is the failure of the hydraulic corrector. Because of this, the headlight cannot be adjusted or the beam of light changes direction when trying to adjust it with the corrector. The cause of the defect is a leak in the seal or jamming of the actuator. To monitor the serviceability of the unit, the stroke of the actuating rods is measured, which should be in the range of 6.5-7.5 mm. In the event of a breakdown, the unit must be replaced; repair of parts is impossible, since the device is non-separable.
The easiest repair method is to install a mechanical regulator. To do this, a suitable bolt with a lock nut is screwed into the actuator housing. The disadvantage of this design is the need to manually adjust each headlight. Therefore, installing a manual regulator is not recommended.
Installation of hydraulic corrector
To replace a standard hydraulic corrector with an original unit, you must:
- Remove all points attaching the corrector pipelines to the body.
- Remove the regulator located in the instrument panel.
- Remove the protective frill of the trapezium wipers.
- Remove from the mountings and move the expansion tank to the side.
- Remove the old tubes from the seats protected by rubber seals. Many owners cut the lines and take them out piece by piece.
- Remove the old system master cylinder.
- Clean out debris from under the frill. Insert the new tube into the standard hole. To simplify the procedure, it is recommended to use copper wire to pull the tube.
- Reinstall the rubber channel seals. This is important because the hole is located directly above the relay and fuse mounting block.
- Route the lines along standard routes through the engine compartment.
- Check the system operation.
- Adjust the headlights using the method described above.
Some of the replacement steps are shown below.
General view of the new corrector Approximate volume of dirt under the frill Pulling the wire through the hole Tubes leading into the engine compartment Routing lines Installing the regulator
The procedure for installing a new hydraulic corrector is shown in the video tutorial from the author “Aleks B”.
Installation of electrical corrector
A number of owners install an electric drive from the GAZ 3110 Volga on the VAZ 2110:
- Install the corrector motors in the standard place. The installation location does not require any modifications.
- To control the installation angle, a button from the standard electric window, installed in the housing of the hydraulic corrector control handle, is used.
- Connect power to the electric drive from the ignition switch. A 5 A protective fuse is installed in the circuit.
- Route the wiring into the engine compartment. It is recommended to use protective corrugated sleeves to protect the wires from chafing the insulation.
- Crimp the ends with plugs that will ensure reliable contact with the motors. On motors, only two of the available four contacts are used.
- Protect the connection point of the wires to the motors with electrical tape.
- Cross the wiring onto the plug that will connect to the control key.
- Connect button.
A schematic diagram of connecting wires to the key plug.
A photo gallery of installing an electric corrector on a VAZ 2110 is shown below.
Installation kit Electric motors for GAZ 3110 corrector Power supply to the button Upgraded standard regulator Wiring pulling Laying wires in sleeves Connecting motors Insulated unit
Trembling of light
Another common defect is the shaking of the light beam, which is observed when the car is moving. The defect occurs on Kirzhach headlights; German products have a durable design.
The causes of the defect are:
- reflector exits from mounting points;
- corrector failure;
- poor condition of lamps;
- weakening of the adjusting springs.
To install the reflector in its original place, the headlight must be disassembled using the method described above. You can compensate for spring fatigue by lengthening the working rod of the corrector using a cap. A part of a plastic dowel is used as an extension, which is put on and fixed on the rod.
Preparing to adjust the light output
In order to improve visibility on the night road, without dazzling drivers of oncoming cars, it is necessary to adjust the headlights. You can do this in a service center, or with your own hands. Knowledge of the basic rules for adjusting headlights will help improve the luminous flux on a VAZ.
So let's get started:
- Serviceability. Make sure that your hydraulic corrector or electric headlight corrector is working correctly (depending on the configuration). Please note that the corrector plays an important role, therefore, before the adjustment takes place, you need to be sure that this mechanism is working properly;
- Position. Having chosen a completely flat area, install the car. The area must be checked with a level to prevent distortion, otherwise it will not be possible to adjust the headlights correctly;
- Build a kind of vertical shield screen at a distance of 5 meters from the car on which you can draw;
- It’s not bad if you have a flat area in front of the garage door. They are also unlikely to be particularly harmed by chalk;
- Loading. A car that is being adjusted must be “fully equipped” - fueled, with normal tire pressure, and a load of the driver’s weight (or a person of approximately the same weight) placed on the driver’s seat;
- Vertical markings. On the screen, wall or garage door, draw three vertical lines and mark them: “O” - there will be a line in the middle of the car (this place is usually indicated by the sign of the car, in our case it is the usual VAZ sign); “L” means right;
- Horizontal marking. Draw a horizontal line through the centers of the headlights, marking it N, and 65 mm below it, draw another line, which is marked “P”. Now it becomes possible to adjust the light with your own hands.
Marking the wall.
- Drive the car 2 meters away from the selected vertical plane.
- Using a tape measure, thread and ruler or other device, measure the distance from the center of the headlight to the ground. Transfer this distance to the wall (for new cars it is usually 60 cm). Draw a horizontal line. And under it, 7.5 cm lower, there is another one.
- Turning on the headlights, mark their centers on the existing horizontal lines and draw two verticals through them, and between them (at an equidistant distance) a central axis. The distance between the extreme verticals for the VAZ 2110 should be about 110.8 cm.
The improvised screen is ready, you can start setting it up directly.
Adjustment algorithm
We sequentially perform the following:
- Cover the right headlight with cardboard or other material that does not transmit light;
- Turn the hydraulic corrector to the first position (I);
- Open the hood, find the screws used for adjustment, and turn them. At the same time, if the left headlight is adjusted, then it will be correct if its light at the top reaches the line N, and at the bottom – P;
- Having adjusted one, the adjustment of the other begins, closing the previous one.
Remember, if the headlights shine too low, they need to be raised, otherwise you may not notice the pedestrian in time, especially if there is slush on the street and he is wearing black clothes. If the light is set high, that is, you deign to raise them high, oncoming drivers will not thank you because you will blind them. Therefore, do-it-yourself adjustment on the VAZ must be done very carefully.
Video “Polishing optics with toothpaste”
How to polish the headlights on a “ten” with your own hands using toothpaste, see the video below (the author of the video is Dima Artist).
As practice shows, road accidents most often occur at night. And this is not strange, because after sunset, the visibility of the motorist is significantly reduced. And in the case when the headlights do not work at all, the likelihood of an accident is extremely high. According to statistics, the main reason for this trend is improper adjustment of lighting fixtures, which leads to dazzling other road users.
Every motorist knows first-hand how much strain the eyesight experiences in a direct beam of light.
The view is not just reduced, it practically disappears, resulting in unpleasant or even tragic consequences.
In our realities, uneven road surfaces always stimulate vibration of the car, which disrupts the glow geometry of the head optics. Therefore, headlight adjustments should be carried out regularly, including when installing new lights.
Modernization
With a little modification, you can significantly improve the Kirzhach headlights with your own hands and make their glow brighter.
First, the headlight must be removed, then disassembled in the following sequence:
- To remove glass from Kirzhach, use a hairdryer - you need to heat the sealant, then use a sharp knife to separate the glass;
- Remove the reflective pad;
- The modernization will only affect the low beam units, so unscrew them;
- And then you have a choice: with Kirzhach you can either move the lens towards the reflector by 10 millimeters, or grind off the modular ring, making it shorter. This will help improve the luminous flux of the Kirzhach headlights, raise it and make it wider.
Alternative to mechanics
Even if you adjusted it yourself according to all the rules, if the VAZ load changes, you also need to change the angle of the light beam. A hydraulic corrector was invented for this purpose. Moreover, the corrector is designed non-separable, it is also not adjustable.
Accordingly, if it fails, the corrector is simply replaced with a new one. And the most common reason that the hydraulic corrector fails is a “wedge” of the pistons or a fluid leak.
If the need arises, it would be advisable to replace this corrector with a more modern and high-tech electrical corrector. The kit, which provides for an electric corrector to be installed on the car, consists of a headlight range control, the mechanism itself with rings - seals and wires.
Making an element by hand
The main advantage of the method is that if the hydraulic corrector becomes deformed, you do not need to repair it - you just need to manually adjust the headlights.
For one optical element you will need:
- lock-nut;
- a pair of nuts with turned ends to secure the bolt in the body of the product;
- M8 bolt 6-10 cm long;
- The corrector housing from the device is in working condition.
On the back side of the correction housing, drill a hole for normal movement of the bolt in it. The structure will sit smoothly thanks to the nuts with ground edges. For extra confidence, you can seal the nuts with epoxy glue.
Author: Baranov Vitaly Petrovich
Education: secondary specialized. Specialty: car mechanic. Professional diagnostics, repair, maintenance of passenger cars of foreign production 2000-2015. Extensive experience working with Japanese and German cars.