Modification of the rear brake of a VAZ
Don't piss,
I turn around on it every day, soon there will be 2 and 3 clicks
I completely removed the springs from the side of the cable that goes into the drum, inflated the cables themselves with the transmission, changed the expansion plate and pads. The handbrake has become much lighter and holds much better.
I completely removed the springs from the side of the cable that goes into the drum,
+1 I do the same thing, only I bite off 3-4 turns. at the same time, you will forget about replacing the cable forever, and it will hold 100%
On the left is the normal one, on the right is the modified one.
I redid it 10 thousand ago, until nothing fell off.
What function does this spring actually serve?
In short, when the cable stretches, you pull the handbrake and think, 7-8 clicks. need to tighten up.
And this is useless because this same spring, when compressed, does not allow the pads to be fully extended.
And it seems to you that you lifted the handbrake with force and the brakes do not hold, this is the effect of a compressed spring which, having chosen its compression, allows the cable to be pulled further.
So . I don’t recommend throwing out the spring completely, but biting off 4-5 turns (in the drum) will really help.
gorodionok_igor
Listen, my friend’s Kalina car had this problem.
It all started like this, he says he doesn’t hold the handbrake well. I say I need to pull it up. I bring my key, climb under the car and pull it up. I tell him to check the clicks. He says 3 I get out, I think everything is ok I get into the car and pull as usual at home Result 8 clicks..
In short, a handbrake system without an amplifier. If there is not enough braking force, it means you are not pulling hard enough.
Source
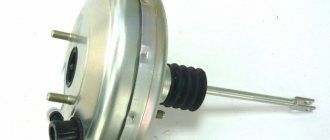
How to remove a Priora vacuum booster Tricks of Life
Installing a Vacuum Brake Booster and Master Cylinder from Priora will make the brakes softer and more precise.
Author: Realmatroskin Share:
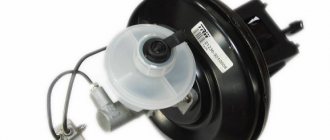
It all started with the fact that on one not very beautiful frosty morning I got into the car and pressed the brake pedal, I heard PSHSHSHSHH and noticed a drop in revolutions to 500. The decision was to replace the vacuum seal. After reading the forum, I settled on two options: 1. VUT from Torgmash 2. VUT and GTZ from Prioro-Kalina Well, since we are not looking for easy ways, the second option was finally chosen.
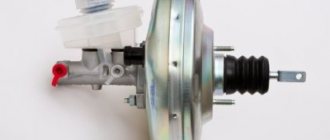
So, through long wanderings around the market, the following was acquired:
VUT and GTZ Priors, 2 tees from the classics, 4 nuts by 8 for attaching to the VUT GTZ and pedal assembly (the old ones don’t fit anymore) stray bits for pumping the brakes in one mug. 2 tubes from Priora with fittings 12x1 and 10x1 on the GTZ side, and 10x1.25 on the tee side. brake fluid with a spare VD (not useful, but will not be superfluous) sorcerer at the same time for replacement (the old one is finished with magic)
By the way, here is the appearance of Prioro-Kalina pipes:
left Prirovskaya 12x1.0 right tenth 10x1.25
left tenth 10x1.25 right Prirovskaya 10x1.0
both tubes general view
Having bought all this, we go to the garage, look for screwdriver keys, a drill with drills, a file (this will not be needed if you buy the assembled VUT + GTZ + pedal from the Priora) and begin to disassemble the car. 1. We remove the Shumka (the right half of the Shumka is required, the left one can be bent), the frill will also have to be removed since it interferes with removing the original GTZ and VUT and, accordingly, installing new ones. Drain the brake fluid if possible and unscrew the brake pipes. Next, we climb into the cabin, remove the terminals from the brake light limit switch and unscrew the 4 nuts securing the VUT to the body
We return to the muzzle again and remove the entire structure from the bowels of the car, trying not to get wet with the remaining brake fluid. For those who bought everything assembled, skip the next point
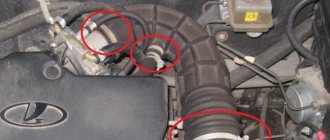
2. Next, unscrew the pedal from the VUT and go to assemble the new VUT, GTZ and the old pedal into one whole. Having assembled the VUT and GTZ, we see that the pedal with standard mounting holes to the VUT will be rotated 90 degrees with respect to the vertical position of the reservoir with the brake fluid. To turn the pedal to the normal position, it is necessary to re-drill the mounting holes in the pedal assembly, apply the pedal to the VUT and carefully mark where necessary make new holes, go drill, try them on and, if necessary, adjust with a drill or file (I didn’t get it quite right, and one of the holes turned out to be inside the U-shaped housing of the pedal mount and the nut was tightened by the same g.r., but now it doesn’t for what kind of twists it won’t unscrew itself))) in the photo you can see a little in the red circle) we screw the pedal assembly to the VUT.
VUT and GTZ and pedal assembly:
Attaching the pedal to the VUT, the nut turned out to be inside; tighten it was another dance with a tambourine:
the other side of the pedal went much easier:
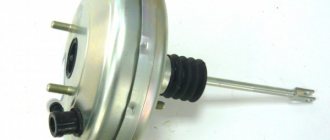
VUT and GTZ assembled:
3. Now we install the resulting structure on the car, try on how the frill will fit, there were fears that the frill would have to be cut, but everything fits like original. We install tees
Next we screw the Priora tubes to the GTZ and tees
we fasten the tees to each other with a pin, preferably 5; in the absence of one, it’s 4
4. then we climb into the hole under the car to change the sorcerer
unscrew the brake pipes from the sorcerer, remembering where they were, unscrew the 2 bolts holding the sorcerer and remove it
From “sorcerers” to discs: Budget modifications to VAZ-2109 brakes and their effectiveness
Rear disc brakes
Almost all foreign cars (not counting budget models) have long been equipped with rear disc brakes. The point is not only the superiority of disc brakes over drum brakes. As for the VAZ 2109, rear disc brakes ensure uniform braking force on all wheels. VAZ 2109 disc brakes can be easily installed on the rear wheel with your own hands.
Note! As a rule, a lag or advance in the functioning of any of the braking mechanisms causes loss of controllability.
Introduction
Almost all domestic cars are far from ideal; their owners try to improve vehicles to improve functionality. Tuning the brake system of the VAZ-2107 helps optimize an obsolete design. All Russian cars have a lot of shortcomings that concern the brakes, in particular, the driver has to make enormous efforts to slow down in time; in addition, due to the weaker rear drum brake, a difference in braking forces is created, which is expressed in “skidding” of the car and a long braking distance. In the article below, we will look at effective ways to modify the factory brake system, allowing you to improve the system.
The VAZ 2107 is a very popular model in the domestic automobile industry.
Differences between disc and drum brakes
VAZ 2109 rear disc brakes
Compared with drum brakes, disc brakes have the following advantages:
- shorter braking distance;
- even distribution of braking forces;
- brakes operate faster;
- Unsprung weight is reduced;
- heat dissipates better;
- greater reliability;
- maintenance and changing pads is easier;
- there is no need to frequently tighten the handbrake;
- more attractive appearance;
- During the winter months, disc brakes do not freeze after washing, which cannot be said about drum brakes.
Advantages and disadvantages
This device has its pros and cons. Let's start with the cons:
- It has been proven that the braking efficiency of this type of mechanism is slightly lower than that of disc mechanisms. The braking distance is almost 20% longer. This is due to the following reasons: insufficient contact area, which is not provided even by two cylinders, and the resulting slipping, which is caused by dust that has penetrated into the mechanism.
- Overheating of the drums due to lack of cooling; when braking, the temperature of the drums can rise to 6000 degrees.
- A reduced maximum load value, at high pressure, can rupture the drums with liquid pressure.
However, not everything is so bad; there are also undeniable advantages of this mechanism:
- The closed design allows you to get good braking force, and you can increase the friction surface by making the drum wider and the pads too. This is what ensured the widespread use of such a mechanism on all trucks and buses.
- The degree of resistance to wear and the service life of the linings is increased, which is caused by less frictional contact than with a disc brake.
- Good protection against dirt getting inside, which the disk version does not have.
Tuning VAZ rear brakes
To tune the rear brakes of front-wheel drive VAZs, three types of brake discs with a diameter of 13-14 inches are used. They are used as front brake discs:
- unventilated 13-inch (2108),
- ventilated 13-inch (2110),
- ventilated 14-inch.
Accordingly, calipers, depending on the discs used, also come in three types. They are sold together with a hose and pads. The average price is about 800 rubles.
Fastening to the rear beam of the car is carried out using a special adapter faceplate, which is just suitable for 13-14 inch wheels. On average, its price is approximately 350 rubles.
Adjustment
The work of the sorcerer on VAZ cars depends on the position of the body. Therefore, adjustment must be performed not only during each maintenance, but also when replacing shock absorbers and springs, after repairing the rear beam and, of course, replacing the sorcerer itself.
The car is placed on an overpass or inspection hole, to set the suspension to a balanced position, the trunk is rocked a couple of times by hand. Use a 13mm wrench to loosen the fastening bolts to the bracket; the front bolt is not visible from below, you need to find it by touch.
By moving the regulator, a gap of 2 mm is achieved between the elastic plate (the rod rests against it) and the lever. The spring resistance is high, you need to use a “mounter” or a special device. The bolts are tightened and the gap is checked with a feeler gauge. If you don’t have a probe, you can use a drill with a diameter of 2 mm and even a two-ruble coin.
Further verification is carried out on the fly. When braking from a speed of 40 km/h, on your own or with the help of a partner outside the car, evaluate the moment when the rear mechanisms begin to operate in comparison with the front ones.
What problems may arise after changing drum brakes?
VAZ 2109 rear disc brake
Of course, the VAZ plant does not officially install rear disc brakes on its cars, but despite this fact, the instructions provide a section on replacing brake drums with disc devices. Let's pay more attention to the shortcomings of installing the HCD on VAZ 2109 cars. So:
- High-quality brakes are the key to safety. They are not installed just for beauty; they are precisely balanced mechanisms developed by experienced engineers. It’s not enough to just buy and deliver a product; it needs to be properly adjusted and tested. All this work can be done either at a service station or independently, following certain instructions. In the worst case, braking will be uneven, the car will skid when braking, the discs may overheat and complete or partial failure. In addition, you can hear an unpleasant creak.
- It is not always practical to install an HTD on VAZ cars. Perhaps the money spent produces the desired results, but along with the purchased HRT, new problems arise.
- Troubles associated with maintenance. Even though HBRs are much more efficient than drum brakes, replacing them is perceived as an illegal change.
VAZ 2109 how to make rear disc brakes
- Problems on the road with traffic police. Often on the road people don’t find much fault with the rear brakes, but if this does happen, you’ll have to come up with a convincing explanation.
- Troubles with the handbrake of a VAZ. When changing brakes, you will need to think about the handbrake. You can consider two options: installing a cable handbrake or using a hydraulic handbrake. In the second case, it becomes possible to brake on any plane, but it is not recommended to use it for parking, since it weakens over time. Some drivers do not pay attention to the handbrake at all and pass the technical inspection without any hindrance.
- In an accident, a car with rear disc brakes will most likely be the culprit, since design changes have been made that are not required by law.
Replacing brake discs and pads
Replacing original parts with high-temperature ones improves the braking properties of the Land Cruiser 200 with a diesel engine.
However, to ensure long-term high-quality braking, the Land Cruiser 200 should be equipped with reinforced brakes, which significantly improve braking dynamics.
Features of replacing hand brake pads
The adjusted parking brake on the Land Cruiser 200 provides braking with 5 clicks. If it weakens, then the number of clicks increases significantly, and suspicious knocking noises begin to be heard from the rear wheels.
The handbrake is adjusted when replacing the pads. The stroke of the lever must be checked every 10 thousand, and the condition of the pads must be assessed every 20 thousand kilometers.
Pads
The time to replace the pads depends on their quality, driving style, road conditions and engine power. On average, they should be changed every 30 thousand km, and on bad roads or a sporty driving style - even after 5-10 thousand. Front axle parts wear out faster than rear axle parts, so they are replaced 3 times more often.
Signs of pad wear:
- A characteristic sound - when the friction material of the parts is worn out, a special plate (wear sensor) is exposed. During braking, it rubs against the disc and makes a corresponding sound.
- Light indicator on the machine panel - a metal contact is inserted into the thickness of the material. When the base substance is erased, it becomes exposed and, upon contact with the disc, sends the necessary signal to the driver.
- Thinning of the material that provides adhesion, up to 1.5-1 mm.
- Indirect signs of wear - brake fluid consumption increases, the car brakes worse, its distance to a complete stop increases, the pedal “falls through”.
If the pads wear unevenly, when the grooves are worn out mainly on one side, the caliper must be repaired at the same time as replacing them.
Design of rear disc brakes of front-wheel drive VAZ cars
The design has the following features:
- A hub with special brake discs and rotating wheels on each side is attached to the rear beam of the car.
- Also, a hydraulic brake caliper with pads is attached to the beam using an adapter faceplate.
- The caliper may have a built-in mechanical parking brake.
We must not forget that to prevent over-braking in the rear axle, it is better to install brake discs with a diameter several inches smaller than on the front wheels.
Device
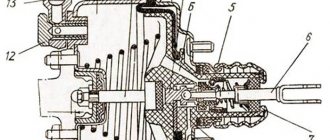
The rear drum brakes are shown in the picture below. This type of brake mechanism has a drum as a rotating element. In the fixed part there is a support shield and pads.
In the figure, elements 1 and 3 are stationary, and element 2 rotates.
This type of brake device includes:
- A drum that is attached to the wheel hub;
- Pads with linings;
- Brake working cylinder, which has 2 pistons with cuffs and boots;
- There is also a fitting screwed into it, with the help of which the liquid is pumped;
- Compression (return) springs that cling to the pads and hold them in the desired position;
- Brake support plate attached to the bridge beam;
- Stand support pads;
- The lower support for the pads with adjustment is an adjustment of the rear pads, allowing you to set the desired gap between the drum and the pad so that the brakes work well and at the same time they do not touch when it is not necessary;
- Brake fluid mechanism;
Their effectiveness is recognized to be higher than the first option. The principle of operation of drum brakes with two cylinders is the same, only a second cylinder is installed instead of the lower support. In such a mechanism, the surface area of contact between the shoe and the drum is larger, which means the braking is stronger.
How often should you check your brakes?
Check your brakes before every ride. Make sure all brake components are properly installed and in good working order. Also, in addition to checking your brakes yourself, before you ride your bike anywhere, it's a good idea to have an experienced mechanic check your brakes to find any problems you're looking for. If you cannot find or repair it due to inexperience (checking once every 6 months is quite enough for a non-professional cyclist), if you ride professionally or just very often, then you should do such checks more than once every 6 months
Setting up a budget system: how to properly adjust V-Brake brakes on a bicycle
Ideal for field repairs and cheap to operate, V-Brakes are adjustable in four steps
Moreover, maintaining their sequence is extremely important. Before adjusting the brakes on your bicycle, you must disconnect the brake line from the right (front brake) or left lever (rear) by simultaneously pulling back the metal cable guide and pulling the brake lever toward the rim.1
Finding the optimal location of the pads relative to the rim is done in the following sequence (the pads are adjusted alternately):
- use a hexagon to loosen the screw securing the block to the lever;
- the block is pressed tightly against the rim;
- a search is made for the optimal location of the pad - its outer and inner edges should be coradial to the circumference of the wheel;
- the block is slightly pulled towards the lever.
2. Debugging the location of the working plane of the block
When setting up lever brakes on a bicycle, special attention is given to this transition: it is necessary to ensure that the front edge of the pads touches the rim before the rear. To do this, place some hard object 1-1.5 mm thick under the rear edge of the pad and press it to the rim
Then the fixing nut is finally tightened. Next, repeat the transition for the second lever.
3. Centering the position of the levers (selecting the force of the springs of the levers) The task is to ensure simultaneous adhesion of the pads to the rim. Regulating elements are screws located on the left and right levers, near the place where the latter fit on the fork. The commissioning preparation cycle includes the following transitions:
- install the cable guide square into the tube holder on the lever;
- if the cable was disconnected, it must be secured with the appropriate screw on the lever.
The contents of the operation on the question of how to adjust the force of the brake springs on a bicycle are as follows:
- by clamping the brake lever, the moment of contact of the pads with the rim is monitored;
- on the lever with the block that touched earlier, it is necessary to strengthen the spring by tightening the corresponding screw (you can loosen the spring on the second lever).
4. Setting the distance of the stationary location of the pads from the wheel rim (selecting the optimal cable tension) The task of this stage is to adjust the sharpness of the brake mechanism. The operation is performed in the following sequence:
- the adjusting drum is screwed in almost all the way (you can leave 2-3 turns of thread);
- by unscrewing the screw securing the cable to the brake lever, slightly pulling it and tightening the fixing bolt again, the optimal distance between the pads and the rim is found (1-2 mm);
- If you need to slightly increase/decrease the severity of braking, just unscrew/screw in the drum.
The last adjustment of the brakes on the bicycle (point 4) largely depends on the correct shape of the rim. If you have a small figure eight, you need to find the optimal position in which the pads will not wipe the rim. When driving over bumps or potholes at high speed, you should check this setting as often as possible.
Procedure for replacing the front brake cylinder on a VAZ 2110-2112
Video instruction
The video was made using the example of a VAZ 2110 car and is equally suitable for both 2111 and 2112. The only way the car parts may differ externally is the brake discs: ventilated or not, as well as their sizes.
Photo report
First of all, we will need to remove the front wheel of the car, after first lifting the car with a jack. After this, using a hexagon, you need to unscrew the two bolts securing the caliper bracket.
Now you can remove the bracket and remove the pads:
Then you can rip off the brake hose with a wrench, but you don’t have to unscrew it completely.
Next, we unscrew two more bolts securing the cylinder to the caliper, having previously bent the two locking plates under them using a screwdriver.
And we move the cylinder to the side, since nothing else holds it.
The hose can now be unscrewed completely by turning the brake cylinder itself several times counterclockwise.
To avoid excessive losses of brake fluid, it is advisable to fix the hose as high as possible, and always with the fitting facing up. You can also substitute a container if liquid suddenly leaks out.
A new front one costs about 500 rubles, so this price is quite acceptable. But the assembled caliper already costs about 2,000 rubles, which is already significant if you suddenly have to change the entire assembly. Installation of this part occurs in the reverse order.
Proper riding technique: how to change speeds on a bicycle in different conditions
Considering the technique of shifting gears from the perspective of a driver, with the goal of increasing the service life of the transmission, two fundamental principles should be noted:
- the selection of suitable sprockets should occur with minimal load on the transmission system;
- with the resulting gear ratio, the chain misalignment should be minimal (when using 1st, 2nd and 3rd gears at the front, at the rear (for example, on a 24-speed transmission) you should select a position in the appropriate range: 1-3, 4- 6, 7-8).
Based on this, you can determine how to change gears on a bicycle in various conditions:
- when approaching a mountainous section, you should select a suitable gear ratio in advance (switch to lower gears);
- If you notice a sandy or muddy area, you need to shift to higher gears;
- when approaching any obstacle, you must lower the gear;
- when actively traveling on busy streets, you should select the optimal ratio that can provide dynamic acceleration.
The choice of gear ratio is also determined by the physiology of the knee joint - the most vulnerable part of the cyclist’s body. Increased stress (low cadence) causes greater friction in the knee joint, increasing the risk of failure of the “living joint”. A cadence of 90-110 rpm is optimal for both the loaded “hinge” and the cyclist’s cardiovascular system.
DIY vacuum booster diagnostics
First of all, it must be said that malfunctions and failure of the vacuum amplifier are not fatal. There is only a characteristic difficulty when braking the car and, in some cases, a disruption in the stable operation of the engine. In any case, before the trip, you can independently conduct a fairly effective and not requiring special skills check of the operation of the vacuum brake booster, for this:
- When the engine is not running, press the brake pedal several times at full speed;
- Keep it pressed;
- We start the engine.
If at the same time the pedal “goes” a little to the floor, it means that everything is in order with your vacuum amplifier, but if not, then we continue further diagnostics of the system.
Main symptoms of VUT malfunctions (table)
| Signs | Diagnostics | Conclusion | Elimination method |
| Hissing when braking | The engine is running, press the brake pedal and at the same time detect a hissing sound in the pedal area | The integrity of the diaphragm is compromised | Diaphragm replacement, total VUT |
| Hissing when the engine is running | The engine is running and a hissing sound is heard in the engine compartment. The engine runs unstably; when you press the brake pedal, the speed increases slightly briefly | The integrity of the pipe connecting the VUT and the intake manifold is damaged | Search for air leaks, elimination, replacement of pipe |
| Soft “cotton” brake pedal | When you press the pedal, it steadily, non-stop “goes” to the floor. When braking there is no feeling of stable resistance to pressing force | Depressurization of the hydraulic system, air ingress | Searching for leaks, checking fluid levels, bleeding brakes. |
| The car does not “slow down” | When you press the pedal, the braking is delayed, the pedal travel is not enough to lock the wheels | Large free stroke of the rod | Adjust idle speed |
Conclusion
The process of setting up optics in Camry does not take that much time (on average about 15-25 minutes). In addition, almost every motorist will be able to carry out such a procedure.
For the manufacture of brake discs used on cars of this modification, high-quality high-carbon steel is used, which allows the product to better maintain its technical and operational characteristics not only during periods of high temperatures, but also during sudden temperature changes.
In addition, the unique design of the brake discs for Toyota Camry 40, expressed in the presence of a system of internal ventilation ducts, ensures maximum efficient heat dissipation.
For the same purpose, the vast majority of manufacturers successfully use product perforation technology, which consists of making holes perpendicular to the working surface. Additional perforation function. to ensure uniform wear of the gaskets and timely removal of road dirt, dust, moisture and wear products of lining friction from the working elements of the unit.
High-quality paint protects brake discs from the harmful effects of corrosion.
Let's start small
Statistics show that a significant number of road accidents occur due to insufficient efficiency of the braking system.
The brakes simply do not work at the right time, due to a sharp increase in loads on the system. This problem is especially acute on domestic cars that do not have the anti-lock braking system usual for most foreign cars. It must be borne in mind that homemade modernization of the car's brake system is a prohibited procedure. It is very dangerous to tamper with the braking system of a car in the “garage conditions of an auto cooperative.” Independent, unprofessional intervention in the brake system of a car in the vast majority of cases puts an end to an honest technical inspection of the car, and the effectiveness of such intervention is often very doubtful.
However, if you carry out the necessary actions accurately and correctly, you can significantly improve the performance of your car's brakes. Moreover, this will be relevant both for domestic Ladas of different years of production, and for many foreign cars. Moreover, minor alterations can be done by anyone who has at least a little understanding of the structure of the car. So, on many foreign cars, as well as on modern domestic cars, it is quite easy to install ventilated brake discs and replace brake calipers and pads. Today, many well-known companies produce special tuning car brake pads that have an increased coefficient of friction compared to standard pads. Such products do not lose their efficiency, even at very high temperatures of the working surface, while possessing a significant indicator of thermomechanical strength.
As for tuning brake discs, in most cases they are made from high-quality cast iron. As a rule, tuning brake discs are made ventilated and have perforations. The ventilated brake disc resembles a pump rotor and performs the function of creating additional air vacuum for greater cooling. To speed up the cooling of the disk, perforation is also used. In addition, the perforated disc is good at removing carbon deposits that form on the pads when they come into contact with the discs. It is not surprising that even tuning pads, working with such brake discs, wear out much faster than with standard brake discs. And this state of affairs may be inconvenient for daily use of the car.
Installing rear disc brakes, adjusting braking forces on the rear axle
- First, the drum brake system is unscrewed and removed.
- Next, the four bolts are unscrewed and the hub is removed.
- After this, the brake pipe is unscrewed from the cylinder.
- Next, the hub is installed using the appropriate faceplates (left and right). The tabs on the adapter must be on the outside.
- There is no need to place a grommet under the bolt indicated by the arrow, as it will make it difficult to install the caliper.
- The hub bolts must be replaced with new ones, 5 mm longer than the old ones.
- Six bolts are needed on each side: four to secure the hub and two to install the calipers. A total of 12 new bolts will be needed. If it was not possible to find bolts of the required length, then you can take longer ones and cut them to the required length: the thread to the head should not exceed 13 mm.
- The corner of the beam will have to be crushed with a hammer, and, if necessary, the surface will have to be refined with a grinder. The metal here is soft enough, so there will be no difficulties. This is done in order to prevent the caliper from touching the beam. If rear 14-inch wheels and calipers are installed, then this operation is not necessary.
- There is a protrusion around the circumference of the hub that prevents the VAZ disk from seating. The internal diameter of the disc, like the hub, is 58 mm, but where there is a protrusion, the diameter is 60 mm.
External tuning.
This is carried out if you want to change the appearance of your six. Before starting work, check the condition of the car body.
If there are traces of rust or dents, remove them first. Otherwise, a little time will pass and your tuned car will have to be redone.
Their appearance and quality leave much to be desired. Installing halogen or xenon lamps will significantly improve lighting. When replacing lamps, do not forget about the standards. It's better to choose a good manufacturer.
Body kit
These include bumpers, rear and front, side skirts. Tuning with body kits is the most inexpensive way to change the appearance of a car.
Wheel disks
One of the elements of external tuning is replacing classic wheels with cast ones. Such discs look more aesthetically pleasing.
Forged wheels SLIK for VAZ 2106
In addition to beauty, replacing disks is utilitarian in nature:
Alloy wheels are lighter, which means the load on the suspension will be reduced;
Alloy wheels cool better. Some alloy wheel models have additional ventilation holes, which provide additional cooling to the brakes.
Selecting disks
How to choose wheels for a car? Knowing the factory parameters of the car's wheels, this is not at all difficult to do. By increasing the diameter of the disk, while reducing the rubber profile, we will maintain the overall diameter of the wheel; then we need to look at the width of the disk. If you have chosen a size that is significantly larger than the factory one - remember, it will probably also be wider, the question arises whether these wheels will fit into the original arches. If, for example, the offset is large, then you can hitch the wheel on the arch. Of course, you need to take into account drilling (the diameter of the centers of the mounting holes).
The diameter of the disc can be increased by reducing the rubber profile. Here we will get a significant advantage to handling, since the car will be less shaky in corners. Before you buy new disks in a store with the planned diameter, remember that the width of the disk and its offset are also very important technical characteristics of the disk.
VAZ 2106 on fire
If these parameters are not selected correctly, it may happen that the wheel sticks out beyond the arch and “scrapes” against it on uneven roads. Agree, this is not a very pleasant phenomenon. Plus, dirt from the wheels will be widely scattered throughout the car. You will have to wash it more often.
In addition to cast wheels, there are also forged or light alloy wheels. These wheels are called forged because they are produced using the die forging method. In terms of strength and ductility, forged wheels are superior to cast wheels. And their weight is 30% less. True, their price is much higher than cast and stamped steel wheels.
Stages of work
The process of raising the car's lighting line in bodies 50, 40, 30 and 55 is quite similar and consists of several stages:
- First you need to check the standard settings for the electric headlight range control and make sure it is working correctly (on newer cars this unit may work, but on cars older than 5 years it may have problems). If it fails, the first step is to replace the corrector and only after that proceed to adjusting the headlights of a car with a body size of 50 and 30.
- After this, before starting work, you need to find a place to park the car.
- All you need to adjust is the 8-key key and, for convenience, some special sockets with curved tips.
- When the corrector is working correctly, it is necessary to measure the distance at which it adjusts the light beam and outline its magnification level, which is twice the maximum (corresponding to one in the corrector setting).
- Having prepared the tool and checked the correctness of the corrector, open the hood of the Toyota 50 (or 30, 40) and find the plastic adjustment plug in the engine compartment. It is located directly behind the headlight housing.
- Then you need to mark the expected level of the light beam after adjustment with a ruler and, accordingly, begin the adjustment (before that, set the corrector to position 0).
- There is a special adjustment screw on the back plastic cover; if you rotate it, the light output will gradually increase to the desired level (rotation should be done slowly to avoid damaging the plastic parts of the screw). You also need to rotate to achieve a certain level of light output.
- Then tighten the screw and measure the headlight level.
Replacing antifreeze on a VAZ 2109 yourself. Do it
Often people are faced with such a problem as replacing antifreeze on a VAZ 2109. This need may arise as a result of repairing the cooling system, or simply occur according to plan. Approximately every 40,000 km. mileage, this fluid will need to be changed in any case. If the car is used little, then it is worth replacing every two years. Replacing antifreeze on a VAZ 2109 is quite simple. To do this, you need to stock up on a limited number of tools, as well as a wealth of knowledge, which will be provided in this article. After reading it, you will definitely learn how to carry out this procedure without any problems and in the shortest possible time. Tools and materials
- antifreeze It is advisable to take with a small reserve, although five liters is quite enough for the VAZ 2109;
- key to 8;
- hexagon 12;
- screwdriver.
So, all the tools are ready for use, which means you can start.
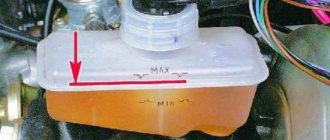
Instructions The cooling system of a car engine has a rather complex structure. There is not only a tank, but also a number of other equally important components. These are all kinds of tubes and hoses that allow coolant to move freely throughout the engine compartment. Moreover, it is worth noting that the system is in a sealed state. To carry out this kind of work, the tightness must be broken. This is done by simply opening the tank cap. Now you can start removing the crankcase protection. Any even unprofessional driver can handle this job. It is necessary to remove the protection so that antifreeze, which is a very toxic liquid, does not get on it.
After this, you should turn your attention to the drain plug, which is located on the radiator. It unscrews using a hexagon
Finding it is extremely easy. Every self-respecting car enthusiast knows where it is located. When the plug is removed, it is imperative to bring some kind of container to the hole, into which the already used antifreeze will be removed.
There is also a drain plug on the block head. It must be unscrewed. Here it is also worth placing some kind of container so that the antifreeze does not leak into the street. After all the liquid has been removed from the cooling system, you can screw all the plugs back in. Now you need to turn your attention to the carburetor. There is also a pipe here. It needs to be unscrewed. For this purpose, a regular screwdriver is used for standard fastening. Now you can start pouring antifreeze. This must be done extremely carefully so as not to miss the filler hole. In this case, you can use additional devices to make work easier. For example, some car enthusiasts have long preferred to carry out work through a funnel. Liquid is poured in until it begins to drip from the pipe that was unscrewed earlier. This measure will eliminate excess air from the cooling system, which can lead to stagnation of antifreeze, and this has a detrimental effect on the operation of the engine as a whole.
After the liquid has flowed through the pipe, it can be replaced. Then antifreeze is poured into the expansion tank to a certain level. It's best to stick to the maximum cutoff. Now you can warm up the engine. In this case, there is no need to close the hood, because you need to look to see if there are any leaks that could have formed during the work. If smudges are visible anywhere, they must be eliminated immediately. To do this, use a screwdriver to tighten all the clamps securing the pipes and hoses. Are there other mounts? They should be adjusted. So, now everyone knows how to replace antifreeze on a VAZ 2109. As you can see, this process is quite simple. The most important thing is to strictly follow the instructions, then all the work will be done as quickly and efficiently as possible.
Brake bleeding sequence
Why is the brake pedal on the VAZ 2110 tight?
Removing air from the hydraulic brake system of a VAZ 2108 car (the so-called bleeding) is a necessary final stage of their repair work on the hydraulic brake system. The presence of air in the hydraulic drive system is evidenced by the peculiar behavior of the brake pedal of the VAZ 2108. When pressed for the first time, the pedal behaves softly, resists pressing weakly, and sinks deeply. With several successive presses, it becomes stiffer and its stroke decreases. This behavior indicates the need to bleed the hydraulic system.
Get an assistant to do the work. Ask him to sit in the driver's seat and, at your command, consistently press the gas pedal. Before starting work, make sure that the amount of fluid in the hydraulic system reservoir is at the maximum level. If not, add fluid. Prepare a transparent one and a half liter bottle half filled with brake fluid and a flexible hose 70 cm long and with a diameter suitable for the car’s brake cylinder fittings.
The sequence of your actions.
- Place the hose onto the left rear wheel cylinder fitting. Place the hose in a bottle of brake fluid.
- Ask an assistant to pump up the system: press the brake successively until the pedal locks.
- Unscrew the fitting a little. Slowly release the brake fluid with bubbles until an assistant indicates that the pedal has failed.
- Ask him to pump the system again.
- Unscrew the fitting a little again, release the liquid with bubbles until the pedal goes down.
- Repeat these steps as long as there are bubbles in the fluid flowing from the hydraulic system.
The hydraulic system of the VAZ 2108 is dual-circuit. Each circuit includes two wheels located diagonally across the vehicle. This is specifically designed to ensure a safe stop, even if one circuit fails. Therefore, the hydraulic system should be pumped, moving from wheel to wheel diagonally.
Sequentially bleed the hydraulic system:
Brakes are one of the most critical systems in a car. If you were unable to accelerate, nothing fatal will happen. But if you failed to stop in time, the consequences could be dire. You, your passengers, drivers and passengers of other cars, and pedestrians may be harmed. Be very careful. Observe the frequency of routine maintenance on the VAZ 2108, monitor the brake fluid level, and periodically inspect the brake components. And your VAZ 2108 will not let you down.
Rear wheel drum brake
Removing and installing brake drums
Note. Replace brake drums on both sides of the vehicle at the same time.
| Rear wheel drum brake mechanism: 1 - upper tension spring of the shoes; 2 — squeezing block 3 — pressing block; 4 - guide spring, 5 - device for automatically adjusting the gap between the pads and the drum |
| Parts of the rear wheel drum brake mechanism 1 - brake pads; 2 — brake drum; 3 — device for automatically adjusting the gap between the brake pads and the drum; 4 — protective cap; 5 - spring; 6 — wheel cylinder; 7 — fitting for bleeding the system brake drive; 8 — brake mechanism shield; 9 — pad guide spring axis |
| Disconnecting the upper tension spring | Removing the brake pad spring guide |
Removal
- Raise the rear of the car, place it on stands and remove the wheels.
- Release the parking brake lever and loosen the tension on the parking brake cables as much as possible.
- Remove the brake drum by unscrewing the mounting bolts.
Installation
- Clean the brake drum and brake pads from dust.
- Reinstall the brake drum.
- Press the brake pedal several times to bring the automatic gap adjustment device between the shoes and the drum into working position.
- Adjust the parking brake system
- Install the wheels and lower the vehicle.
Replacing brake pads
Note. Replace brake pads simultaneously on both sides of the vehicle with new ones of the brand and type recommended by the factory.
Removal
- Raise the rear of the car. Place on stands and remove the wheels.
- Remove the brake drum,
- Disconnect the upper tension spring from the pads using a multi-purpose spring installation pliers.
- Remove the pad guide springs.
- Move the gear lever as far as possible towards the hub axis.
- Move the pads away from the brake shield and install pliers on the wheel cylinder pistons.
- Pull the bar of the automatic adjustment of the gap between the pads and the drum towards you and remove it from the front brake shoe
- Disconnect the parking brake cable from the release lever.
- Turn the ratchet of the automatic adjustment device between the shoes and the drum to the non-working position.
- Turn the front brake pad 90′.
- Remove the brake pads from the lower support pins and remove the pads.
- Inspect the brake drums, check the condition of the brake fluid supply pipes and thoroughly clean the brake parts.
Installation
- Attach the parking brake cable end to the release lever.
- Install the brake pads on the brake shield. turning the front brake pad 90′.
- Move as far towards the axis as possible. hub gear lever and connect the bar of the device for automatically adjusting the gap between the shoes and the drum with the front block
- Install the pad guide springs.
- Attach the upper tension spring to the pads
- Remove the pliers from the wheel cylinder.
- Install the brake drum.
- Press the brake pedal several times to bring the automatic adjustment of the gap between the shoes and the drum into working position.
- Adjust the parking brake system.
- Install the wheels and lower the vehicle.
Removal
- Remove the brake drum.
- Remove the brake pads.
- Disconnect the brake fluid supply pipe from the wheel cylinder, taking measures to prevent fluid leakage.
Installation
The wheel cylinder is installed in the reverse order of removal, observing the tightening torques of the threaded connections. After installation, bleed the hydraulic brake system.
v4x.narod.ru