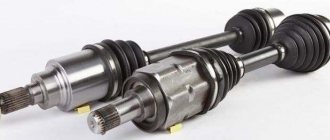
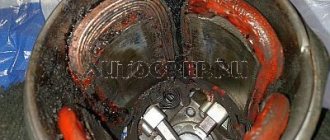
Internal CV joint device
The internal constant velocity joint is designed to transmit torque from the transmission to the outer CV joint. It differs from the external one in size (increasingly) and cost, although it consists of the same parts:
- Bowl-shaped housings with a driven shaft.
- The inner race is a spherical fist with a drive shaft.
- A separator in the form of a ring with holes to hold the balls.
- Metal balls.
The roller type of hinge is characterized by the presence of a support, which, using three rollers, moves along tracks cut into the inside of the body. The balls or rollers are located in the grooves of the housing and are held by a cage, which is connected to the drive shaft by a splined joint. When the angle of the drive and driven shafts changes, the balls move along the grooves, continuously transmitting force.
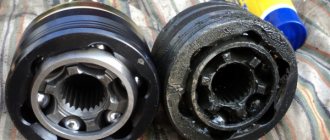
CV joint device VAZ 2110
The CV joint performs an important function in a car; it consists of seven parts:
- Retaining ring.
- Balloons.
- Separator.
- The boot, which is indicated in the technical manual as a bellows cover.
- Frame.
- Drive shaft.
- Inner ring.
The VAZ 2110 drive unit is responsible for transmitting torque to the wheel from the gearbox. The CV joint allows the front wheel pair to make turns by normalizing the changing angle between the axle shafts. The machine has two grenades: the external one transmits rotation to the hub, and the internal one is needed to transmit rotation from the gearbox to the shaft.
Diagram of the internal CV joint of the VAZ 2110
Symptoms of a problem
The operation of a CV joint is always associated with the impact of enormous loads. Despite the use of high-strength materials in the design of the unit, it can sometimes fail. The following reasons contribute to this:
- Use of low quality materials in the manufacture of assembly parts, use of counterfeit or defective spare parts.
- Lack of lubricant inside the mechanism or its poor quality.
- Water or abrasive debris getting inside the mechanism due to damage to the boot.
- Excessive load on the mechanism due to poor road conditions or aggressive driving style.
- Long-term operation, during which the life of the parts is exhausted.
A malfunction of the internal CV joint is manifested by the following symptoms:
- A characteristic crunching sound when hitting obstacles, starting from a stop or sharp acceleration.
- Jerking and vibration during acceleration.
- Play in the joints of the hinge when the wheel is hanging.
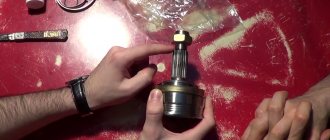
Components and types
In order to replace the internal CV joint of the VAZ 2110, it is important to familiarize yourself with its structure:
- The clip is internal.
- Separator. It is a ring that secures 6 balls.
- Special housing with joint, including drive shaft.
If you need to replace a VAZ 2110 CV joint, it is important to determine which one needs to be changed. There are two types: external and internal. Without them, the car will not be able to fully function.
The first grenade is called internal, since torque is transmitted from the transmission to the shaft.
The second grenade is classified as external and interacts with the wheel hub of the car.
Despite the identical principle of operation, they have differences in design, and there are also differences in cost.
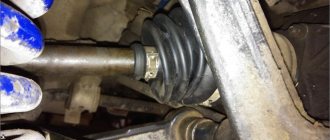
How to check the inner CV joint
The breakdown of any car part is associated with a change in its size, physical properties or the appearance of wear on rubbing parts. A CV joint is a hinged joint in which the elements of the mechanism are in close contact and are under constant load. Over time, wear develops in the places where the parts interact and the gap increases, which manifests itself in an increase in the characteristic “crunch” during sharp acceleration or overcoming obstacles.
Unlike the outer CV joint, which is easy to check when driving at maximum angle of rotation, the inner one is rarely in a state of maximum curvature. You can verify whether the unit is in good condition or broken when hanging the wheel. To do this, on the lift, with the engine running, engage first gear so that the wheels rotate slowly. If a crunching sound is heard from the faulty part, and play is felt when the shaft is impacted, then the CV joint is faulty.
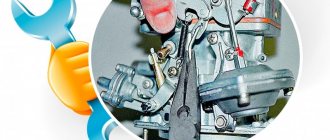
Replacing the CV joint - instructions
Stage 1:
- Secure the vehicle off the ground using a lift while engaging 4th gear and applying the handbrake.
- Install wheel chocks under the wheels.
- Remove the protective cap and use a pry bar to unscrew the hub nut.
- After removing the hub nut, unscrew the car wheel components.
- Raise the wheel using a jack.
- Find the CV joint and unscrew the 6 bolts, in this case the hinge will be fixed only to the flange.
- Unscrew the knuckle mounting bolts (2 pcs.);
- Turn the steering mechanism to its most extreme position; after these steps, the hinge should fall out by itself.
Stage 2. Dismantling:
- replace the boot as part of an updated design solution;
- remove the retaining ring;
- remove the hinge secured by the shaft splines;
- carry out equipment diagnostics;
- install all components, new CV joint.
What lubricant to use for CV joints
The main tasks of lubricants used in CV joints are protection against friction and prevention of corrosion. Also, the lubricant must be inert with respect to the polymer boots, which prevent moisture and debris from entering the mechanism. Most of the above requirements meet the following types of lubricants:
1. Lithium. These are viscous yellowish compounds, which at low temperatures acquire an even thicker consistency, making it difficult to spread on parts. They are able to significantly reduce friction and loads acting on the hinge elements, protect them from moisture and neutralize accidentally trapped dirt. Their only drawback is the ability to dissolve some types of anthers made from organic polymers. One of the representatives of this type of lubricant is the domestic Litol-24, which is replaced after a run of 100 thousand km.
2. Based on molybdenum disulfide. More universal lubricants that are characterized by increased resistance to corrosion. Their composition has a reduced content of organic acids, thereby reducing aggressiveness towards polymer products. Such lubricants are recommended for use in CV joints of cars of any manufacturer. Their main drawback is sensitivity to moisture ingress when the seal of the boot is broken, due to which the lubricant loses its properties. Domestic manufacturers produce lubricants with molybdenum disulfide under the general name SHRUS-4.
3. Barium grease. It is resistant to moisture getting inside the mechanism, successfully resists corrosion, and is also neutral to any polymers from which the anthers are made. Its main drawback is poor resistance to low temperatures. Lubrication is currently not very common due to its high cost. All domestic compounds manufactured using this technology are labeled under the name ShRB-4.
Installing new hinges
And the final stage remains - installing new hinges on the drive. You already know almost everything about how to change a grenade on a VAZ-2109. All that remains is to install a new element.
First, wash the shaft, get rid of dust and lubricant residues, then put on a new boot. Next, perform the following manipulations:
- Install a new retaining ring.
- Carefully, trying not to damage it, place the grenade on the shaft. To make it sit down, you need to apply several sharp blows through the wood spacer.
- Apply lubricant under the boot and on the inside of the hinge. By the way, the kit comes with a small amount, it is recommended to add a little more.
- Secure the boot with two clamps.
Once you have assembled the entire drive, you can begin installing it on the car. The work is done in reverse order. First put the inner CV joint in place, then the outer one.
Tighten the nut and secure it with a chisel. To prevent corrosion, you can apply a small amount of Litol to the nut and close it with a cap. Now you know how to change a grenade on a VAZ-2109 yourself. The procedure will not take much time, but you can save a lot of money. Workshops will charge about the same amount for repairs as a set of hinges costs (about 1,000 rubles).
Replacing the inner CV joint
A faulty internal CV joint can fall apart while driving, depriving the car of mobility. To avoid breakdowns and unexpected costs, the unit should be replaced at the first sign of failure. It is advisable to carry out all work at a specialized service station, since the operation requires certain knowledge and skills from the master. But if you have the necessary tools, appropriate experience and self-confidence, a car enthusiast can do everything on his own in a garage.
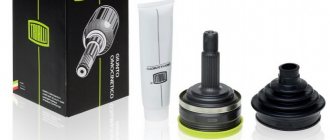
Before replacement, prepare the following spare parts:
- The hinge itself.
- Boot with new clamps.
- Grease.
- Hub nut.
The replacement procedure is carried out in the following order:
1. The car is jacked up on the side of the CV joint being replaced or placed on a lift, after which the oil is drained from the gearbox.
2. The hub nut is unscrewed and the wheel is removed.
3. Disconnecting the strut from the steering tip and the ball joint mounting.
4. Pulling the brake disc with caliper from the splines and moving the structure to the side.
5. Pulling off the inner CV joint from the splines using a metal guide and a hammer.
6. Removing the entire drive out.
7. Removing the boot clamps, the boot itself and the faulty CV joint after clamping the drive in a vice.
8. Adding lubricant to the new CV joint.
9. Installing the boot and installing the CV joint on the splines.
10. Installing clamps on the boot.
11. Installation of the assembled drive into the gearbox. When it hits the splines, a characteristic click is heard, after which the drive is driven into place.
12. Further assembly is carried out in reverse order.
The described method allows you to replace the inner CV joint of all VAZ models: 2101, 2102, 2103, 2104, 2105, 2106, 2107, 2108, 2109, 21099, 2110, 2111, 2112, 2113, 2114, Niva, Lada Priora, Kalina, Granta, Vesta and most foreign cars.
Front-wheel drive cars are loved by motorists all over the world for a reason. Most often, they use MacPherson-type suspension - a very simple and reliable design that will serve faithfully for many years and will not require significant maintenance costs. Depending on the condition of the roads and the aggressiveness of driving, however, some components will have to be periodically changed, for example, ball or bearings on the hubs. And silent blocks and levers fail much less often. This is what most car owners like - the car should be driven and not need to be repaired.
But there are also vulnerabilities in front-wheel drive cars, an example is the constant velocity joint, which is popularly nicknamed the “grenade” because of its visual similarity; you can also find the abbreviation – CV joint. For their production, only high-strength alloys are used, various coatings are applied to the working surfaces, and the original lubricant must ensure the operation of the unit for a very long time. But in practice, it turns out that nothing lasts forever; grenades also break, even on completely new cars that have just left the assembly line. Therefore, if there is a suspicion of a malfunction, an early check of the CV joint is necessary.
Useful tips
Please note that on many popular cars today (for example, the VAG family), the inner CV joint is bolted to the gearbox. So, if the bolts are loose or broken, this also causes vibrations.
Experienced specialists also recommend regular preventive maintenance of CV joints, both internal and external. The fact is that the main cause of premature hinge failures is the CV joint boot.
At the same time, when inspecting or after replacing the boots, it is important that the clamps on the boots are positioned correctly and are properly tightened. The main task of the clamp is not just to fix it, but also to prevent the boot from spinning on the CV joint housing.
Do not assume that boots and wear are the main problems. The reasons for CV joint failure can be different, but they often include driving at high speed on bad roads, as well as play in ball joints. Sometimes the CV joint is installed incorrectly when replacing it or after carrying out other work.
So, when driving on uneven roads, you need to move as carefully as possible, especially if you take into account the specifics of the internal hinge. You should also avoid sudden acceleration with the wheels turned out, etc. If mistakes are made when replacing the CV joint, the distortions also reduce the life of the unit.
It is important to understand that the outer constant velocity joint receives all the impacts from the wheel and is actively exposed to water, dirt and sand. In turn, although the inner CV joint is less loaded, if the ball pulls out or has strong play, the inner joints will also suffer.
Device
Installation of internal and external CV joints
The drive system consists of the following joints:
- two internal ones, which are installed directly in the gearbox, drive the axle shaft (one on each side);
- two external ones are located on the hubs and serve to transmit torque to the wheels.
It may seem that they have the same service life. But in reality, everything is not quite like that, the internal ones work longer, while the external ones fail much more often. The reason for this is that the loads that arise when the car moves on the wheel hub are too high, as well as the fact that the outer CV joint rotates at a much larger angle than the inner one. External differences can also be noted - the size of internal grenades is much larger than external ones.
How to remove a grenade from the drive?
The internal grenade is removed from the gearbox by light tapping. But one condition must be observed - if you remove two inner grenades from the box at once, do it one by one. First, take out one, replace it with a plug, then the second. Otherwise, the differential may simply fall apart. And for repairs you will need to completely disassemble the gearbox.
Now let's talk in more detail about how to change the external grenade on a VAZ-2109. This is not a very difficult matter, but it will require skill. The first thing you need to do is cut off the old boot - you won’t need it anymore, so you can remove it in this “barbaric” way. The clamps, of course, also need to be removed.
After this, clamp the shaft tightly in a vice so that the grenade is at the bottom. Position it so that it sits flat on the shaft - you can knock it down faster. Apply several sharp blows through the wooden spacer. The grenade should come off the shaft without any problems. You cannot strike with metal objects, as you can destroy the integrity of the element. When replacing grenades on a VAZ-2114, it is necessary to remove the drives completely, this will significantly simplify the repair.
Causes of failure
Development on the CV joint cage
The reasons may be as follows:
- A manufacturing defect that was not identified before installation. There are often cases when counterfeit products are installed on new cars. This also includes the very low quality of the metal used to make the assembly.
- Insufficient amount of graphite lubricant or its absence. Poor quality of the anthers, as a result of which it ruptures and dust, dirt, sand, water and other debris gets onto the rubbing surfaces.
- How you drive and where you drive is also important. Aggressive driving coupled with poor-quality road surfaces means rapid wear of the grenades and prompt replacement.
What are the types of CV joint defects?
Replacing a CV joint on a VAZ 2110 involves a preliminary study of the problem: what defect has occurred, so as not to harm the condition of the structure. In practice, there are situations when replacing the internal CV joint of a VAZ 2110 does not bring the expected results, or problems arise during the operation of the new part.
Among the main defects are:
- Unsatisfactory quality of the material from which the parts are made.
- Defective design or counterfeit.
- Low quality components or lack of lubricant. As a result, the grenade quickly receives mechanical damage and breaks.
- The outer CV joint boot of the VAZ 2110 needs to be replaced if debris and dirt gets inside the mechanism.
In the case where the VAZ 2110 internal or external CV joint has not been replaced before, it is recommended to watch a video on the topic and understand the proposed operating instructions.
Is it possible to diagnose grenade malfunctions yourself?
Since the grenade is a simple hinge, it can easily fail. The principle of its operation is very similar to the operation of a bearing - two surfaces, between which balls made of durable metal are located. The difference is that grooves are cut out on the surfaces, due to which you can change the position of the drive axle shaft relative to the driven one. If you take a used CV joint, you can rotate the two axle shafts with your hands without much effort and see how the unit works. You won’t be able to turn them on the new one, since there are no gaps and you need to make a lot of effort to turn them.
Several forces act on the hinge at once. Firstly, when driving, torque is transmitted from the gearbox to the wheel. Secondly, the relative position of the axle shafts is constantly changing, as you rotate the steering wheel while driving or drive over an uneven surface. And there is always friction in the mechanism, which destroys it. In some place, a development may appear, as a result of which the gap between the surfaces increases and extraneous crackling and noise become audible.
Anyone who has experience operating a front-wheel drive car is familiar with how to check the CV joint and the sounds it makes when it breaks. The first sign that grenades need to be replaced is the appearance of this kind of noise during sudden acceleration, moving over obstacles, and also when turning. But if a crunching sound is heard even when moving in a straight line, then this indicates that it is necessary to urgently change the CV joints and operating the car in this condition is not only undesirable, but even dangerous.
Unfortunately, many symptoms of grenade malfunctions are very similar, for example, to the symptoms of a broken ball or steering joint. Therefore, you should once again make sure that the diagnosis is correct. Thus, the presence of subtle jerks at the moment of starting off clearly indicates a breakdown of the hinges. The presence of significant shaft play between the CV joints can be determined by hanging the wheel and trying to move it in different planes. If there is play, then the CV joint has become unusable and should be replaced.
How to replace the outer and inner CV joints on a VAZ 2110-VAZ 2112?
Removal: 1) It doesn’t take that long to change the CV joint, but it’s just a very painstaking job that requires not only removing the CV joint itself, but also the wheels and disconnecting the ball joint, and many other small operations will have to be done, but you will need to start first with draining oil from the box, this is done so that when you get ready to remove the CV joint, the oil does not leak out of the box, but you carefully drain it yourself (For information on how to do this, read the article: “Changing the oil in the box on a VAZ”) , then remove the crankcase protection if it is present on your car (It will just get in the way) and then unscrew the hub nut a little (It is indicated by a red arrow, but only use a screwdriver to open the collars that will not allow it to be unscrewed and also do not forget to remove the plastic cover , which closes this nut from dirt getting into it), and then remove the wheel itself from the car, but just remember which side you are going to change the CV joint, and remove the wheel from the car from that side (For information on how to remove a wheel, read in article: “Correctly replacing a wheel on a car”).
2) When you’re done with the wheel, move to the top of the car and loosen the three nuts that secure the strut to the cup (Indicated by arrows), but don’t unscrew, just loosen two or three turns (If necessary, loosen more), then unscrew completely two bolts that secure the ball joint to the steering knuckle (see small photo) and once the work is done, unscrew the hub nut completely and remove the washer located behind it (Don’t lose it, by the way, it’s very convenient to pry it off with a magnetic screwdriver), and finally Turn the steering wheel all the way to the right or left.
How to diagnose hinge faults
Diagnostics of the external hinge is simple: just turn the steering wheel to its extreme position and drive off. At the maximum angle between the axle shafts, a characteristic crunch will appear - this is a sign of failure of the outer hinge.
It is best to check the internal CV joint on a lift
But the internal mechanisms also have a peculiarity - they can crunch during linear movement. To check, it is not necessary to have special skills, since you can check the internal CV joint by driving off-road - when you get into holes and ditches, the sound is amplified many times over. But the most accurate diagnosis can be made as follows:
- drive the car onto a lift;
- in a suspended state, engage first gear, allowing the wheels to rotate slowly;
- in this position, the faulty CV joint will produce a clearly audible crunch;
- again, when you try to move the shaft by hand, you will feel significant play.
If the symptoms are obvious, then you need to buy a CV joint and install it on the axle shaft. Anthers, clamps and lubricant are usually included in the kit.
Signs of a faulty inner CV joint are largely determined by the features of this part. Therefore, first you need to figure out what it is.
The full name of the part is constant velocity joint. This is the main element of the transmission of front-wheel drive cars. It is this that ensures full transmission of force from the gearbox to the drive wheels. The main task of the CV joint is to equalize the speed of rotation of the wheels when cornering. Since this is a hinge with balls in it, all signs of malfunction are typical for such mechanisms.
Equipment and tools for replacing CV joints
To replace the CV joint, you need to prepare the following tool:
- internal grenade, including a clamp and lubricant; timely replacement of the grenade ensures long-term operation;
- replacement without a pit requires a lift. The inspection hole also implies the presence of a jack and fixing the car in a safe and convenient position for performing work;
- standard tool for replacing a hinge.
Any set for motorists can be used as a tool without any other accessories.
Causes of malfunctions
In theory, the CV joint is made of durable metal, since a large load is expected on this part. According to manufacturers, the service life of the grenade is quite long, but in practice, this is not always the case. There are several reasons for the accelerated failure of mechanics:
- Counterfeit or defective parts;
- Poor lubrication;
- Abrasive debris getting into the CV joint after damage to the boot;
- Bad roads;
- Aggressive driving style.
All this can lead to breakdowns, often quite unexpected.
Replacement frequency
It is hardly possible to name the exact mileage after which it is necessary to replace 2114 grenades. In many ways, the service life of the elements depends on the following factors:
- Manufacturer. Domestic and European grenades last much longer than the Chinese ones that have flooded the market in recent years.
- Metal quality. The main thing is that the metal is hardened, otherwise wear out will occur very quickly.
- Driver's driving style. If you are accustomed to an aggressive style, then you cannot envy the grenades, as well as the entire car. The resource of elements decreases.
Signs of a problem
Malfunction of CV joints can be identified by very characteristic moments in the operation of the unit:
- Crunch when starting from a place;
- There is also a crunching sound when cornering. Here you can determine which of the CV joints has begun to fail. This is done on the side of the turn when a crunch is heard;
- Jerks during acceleration;
- There is play in the hinge itself.
If you look closely at the car, you can quickly notice the problem and fix it.
Diagnostics
To ensure that you avoid problems with a CV joint that pops out while driving, it is necessary to carry out diagnostic work in a timely manner. At least once a month, inspect the condition of the boot; if it is damaged, be sure to correct this problem. Failure detection is carried out as follows:
- A common method is to start with the wheels turned out
. To carry out such diagnostics, you will need to turn the wheels and start sharply from a place. The presence of a specific crunch will mean problems with the CV joints; - Raise the wheel on a jack, ideally you should use a lift, but garages usually don't have them. Then we inspect the CV joint; there should be no visible damage on it. Also try moving the wheel. The hinge should not have any play;
- This method is more complicated, but quite reliable. The front of the car is hanging out. First gear is engaged, if you have an automatic transmission, select mode
– D. Start the engine and listen to the wheels. They should not make even the slightest crunch.
Actually, this is all that can be done for diagnosis. It should be noted that this process at service stations is completely identical to the methods described.
Replacement and repair
If there are problems with the CV joint, it must be repaired. This work is quite difficult, so if you are not confident in your abilities, then it is better to entrust the work to specialists. When carrying out all work, you should do it as carefully as possible and in accordance with the instructions. Please note the condition of the item. If there is a large hole, then restoring the CV joint is impractical; it is better to replace it as an assembly. The work to put the part in order is carried out as follows:
- The CV joint is removed. Be careful. Sometimes you have to shoot him down. This should be done as carefully as possible;
- The dismantled hinge is clamped in a vice. The part is turned all the way and the balls are removed. To do this, knock them out using a screwdriver;
- The separator is installed vertically, after which it is rotated to the position where the windows intersect with the end;
- Next, remove the fist with the separator; to do this, rotate the fist until the moment when you can recess the fastening protrusion into one of the windows.
- Inspect all
hinge elements. There should be no damage to them, no signs of wear or deformation. If there are doubts about the quality of the part, it is better to replace the CV joint. You shouldn't skimp on your safety. - Assembly should begin by lubricating the parts. It is important to carry out this work as efficiently as possible; the future service life of the hinge depends on it;
- The balls are placed in the CV joint in pairs, as they were located before;
- Grease is again applied on top of them;
- The last step will be installing the boot. You should also put 50-100 grams of lubricant in it.
The quality of CV joint restoration depends on the correct installation of the balls and the presence of lubricant. It is better to use CV joint-4 as a lubricant, but in extreme cases LITOL-24 will also work. Actually, the main quality that affects the service life of the hinge is the abundance of lubricant. This way you can significantly reduce the level of wear on the part and, accordingly, prolong its operation.
Conclusion
. CV joints are one of the important elements in a car transmission. They allow optimal transmission of force to the wheels. To avoid problems, it is advisable to know all the signs of a faulty inner CV joint. This knowledge will allow you to identify the malfunction in a timely manner. If a breakdown is detected, it should be repaired as soon as possible. This will increase the level of safety when driving.
«>
Replacing a faulty CV joint
Since repairing a worn CV joint, apart from replacing the boot and lubricant, is practically impossible, we are almost always talking about replacing it. And as we have already said, replacing a grenade is a rather complex and time-consuming task, and therefore it is better to entrust it to a professional. This requires special pullers, keys, as well as skills and abilities. You will have to remove the hub, which in itself is not an easy task. As for replacing the inner CV joint, it is even more difficult. Therefore, amateur activity in such matters is absolutely not welcome. It will be better if you check the condition of the anthers more often. In general, even replacing the boot is not a five-minute procedure.
vote
Article rating