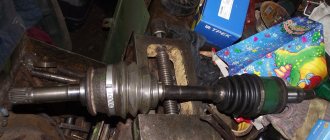
To transmit torque to the steered wheels, shafts with special hinges covered with rubber covers are used. When the casing is destroyed, the lubricant is washed out and dust gets onto the rubbing surfaces. Timely replacement of the CV joint boot reduces repair costs and extends the life of the joint.
Checking the condition of the anthers
To check the condition of the rubber boot, it is necessary to inspect the surface of the part by turning the drive shaft. The search for the damaged part is carried out on a lift or with the wheel removed; a flashlight or portable lamp is used to improve visibility.
No breaks or tears are allowed on the surface; for additional checking, it is recommended to feel the surface of the cover with your hand. If there is grease on the surface of the boot, then it is necessary to understand the cause of the oiling.
Garage repair
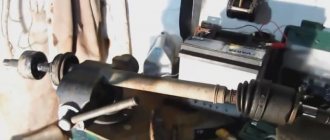
Now let's get straight to replacing the boot without removing the hinge itself, that is, the CV joint.
It is quite possible to replace the anthers without dismantling the drive. After all, the main task is to release the outer end from the hub. Then all that remains is to simply pull the new seal, like a contraceptive (condom), across the entire shaft.
Before tightening, be sure to turn the boot inside out correctly.
After this, you will need to cut the old element, install new clamps, and add high-quality lubricant. Since the new boots are highly elastic, you can tighten them without any problems. In this case, reliability will not be affected.
Step-by-step instruction
If you decide to do everything yourself, then you need to follow a certain sequence and follow the instructions.
The whole process roughly looks like this. Here it is worth making allowances for design differences between different cars.
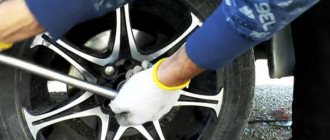
- First, place the car on a pit or lift. The vehicle must be securely secured and prepared for work;
- Unscrew the drive nut first. There is a possibility that it will have to be changed;
- If you have a MacPherson type suspension, you will need to unscrew the ball joint nut;
- After this, you can pull the hub to the side. This will allow you to pull out the outer part of the drive;
- Armed with a pry bar or large screwdriver, pry up the inner CV joint and pull out the drive;
- The drive is in front of you. Place it where it is convenient for you. Dismantle the old clamps, remove the retaining ring;
- Now carefully pull on the new boot;
- Connect the 2 parts of the drive until you hear a characteristic click;
- Return the locking ring to its place and fully tighten the fresh boot;
- All that remains is to tighten the clamp and return everything to its place.
The only problem is that this method is not suitable for everyone and not always. First you will need to purchase a special elastic boot. Many commercially available parts are extremely hard.
Therefore, in the case of their use, there is no need to talk about any possibilities of twisting and pulling, like a condom.
Special devices are also used to tighten the anthers. But they are not so easy to get, plus the price is high.
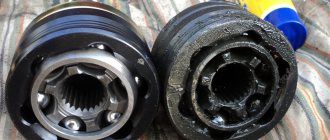
Procedure for replacing the outer CV joint boot
The procedure for replacing the outer CV joint boot, which has a unified design, is identical for most cars with front-wheel drive. The work is carried out on an overpass or inspection pit.
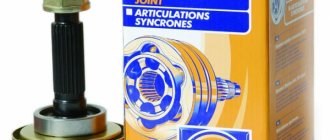
Before starting repairs, you must purchase a new cover (original or from an alternative manufacturer) with a set of metal mounting clamps. You also need to purchase a lubricant that is introduced into the inside of the boot.
Required Tools
Minimum set of tools required to perform repairs:
- mechanical or hydraulic jack;
- wheel stops and auxiliary stands for holding the body;
- a metal brush to clean the surface from dried dirt;
- hammer and chisel;
- rags for wiping;
- set of wrenches and sockets;
- torque wrench;
- flathead screwdriver and pliers;
- a spatula for applying lubricant to the cavity of the cover.
Progress
Sequence of actions when replacing the external boot:
- Place the car in the pit, apply the handbrake and place chocks under the rear wheels.
- Loosen the nuts or bolts securing the wheel rim to the hub, and then jack up the body.
- Install safety stops under the threshold (if they are missing, it is allowed to use a spare wheel with a board).
- Dismantle the wheel, and then remove the clamps of the central nut (a cotter pin or a bevel of the nut bent into the grooves is used to hold it in place).
- Unscrew the nut; to complete the procedure, you will need the help of a second person to press the brake pedal.
- Remove the brake pads and caliper, which is moved to the side (removing the hose is not required). The caliper is bolted to the steering knuckle, the size and location of the heads depends on the car model.
- Pull off the brake disc. If the part is stuck to the hub, then you need to use a hammer. The blows are applied through a wooden spacer that prevents damage to the disc surface.
- Remove the bolts connecting the hub and the shock absorber housing. Before disassembling, it is necessary to remove the layer of dirt with a brush and wipe the surface with a rag.
- Pull the hub towards you, moving the shaft splines out of the hole.
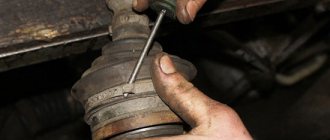
- Remove the old cover using a knife or screwdriver. At the same time, the old clamps are removed; reusing the fasteners is not recommended.
- Carefully remove old grease with traces of water or dirt from the hinge surface. Grease is removed with a wooden spatula and clean rags or rags.
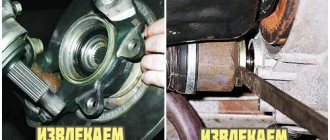
- Remove the outer hinge together with the housing. To complete the task, you will need the help of a partner, who does not allow you to disconnect the shaft joint near the gearbox housing. The hinge is removed from the axle using a chisel and hammer (the design uses an internal retaining ring that is compressed upon impact).
- Wipe the shaft and CV joint from any remaining lubricant; you can disassemble the unit and wash the parts with gasoline.
- Assemble the assembly and apply a layer of lubricant to the parts; the substance is tightly packed into all cavities and grooves.
- Place a new boot on the shaft; a portion of lubricant is first added to the cavity of the boot.
- Connect the hinge and the axle shaft, first aligning the seating teeth.
- Place the clamps in their original places, and then install the removed parts. When tightening threads, use the tightening recommended by the manufacturer.
Option without removal
The procedure for removing and installing the cover without separating the shaft and the hinge involves the use of a special device that stretches the rubber boot. The method is used in cases where it is impossible to separate parts without destroying the metal elements (due to corrosion or design features).
The technique reduces the time spent on repairs, but when the boot is stretched, damage to the elastic material is possible. In addition, difficulties arise in filling the internal volume with lubricant.
Possible problems
A common problem is the joint sticking to the shaft. If the hub is secured with a bolt, then to separate the parts it is necessary to screw the bolt into the hole until it stops. After the part rests against the end of the axle, you should make another 2-3 turns with a wrench, which will allow you to remove the hinge. If fastening is carried out with a nut, you will need to completely remove the axle shaft and then clamp the drive in a vice. Tightly fixing the part will allow you to knock down the hinge with a chisel, but if the contact cannot be separated, you will have to cut the inner ring of the CV joint with a grinder.
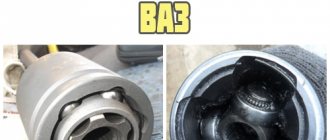
Disassembling and removing the outer CV joint boot
Drive the car into a viewing hole or overpass and put on the handbrake. Be sure to install chocks under the wheels. For maximum safety, you can set it to first gear.
The next step is to loosen the nuts that tighten the CV joint, and also remove the cap that ensures reliable fastening of the drive. We jack up the car and install supports under the sills. Remove the wheel and press out the tie rod ball assembly. Unscrew the two bolts securing the lower ball joint to the hub.
We assess the condition of the lower support. Remove the hub from the splines on the drive shaft. There are two ways to disassemble the drive, used exclusively in relation to the external CV joint:
The first method is to knock down the outer grenade without pulling out the CV joint located inside:
- Remove the clamps on the boot of the outer hinge, cut and wipe off the excess grease present on the hinge.
- Firmly clamp the shaft with a gas wrench.
- Knock out the CV joint with a hammer.
Disadvantages of this method:
- It is unacceptable to drain oil from the box;
- knocking down a grenade is a very inconvenient operation.
%rtb-4%
The second method involves completely removing the drive :
- Drive a pry bar between the transmission housings and the inner joint.
- We pull out the shaft, which is part of the gearbox. This is done using simple forward and backward movements.
- We completely remove the drive.
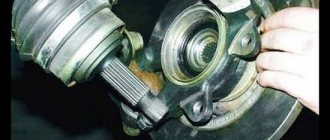
Work progress when replacing the inner CV joint boot
To replace the protective rubber boot of the inner CV joint you will need:
- Remove the wheel, brake caliper and disc.
- Disconnect the hub mounting points from the shock absorber, and then remove the hub from the drive axle. On some machines, it is necessary to remove the ball joint from the seat on the steering knuckle, and then remove the hub.
- Remove the clamps holding the boot on the gearbox housing. Since liquid oil leaks out of the transmission housing when removing the shank, it is necessary to place a rag.
- Remove the retaining ring holding the tripoids, and then carefully pull the drive out of the crankcase, marking the position of the parts with a marker.
- Mark the positions of the tripoids with a marker, and then dismantle the tee.
- Wash the parts in gasoline and wipe with a dry cloth.
- Install a new boot on the shaft, fill the assembly with lubricant and reassemble the drive. During installation, it is necessary to apply lubricant to the tee and tripoids.
- After installing the shaft in the box, mount the clamps, and then install the removed suspension parts in their original places.
When to change the CV joint boot
Replacing CV joint boots is necessary if damage to the boot itself has been detected, while the joint is still in good working order. In such a situation, it is enough to remove the old boot, renew the CV joint grease and install a new grenade boot.
If problems with the hinge have already begun to appear, in this case replacing the lubricant and anthers does not solve the problem. In other words, if the CV joint crunches or knocks, this indicates damage to the part. In such a situation, it is necessary to completely change the hinge and install a boot.
What to do if the boot ruptures on the road?
If the boot ruptures on the road, it is necessary to jack up the car body, and then remove the old lubricant through the hole and introduce a portion of fresh substance. The damaged area is covered with a plastic bag or wrapped with insulating tape or stationery tape. Such protection is designed for a range of up to 500 km on dry roads. If driving in wet weather, it is recommended to check the condition of the package every 30-40 km, since dirt getting into the lubricant leads to accelerated wear of the hinge.
What is the dust cover used for?
The outer boot of the CV joint reliably protects the elements of this mechanism from dust and dirt getting into it. It is made of durable, elastic rubber that is resistant to wear, temperature fluctuations and aggressive environments and can last quite a long time, but over time it will still crack or rupture.
If the outer boot breaks, dust and dirt get inside the grenade, acting as an abrasive. And since the moving parts of this mechanism work under high loads in different planes at different angles, this leads to rapid failure of the hinges. Therefore, it is necessary to monitor the integrity of the boot so that the CV joint does not break over several hundred thousand kilometers.
Additional clarifications
In general, initially, the boot of the CV joint of a Hyundai Santa Fe or any other car is turned inside out and in this form, inside out, and pulled onto the cone, by the way, before doing this, lubricate the cone with oil so that the boot slides over it easier.
After the boot is pulled onto the cone in the reverse state, the cone itself is put on the wide side of the CV joint and the boot is pulled off it; when the boot is already pulled off, it is taken by the wide edge and pulled back, thereby putting it on the boot of the CV joint. That's all, watch the video above again and everything will become clear to you.
And such a cone for putting the boot on the CV joint can be made from anything, even from iron, rolled up into a ball and welded, then clean everything thoroughly so that there are no seams or snags, it is better to make it from stainless steel and it glides well and looks beautiful and very reliable .
How to replace the inner joint cover
If there is no need to remove and disassemble the inner CV joint, then with the outer one removed, it is enough to pull the boot through the shaft and install a new one in the reverse order, so it is advisable to change both boots, no matter which one is torn.
When installing a new cover, it is necessary to control the distance at which the small clamp will be installed, otherwise the boot will be excessively compressed or stretched during operation due to the horizontal movement in the hinge.
What to do if the boot breaks on the road
The situation is not uncommon: you had to change a tire while on the road and you noticed that the boot was torn. It is highly not recommended to leave “everything as it is” and go to the nearest car service: CV joint is not a cheap part at all, especially if it is on an expensive foreign car. Options:
- Place the car on a jack (if it is not already on it), pull out the old contaminated grease through the hole and fill the boot with grease until it stops, and to prevent it from falling out when driving, wrap the problem area with a plastic bag and tighten it along the corrugation with a rope.
- Wrap the torn case with opaque tape or electrical tape. This “alternative” will last for 500 kilometers until the boot is changed.
On the road, check whether your “winding” is in place: getting dirt under it will sharply reduce the life of the CV joint.
Which one is better to choose anther?
When choosing a part, you should focus on the manufacturer and the material from which the case is made.
The quality of a product is usually clearly dependent on its price, unless, of course, it has been verified by several suppliers.
Some of the best and most widespread manufacturers in the spare parts markets are the brands GKN (Loebro, Spidan), Maruichi , SKF . They are also the most expensive, which indicates the best materials used. Such boots will never suddenly break, will last a long time, are very durable, and the repair kits contain everything you need, including high-quality specialized lubricant in the right quantity.
Cost of anthers
The price range is quite wide: from approximately 150 to 1000 rubles. and higher. It all depends on the make of the car and the manufacturer of the part. Non-original spare parts are cheaper. However, it also happens that the cost is unreasonably high: for example, because of the brand. Thus, the price of covers for a Toyota Land Cruiser reaches 8,000 rubles. The same can be said about other prestigious car brands. But not all car owners are eager to pay that kind of money for essentially an ordinary rubber band, albeit of high quality. Therefore, many simply select covers from other cars that are suitable in size and cost.
Causes of boot rupture:
- constant driving through water and mud;
- high torsional load (regular sharp turns);
- careless (unprofessional) repair of suspension parts.
Malfunctions in the ShchRUS boot
They can occur if dust or dirt gets into the frame in the smallest quantities.
If, when turning the car, a sound resembling a crunch is heard, then this will be a significant sign that just such a breakdown is taking place. This is the first “bell” indicating the need to inspect the joint and its components.
Unfortunately, some people do not pay enough attention to the rubber covers, which are called anthers. And they do it completely in vain. They must be periodically given attention and examined. But this does not require any special equipment at all. Just a visual inspection is enough to determine the presence of defects of various types.
Methods for checking the inner CV joint
“Grenade” is a simple hinge consisting of 2 axle shafts. It is affected by several forces:
- when driving, torque is transmitted by the gearbox (front-wheel drive);
- when turning - steering;
- when driving off-road - bumps and unevenness.
There is constant friction in the mechanism, which gradually destroys the parts. The slightest ingress of dust inside quickly disables the “grenade”. The mechanisms are worn out, the gap between the surfaces increases, and extraneous crackling and noises become noticeable. The first signal that the grenade has broken is a strong crunching sound when the car accelerates sharply or when driving over obstacles. It’s even worse if the noise is heard even during normal, straight-line movement - then the joint needs to be changed urgently.
Repair or replacement?
A simultaneous check of the bellows protection (casing) and the hinge is carried out on a jack:
- the machine is installed level;
- one of the wheels hangs out - be sure to install a wheel chock;
- The boot is carefully inspected.
If the rubber is intact and there are no traces of oil around, the CV joint is in order. If the rubber is torn, you need to change the cover so that dirt does not get inside the mechanisms. However, you should not immediately start replacing the casing - you need to continue checking:
- apply the parking brake (the selector must be in neutral);
- start the engine;
- Depress the clutch, engage 1st speed;
- Slowly release the clutch while pressing the brake with your other foot to load the joint.
If one of the internal grenades is damaged, a characteristic knock will be heard. In this case, it is necessary to replace the CV joint. On the other hand, if the mechanisms are not damaged, but only the casing is torn, repair is sufficient.