After using the Priora for a long time, a number of problems may appear with the braking system, especially the front wheels:
- caliper rattling
- guide bracket jamming
- Uneven wear of the front brake pads
Very often, the reason for all this can be wear on the caliper pins, which results in excessive play of the bracket in the caliper, which leads to the problems mentioned above. To avoid this, it is necessary to monitor the condition of the caliper boots and, if any tears or other damage is detected, replace them immediately.
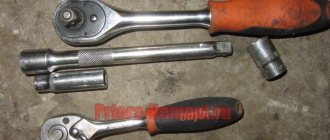
To carry out such an inspection of the Priora brake system, we will need the following accessories:
- Open-end wrenches for 13 and 17 mm
- Flat blade screwdriver
- Caliper Lubricant
- Brake cleaner
It is difficult to compress the rear pistons of the brake cylinder on a Priora
Replacing rear pads.
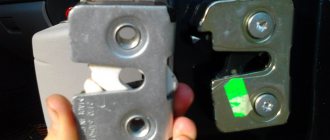
Why couldn’t I use two pry bars to compress the brake cylinder pistons? The handbrake under the car was completely released. I had to remove the pads and hit the pistons with a hammer directly (where the pads rest) to knock the piston inside the cylinder. When the brake drum was removed, the pistons were in this position (photo). And on the other side, when the drum was removed, the pistons were recessed much more inside the brake cylinder. At the service station they changed everything, including: guides, caliper, brake disc, pads. At the beginning of the trip everything is fine, about 5-7 km. Then the brake pedal sticks out and the car slows down.
How to adjust the brake force regulator if you install so-called houses.
Priora without ABS. Why, when I sharply press the brake pedal all the way, the wheels begin to lock only a couple of seconds after I pressed the pedal.
For example, due to the pressure regulator, the pressure in the line to the wheel was not released. Or, the lock washers on the pistons of the working cylinder become wedged.
The brake pads and the brake drums and piston cylinders could have worn out badly. Or maybe there was pressure due to a pinched tube or there was an internal delamination of the brake hose. Did you press the brake pedal with the drum removed?
With a hammer, of course you are in vain. You had to let go of the drain fitting so that a little liquid would come out and you could easily press it in with the mounting tools. If this has been done, then the reasons for the indentation resistance are:
- Piston sticking in the wheel cylinder due to contamination or corrosion of the cylinder body
Disassemble the cylinder, clean and rinse parts, replace damaged ones, and bleed the system.
- Swelling of the wheel cylinder sealing rings due to gasoline, mineral oils, etc. getting into the liquid.
Replace the rings, flush the brake hydraulic system with brake fluid, and bleed the system.
Source
How to separate the front brake pads on a VAZ 2101-VAZ 2107?
Welcome! Front brake pads - sometimes it happens that the pads freeze tightly and it is very difficult to move them somewhere, but they need to be replaced, but how to replace them if they do not move at all, today we will reveal a detailed answer to this question with attached pictures .
Note! In order to spread the front brake pads, you will need to stock up on: Large sliding pliers!
Where are the brake pads located? On a classic, they are located like on all other cars in the front and rear of the car, but since we are telling you about the front brake pads, they are located immediately behind the wheel of the car and in order for you to see them unobstructed, you will need to first remove wheel from the car and then you will see them in the brake caliper.
When do you need to spread the brake pads? They are separated only for removal, since without spreading the brake pads it is simply impossible to remove them, since the brake cylinders will press on them and thus removing the pads will be difficult, and when replacing you will still need to press the brake cylinders into the inside of the caliper , so this operation of spreading the pads will need to be performed.
How to separate the front brake pads on a VAZ 2101-VAZ 2107?
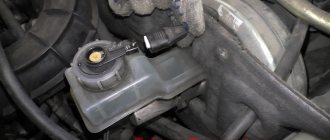
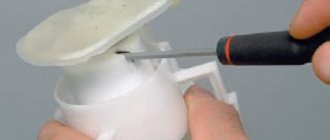
Note! Before you start, be sure to look into the reservoir containing the brake fluid (It is indicated by an arrow in the photo), if it is overfilled, that is, the fluid will be filled to the MAX mark, then pump it out a little because when the pistons are retracted, the fluid in the brake reservoir will be gradually increase and thus can go over the edges if you don’t pump it out a little! (We will repeat this operation only if the tank is filled to the MAX mark)
Replacing the Priora caliper cylinder
After using the Priora for a long time, a number of problems may appear with the braking system, especially the front wheels:
- caliper rattling
- guide bracket jamming
- Uneven wear of the front brake pads
Very often, the reason for all this can be wear on the caliper pins, which results in excessive play of the bracket in the caliper, which leads to the problems mentioned above. To avoid this, it is necessary to monitor the condition of the caliper boots and, if any tears or other damage is detected, replace them immediately.
To carry out such an inspection of the Priora brake system, we will need the following accessories:
- Open-end wrenches for 13 and 17 mm
- Flat blade screwdriver
- Caliper Lubricant
- Brake cleaner
Replacing the Lada Priora caliper (VAZ Priora)
Restoring a brake caliper is a rather complex and lengthy process, therefore, if the caliper has burst, is deformed, or the caliper mounting bolts are broken, then it is better to simply replace it with a new one. Replacing the caliper bracket on a VAZ is quite simple.
- Turn the wheels for ease of operation. Remove the brake caliper. To do this, unpin the two guide bolts
- And use key No. 13 to unscrew them.
- We remove the movable caliper bracket with the brake cylinder and hang it on the wishbone. This will prevent damage to the brake hose.
- We take out the brake pads.
- Using wrench No. 17, unscrew the 2 bolts securing the bracket to the steering knuckle.
- Now we take a new bracket. You need to move the guides from the old bracket into it.
Thanks for subscribing!
- Let's extract them. We wipe it. Be sure to lubricate with a special lubricant for guides, based on lithium soap. And insert it into a new bracket. If the guides are not lubricated, then at some point the caliper will jam. This means that the brake mechanism will stop working.
- It is recommended that you drill out threaded holes in new brackets before installing them as factory paint may prevent the bolts from turning properly. To do this, clamp the bracket in a vice. And screw in the fastening bolt with a No. 17 wrench.
- Now we install a new bracket and assemble the caliper structure.
- We tighten the bolts securing the bracket to the steering knuckle. And forcefully clamp them with key No. 17. We insert the brake pads. Install the brake cylinder. Tighten the guide bolts. We clamp them. And we pin it. Install the wheel.
Procedure:
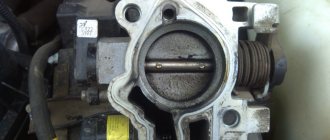
- Unscrew the two guide pins using a 7mm wrench.
- Remove the Priora brake disc with your own hands. If this cannot be done, then you should knock it down with a hammer.
Installation of brake discs is carried out in the reverse order. The mating surfaces of the hub and disk should be cleaned of rust and scale. If a small particle of dirt gets between them, then it will cause the disc to run out and vibrate when braking.
In order for the Priora brakes to work properly, when replacing brake discs, be sure to replace the brake pads with a new set.
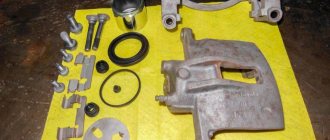
The front brake caliper on a Priora car is a part of the suspension that is responsible for smooth braking and is a kind of guide for the braking system. A device that presses the brake pads against the disc when the vehicle is braking. The brake caliper on the Priora is disassembled and is fully repairable.
You just need to buy spare parts and install them on the car. The price starts from 2400 rubles. Caliper repair kit for a Priora car: we counted 3 manufacturers of the part, which we will present below in the article. Those who have already changed it on a Priora understand that it is better to repair this component on time: its wear is reflected in the fact that it simply becomes scary to brake - the car rocks from side to side.
AvtoVAZ has relieved itself of the responsibility of interchangeability; standard parts fit VAZ models perfectly. The VAZ-2170 model is front-wheel drive, so the braking system is located on the front of the chassis.
When replacing the Priora caliper, do not forget to inspect the system for damage. Remember that it is better to change them at the same time - the entire chassis is built on this principle. Everything should be worn out approximately equally on both sides, otherwise the car will drive. And its movement should be uniform - even when you brake.
Replacing caliper guide pins and anthers on a Priora
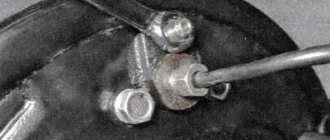
First of all, we lift the front part of the car, after which we unscrew the bolts securing the wheel, then remove it. Next, using a 13 and 17 mm wrench, unscrew the bolts securing the caliper to the bracket, as shown in the photo below. Of course, you must first bend the locking washers using a flat-head screwdriver.
We do the same with the second bolt from the bottom. Then use a screwdriver to press the piston of the brake cylinder until the caliper opens without any problems.
The result of which is shown below.
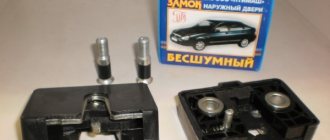
Now you can start removing the fingers and the anthers themselves, as shown in the picture.
Replacing front brake pads
Replacement of front brake pads without wear indicators is indicated To replace the brake pads with indicators, additionally disconnect the tip of the brake pad wire from the connector.
To complete the work you will need:
— a reliable stand for the car;
- a small metal brush.
1. We prepare the car for work.
2. Remove the front wheels.
3. Clean the master cylinder reservoir from dirt. Remove the tank cover. If the fluid level in the master brake cylinder reservoir is at the MAX mark, use a rubber bulb to remove some of the fluid from the reservoir.
4. Clean the brake mechanism from dirt.
5. We recess the piston into the cylinder using a clamp.
6. Using a slotted screwdriver, bend the corner of the locking plate of the lower guide pin bolt.
7. Remove the brake hose of the strut bracket.
8. While holding the guide pin from rotating with a 17 mm open-end wrench, use a 13 mm wrench to unscrew its bolt.
9. Raise the movable bracket up, turning it on the upper guide pin.
10. Remove the brake pads.
11. Using a small metal brush, clean the places where the pads are installed from dirt and rust.
12. Make sure that there is no leakage of brake fluid from under the brake cylinder cuff.
1. Install new brake pads in place.
2. Lower the movable bracket down until the hole in the body aligns with the hole in the guide pin.
3. Wrap and tighten the guide pin bolt.
4. Secure the bolt from loosening with the angle of the locking plate.
5. Install the brake hose into the suspension strut bracket.
6. Similarly, change the brake pads of the brake mechanism of the second front wheel.
How much does a caliper cost on a Priora: standard part - article number and price
When buying a front braking element for a Priora, you have the option of buying it assembled or “naked” - without a special bracket.
- Right (assembled). Catalog number 11180-3501012-20. Price – 3600 rubles.
- Right (naked). Catalog number 11180-3501014-00. Price – 2,400 rubles.
- Left (assembled). Catalog number 11180-3501013-50. Price – 3,850 rub.
- Left (naked). Catalog number 11180-3501015-00. Price – 2,400 rubles.
The Priora caliper repair kit is available in two versions:
Basic caliper malfunctions
Just like with a human illness, you need to be extremely careful with the running of your car, paying due attention to the signs of illness that appear. As for the braking system, malfunctions in it can manifest themselves in the following form:
- the brakes work sluggishly, you literally have to press the pedal to stop;
- when braking, the car wobbles or pulls to the right or left;
- weak shocks and vibration are heard in the brake pedal;
- the pedal became heavier;
- The braking element is jammed - it does not move away from the brake disc.
Calipers instead of drums back
In order to put the unit back you will have to change the drums. You can find its advantages, because the disc brake system has many advantages:
- braking distance is reduced;
- faster pedal response;
- replacement is easier, and less time is spent;
- Driving safety increases - you will have time to brake everywhere;
- the brakes of all wheels are applied evenly, simultaneously;
- The pads don't freeze to the discs.
For Priora, you can consider the following TDT options:
- Tornado R With ABS – 15,120 rubles, without – 14,370 rubles.
- Brembo MAX brake disc, art. 09.8903.75 - 2,100 rubles each.
Installation work can cost about 10,000 rubles, so it is better to take on the work yourself. The steps for installing rear disc brakes are as follows:
- Drain the brake fluid at least halfway and lower the handbrake.
- Jack up the car from behind, securing it with a wheel chock.
- Remove the rear wheels: use a gas wrench to loosen the bolts, moving in a circle. Pull the wheel towards you.
- Using a hexagon “7”, unscrew the guide pins.
- Remove the brake drum.
- Using a screwdriver, pry up the hook of the upper tension spring and disengage it. Take out the spring. Remove the spacer bar.
- Also remove the spring from below, then disengage the pressure spring from the block. Remove the front block.
- Remove the handbrake drive lever from the hole in the parking brake cable end.
- Remove the cotter pin from your finger and remove the washer.
- Pull out the handbrake cables and loosen the hub mounts.
- Once the drum is removed from the wheel, the new system can be installed.
- Prepare a plan washer from the ZDT kit. Screw on the two small mounting brackets. The entire system will be attached to it.
- Install the discs, but do not tighten the fasteners.
- Install the caliper and then adjust its position so that the disc runs parallel to the hub.
- Pass the handbrake cables through the brake assembly lever. The handbrake will have to be adjusted again.
- Put on the wheels.
- Bleed the brakes. Add brake fluid and remove the air lock.
Tip: When installing the HTA, use Permatex to secure the threads.
Removing the caliper
Replacement occurs in the following order.
First, you need to raise the car (using a jack) and remove the wheel whose brake system has a malfunction. On the Lada Priora, the front caliper is attached to the bracket using M 17 tie bolts. One is located at the top of the entire structure, and the other at the bottom. They are tightened quite tightly, therefore, for more accurate and easy screwing of them with a spanner wrench, it is recommended to pre-treat them with a penetrating lubricant. Having loosened the bolts with a wrench, it is then better to screw them together with a special “ratchet”, which will significantly speed up the whole process.
If you intend to completely replace the caliper (that is, the entire assembly), you should first unscrew the brake hose. If not, then you can leave it in place.
If removing the caliper was necessary to replace other components, then, when removing the guide for the pads and the pads themselves along with the bracket from the disk, for greater convenience it is necessary to fasten the caliper to the suspension spring. Next, you need to free the part by disconnecting it from the brake hose, which must be plugged so that all the fluid does not leak out of it. By unscrewing the brake hose leading to the caliper, you can unscrew the bolts. The part can then be removed from the disk.
Installation of the product after diagnosing it and replacing faulty parts is carried out strictly in the reverse order. Once the front caliper is in place, you need to check the brake fluid level in the reservoir and remove air from the system.
Replacing a caliper on a Priora car
To work on replacing the unit you will need: a gas wrench, a jack, a “14” head. Follow these steps:
- apply the handbrake;
- jack up the front;
- remove the wheels (because the parts need to be changed together for uniform braking);
- Use a gas wrench to gradually unscrew the bolts, going clockwise;
- remove the wheel;
- Turn the steering wheel first in the direction from which you are going to remove the caliper;
- use a head to unscrew the screws securing the guide;
- remove the braking elements together with the bracket;
- turn the steering wheel in the other direction, dismantle it from the other side.
Installation is performed in reverse order
Directory
Tags
Removing, replacing, installing anti-roll bar
Removing, replacing, installing timing belt
Removing, replacing, installing rear suspension shock absorber spring
Inspection, checking the steering
Removal, replacement, installation of the crankshaft and its bearings
Symptoms: the front of the car drives when braking, the front wheel does not brake, the front wheel brakes intermittently, the front wheel does not brake well.
Possible cause: the front brake wheel cylinder is faulty.
Tools: set of sockets, set of wrenches, special TORX E14 wrench.
Removal and installation of the working cylinder of the front brake mechanism of the VAZ 2170 Priora
- Repair manuals
- Repair manual for VAZ 2170 (Priora) 2004+.
- Removing and installing the front brake working cylinder
You will need: keys “13”, “15”, “17”, TORX E14 key.
1. Remove the corresponding wheel.
2. Remove the brake hose seal from the bracket on the suspension strut.
Helpful advice
To prevent excessive leakage of brake fluid from the brake hose when disconnecting it from the working cylinder, pinch the brake hose using pliers that are fixed in a compressed position, placing a piece of rubber under the jaws.
| 3. Using a 15mm wrench, loosen the hose tip on the working cylinder. | 4. Bend the tabs of the lock washers... |
| 5. ...with a 13mm wrench, unscrew the two caliper mounting bolts, holding the guide pins by the hexagons with a second 17mm wrench... | 6. ...and remove the caliper assembly with the working cylinder. |
| Note Removal of the working cylinder and caliper assembly is shown on the removed brake mechanism for clarity. The working cylinder can also be removed with the brake mechanism installed on the vehicle. |
7. Holding the hose tip by the hexagon with a 15 wrench, unscrew the working cylinder from the tip. Be careful: brake fluid will leak from the hose.
| Note Please note that the tip has a copper O-ring. Replace the ring when reassembling. |
| 8. Using a TORX E14 wrench, remove the two bolts securing the cylinder to the caliper. | 9. Remove the wheel cylinder from the caliper. |
| 10. Check the condition of the protective covers of the guide pins. If signs of rubber aging appear, replace the protective covers. | 11. Lubricate the guide pins with UNIOL-1 grease. |
12. Install the slave cylinder in the reverse order of removal.
13. Bleed the hydraulic drive and check the efficiency of the brake system (see “Bleeding the hydraulic drive of the brake system” ).
↓ Comments ↓
1. Car structure
1.0 Car structure 1.1 General information about the car 1.2 Passport data 1.3 Car keys 1.4. Controls 1.5. Heating and ventilation of the cabin 1.6 Ensuring a comfortable air temperature in the cabin 1.7. Doors 1.8. Passive safety equipment on the car 1.9. Seats
2. Recommendations for use
2.0 Recommendations for use 2.1. Safety rules and recommendations 2.2 Running in the car 2.3 Operating the car during the warranty period 2.4. Preparing the car for departure
3. Problems along the way
3.0 Malfunctions along the way 3.1. The engine does not start 3.2 Malfunctions of the fuel injection system 3.3 Idle speed has disappeared 3.4. Interruptions in the operation of the 3.5 engine. The car moves jerkily 3.6 The car accelerates poorly 3.7 The engine stalled while driving 3.8. Oil pressure dropped to 3.9. Engine overheating 3.10. The battery does not recharge 3.13. Knocks in the engine 3.16. Wheel puncture
4. Maintenance
4.0 Maintenance 4.1. General provisions 4.2. Inspection work 4.3. Lubrication and filling works 4.4. Diagnostic work 4.5. Repair and adjustment work
5. Engine
5.0 Engine 5.1 Design features 5.2 Possible engine malfunctions, their causes and solutions 5.3 Useful tips 5.4 Checking compression in the cylinders 5.5 Removing and installing the decorative engine casing 5.6 Removing and installing the engine splash guard 5.7 Installing the piston of the first cylinder to the TDC position of the compression stroke 5.8 Replacing the drive belt gas distribution mechanism and tension roller 5.9 Replacing the power unit supports 5.11. Replacing engine seals 5.13. Engine cylinder head 5.15. Engine repair 5.16. Lubrication system 5.17. Cooling system 5.18. Power supply system 5.19. Design Features
6. Transmission
6.0 Transmission 6.1. Clutch 6.2. Gearbox 6.3. Front wheel drives
7. Chassis
7.0 Chassis 7.1. Front suspension 7.2. Rear suspension
8. Steering
8.0 Steering 8.1 Design features 8.2 Possible steering malfunctions, their causes and solutions 8.3. Steering column 8.4. Steering linkage 8.5. Steering gear
9. Brake system
9.0 Brake system 9.1 Design features 9.2 Possible malfunctions of the brake system, their causes and solutions 9.3 Bleeding the brake system hydraulic drive 9.4 Removing and installing the vacuum brake booster 9.5 Replacing the brake pedal axle bushings 9.6. Main brake cylinder 9.7. Front wheel brakes 9.8. Braking mechanisms of the rear wheels 9.9. Pressure regulator 9.10. Brake hoses and tubes 9.11. Parking brake
10. Electrical equipment
10.0 Electrical equipment 10.1 Design features 10.2. Battery 10.3. Mounting block (relays and fuses) 10.4. Generator 10.5. Starter 10.6. Ignition switch (lock) 10.7. Electronic engine control system (ECM) 10.8. Ignition system 10.9. Lighting, light and sound signaling 10.10. Windshield cleaner 10.11. Washer reservoir 10.12. Electric fan of the engine cooling system 10.13. Electric motor of the heating and ventilation system fan 10.15. Cigarette lighter 10.16. Instrument cluster 10.18. Electronic anti-theft remote control system 10.19. Immobilizer 10.21. Replacing sensors and switches
11. Body
11.0 Body 11.1 Design features 11.2 Possible body malfunctions, their causes and solutions 11.3 Removing and installing windshield frame lining 11.4 Removing and installing soundproofing upholstery in the engine compartment 11.5. Removing and installing bumpers 11.6 Removing and installing the fender liner and protective wing cover 11.7 Removing and installing the front fender 11.8 Removing and installing decorative sill trims 11.9. Hood 11.10. Trunk lid 11.11. Doors 11.12. Seats 11.13. Seat belts 11.14. Rear view mirrors 11.15. Interior fittings 11.16. Instrument panel 11.17. Heater 11.20. Body care
12. Applications
12.0 Appendix 12.1 Appendix 1. Tightening torques of threaded connections, Nm 12.2 Appendix 2. Fuels, lubricants and operating fluids 12.3 Appendix 3. Nominal filling volumes 12.4 Appendix 4. Basic data for adjustments and monitoring 12.5 Appendix 5. Spark plugs used on vehicles 12.6 Appendix 6. Lamps used on a car 12.7 Appendix 7. What you need to have in a car 12.8 Appendix 8. Tools used when repairing a car
13. Electrical diagrams
13.0 Electrical Diagrams 13.1 Diagram 1. Instrument Panel Harness Connections 13.2 Diagram 2. Vehicle Front Wire Harness Connections 13.3 Diagram 3. Engine Electronic Control System (ECM) Harness Connections 13.4 Diagram 4. Vehicle Rear Wire Harness Connections 13.5 Diagram 5. Light Harness Connections license plate light 13.6 Diagram 6. Left front door wiring harness connections 13.7 Diagram 7. Right front door wiring harness connections 13.8 Diagram 8. Rear door wiring harness connections