Almost all modern cars are built on injection engines, the VAZ 2114 is no exception. This type of engine made it possible to increase power and reduce fuel consumption of the vehicle as a whole. As you know, for the injector to work, you need many different parts and sensors involved in the operation of the engine. The fuel in such an engine is supplied under pressure, and then atomized and mixed with air, then enters the combustion chamber in the form of an air-fuel mixture. To spray fuel, fuel injectors are used, which operate under a certain pressure.
This article talks about VAZ 2114 fuel injectors, namely their purpose, design, signs of malfunction, methods of cleaning and self-replacement, as well as cost and much more.
Do-it-yourself cleaning of VAZ 2114 injectors: instructions.
After checking the injectors, start cleaning. To do this, you need to assemble the following circuit. Two contacts are output from the battery in series through the lamp, then through a switch (microphone or non-latching button). These two contacts connect directly to the injector.
Here's the diagram:
The question arises of how to connect to the nozzle; you need to know the polarity of the nozzle itself. On some injectors, the polarity is indicated on the body with a plus sign, on some, the polarity is not indicated. In such cases, it is necessary to install the fuel rail as shown in the photo.
Then the left terminal from you will be a plus, and the right one will be a minus.
Procedure for cleaning and replacing rubber seals
It is best to remove the injectors from the fuel rail and blow and clean each of them, and at the same time inspect them for wear on the rings. This method has a huge advantage over using an additive, since you can visually check how well the restoration work was carried out.
What tool can you use to make repairs?
To dismantle and replace seals you will need:
- diamond key 8;
- carburetor cleaner;
- a can of compressed air;
- rubber hose (you can use a vacuum cleaner);
- syringe with outlet diameter 10 mm;
- wire approximately 2 meters long;
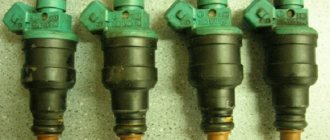
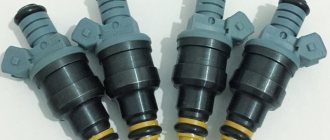
- standard set of rings for injectors (includes eight products);
- rubber seals for fuel lines.
The repair and cleaning process is as follows:
- Remove the rubber seal from the nozzle.
- Place the rubber hose on the tail part of the nozzle.
- Connect the wire to the battery (you can choose any terminal).
- On the reverse side of the hose, connect an aerosol tube through a syringe to flush the carburetor.
- Holding the entire structure with your hands, spray the cleaner several times until the jets emitted become uniform.
- After cleaning, it is recommended to use the same principle to blow out the injectors with air from a can.
- Next, it is recommended to immediately put new rings on the product, after moistening them with gasoline.
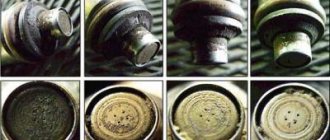
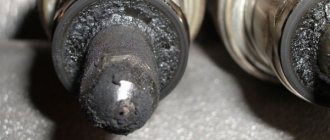
In the photo the nozzle is in critical condition
The injector repair procedure can be considered accessible to beginners and inexperienced drivers. The only difficulty is dismantling the fuel rail, since you will have to first relieve the pressure in the system. Cleaning and replacing the rings on the injectors with your own hands gives the driver the opportunity to carry out the highest quality repairs of these elements and be confident that repeating the procedure will not be necessary for a long time.
Source
Removing injectors and fuel rail
https://youtube.com/watch?v=fR9jaFxvnbI
1. Disconnect » — » from the battery.2. Remove the hose from the pressure regulator
3. Relieve pressure in the rail. Unscrew the cap on the left side of the ramp and press the valve (nipple) with a screwdriver or finger
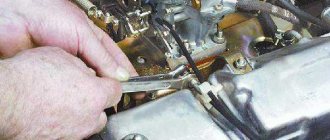
4. Take two keys “for 17”. We will support one, and unscrew the fuel supply hoses with the other. Label the hoses so that they are not mixed up during assembly.
5. Disconnect the ramp power supply.6. Using a Phillips screwdriver, unscrew the screw of the fuel pipe fastening bar and remove it
7. Use a 5mm hexagon to unscrew the two ramp mounting screws. One is located between the first and second nozzles. The other is between the third and fourth injectors. Don't lose the washers.
8. You can also unscrew the coolant supply hose to the throttle. This will make it easier to get the ramp.
9. Pull the ramp up at the injector installation angle, remove all four injectors and remove the ramp towards the left side of the car. To the side there is a barrel of washer fluid.
10. Squeezing the spring clip, disconnect the chip from the injector
11. Use a screwdriver to move the injector retainer along the ramp...12...and remove it. 13. While rocking, remove the injectors from the ramp.14. Using a thin screwdriver, remove the O-rings...
...and the injector body.
If you decide to change the nozzle, then the following table will help you choose an analogue of the one you had.
Procedure for removing injectors
- First, remove the fuel rail with all the injectors. (You can read about this in more detail on the website in the article “How to remove the fuel rail of injectors?”).
- Next, you need to disconnect the injector wire block, while holding the spring clip.
- Using a screwdriver, move the injector retainer along the ramp.
- We remove the injectors from the ramp, while turning it a little.
- Then remove the O-rings from the injector by prying them off with a flat-blade screwdriver.
- They are removed from the nozzle body itself, as well as from the atomizer. You can throw them away, as they will most likely be replaced with new ones.
Attention! Be careful when removing or installing injectors!
- Do not damage the nozzles or the connector plugs.
- The injectors cannot be disassembled.
- Do not allow engine oil to get inside the injector.
- Do not immerse the nozzles in any detergents, as the nozzles contain electrical components.
And finally, I bring to your attention the following signs of injector malfunction, which in the future will lead to the replacement of the injectors themselves:
- the engine starts to stall at idle;
- fuel consumption in the car increases noticeably;
- the engine cannot start working at full power;
- engine response has become insufficient;
- engine operation has become unstable;
- the amount of CH in the exhaust gases has increased;
- the engine starts to work poorly;
- at idle, the crankshaft rotation speed is reduced;
- failures in the operation of the engine itself while the car is moving.
In order to install new injectors on the ramp, you need to do everything the same, but only in reverse order. You can learn more about this on the website in the article How to install injectors?/.
Source vaz-2114-lada.ru
Hi all. Today we’ll talk about the fuel rail, for your attention step-by-step instructions on how to remove the VAZ 2115 fuel rail with your own hands. A few words about what a fuel rail is. This device is a bar with a pressure regulator into which fuel injectors are installed.
The fuel rail is mounted on the intake manifold with two bolts. Through this ramp, fuel is supplied to the injectors, and then through them into the intake pipe. The pressure in the fuel rail is adjusted using a fitting located on the fuel rail housing.
The need to remove the fuel rail usually arises when it is necessary to clean the injectors or replace the pressure regulator. In order to avoid any problems with removal during work, we will tell you how to remove the VAZ 2115 fuel rail quickly and easily.
Cleaning injectors VAZ 2114
To clean the injectors, they need to be removed from the car, this is done as follows:
- From a vehicle with the engine not running, disconnect the battery terminal.
- Relieve pressure in the fuel rail. On the back there is a valve with a cap; by unscrewing it and pressing the valve with a thin screwdriver, you can release the pressure.
- For convenience, remove the air filter pipe.
- Disconnect both fuel pipes.
- Disconnect the connectors from the injectors.
- Unscrew the fuel rail.
- The injectors are removed along with the ramp; in order to disconnect them, you need to move the fixing washer and pull the nozzle.
After removal, you can begin cleaning yourself:
- Remove the O-rings from the injectors and soak for a short time in acetone or gasoline.
- After soaking, carefully clean the nozzles with a needle and remove any other external deposits.
- To clean the inside you will need carburetor cleaning fluid, a syringe, a tube that fits tightly in diameter to the injector inlet holes, and a button with wiring.
- Connect the injector through the button to the battery terminals, as you did when checking.
- Fill the syringe with liquid and connect it to the nozzle using a tube.
- Apply pressure with the syringe and press the button.
- Liquid should spray out of the nozzle.
- Repeat this procedure several times, constantly maintaining pressure with the syringe.
- After washing, it is better to immediately replace the fuel filters.
This method removes only surface deposits; for deep cleaning of VAZ 2114 injectors, send them for ultrasonic cleaning.
Functionality check
Checking functionality yourself:
- Check the performance of the injectors on a cold engine, but with the engine running. We touch each nozzle with an ordinary hand. The working nozzle should pulsate and “tremble”. But this method is not entirely informative.
- There is another way to effectively diagnose. Add idle speed and let the car run. Then we loosen the cap nuts holding the injectors one by one, and the engine speed should decrease. How to bleed the brakes on a VAZ 2106. When this does not happen and the conclusion is drawn that this injector
does not work. easy installation of injectors on a VAZ VAZ 2114 Volga injectors how to clean injectors. If a malfunction is detected, you can clean the injectors yourself.
How to clean the injectors
for a VAZ 2114 to reduce the cost of replacing spare parts, repairing and maintaining the car? Cleaning injectors on a VAZ 2114 is quite simple. First you need to remove them. How to remove injectors VAZ-2114, 2115, read in detail on the website in the article on how to install. For safety reasons, turn off the engine and let it cool. Disconnect the negative cable on the battery, remove the protective casing and air filter. We unscrew the high-pressure pipeline from the nozzle and pump, remove it from the bracket supporting it.
Using a spanner, unscrew the nozzle along with the old washer and remove it. In this case, it is necessary to disconnect the electrical connector and slide the lock along the ramp to remove it. And so all 4 pieces. Now let’s get to the main question: “How to clean the injectors
for VAZ 2114? The injectors need to be examined first. If there are signs of leakage, it is better to immediately replace the spare parts with new ones. For the rest, it is necessary to remove the o-rings from the atomizer and body. VAZ 2110. how to tighten the steering rack on a VAZ 2110, how to check the steering rack of a VAZ 2108 - 2109!. Other than that, the most interesting, and most importantly effective, method is how to open the door on a VAZ 2114. The prepared injectors need to be soaked in acetone or gasoline for a while, this will allow them to be better cleaned.
The product is supplied under pressure through a tube, simulating injection.
It will take several such movements for each nozzle so that they break through and begin to spray the liquid evenly.
Then you need to let the injectors dry, put new o-rings on them and reassemble everything in the reverse order, while changing the fuel filter and the fuel pump mesh.
All this will extend the life of your car. “In the future, it is necessary to refuel only with high-quality 95 grade fuel at proven gas stations, as recommended in the VAZ 2114 passport.”
Injectors for VAZ 2114
On VAZ cars, carburetor engines were replaced by inverter engines. Unlike the previous generation of engines, now the fuel supply to the combustion chamber is carried out not by one unit - the carburetor, but by an entire system. Car enthusiasts call it an injector.
In such an engine, it will no longer be possible to manually regulate fuel consumption or engine idle speed. An injector is a complex system that is controlled by special electronics. It receives and analyzes data from a large number of sensors, and then regulates the fuel supply to the engine.
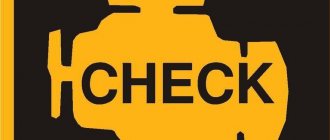
VAZ 2114 is equipped with an injection engine. You can see a “check engine” sign on the dashboard. If this signal comes on, you need to diagnose the vehicle's operation in order to maintain the serviceability of all components. However, if, in addition to the burning icon, other symptoms of deteriorated vehicle performance are recorded, then you need to check the VAZ 2114 injectors.
What injectors are installed on VAZ cars 21142115
Do-it-yourself cleaning of diesel injectors
Almost all types of injectors that the VAZ 2114/2115 are equipped with at the factory can be considered interchangeable. Depending on the year of manufacture, injectors manufactured by Bosch and Siemens of different markings were installed on the car.
Bosch injectors:
Model 0280 158 022. The product is compatible only with a 16-valve 1.6-liter engine. The nozzle is black and is designed to operate at an optimal pressure of 3.8 atmospheres. Model 0280 158 017. An injector with this marking is installed on 8-valve engines with a volume of 1.6 liters. The body is also black. Modification 0280 158 996 is considered obsolete, since injectors with this marking were installed on cars until 2006. The model was intended for 8-valve power units.
Standard equipment of VAZ 2114/2115 injection engines
Siemens injectors:
VAZ20734 is made in an orange case. The model can be installed on a VAZ 2114/2115 of any year of manufacture, but the modification is paired with an 8-valve engine. Model VAZ20735 is intended for a 16-valve engine. In terms of its characteristics, it is practically no different from the previous model. The nozzle has a blue marking.
Depending on the marking, it can be used on different types of engines
Malfunctions that injectors may have
Injectors are a fairly precise mechanism; they can open and close several times per second, while providing:
- lightning-fast opening;
- good fuel flow;
- fine atomization of gasoline for better mixing with air;
- tight and fast closing.
The life of injectors is highly dependent on the quality of gasoline and the frequency of replacement of fuel filters. Any, even the smallest debris can prevent them from fulfilling their purpose. Over time, the injectors become clogged with deposits and the following problems may occur:
- The injectors do not open immediately when a signal is given, or if they do not open at all, they become jammed.
- Less gasoline may pass through a clogged hole than the ECU calculated, this will lead to a lean mixture.
- Debris can also interfere with the atomization of fuel, causing it to flow in a stream and not mix enough with the air.
- A loose closure means that more gasoline than necessary will enter the combustion chamber.
Such malfunctions in the fuel system can, in turn, lead to the following problems with the operation of the engine as a whole:
- misfires at idle;
- significant loss of power;
- unstable engine operation;
- increased fuel consumption;
- Difficulty starting the engine.
The reason for such changes in operation may be dirty or failed injectors. They very rarely become completely unusable and you can always try cleaning them before replacing VAZ 2114 injectors.
How to determine a breakdown
If the injector on a car does not function, an experienced car enthusiast will notice the problem almost immediately. Firstly, the engine will begin to operate unstably and fuel consumption will increase significantly. Secondly, you may notice misfire at idle and deterioration in vehicle dynamics. It will take much longer to accelerate with full throttle.
Please note that poor injection system performance does not guarantee that the injector is not working. It is quite possible that it is simply time to clean the injectors; there is no point in changing working devices. But how can you determine if everything is fine with the elements of the fuel system? There are two main ways:
- Touch the nozzles. If you feel a pulsation, it means they are fully functional and you can get by with regular cleaning.
- Start the engine and increase idle speed. After this, you need to slightly twist the caps on the injector, which will cause the engine speed to drop. If the number of revolutions does not change, then there is a problem that needs to be solved.
So, you have identified the problem and are convinced that the car really needs to replace the injectors. Next, we’ll talk about how to remove them and install new ones.
Cleaning
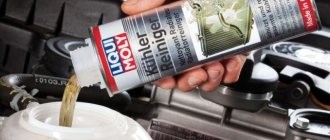
Useful cleaning agent
The procedure is not complicated, but try to do everything carefully and step by step.
Visually examine the condition of the item. If there are traces or signs of leakage, it is better to immediately replace the elements, since cleaning will definitely not have a long-term effect. If the injector can be saved by stripping, remove the O-rings located on the body and nozzle. Place them in acetone for a while. As an analogue, you can use regular gasoline. But do not forget that these are highly flammable mixtures, so there should not be any sources of even the slightest spark nearby. Be sure to keep a fire extinguisher near you. May you be the most careful and consistent person, accidents have never been canceled. Keeping the injectors in acetone or gasoline will allow you to better clean all accumulated contaminants. While the units are soaking, pay attention to the valve cover and ramp. It is advisable to clean them, as they act as sources of contamination. The ramp is blown out with a conventional vacuum cleaner. Now we take out the nozzles and start working directly with them. Coke often forms on the nozzles, resembling resin in appearance and consistency. Be sure to get rid of these deposits. The surface around the nozzle is cleaned with gentle movements of a pin or needle. At this point, external cleaning can be considered complete. Now the most difficult process is the internal “cleaning” of the elements. For this procedure, arm yourself with a tube, a syringe and a can of a substance intended for cleaning carburetors
It doesn’t matter that you have an injection car produced by our glorious automobile company AvtoVAZ. It is not difficult to purchase such a product, and it is cheap. The product must be applied under pressure using a tube, simulating an injection. For each injector, perform several such manipulations.
This will allow them to cleanse themselves and break through from within. As a result, the devices will be able to spray fuel liquid more evenly than before cleaning. Be sure to give them some time to dry. You should also replace the old O-rings with new ones. It is strongly not recommended to use the old ones, even if you clean them. Replace the seals every time you clean the injectors. To delay the next cleaning as much as possible, and also to ensure long-term and efficient operation of the cleaned injectors, it is recommended to replace the mesh on the fuel pump, as well as the fuel filter.
The most important recommendation, which should be followed in any case, before and after self-cleaning, is a little different. To save your car, get rid of many problems and malfunctions, and also allow the elements of the fuel system to do their job effectively, refuel with high-quality fuel.
https://youtube.com/watch?v=HPo2BkH8sBc
VAZ 2114 drivers motivate the use of cheap gas stations by the need to save money. But if this is not stopped, clogged injectors will be only a small part of the problems your car will face due to poor fuel. And all the money saved on gasoline, plus the same amount, will be spent on repairs. Here is the price of cheap gas stations.
Restoring the functionality of injectors
An inoperative nozzle can be replaced with a new one or properly cleaned. Repairing injectors is ineffective due to their design features.
The reason for incorrect operation of the injectors may be the presence of impurities in the fuel. The accumulation of deposits in the injector occurs especially intensively when the engine is stopped.
During operation, the injector heats up, and the fuel is not able to cool it. Heavy fractions accumulate in the atomizer, thereby reducing the cross-sectional diameter of its channel. Thus, deposits of 5 microns in size can reduce throughput by 25%. The quality of the fuel-air mixture will decrease with all the ensuing consequences.
Domestic gasoline is not always of high quality. Therefore, the injectors lose their functionality after less than 100 thousand kilometers.
Extending injector life
There are practically no differences in the procedures for cleaning and flushing injectors in 8- and 16-valve engines.
There are several ways to extend the life of sprayers:
- With low mileage, it is possible to regularly add various additives to the fuel.
- You can clean the injectors at a service station using ultrasound every 40 thousand km.
- Solvent cleaning is carried out at specialized service stations and is a very expensive procedure.
Self-cleaning injectors
To clean the injectors yourself you will need:
- A set of keys and tools for dismantling injectors.
- Three cans of special cleaner for carburetors or injectors.
Injectors can be cleaned using special products
The metal clamp ensures a tight connection of the hoses
To clean the injectors you will need a 12V light bulb.
To temporarily close the electrical circuit, a two-contact button without fixation is used
For high-quality electrical contact, special terminals are used
Self-cleaning of injectors is carried out in the following order:
- The injectors are being dismantled.
- The injectors are carefully inspected. If there are signs of leakage, the injectors are replaced.
- The O-rings are removed from the body and nozzle.
Rubber rings must be replaced
How to replace VAZ-2114 injectors
At one time, the injector became a real breakthrough in the automotive industry. It replaced outdated carburetors that did not provide the proper level of fuel supply. Injectors are widely used not only in the fuel system, they are also used in windshield and headlight washers. Absolutely all modern models of the Volzhsky Automobile Plant use an injection system, and the VAZ-2114 is no exception.
At the same time, the injectors can become clogged and fail. In this case, the quality of operation of the entire vehicle deteriorates significantly. The approximate service life of the injector is 100,000 - 120,000 kilometers, but taking into account the rather low quality of gasoline in Russia, the device may not run even 80,000. In this case, the VAZ-2114 fuel injectors will need to be replaced. Today we’ll talk about how to do this on 1.5 8-valve and 1.6 16-valve engines.
Nozzle selection
The VAZ-2114 model can be equipped with different injectors from different manufacturers. Depending on this, durability and their cost also differ.
It is recommended to buy not domestic parts, but from other companies, for example, GM, BOSCH, SIEMENS.
Also, the choice of injectors also depends on the working volume and the number of valves. For 16-valve engines, the performance of such parts will be different than for the 8-valve version. If the parts are selected incorrectly, then most likely, gas mileage will be higher or the car will lose power.
If we talk about choice, then preference should be given to the BOSCH brand at number 0280158502. This is the serial number that is suitable for an 8-valve engine with a volume of 1.5 liters.
BOSH injectors catalog number 0280158502
Injectors fail not only because of their quality; their performance is largely affected by fuel that contains a lot of dirt or large fractions.
Cleaning injectors at service stations will not be cheap. Therefore, if you do not check and clean it yourself, then you should think about whether it might be easier to buy new parts and replace them.
Every car owner of an injection car sooner or later encounters problems in the fuel system and begins to think about cleaning the fuel injectors.
The task of the injector is to maintain the pressure created by the fuel pump and only at the right moment to open for a fraction of a second to allow the required amount of fuel to pass through.
There are a lot of different additives in the fuel, which during engine operation stick to the seat of the injector locking needle. As a result, the injector begins to spray fuel incorrectly or leak fuel when it should be closed. In such cases, it is necessary to clean the injectors or replace them.
The recommended period for cleaning injectors is 25,000 km - 30,000 km. Failure to properly maintain fuel injectors can lead to their complete failure, and then only replacement will be necessary.
How to remove and clean
- Turn off the fuel supply from the fuel rail.
- Disconnect the electrical connector for the fuel injectors.
- We unscrew the two bolts securing the ramp and pull it out.
- We remove the injectors from the ramp and install them in a special stand
- After cleaning, put everything back together in reverse order.
Further in our photo report there are more detailed instructions.
1We begin to remove the fuel injectors for further cleaning. The injectors are located behind the intake manifold.
2First of all, we need to relieve the fuel pressure from the fuel rail. To do this, unscrew the plastic cap indicated by the arrow in the photo.
3And use something sharp to press on the spool valve, first placing a container so as not to pour gasoline all over it.
4Having released the pressure, screw the plastic cap back on and unscrew the 5mm hexagon bolt securing the fuel rail.
5On the other side of the manifold, between the third and fourth injectors, there is another fuel rail mounting bolt.
6It is convenient to unscrew it using a small ratchet with extensions and a 5mm cue ball.
7Under the air filter bellows we need to disconnect the fuel supply hose to the ramp using two 17mm wrenches. And disconnect the electrical connector of the fuel injector wires.
8Now that everything is turned off, lift up the fuel rail with the injectors, pulling them out of their seat in the manifold.
9And we pull out the ramp with injectors and wires towards the right wing of the car.
10Located on the table, disconnect the electrical connectors from the fuel injectors by pressing the metal brackets on the sides of the connectors.
11Pull out the metal clamps of the injectors. They can be removed by hand, but if difficulties arise, you can use a screwdriver.
12We remove the injectors from the ramp and clean them of dirt, preparing them for installation in the stand.
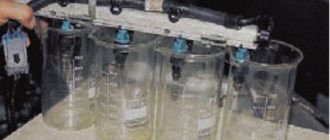
13In a special stand for cleaning injectors, we create WYNN'S liquid pressure and make sure that the injectors do not allow liquid to pass through themselves. Then we turn on the intermittent opening of the nozzles and look at their spray. The liquid is sprayed filling the container in the stand.
14After cleaning the nozzles by passing liquid through them, we lower the nozzles into a container with WYNN'S liquid and turn on the ultrasonic cleaning mode, setting the timer for 30 minutes.
15After cleaning, replace the injector O-rings, if necessary, and install them back into the fuel rail. We recommend lubricating the O-rings with silicone grease before installation to avoid damaging them during assembly.
16It is also necessary to lubricate the rubber bands of the injectors on the installation side of the manifold.
17Here are all the tools needed to remove and install fuel injectors.
18The work is finished. Before starting the engine for the first time, you must turn the ignition on and off several times to fill the fuel rail with gasoline.
Hello dear readers! In today’s article I want to talk about how to clean the injectors on a VAZ 2114 yourself. First, a little theory.
Dismantling and replacement of DPKV
Advertisement for the sale of VAZ LADA 2115 Samara 2008
Determining the location of the DPKV is quite simple. The device is located in the engine compartment, next to the oil pump.
The device is secured to the generator pulley cover with one bolt, so dismantling it, as a rule, does not cause any problems. To do this, you only need a key for ten.
- We turn off the engine, open the hood of the fourteenth. Determine where the device is located. Disconnect the block from the contacts;
- Using a 10mm wrench, unscrew the sensor fixing bolt;
- We take out the device.
At the same time, it wouldn’t hurt to check the condition of the generator toothed pulley, since tooth wear can also cause the DPKV to malfunction.
If the check shows that the device is faulty, it is recommended to replace the unit with a new one, since manual repair of the DPKV will not bring the expected results. The sensor is a fairly “delicate” device, which, if it has already started to act up, will continue to do so in the future. Considering that it is not expensive, it is more rational to replace it.
When installing a new part, repeat the same steps in reverse order.
It is important to use special washers to adjust the position of the DPKV, which come with the device. You will need a ruler or caliper
Install the sensor like this. so that the gap between its core and the generator pulley is 1 millimeter. An error in the smaller direction is not allowed, in the larger direction - no more than 0.41 mm.
Many drivers are not even aware of the existence of such a device as a crankshaft position sensor (CPS).
But, nevertheless, its importance cannot be overestimated. The VAZ 2114 crankshaft sensor is a miniature device that transmits data about the position of the crankshaft to the power unit computer
The correct functioning of the injectors responsible for supplying fuel and the ignition system of the VAZ 2114 depends on this small part. It rarely fails. But if you are planning a long trip, it would be good to have a spare one.
The shaft position sensors on the VAZ 2114 differ not only in their design, but also in their operating principle.
Inductive-type DPKVs have a metal rod with a magnet, which is needed to magnetize it. A copper winding is wound over the rod. The principle of its operation is to give a signal when a steel object is nearby.
DPKV of the second type works according to a different scheme. Inside such a device there is a hall sensor. If you bring a metal object to it, its state will change.
Pulse-type devices are also often used. They generate pulses of a specific frequency. If there is a metal object nearby, the generation frequency will also change.
What you need to know about injectors
The quality of the fuel used has a huge impact on the safety and efficiency of the injectors on your VAZ 2114. Alas, the quality of domestic fuel leaves much to be desired. If you regularly fill your car with low-quality gasoline, the injectors will not last more than 120 thousand kilometers.
Unscrew the fuel pipe
The optimal replacement frequency is about 80-90 thousand kilometers.
As for the cost, original injectors for the VAZ 2114 cost from 500 rubles apiece. Foreign analogues are more expensive, sometimes several times. But the price is largely justified by reliability and longer service life. Therefore, if possible, buy high-quality imported devices.
Extending the life of injector nozzles
How to extend the life of injectors? At the initial stage, with low mileage, various special additives that are added to the gas tank with fuel can help out. They can be bought in specialized stores, car markets and junkyards. How to bleed the brakes on VAZ 2101-2107 cars? Instructions on how to do this are included. The cost of additives is low. How to change a belt on an Audi. This method is good if you do it regularly, and it can extend the life of the injectors, but it will not clean them completely. Some car enthusiasts, on the contrary, are against the use of chemicals, believing that additives clog the injector even more.
It is recommended to clean the injectors every 40 thousand km. Many auto repair shops provide cleaning services. How to replace nozzles on a gas stove. How to install wheel alignment on a VAZ wheel alignment, how to do it yourself. How to change injectors on a gas one. The cost starts from 1,500 rubles, and the procedure is done on special equipment using ultrasound. But in order to save time and money, you can carry out this procedure yourself. Cleaning the VAZ 2114 injectors with your own hands is not difficult even for a newbie. But first you need to find the performance of the injector nozzles. If you suspect this malfunction, then how to check the injectors of the VAZ 2114? Many car owners do this on a special shield, but it makes no sense to take it for rare diagnostics. In this article we will talk about checking without additional devices.
https://youtube.com/watch?v=2lX9fJXOk_s
https://youtube.com/watch?v=2lX9fJXOk_s
https://youtube.com/watch?v=eK4uooCG2Lw
This video shows how to remove VAZ injectors
2113,2114,
2115
, and how to wash
the injectors
. In order to remove
the injectors
.
Signs of injector contamination.
When the injectors of an injection engine of any vehicle become dirty, characteristic signs of malfunction arise, which necessitates the need to clean the engine injectors. Among these signs we note:
- Difficulty starting the engine, especially as the outside temperature drops and the engine is cold;
- Unstable engine operation at idle;
- Perceptible dips when sharply or smoothly pressing the accelerator pedal;
- Loss of acceleration dynamics and power by the motor;
- Increased gasoline consumption;
- Increased toxicity of CO-CH exhaust gases;
- A several-fold increase in detonation when accelerating, which is a consequence of an increase in temperature directly in the combustion chamber and a depletion of the air-fuel mixture;
- Misfires (ignition);
- Periodic, characteristic popping sounds directly in the exhaust system;
- Premature failure of sensors, including the catalytic converter, spark plugs and oxygen sensor (lambda probe).
It should be noted that even if all the problems listed above are present during the operation of your machine, this does not mean that the cause is clogged injectors. These problems can arise for a large number of reasons - from the failure of any sensor (air meter, throttle sensor, lambda probe, IAC) or a drop in pressure in the fuel system (RDT, fuel filter, fuel pump), to spark plugs.
What breaks in injectors
Failures in injectors do occur, but extremely rarely; in most cases, injector malfunctions are not accompanied by their breakdown, most often they simply become clogged, which leads to a decrease in efficiency and, consequently, a decrease in the amount of fuel.
Clogged injectors
When an injector becomes clogged, the fuel to pass through it becomes more difficult and it loses in quantity, and this leads to a lean fuel mixture, which is fraught with a decrease in engine power, overheating of the spark plugs and melting of the insulators, as well as burnout of the valves.
Injector leakage
When the injectors are leaking, it may be because the shut-off valve is not keeping the fuel pressure closed. Leaking injectors are dangerous because they can wash away the oil film from the cylinder walls, thereby reducing engine compression, and fuel can also get into the internal combustion engine oil and reduce its functions to zero.
If there is any problem with the injectors, they must be repaired as soon as possible.
How to restore the performance of a VAZ-2114 engine: expert advice
Automotive repair experts recommend that motorists use several tips to restore the functioning of a VAZ-2114 engine that is tripping.
First tip: check and replace the electronic control unit.
Second tip: check and replace the oxygen sensor.
Third tip: check the functionality of the crankshaft position sensor. This can be done using the electronic control unit. This device will generate an error if the crankshaft position sensor is faulty. This means you will have to replace it with a new one.
Fourth tip: check and replace the ignition coil.
Fifth tip: check and replace the air filter.
Sixth tip: check the correct placement of the timing belt.
As you can see, almost every piece of advice contains two stages - checking and replacing some part related to the proper functioning of the VAZ-2114 engine. Therefore, the easiest way would be to immediately allocate a few hours of your time in order to come to grips with the search for the problem of its tripling. Although the best option, but more expensive, is to entrust the inspection to qualified service center specialists, who will find a solution to the existing problem much faster.
autovazremont Blog Checking the crankshaft position sensor with a VAZ-2107i multimeter
Changing the oil in a VAZ-2114 engine with your own hands
As we know, the crankshaft position sensor (DPKV or synchronization sensor) in injection engines is the most important for its operation as such. If the sensor breaks down, it will be impossible to simply start the engine, or there will be problems with its operation a failure occurs resulting in the inability to continue movement.
To check its performance at home or on the road, you can use a conventional multimeter. The injectors of the classic range of VAZ cars use an inductive type sensor, consisting of a permanent magnet and a coil with two terminals. When the teeth of the crankshaft rotate, the magnetic field of the sensor changes; it, in turn, produces electromagnetic pulses, which are perceived by the car’s electronic control unit. Therefore, using a multimeter, we can determine the serviceability of the coil and check whether it produces any pulses. Unfortunately, we will not be able to check the quality of these impulses, since this requires more complex equipment. So, let's get started. First, we need to remove the sensor itself from its mounting location on the front engine cover. To do this, remove the terminal from it and use a Phillips screwdriver to unscrew one fastening screw. Set the multimeter to resistance measurement mode at a limit of 2000 Ohms and connect the probes to its terminals. The device should show us a normal value ranging from 550 to 750 Ohms. As we see in the photo, it shows 630 Ohms - which means the coil is working.
Now let's check whether it can generate electromagnetic pulses - i.e. just current. To do this, we switch the multimeter to voltmeter mode with a limit of 2000mV, as it is more sensitive. We also pick up the probes, take a metal object, such as a screwdriver, and move it with several movements near the tip of the magnetized core of the sensor. In this case, the voltmeter should show some values other than zero - this means that pulses are being generated.
However, in this way we can only check its performance in an emergency and this does not give us a guarantee of its full serviceability.
Subscribe to the blog! Good luck on the roads!
Previously Automotive multimeter. How to use? Next How to replace and tension the VAZ-2107i alternator belt
Cleaning VAZ injectors
To clean the nozzles, you need to disconnect the minus on the car battery, then remove the protective cover and air filter. The pipeline must be unscrewed from the pump and nozzle and the brackets removed. Next, using a spanner, you need to twist the injectors and the washer. Don't forget to remove the electrical connectors and slide the ramp clamp and the frame itself. This sequence of actions must be done for all 4 sprayers.
Before cleaning the injectors, you first need to carefully examine them. If signs of leakage are noticeable, they will need to be replaced. Next you need to remove the seals from the body and injector nozzle. Finished parts should be temporarily soaked in acetone or solvent. At this time, you can start cleaning the ramp and valve cover.
As practice shows, the ramp can be cleaned perfectly with a vacuum cleaner. Now let's move on to cleaning. You can see coke around the nozzles, it needs to be removed. Next, using a needle or pin, you need to clean the surface near the nozzle. The outside of the nozzle is now completely clean.
https://youtube.com/watch?v=IIz7rI1RHSc
To clean it from the inside, you need electrical tape, a carburetor cleaner, a tube and a syringe. The product must be supplied under pressure through the tube. This action must be repeated several times for each nozzle. Then all that remains is to dry everything well, install new seals and put the structure back together.
Engine Troubleshooting
If there are hints that your car needs repairs, try checking and, if necessary, replacing the injectors. An injector is a spray system that moves fuel into the combustion chamber.
If the fuel system and nozzles show signs of malfunction, it’s time to clean them of contaminants.
How to remove the injector fuel rail from a part such as a VAZ-2115 and 2114 injector? For this purpose, you need to perform the following steps:
- In order to remove the fuel rail and replace the VAZ-2114, 2115 injectors, you need to turn off the fuel pump. This is done to reduce pressure in the fuel system. The next step is to turn on the ignition and leave the engine running until it stalls.
- Turn off the power.
- We remove the battery terminal to minus.
- Disconnect the vacuum hose and the air hose of the receiver.
- We unscrew the fittings and move their tubes to the side.
- We remove the wires.
- Remove the clamping bar securing the fuel pipes.
- Remove the bolts that secure the fuel rail.
- All that remains is to remove the injectors and get the fuel rail.
How to clean injectors? In order to clean VAZ injectors, we inspect them. If there are traces of fluid leakage, then the injectors are replaced. Next, you need to remove the seals from the body and injector nozzle. You need to place the parts in a solvent and clean the ramps. This is easy to do with a vacuum cleaner. Let's begin the cleaning process. The coke around the nozzles must be removed. Next, using a knitting needle, a thin tip of an awl or another sharp object, you need to clean the surface around the nozzle. To carry out internal cleaning, we use adhesive tape, a carburetor cleaning bottle, a thin tube and a syringe. The product must be supplied under pressure through the tube. This procedure should be done for each part. Dry. Put the parts in place.
That's all about how to wash the injector nozzles of a VAZ. If you do everything correctly, cleaning VAZ injectors will not cause you much trouble. Injectors on the VAZ-2114 are cleaned in the same way.
Like any car, the VAZ-2115 (injector) has its own characteristics, positive and not so positive characteristics. This model is prone to certain faults. Here are the main points in the operation of this line of cars. And the choice of brand and country of manufacture of your future iron friend is a purely individual matter. As they say: there are no comrades according to taste.
Replacing injectors
Of course, a car service center can replace the injectors for you. The price for this service starts from 1500 rubles. However, to save time and money, it makes sense to change the injectors yourself.
Removing injectors yourself
Here is a simple algorithm for removing injectors that all car owners can perform.
1.Disconnect the negative terminal from the battery
2.Take two 17mm wrenches and relieve the fuel pressure by unscrewing the fuel pipe fittings.
3. Separate the electrical connector from the fuel rail.
4.Take a Phillips screwdriver, unscrew the screw on the bracket on which the fuel pipes are attached, and remove it.
5.Use a 5mm hexagon to unscrew the two screws on the fuel rail mounting
6. Move the ramp in the direction of the injector axis, remove all 4 injectors from the engine and remove the ramp towards the left side of the vase.
7.Press the spring clip (1) located on the injectors, move it aside, and disconnect the electrical connector (2)
8.Using a screwdriver, move the injector clamp along the ramp and remove it (on new ramps, the bracket is simply removed).
9.Remove the nozzle from the hole on the ramp, slightly rocking it from side to side.
10.Remove the O-rings that are located on the nozzle body and sprayer using a thin screwdriver
That's all, now the injectors are ready for cleaning.
Do-it-yourself injector cleaning
For cleaning you will need electrical tape (wire) to secure the joints, a carburetor cleaner in a can, a syringe and a thin tube. The cleaning algorithm is as follows.
1.Insert the tube into the cap (nozzle) of the can 2.Insert the end of the tube into the hole of the syringe (without a needle) 3.Attach the end of the syringe to the nozzle 4.Start injecting the product through the tube, simulating fuel injection.
You need to inject until the coming out stream becomes smooth and clean. Then this will mean that the injector is clean.
Another way, if you have a battery nearby, you can try applying voltage to the injector with ordinary wires (polarity does not matter) simulating their operation and at the same time spraying liquid to clean the carburetor.
After this, you need to put on new O-rings and you can begin assembly, having first checked the resistance, which should be in the range of 11-15 Ohms. Reassemble the injectors in the reverse order of disassembly.
Injector installation
Before installing new injectors, you must first remove the old ones. The work itself is not particularly difficult, but it will still take up the car owner’s time. So, how to properly disassemble the fuel system? Let's look at the step-by-step instructions.
- First of all, you need to disconnect the negative terminal from the battery. This is a basic safety requirement.
- The next step is to release the pressure in the system. It is necessary to twist the fuel hose fittings. To do this, use open-end wrenches size 17.
- Then you need to disconnect the injector wiring harness from the fuel rail.
- The fuel supply pipes are mounted on a special bracket secured with a single screw. Let's use a Phillips screwdriver to remove this bracket.
- Next, we will need a 5mm hex wrench, which will be used to remove the screws holding the fuel rail in place. The ramp is then moved towards the injector axis, after which it is removed towards the left wing. We take out the injectors.
- The injectors are held in place by a special spring clip that will need to be removed. Device wires are disconnected. The bracket is removed by lightly pressing it.
- The injector lock should be moved along the ramp and then removed.
That's all, actually. The injectors have been removed and are ready for replacement. It is advisable to remove the O-rings from non-working devices, which you may need for a spare. If you are making a complete replacement, the functioning elements of the fuel system should also be placed in the glove compartment. It is recommended to clean them first. If you follow the cleaning procedure, even old injectors will last for another tens of thousands of kilometers. Installation of the fuel system is carried out in the reverse order. Before starting work, check the resistance of the injection devices; it should be at the level of 11-15 Ohms. If any points remain unclear, check out the video instructions on our website.
Signs of injector failure
If misfires occur at idle, if the engine becomes unstable, and fuel consumption increases significantly, if the car accelerates slowly, you need to diagnose the injectors. An injector is an electromechanical atomization system that supplies fuel to the combustion chamber. If the nozzle is dirty or faulty, it must be replaced or cleaned at all costs - repair is useless.
During engine operation, various deposits remain in the elements of the car’s fuel system, namely injectors, fuel frame, and intake valves. The main reason for the deteriorating performance of nozzles and the fuel system is, first of all, their contamination. One of the main causes of pollution is the presence of heavy fractions in fuel. Deposits accumulate especially intensively immediately after the engine has stopped.
At this point, the injector body is heated by the engine, and the fuel does not cool the atomizer. Lighter fractions in the working area of the nozzle will simply evaporate, and heavier fractions will accumulate in the form of deposits and thereby reduce the cross-section of the channel. Deposits 5 microns thick can change the channel capacity by a quarter. If the fuel spray holes become dirty, this will impair the creation of the air/fuel mixture.
Since the gasoline sold at domestic gas stations does not always meet modern standards, the injectors do not last even 100 thousand km. The cost of a new VAZ part is about 500 rubles. Although many car enthusiasts argue that it is worth buying imported components.
Symptoms for replacement
In fact, there are quite a lot of reasons why injectors may not work well. And below are the most common symptoms:
- Difficulty starting the engine in any weather;
- The engine is running erratically;
- The engine stalls at idle;
- High crankshaft rotation speed at idle speed;
- Loss of power, poor response to the accelerator pedal;
- When you press the gas, shocks or dips may appear;
- High gas consumption;
If the nozzle is dirty or damaged, it should be replaced or cleaned. There is no point in repairing it. It should also be noted that today injectors cannot last even 100 thousand km.
We clean the injectors with our own hands using carburetor cleaning fluid
Checking old injectors
Before replacing injectors, it is recommended to check them. This will allow you to determine whether it is working or not.
The test is carried out on a removed fuel rail, on a special stand.
Such a check can be done in almost any service.
Checking injectors on a bench
You can also check not all injectors at once, but each one separately. To do this, you will need to apply current to the part and install a container with fuel on it. When current is applied, the valve will operate and gasoline will spray out through the nozzle. But such a check is inaccurate and will still need to be checked at a stand.
Possible reasons
It turns out that there are quite a lot of reasons for such a malfunction in the VAZ-2114 engine. They directly depend on the nature of the vehicle malfunction. So, most often the VAZ-2114 engine will triple due to:
- non-working candle;
- broken high-voltage wire;
- ignition coil failure;
- faulty control unit;
- presence of air leaks in the intake manifold;
- exhaust valve burnout;
- broken cylinder head gasket;
- broken compression rings on the piston;
- burning out of the piston itself;
- a broken piston bridge between the compression rings.
But since we are considering a VAZ-2114, the engine can also be damaged by faults in the injector - a fuel system with distributed injection.
Cons and pros
Depending on which 2114 engine is used, the owner’s risks differ:
- 2111, 21183, 21114 and 21124 – do not bend the valve if the timing belt breaks;
- 21126 – valve bending due to insufficient groove.
The main disadvantage of the latest 16 valve versions is the lighter crank mechanism:
- the engine is adjusted to Euro-4 standards;
- to reduce weight, the length of the piston skirt is reduced;
- Accordingly, the width of the oil scraper and compression rings decreases;
- The resource of the internal combustion engine is sharply reduced.
The drive power increased from 77 horsepower to 81 hp, then 82 hp, 89 hp, and 98 hp. In models with hydraulic compensators, periodic adjustment of this unit is not required, however, the quality of the oil in the system must be high for normal operation of the pushers.
How to check injectors without removing them from the engine?
Checking the winding resistance level on the injectors
1. You can carry out an inspection by turning off the ignition and removing the negative terminal from the battery.
2. Using a thin screwdriver or an awl, you need to unclip the spring clip on the block.
3. Disconnect the connector from the injector.
4. Attach an ohmmeter to the injector terminals and measure the winding resistance.
5. If the resistance between the side and central pins of the connector is within 11–15 Ohms, then the injector is working properly. If the device shows more or less than required, it should be changed.
Checking the functionality of all injectors
1. Initially, you need to remove the fuel rail on which the injectors are installed.
2. Then you should connect the wire block to the ramp harness. If the “-” terminal was removed from the battery, then put it back on.
3. Connect the fuel pipes to each other and, using a wrench, tightly tighten the fittings securing them.
4. Place a measuring cup or any other container with markings under each nozzle.
5. Using the starter, crank the engine and monitor the operation of all injectors. Fuel should come out evenly from each.
6. Turn off the ignition and check the fuel level in the measuring cups, it should be the same. If the amount of fuel in the containers does not match, replace or clean the nozzle that has come out of alignment.
7. Inspect all injectors for flaws or defects. There should be no fuel leaks on the spray part when the ignition is turned off. If there are such flaws, then the part is not sealed and needs to be replaced.
Diagnostics of removed injectors
- Activate the battery by connecting the negative terminal.
- Connect the fuel supply pipe and power supply block to the removed ramp.
- Install the ramp in such a way that equal containers can be placed under each nozzle.
- An assistant is needed to turn the starter. The containers will be filled with fuel and poorly functioning injectors or those that are completely out of order will be revealed as the containers are filled.
- It is better to immediately replace a nozzle that is not working with a new one; washing the old one will not eliminate the problem for a long time. The same goes for sealing gaskets and power supply terminals.
- If the block is faulty, the injector will not function.
When diagnosing yourself, do not forget about fire safety!
Useful video
You can get additional information on this topic by watching the video below: https://www.youtube.com/watch?time_continue=89&v=H55y5s0mBEwPublished September 29, 2019
- Remove the decorative trim from the 1.6 engine.
- Disconnect the injector wiring harness connectors.
- Turn on the ignition and use a voltmeter to measure the voltage at terminal E of the wiring harness block. The voltage must be at least 12V.
- After taking measurements, turn off the ignition. If, as a result of measurements, it turns out that there is no voltage on the block or it is less than 12V, then you need to check the battery charge, the power circuit and the serviceability of the computer.
- We check the electrical resistance of the injectors, for which we use an ohmmeter to alternately measure the resistance between terminal E and the other four terminals of the block (2). The block terminal marked with the letter B corresponds to the injector of the first cylinder, and terminals C, G and F correspond, respectively, to the injectors of the second, third and fourth cylinders. For serviceable injectors, the resistance should be 13 ohms.
- When performing the following operation, do not apply voltage more than 12 V to the terminals of the block, and after performing the test, do not leave the terminals under voltage, as this may lead to burnout of the injector windings.
- Using two wires directly from the battery, we briefly apply 12 V voltage to the terminals of the block (2) - connect terminal E to the positive terminal of the battery, and terminals B, C, G and F in series with the negative terminal of the battery. For a working injector, a characteristic click should be heard when the valve opens.
- We replace faulty injectors.
- nadomkrat.ru
- nadouchest.ru
- vazremont.com
- remont2114.club
Replacement technology
On VAZ 2110 cars, replacing injectors is carried out as follows. The first step is to disconnect the battery. Then you will need to remove the air filter. After this, disconnect the vacuum hose from the fuel pressure regulator. Next, press the plastic latch of the throttle position sensor connector and disconnect this connector. The same is done with the connector going to the idle air control regulator.
Now you need to unscrew the two bolts that secure the fuel rail, as well as the screw securing the fuel pipe holders. Then remove the holder itself. The fuel rail will need to be carefully moved along the axis of the injectors. The ramp should be removed from under the receiver with extreme care, as there is a risk of damaging the injectors.
The next stage of work is to check the condition of the injectors. It is best to place them in transparent containers, first connecting them to the battery via wires. Next, you will need to turn on the starter and check the atomization of the fuel injectors. Each of them should spray the same amount. If one of the nozzles sprays less than the others, then most likely it needs replacement. In addition, it will be necessary to conduct a thorough inspection of the remaining devices for leaks.
A fuel injector that does not spray fuel needs further inspection. Perhaps it simply does not receive electrical power. It is necessary to disconnect the connector with wires from it. After this, you should directly connect the battery to the injector contacts and turn on the ignition. If in this situation the device begins to spray fuel, this will mean that the malfunction is hidden in the electrical circuit.
What to do if the engine on a VAZ-2114 is malfunctioning
To understand the causes of malfunctions in the VAZ-2114 engine, you need to know its configuration. He has:
- there are eight valves in the cylinder head;
- 1.6 liter internal combustion engine with 16 valves.
Experts advise that at the first signs of tripping, immediately check the functioning of the spark plugs. To do this, carry out the following steps:
One by one, pull off the high-voltage wires from the cylinders. Pay attention to changes in engine operation:
The next step is to check the spark in the ignition system. This procedure is also simple:
- The first step is to remove the tip from the high-voltage wire.
- While the car engine is running, bring the wire from the cylinder head (ground) to the “break” position.
- Check for a spark between ground and wire:
But the following situation also happens: the spark is powerful, but malfunctions are still heard in the engine. This means that the time has come for the next step of testing - to measure compression in the cylinders, preferably in all of them at once. If the cylinder is operating correctly, there should be no difference in the pressure gauge readings (minor deviations are allowed). If the cylinder is faulty, there will be no or very weak compression.
A malfunction in the cylinder may be due to one of the following reasons:
- cylinder head gasket is broken;
- exhaust valve burnt out;
- piston rings burst;
- The piston itself burned out.
If you are unable to independently identify the reason that the VAZ-2114 engine is malfunctioning, you definitely need to do computer diagnostics. This can be done in two ways:
- On a special computer stand.
- Using a portable scanner (for example, ASKAN).
An experienced motorist himself will be able to figure out the malfunctions of the VAZ-2114 engine, but if he does not have sufficient experience, then it is best to contact qualified specialists at a service center for servicing cars of this model.
Replacement or cleaning?
Cars Lada 2114 Lada 2114 Black on white Former
In order to understand what needs to be done with the nozzle, change it or simply clean it, it is better to diagnose them on a special stand. replacement Removal and replacement Cleaning Removal of injectors on VAZ 2110 8 and 16 valves. Under such conditions, you can test it in operation under different pressures, and also visually see how tightly it closes, and whether it is “snotty.”
If any of the injectors needs to be replaced, then you should buy a new one with exactly the same part number as the old one. Replacement and repair of VAZ 2110-2112 injectors with our own. Also, during installation of cleaned injectors, all O-rings should be replaced (2 pieces on each injector - approx.).
Installation is carried out strictly in the reverse order, similar to the removal procedure.
How to clean injectors?
For cleaning, use ABRO CARB & CHOKE CLEANER cleaning solution (carburetor cleaner). Many sites describe cleaning methods using all kinds of adapters, hoses, etc., everything is much simpler.
- Remove the top of the carburetor cleaner can.
- Insert the valve-spray system of the can into the nozzle.
- Connect the two contacts of our circuit to the injector contacts. Press down on the nozzle installed on the can. For one or two seconds, use the switch to activate the circuit so that the nozzle starts working (it is not recommended to hold it for more than two seconds at a time).
Important: Be sure to follow safety precautions. Spray strictly away from yourself, take care of your eyes, use protection! For more information on cleaning injectors, watch the video.
For more information on cleaning injectors, watch the video.
- www.drive2.ru
- etlib.ru
- portalvaz.ru
- 24techno-guide.ru
Checking the engine at idle
If you notice that the VAZ-2114 engine starts to stall at idle, then you need to check the following systems:
- Fuel supply system.
- Ignition system.
- Valve system.
In the first case, if the faults are in the fuel supply system, then the first step is to flush the fuel system, and then clean the injectors using ultrasound.
The second case involves problems with the ignition system. Therefore, perform the following actions:
- change spark plugs;
- check the functionality of the ignition coil;
- update the set of high-voltage wires.
In the third case, the valves are closely dealt with, that is, they should be adjusted so that they perform their functions properly. If this cannot be done, the old valves are simply replaced with new ones.
Step-by-step replacement instructions
You can check the condition of the sensor in different ways, but specialists at a service station can do this better and more accurately. Before checking, of course, it needs to be removed and this is done very simply and even a novice car enthusiast can do it. If you are sure that the sensor is not working correctly, you can also replace it yourself.
- Turn off the ignition.
- Raise the hood cover.
- Find where the sensor is installed.
- If it and the place where it is installed are very dirty, then you must clean it with a rag or brush.
- We remove the block.
Removing the block from the connector Unscrew the bolt.
Unscrew the fastening bolt. Remove the shaft position sensor.
We take out the required part
We check the generator drive toothed pulley for damage and other malfunctions. This is very important because if it becomes damaged, data will not be transferred correctly. Before installing a new sensor, clean the installation site. We install a new one or an old one, if you determine that it is working. Tighten the bolt. In this case, it is necessary to strictly control that the moment is not higher than 8-12 Newton meters. Using a feeler gauge, we control the gap between the pulley and the DPKV core. It should not exceed one millimeter. The maximum deviation is 0.4 mm in the direction of increase.
Required clearance
Let's start the engine. If it starts confidently, and the operation of the VAZ 2114 power unit is stable, then we can state that the work was done correctly.
As you can see, there is nothing complicated and you shouldn’t go to a service station unless absolutely necessary, spending extra money.