If you are faced with questions about how to recognize signs of a faulty water pump and how to replace the pump on a VAZ 2114, then after reading the material in this article you will be able to figure out how to independently diagnose and carry out repairs, as well as how much the new parts will cost.
This video clearly demonstrates the process of replacing the pump on a VAZ 2114:
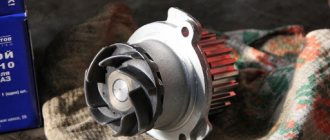
How to check the pump?
When a pump malfunction occurs, the first sign will be the smell of antifreeze in the car interior. If this happens, it is necessary to urgently inspect the engine compartment for coolant leaks.
The manufacturer claims a pump service life of 100,000 km , but due to poor road surfaces it usually becomes shorter - about 7,000 km.
Product delivery options
Note! Below are the shipping methods available specifically for this product. Payment options may vary depending on the shipping method. Detailed information can be found on the “Delivery and Payment” page.
Parcel by Russian Post
Available payment methods:
- Cash on delivery (payment upon receipt)
- Using cards Sberbank, VTB, Post Bank, Tinkoff
- Yandex money
- QIWI
- ROBOKASSA
Shipping throughout Russia. Delivery time is from 5 to 12 days.
Signs of pump failure
You do not need to have special knowledge to determine whether the pump is faulty. There are three signs by which diagnosis can be made:
- Engine overheating. Even if, when driving in winter, the engine temperature remains above the operating mark of 90 degrees, this is a clear sign indicating a malfunction. To carry out diagnostics, you need to bring the car and warm it up to operating temperature. Then we turn on the stove and if cold air immediately starts flowing out of it, then there is a malfunction in the pump impeller.
- Uneven timing belt wear. This happens due to wear of the bearings inside the pump, and since it guides the belt, its wear may be uneven. For example, there will be more on one side.
- Pump leaking. When the mechanism has not been replaced for a long time, over time the pump will begin to leak due to severe wear of the oil seal. A few drops a day will not affect the correct operation, but if the antifreeze leaks out profusely, you need to urgently start replacing it.
The cooling of the car directly depends on this unit, and if you do not notice the breakdown in time, you can bring the engine to a major overhaul.
FakeHeader
Comments 12
Did you manage to align the belt?
No, I didn’t do anything to the belt, it didn’t eat it at all anymore
Regarding the sealant 2 times, and calluses on the fingers I will say. The sealant hardens tightly due to high temperature, but what you are talking about simply crusts over in the open air. In chemistry it looks like I got a bad grade. Calluses from stupidity, a bad head does not give rest to the hands. This is not an insult, no offense. I speak as I see it. You can climb into the internal combustion engine of a VAZ in any position. Without removing the cylinder head, you can do everything that is impossible on another head. Like two fingers on the asphalt. The main thing is to have the necessary tools in hand. And the strength of desire to achieve the desired goal. Then you, even with leaky wheels, will leave point A and reach point B without problems and on time. I drove 100 km there and 100 km back with a shrapnel the size of my thumb in the box. There was no oil there at all. Only the buzzing is terrible. The main thing is the feeling of the spirit of the car itself. Mine knows me and helps. Thanks to her for this. and AMEN.
Required tools and parts
When starting to replace the pump on a VAZ 2114, we need to prepare a set of tools:
- Wrenches for 10, 17 and 19;
- Socket head 10;
- Driver and extension for it;
- A flat-head screwdriver with a thin blade.
The set of spare parts depends on the severity of the breakdown. When the malfunction is detected in the early stages and there are no signs of severe uneven wear on the timing belt, then you can get by with replacing only the pump. But if coolant has flooded the belt and rollers, or severe wear on the belt is noticed, the entire assembly must be serviced. A rupture of an element during engine operation can lead to a collision of valves and pistons, which will entail a major overhaul of the engine. Therefore, it is better to replace all components.
Air lock formation
Replacing the pump supply pipe and draining the antifreeze associated with the work can lead to the formation of an air lock in the cooling system.
There are 2 ways to fix the problem:
- With the engine warm, remove one of the 2 throttle body hoses for 5-10 seconds. A small amount of antifreeze may leak out, which must be added through the expansion tank.
- The car is installed on a rise (overpass) so that the radiator is higher than the engine. The expansion tank cap is removed and the engine is started. After removing the plug, coolant is added.
Replacing the pump
Having asked the question “how to replace the pump on a VAZ 2114 with your own hands?” Don't despair that this process is too complicated. It is enough to work on the following points:
- We drive the car into a pit or into a spacious garage, where it will be possible to jack up the right side of the car. Before disassembling, it is recommended to let the engine cool down so as not to get burned during operation.
- Remove the valve from the radiator, which is located on the left side, and drain the coolant.
- Under the ignition module there is a bolt for draining antifreeze from the engine. We unscrew it and also drain it.
- Now you can remove the protective cover of the timing mechanism. It is held on by three 10mm bolts.
- We tear off the toothed pulley bolt using a 17mm wrench. Before doing this, you need to align the entire mechanism according to the marks.
- Using the same key, unscrew the bolt securing the tension roller and remove it.
- Remove the belt from the upper pulley and pump, moving it towards the radiator.
- Unscrew the toothed gear completely and also remove it. Do this carefully so as not to lose the key!
- Now we need a wrench with a 10mm head. Unscrew the rear belt cover.
- To remove the water pump, we need to pry it with a screwdriver and pull it out of the groove.
- We clean the cylinder block and the landing site from the remains of the old gasket. If this is not done, the pump will not sit level and will leak.
- We lubricate the gasket with sealant on both sides and install it in the pump seat.
- We insert the new pump so that the inscription on it is on top.
After waiting a bit for the sealant to set, you can begin assembly in the reverse order. It is better to start the engine for the first time after 2-3 hours. During this time, the sealant will definitely harden and will fully perform its functions.
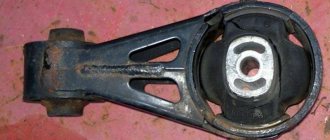
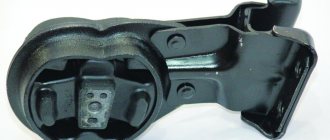
Supply pipe of the coolant pump VAZ 2114
Not even after 20 thousand the pump started leaking. I also noticed that antifreeze was leaking at the junction of the pump supply pipe and the block. For those who don’t know, it is located at the rear of the block, in the most inconvenient place in the front-wheel drive family.
At first the pump did not flow much, then a river appeared.
I chose the time and started replacing. I carefully drained the antifreeze and had to come up with a whole system. It was not difficult to remove everything. When I removed the carburetor heating hose, I saw that it was all cracked and dry. It's strange that it hasn't leaked yet.
The oil seal on the pump leaked and a creaking sound appeared when rotating. The gasket on the supply pipe is rotten. In principle, I could have left the old pipe, but I immediately stocked up on a new one.
I bought the pump from Mstart
.
To be honest, I have never heard of this, but the seller assured me that it was good. I immediately took a roller of some kind, a Continental Contitech
, I had heard a lot about its quality.
I cleaned the seats of old gaskets and spent a long time fiddling with the seat pipes. It was very inconvenient, I had to jack up the car and clean it while lying under it. I wiped off the old traces of antifreeze a little to suddenly see a new leak.
While I was taking pictures of the whole thing, in the light of the flash I saw fogging on the intake manifold. You'll have to change the gasket.
The new pipe laying was sealed with sealant. It is extremely inconvenient to put it in place. While baiting, I reapplied the sealant 2 more times: it had time to dry, and rubbed a callus on my finger. Tightening is also inconvenient; you can’t get anything in there except a spanner.
I assembled everything, installed it, tightened it. Replaced the carburetor heating hose. Filled with antifreeze. Everything is fine. Everything is working.
After that I drove another 1000 km. Everything is dry, you can only see that the belt has eaten a little. Now I'm wondering why he's slipping. Most likely the pump is crooked. We'll watch.
Well, according to tradition - smooth roads to everyone))
Price tag: 1,500 ₽ Mileage: 200,300 km
Which pump to choose?
Before you change the pump on a VAZ 2114 with your own hands, you need to start looking for a new spare part. It's better to opt for the original. Most car enthusiasts advise installing it, since the concept of price and quality of the product is superior to its competitors.
The part can be found by article number: 21114-1307010-82 . When purchasing, look carefully to see if it is printed on the box, since there are Chinese analogues on the market made to resemble the original. The cost of a high-quality element is about 1,200 rubles, and analogues of poor quality are much cheaper.
Another brand that can be recommended for purchase is Marel . The company produces spare parts not only for domestic cars, but also for foreign cars. At the same time, it has positive reviews from many car owners. The price of the part is about 1300 rubles .
You can also focus on one of the most reliable but expensive brands - Valeo . The mechanism runs 50% more than domestic ones, but has prices of about 3,000 rubles . Another disadvantage will be the large number of Chinese fakes.
Purchase rules
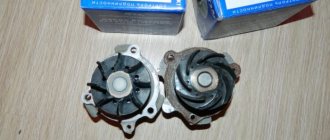
When purchasing a spare part, visually inspect it, evaluate the condition of the metal and connections. Visually compare several options from different manufacturers for the quality of rotation of the blades and the clearly set angle on the side where the pump is attached to the engine block. Because an unevenly located pump will lead to belt wear. Below, we have selected the most popular models of water pumps, which are characterized by stable and long-lasting operation.
Choosing a pump (which is better for VAZ-2114)
- Gates.
- Luzar.
- TZA.
- HEPU.
Pump from TZA
Pump from Luzar
Pump from HEPU series R 620-625
pay attention to how to determine the originality of the product.
It is very difficult to definitively answer the question of which manufacturer or company is better, because a large number of devices have both negative and positive reviews. Therefore, you should make your choice from the most popular models among car enthusiasts.
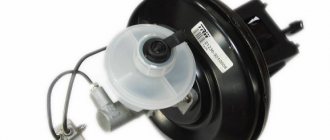
Installation of the Grants thermostat on VAZ 2110, 2112
| It is no secret that the production of VAZ cars of the tenth family in Russia has already been completed. However, nothing prevents owners from improving their cars by replacing outdated parts with more modern ones, from foreign cars or VAZs of the latest years of production. An example of this would be replacing a VAZ 2110 thermostat with a Lada Granta thermostat. |
Will need to buy
- Thermostat Lada Granta (catalog number: 21900-1306010-00), price 640 rub.
- Gasket for the thermostat (same as standard), price 8 rubles.
- Lower radiator pipe for Lada Granta (1 self-tightening clamp included), price 440 rub.
- M8 studs, approximately 85mm long, price 20r.
- Washer for temperature sensor.
- ABRO sealant, clamps.
- Antifreeze.
Replacing the thermostat
- Remove the hoses by unscrewing the clamps (don’t forget about the throttle assembly).
- Unscrew the thermostat mounting bolts (see replacing the thermostat).
- Remove the studs and lower pipe.
- Install a new pipe and tighten the clamp.
- Plug the hose coming from the throttle valve using an M10 bolt and tighten it with a clamp.
- Screw in new thermostat studs.
- Secure the Granta thermostat.
- Connect the hoses. Cut the hose from the stove in place (by about 5 cm). Reinstall the temperature sensor.
Conclusion
- faster engine warm-up, especially while driving.
- the cabin became noticeably warmer
- more stable temperature conditions in different operating modes (during traffic jams, using the stove, in winter on the highway and in the city).
xn--2111-43da1a8c.xn--p1ai