To get started, just read the messages found by searching in the conference.
“The temperature gauge doesn’t want to rise at all. Only after complete warming up does it slightly raise the needle to about 50. I tried to remove the wire and apply it to ground, then the needle quickly shoots up and the instrument cluster lights come on (and for some reason it doesn’t work in normal mode). I bought a new sensor, but the situation has not changed.”
“In the morning, when you turned on the stove, all the lights came on, all the arrows went to maximum, after 20 minutes of driving - it started working, what is it, what should I look at?”
“If the low beam is on, the engine does not stall when the ignition is turned off. It's cool at first, but after a few days it starts to get annoying. If the headlights are already on, then when you turn on the ignition they begin to burn brighter. It would seem like a banal short circuit of the wires in the harness going to the switch and to the headlights (or rather, to the right headlight, the left one does not light up, but when the ignition is turned on, the headlights do not light up! "
“I also have a problem with the electrics: the dashboard backlight does not light up when the low beam is turned on, and the tachometer immediately, at idle, drops all the way down. And only when moving does it “come to life”, the error is about 1500 - 2000 rpm. With the lights off, everything is fine.”
“Symptoms: at times it jerks (shuts up slightly) at medium speed. This crap appears absolutely haphazardly, and at the same time (but not always) the alarm beeps in the same way as when disarming.”
“I was driving calmly, when suddenly, when I stopped at idle, the oil pressure light came on. It starts to go out at 2000 rpm. I checked the oil - it’s normal, replaced it, the lamp continues to light. What could this be, or should I just replace the oil pressure sensor? Yes, I almost forgot, the turn signal relay works at double the frequency, but here the problem seems to be on the surface, when the light bulbs are working, it turns out that the relay is covered or am I wrong?
“When the turn signal is on, I press the brake - the turn signals begin to flash more often and the rear fog light indicator light comes on fully. I turn on the front fog lights and the interior lights come on instead.”
Enough? I can add more, such questions appear in the conference sometimes several times a day.
And the reason for all these miracles is the lack of connection between electrical circuits and ground, i.e., the car body in the places where it should be. Or a low-quality, oxidized compound that has a fairly large transition compound.
Let me give you an example. Let there be three lamps, as in Fig. I. One is turned on by its own switch and connected to the ground pin. The other two also have their own – common – switch, but are connected to different ground pins (one has a common pin with the first lamp). This is a very real situation: the first lamp is the feet, the second and third are the dimensions (their masses are located close to the lamps, i.e. in front too).
In Fig. II the first lamp is turned on, the current flows from the positive of the battery through the lamp, and then through the ground pin and the car body to the negative of the battery. And here is the rice. III shows how the current will flow in the same situation if the terminal is poorly screwed to the ground stud. The current also passes through the first lamp, but enters the negative of the battery through another pin, passing through all three lamps. They will all burn faintly, but noticeably. If the lamps are the same, then each of them will have 1/3 of the supply voltage, i.e. 4.2 V.
The example considers the option when there is no mass at all. But there may be intermediate options: there is mass, but it is bad: the connection to the body has a significant resistance, across which a noticeable voltage drops when current passes. Noticeable - this can be volts or fractions of a volt; for different circuits of the car, “noticeable” can be a different voltage. For example, the lambda probe of an injection engine produces a voltage of up to 1 V, so a voltage drop across the transition resistance of just one tenth of a volt will already cause serious problems in the operation of the engine. And for the relay to operate, several volts are needed, so due to a voltage drop of 1-2 V, they will not operate, but 3-5 volts can prevent the relay from turning off.
The general principle for determining such glitches in the operation of electrical equipment: completely unrelated circuits influence each other.
You turn on the headlights and the engine stalls, press the brake and the turn signals turn on, turn on the heater fan and the tachometer needle begins to dart.
There is one serious “but” in the rule stated above. Poor contact can also be in the positive circuit. If the interacting circuits are connected to one fuse, then you need to start checking from it. To do this, look at the fuse table. The same can be said about circuits connected through the ignition switch contacts. Or the terminal on the battery is simply not properly tightened. The ones listed are the easiest to check, so start your search from these places. If everything is in order there – “Cherche la femme” – look for the ground pin.
How is a relay different from a fuse?
Fuses are needed to break the circuit when the current increases above certain values. This is necessary in order to protect wires and electronic components from damage. A sharp increase in current is usually associated with a short circuit.
The Chevrolet Niva uses blade-type fuses.
Each of them corresponds to a certain current strength, which is critical for the circuit. When a short circuit occurs, the small jumper inside the fuse burns, thereby breaking the circuit.
That is why it is also called “fusible”. When replacing, you must always de-energize the circuit that it protects, and then install a new element.
The relay is an electronically controlled switch. Relays are often used to turn on elements remotely, so that there is no need to run a large number of cables to the instrument panel. Typically, a relay uses a lower current to operate than the circuit it controls. Some have a timer function, such as those used to control the windshield wiper or turn signal lamp. This allows you to set an impulse at certain intervals.
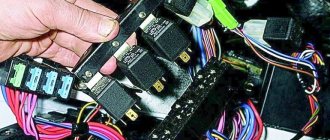
Most relays and fuses are located in the passenger compartment, in a special panel, on the driver's side. But specialized relays that control high-current wires are placed under the hood in the engine compartment.
Installation instructions
Operating a car with a computer will be more comfortable, so every owner of a domestic SUV can install a computer on their vehicle.
Let's consider the installation and connection procedure using the first generation Niva as an example:
- First you need to turn off the power supply, disconnect the battery.
- Then remove the dashboard trim. Remove the two cover buttons; the screws are hidden behind them. It should be noted that two similar screws are located above the glass and can be accessed from the cab.
- Having done this, carefully pull the plastic panel towards you; there are no other fasteners to secure it. The connectors do not need to be disconnected yet.
- Next, you need to squeeze the latches, then push the display module forward and disconnect both plugs connected to it. The 6-pin plug is designed to connect a computer. It should also be noted that modern BCs are equipped with an “ignition” input; this contact should be connected to cable 1 on the six-pin plug. To connect, you will need a T-shaped outlet.
- Now you will need to stretch a special cable and connect it to the on-board computer, as well as the OBD output. Before connecting, make sure whether the immo is in the car or not (it doesn’t matter whether the system is activated or not). If there is no immobilizer, jumper 18-9 should be located in the plug. If it doesn’t exist, then you need to make it - just close these two contacts, for this you can use two connectors with a cable.
Photo gallery “Installation and connection of BC”
Price issue
The cost of the BC Multitronics S-570 model today is about 5,400 rubles. The Matrix-M computer will cost the buyer approximately 4,500 rubles. More affordable options, for example, State X-1M or Multitronics UX-7, cost around 1300-1500 rubles.
Where is the ignition relay located for Niva Chevrolet?
The ignition relay is located in the passenger compartment fuse box; it can be found on the driver's side of the instrument panel, opposite the seat. On the diagram it is usually designated K6 and in the technical description it is sometimes called an addition relay.
It is responsible for turning on the fuel pump and supplying voltage to other elements. Triggered when the ignition key is turned. At this moment, you can hear a click behind the instrument panel. This electric coil built into the relay receives voltage and closes the contacts of a certain circuit. If there is no characteristic sound when turning the key, this may indicate its failure.
Symptoms of a problem
If, after warming up the car for some time at a speed of about 1500/min, the probe produces a low or high stable signal, a slow response, a lack of heating of the element is detected, error codes (P0130 - P0138) are sent to the engine control unit. Next, the engine is controlled in a circuit open from the sensors.
The main signs by which a probable failure of the lambda probe is judged:
- Gasoline consumption increases.
- Instability of the propulsion system (steep increase in speed and sudden attenuation).
- Noticeable decrease in power.
- The dashboard flashes a “check engine” error signal.
- It is difficult to start the car smoothly.
- Slow response to the gas pedal.
- Periodic popping sounds.
- Change in exhaust color (darker).
Attention: The main sign of a malfunction of the oxygen sensor can be considered a noticeable decrease in the power of the car.
Low beam relay Chevrolet Niva
The low and high beam control units are located on the same board and are marked K4 and K5, respectively. If both low beam lamps do not work, then most likely they can be burned out and the relay should be checked. If you don’t have a spare unit on hand, you can check its performance by swapping K4 and K5. They have the same characteristics and, if necessary, you can use the K5 from the high beam to drive to the nearest auto store and buy a new part.
How to check and repair an air flow sensor yourself
Of course, repair only means cleaning (if possible), restoring oxidized contacts and repairing broken wires. In other cases - only replacement.
If you suspect a sensor failure, the best solution would be to connect any auto scanner with an engine intake tract diagnostic program. This can be a stand-alone specialized device (quite expensive) or a regular “error code reader” like the Chinese ELM-327. Using programs for Android or PC, you can fairly accurately diagnose the condition of the mass air flow sensor on your Chevrolet Niva.
A more primitive method is to measure the voltage at the signal output of the sensor at rest (the ignition is on, the engine is not running).
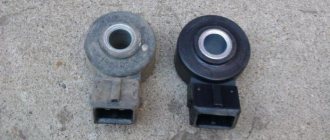
We connect the multimeter in the measurement range of 2–10 volts to ground (contact No. 3) and the signal output (contact No. 5). In the illustration, the air flow sensor version 037, contact No. 1 is not used.
- voltage 1–1.02 V - the sensor is operational, excellent condition;
- voltage 1.03–1.05 V - still alive, but will soon fail;
- more than 1.05 V - cannot be restored.
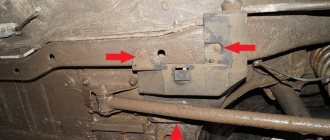
Where is the mass of the Niva Chevrolet engine?
But if everything is in order with the relay, and the devices do not work, then there may be a problem elsewhere - the mass attachment point. The negative wire coming out of the battery is connected to the car body and goes to some of the main energy consumers in the form of wires. This is sometimes the difficulty when calling an electrician.
The architecture of the circuit can be described as follows: a wiring harness comes out of the negative terminal, connecting devices operating from one ground point, then wires connecting other ground points are connected to them using a crimp sleeve. As a result, finding a specific mass attachment point is quite difficult. For example, the mass of the mirror control unit is located behind the trunk trim. But with the engine everything is a little simpler. Since it is connected to the frame and body through pads, which are essentially a dielectric, it has its own wiring harness. The terminals are located on the left side of the engine, below the ignition module. They are responsible for the operation of the ECU and ECM sensors.
.3.3. Poor Ground Detection
The negative terminal of the battery is connected to “ground” - the metal of the body, engine or gearbox;
Moreover, many elements of electrical equipment are connected in such a way that only the positive wire is suitable for them, while the current returns to the battery through the metal of the body. This means that the electrical component mount and the body are part of the electrical circuit. As a result, poor or corroded fasteners can cause the element to fail or cause it to perform erratically or poorly. In particular, light bulbs may glow dimly (especially if the light bulb's ground point is connected to another electrical component that is still on), electric motors may run slowly, and the operation of one circuit may have a seemingly unnoticeable effect on the operation of another circuit.
Don't forget that many vehicles use ground wires between certain components such as the engine/transmission and the body, that is, in areas where there is no direct metal-to-metal contact due to soft rubber mounts or a layer of paint.
To check the reliability of the element's grounding, it is necessary to disconnect the battery and connect one of the ohmmeter probes to a reliably grounded element. Connect another probe to the wire or connection to the body that needs to be checked. The resistance shown by the ohmmeter should be zero; if not, check the connection as follows.
If you suspect there is no ground, disassemble the connection and clean the body area and wire terminal (or the grounding surface of the element) to bare metal. Carefully remove all traces of dirt, then use a knife to remove all paint so that there is reliable contact between the two metal surfaces.
Also interesting: Chevrolet Niva | Nameplates and vehicle identification number
When assembling, tighten the connector securely; When connecting a wire terminal, install a serrated washer between the terminal and the body surface to ensure a secure connection. When connecting, prevent future corrosion by applying a layer of Vaseline or silicone grease.
Prospects
In fact, the car itself is slightly outdated, despite being equipped with all sorts of electronic gadgets. The ShNiva shows poor results in crash tests. At the same time, the combination of an excellent transmission with a rather weak engine and high fuel consumption, even at a reasonable price, attracts few people.
Attempts were made to improve the situation by installing German engines and modernizing the transfer case and clutch. However, the increased price and the resulting quality were not optimal. As a result of this experiment, the new modification of the VAZ-21236 was sold in only a few hundred copies in two years.
In the near future, manufacturers intend to release a couple more variations of the updated Chevrolet Niva car. The weight of this version of the car should be in harmony with a powerful, economical engine and safety. Otherwise, competitors will simply physically push the modification out of the market, regardless of its low price.
What is Esud VAZ?
, ECMs appeared on Russian cars
(Electronic Engine Control Systems) developed by General Motors (GM).
They were of two types: central (for all-wheel drive VAZ
21214 and “classic” cars - 21073, 21044) and distributed (front-wheel drive
VAZ
) fuel injection.
Interesting materials:
How to enable virtualization on MSI motherboard? How to enable virtualization in Ryzen BIOS? How to enable built-in T2? How to enable VT in Gigabyte BIOS? How to turn on Xbox Series S? How to turn on Xiaomi via fastboot? How to enable sound in Gmail? How to enable sound in Microsoft Teams? How does Epidural affect the fetus? How does epidural anesthesia work?
Starter relay diagram for Niva Chevrolet
In order to find out where the starter relay is located on a Niva Chevrolet, we recommend that you refer to the fuse and relay diagram for this car model
Fuse and relay diagram for Chevrolet Niva
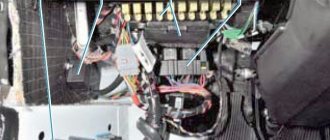
The mounting block with fuses (1) and relays (2) is mounted on special brackets to the left of the steering column and closed from below with a cover (3). To access the mounting block, remove its cover by unscrewing the screws. The current strength for which the fuse is designed is indicated on its front part, and the fuse number is marked on the body of the mounting block. The new fuse must have the same current rating as the one being replaced. The layout of the unit installed on your vehicle may vary.
Door harnesses
There are wires running through the interior that connect to the door wiring. They ensure the operation of power windows, speakers, alarms, heated rear windows, etc. Each line has a socket, thanks to which the door can be easily removed and replaced.
Let's note some features:
- each harness has wires going to the central locking moderator; in more advanced models, the rear doors have wires for the interior lighting and the window regulator;
- the driver's door harness goes to the buttons for the two power windows of yours and the passenger's;
- in the front doors there are wires going to the speakers that are located in them;
- The rear door harness is one of the most complex - it includes wires for the heated glass, wiper and washer gear, rear brake light, central locking and ground wires.
You can see door wiring diagrams in the picture. They all originate from the rear harness, which goes to the taillights.
Mass - summary table glitch-cause. Only the result!
Reg.: 02/17/2005 Threads / Messages: 2 / 235 From: SPb Age: 47 Car: 21213, 1999 + 21310, 2011
Since mass glitches are easy to diagnose in principle, but difficult to find in terms of the specific place where this mass fell off, I propose to collect reports in one topic about specific mass glitches and a specific solution that HELPED.
The goal is to suspect a mass glitch, read the available reports, find the closest glitch, and get into the car in the right place.
No discussions, answers like “it happened to me too,” etc. - there shouldn’t be any in this topic - everything will be demolished immediately.
To make the topic truly useful, we will try to avoid obvious repetitions.
Of course, before posting, you first need to make sure that your solution actually worked - i.e. drive for a couple of days and wait to see if the glitch happens again.