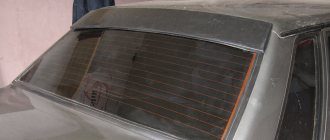
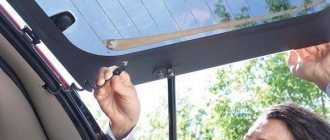
Heated rear window is a useful and very convenient option that allows you to avoid fogging and freezing of the rear window and at the same time provides excellent visibility at any time of the year.
Heated rear window saves not only in winter, but also in autumn, when humidity rises and all the windows in the cabin begin to fog up. In just a few minutes, heating the rear window melts ice and light snow, and also dries the condensation that accumulates on the glass in wet weather.
All this is good, but what to do when nothing happens when you press the button, in other words, what to do if the rear window heating does not work? This is exactly what we will try to figure out today. You will learn how the heating works, why it fails, and also how to find a fault and repair the heated rear window of a VAZ.
How does the heated rear window work?
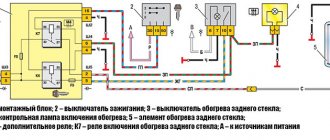
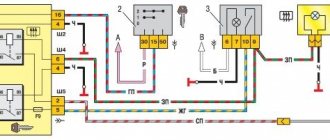
The operating principle of heating is as follows. Voltage is applied to a conductive thread, called a heating element, causing the thread to heat up, thereby melting the snow and drying the moisture. The heating system consists of a network of conductive threads, several fuses and a button. When the driver turns on the heated rear window, a warning lamp on the panel lights up, and power is supplied to one of the relay contacts. The second contact is connected to the car body, which represents the “minus”. In this way, current circulates through the heating system.
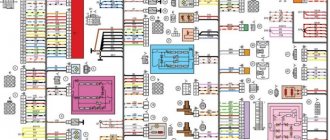
Rear window heating diagram for VAZ cars
In what cases is it useless to repair heating elements?
If there is a significant area of damage, when almost all the threads are broken and over a large area, it is unlikely that it will be possible to restore the mesh to nominal efficiency. There is no hope for the reliability of the result. This glass must be replaced together with the heating element.
As a last resort, you can use an external heater installed under the glass, but this is a temporary measure, it works slowly, unevenly, consumes a lot of energy, and if the glass is very frozen, it can cause cracks and even spillage of tempered glass.
Causes of rear window heating malfunction
- Circuit breakers. If the heating does not work completely, then most likely the fuse has blown and should be replaced.
- Break. It also often happens that conductive threads burn out or break, as a result of which the current does not flow beyond the break point. Thread breakage can occur due to chafing or breakage, for example, during careless repairs.
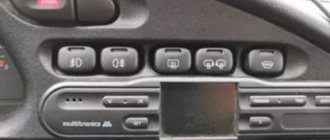
- Faulty button or relay. If the rear window heating button or relay malfunctions, no current will flow.
- Contacts. Oxidation, disruption or deterioration of contacts leads to unstable current supply and, as a result, poor heating of the filaments.
Why do heating elements break?
A break can occur for mechanical or electrical reasons:
- the metal of the thread gradually oxidizes, the cross-section decreases, and the released power increases; severe overheating causes the thread to evaporate and the contact to disappear;
- when cleaning glass, a thin strip of sprayed metal can easily be damaged with the same consequences;
- even minor thermal deformations lead to a weakening of the structure of the conductive strip, which ends in the appearance of microcracks and loss of electrical contact.
Most often, one or more threads break; the entire mesh rarely fails completely. This can usually occur due to a power system failure, a blown fuse, or a failed relay or switch.
Sometimes switching is complicated by the introduction of an automatic electronic relay with timer shutdown, which does not add reliability.
Finding a broken rear window heating
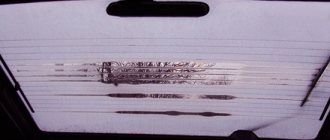
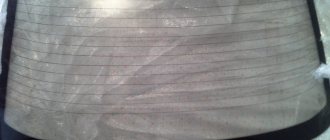
The search consists of finding the location of the circuit break. We check the relays and fuses (F8 (20A) and F8 (20A) mounting block), as well as the button, if everything is in order, then you should look for broken filaments. To do this, we first perform a visual inspection. We turn on the heating and observe where the threads heat up and where they don’t.
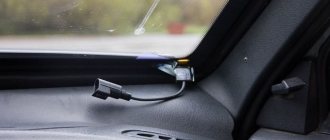
If a visual search does not produce any results, you can use a voltmeter or multimeter. To search for a break with a voltmeter, turn on the ignition and heating, then connect one probe of the device to the ground of the car, and wrap the second in foil and move it to the middle of the conductive thread. In this case, the device should show a result in the range of 5 V. At the point where the device shows 0 V or, conversely, rises above 10 V, we can make the assumption that there is a break in this exact place.
If the rear window heating does not work, then a voltmeter will help you find the break. The device is connected to the positive terminal of the heating, and the second probe is smoothly moved along the filament only from the side of the negative terminal. At the point where the voltage drops to 0 V, there will most likely be a break in the circuit. This is where glass heating repair will be required.
More serious problems
Is the fuse ok? The grille is intact and attached to the glass, but there is simply no defrosting effect? Look for a faulty switch, relay or breaker. To do this, you will need a schematic diagram or extensive experience in identifying wiring problems. Start at the fuse and follow the wire. If the switch is bad, you will be able to plug it in externally and get 12 volts from outside for diagnostic purposes. But you may have to replace the breaker - which may be built into a large electrical control box hidden under the dash. Check your vehicle's manufacturer's manual for more detailed steps. If you don't have one, you'll have to determine the problem the old way. Trace the path of current from the fuse to the switch, then to the breaker and back to the glass.
Remember, the breaker will turn off the current within 5-10 minutes, so you need to do your research within that time, or you will be looking for current when there shouldn't be any.
There will be a relay somewhere in the circuit to switch the high voltage current required for the grid to function. It may (or may not) be combined with a breaker. The procedure will be as follows: connect the relay outputs to an external source to check whether it is in working condition. You can either connect 12 volts to the relay coil to force it to retract, or bypass the relay with a heavy gauge wire to check if the grille wiring between the relay and the window is good. A separate relay won't cost much and can be purchased at many auto parts stores, but if it comes with a breaker you can pay up to RUB 4,000.
Don't try to circle the timer. Rear window defoggers consume a significant amount of electrical current - 10-20 amps, depending on consumption. Most modern cars have a breaker circuit to turn off the grille after enough time. There are two reasons for this. The first is to reduce the load on the generator, which (especially in winter) also supplies energy for the headlights, heater and windshield wipers. Add in the extra drain on the battery to start the car in cold weather, and the alternator may simply not have the power it needs to keep the battery charged.
The second reason is simpler - the grate can overheat if it heats up for too long. Imagine accidentally turning it on on a hot summer day during a long trip. The heat from the grill combined with the heat from the sun will cause the glass to crack or accelerate the wear of the window's rubber seals.
If you need to replace a breaker or switch, you will most likely have to go to the dealer for parts.
Repairing the heated rear window - how and with what?
- There are many options for repairing threads, one of which is a repair kit for rear window heating threads. This category is represented on the market by: Permatex and Quick. Such repair kits allow you to effectively restore large areas of ruptures, up to ten centimeters. The kit consists of stencils, a can of polymer resin, and the heating filaments themselves. The repair proceeds as follows: we find the damaged area, prepare the required piece of thread, remove the protective film and glue the thread to the area using polymer resin. When everything is dry, the procedure can be repeated. After 1-2 days, turn on the heating and check the result.
- The second way to fix heated rear window threads is to use conductive paste, such as Kontaktol. A special paste or glue that is capable of conducting current is applied in a thin, neat layer to the damaged area. For more precise application of the paste, the work area can be covered with tape. The paste takes about a day to dry, but if you have effective heat sources such as a hair dryer or a special heater, the drying time can be significantly reduced.
- There are also alternative “homemade” methods for repairing the heated rear window. So, some people use paint to which they add copper-brass shavings. The paint is matched to the color of the threads, and the shavings are obtained by planing the material. You can use glue instead of paint. Alternatively, you can try to connect the break points using a soldering iron. I would like to note that in this case there will be a result, but it will not look entirely aesthetically pleasing.
I will end here. I hope now you know what rear window heating is, how to find its fault, and how to repair heated glass in different ways. That's all I have, thank you for reading to the end. I would be grateful if you share this article on social networks, this will help us in the development of this project. In addition, more people will know about our existence. Also, don’t forget to leave your comments and add your own tips to this article. All the best and see you again at VAZ Repair.
Scheme of work
- Voltage is supplied to the entire heating element, where the strips are connected in parallel.
- Because the metal strips conduct electricity and have some resistance, they become slightly warm. This temperature does not have a negative effect on the glass, but it can warm it up well.
- According to the methods of applying heating strips, electrochemical option, vacuum deposition or gluing can be used.
Chemical composition of the threads: resin, copper, graphite, nickel, chromium, tungsten. Manufacturers do not disseminate information about the manufacturing technology of the heating system, so you can restore its functionality by learning the striping technique. If spraying was used, it means that a carbon composition was used and conductive glue will be required for repairs.
Signs of breakdown
You can understand that there are problems with heating by the following signs:
- The glass begins to sweat when the warning light does not work. The first thing you need to do is check what voltage and serviceability of the fuses
- The glass does not heat up when the control lamp is on. The reason may be due to lack of voltage
- Condensation appears in some places; this may be due to a broken thread. Can be restored through repairs, special varnishes
- Defrosting does not occur even though the system is working properly. This can happen if the glass is heavily iced and there is not enough voltage; you need to clean the ice yourself.
There can be many reasons for the breakdown, ranging from the switch to the wiring itself, which can only be repaired by disassembling the entire dashboard.
If the reason is a broken thread, you can try to restore it. There are many different ways to solve this problem, which look like this:
- To eliminate a break, up to one millimeter, you need to prepare a special adhesive composition, for example (Kontaktol, Elekont), a syringe, or a glass cleaner. Special glue is applied to the area where there is a break, and insulating tape is tightly applied on both sides.
- You can use soft soldering or resort to the option of galvanic application of the material. But this procedure is labor-intensive and difficult to carry out in garage conditions.
- If the width of the gap exceeds two millimeters, you need to use a tinned copper core with a cross-section of 0.2 millimeters. It is better to perform soldering with POS-61 solder, but do not tinning the thread.
Electrical wiring failure
The fuse is good - check the heater. If it still doesn't work, do some electrical diagnostics. Often the wires on the mount are broken or broken. What to do? The algorithm is like this:
- put the button in the “on” position;
- we check the voltage at the terminals (the place where the wires are connected);
- if there is no U, we look for a break in the wiring;
- We clean the terminals and connections from traces of corrosion.
Contact an auto electrician if you are unable to trace the path of the electrical wiring.
Reasons for failure
You need to start looking for the reasons for the lack of heating by checking the fuse, which for various reasons can fail.
To find it, it is useful to use the operating instructions for a specific car. If this element fails, it must be replaced immediately, and then, if necessary, continue diagnostics.
Another reason for the loss of functionality of the entire system may be the failure of the relay.
In this case, this part simply needs to be replaced, since it cannot be repaired.
Next, you should check the voltage at the contacts of the main vertical buses with the heating button on. It should correspond to a value of 12 Volts.
Otherwise, it is recommended to clean the terminal contacts and other connection points that may oxidize and therefore not allow electricity to pass through. If after such procedures the voltmeter does not show anything, then this indicates an open circuit.
The specific location of damage can be detected visually or using a multi-function tester. From one to three strips can be damaged at the same time.
Design and equipment
Mirrors equipped with heating can be divided into 3 categories:
- Regular ones. Installed from the factory and included with the vehicle. Increasingly, heating is already installed in the basic version of equipment.
- Model. Sold separately and suitable for specific make and model vehicles. Such mirrors can be installed instead of standard ones, where there is no heating.
- Universal. Similar designs of mirrors, which include heating, are designed for a wide range of cars of different brands and models. When selected correctly, they look no worse than standard or model ones.
Heated mirrors can be divided according to their shape, dimensions, and the type of heater used.
In short, heated rear mirrors include 3 main components:
- switch;
- heating element;
- fuse;
- wiring.
The unit is connected to the on-board electrical network, where a voltage of 12 V is normally provided. When the corresponding button is pressed, current is supplied to the heating element and heating begins.
This is quite enough for the mirror itself to heat up and the adhering snow or ice that has formed to melt.
As for the heating elements themselves, they can be presented in the form:
- an ordinary incandescent light bulb;
- tungsten filaments;
- special boards;
- films with built-in elements to which current is supplied.
Each system has its own characteristics, advantages and disadvantages. But they can all fail at some point.