The technology has been tested on this model; the RPM (front axle gearbox) has an independent suspension as standard. To save time, you can purchase ready-made tying kits.
Many car enthusiasts make brackets, plates and fastenings with their own hands, providing colleagues with drawings of their own design.
Important! Such structural elements must be made of durable steel. It is unacceptable to use factory silumin elements as a platform for fastenings.
General rules for revision:
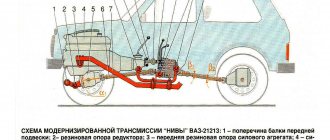
1. The untethered bridge must be fastened at three or four points that do not have a rigid connection with the engine. 2. The front axle beam and anti-roll bar are used as supports. 3. When determining the new position of the RPM, it is important to prevent horizontal displacement of the axes of the propeller shaft and axle shafts. The bridge can be uncoupled using a gearbox suspension kit from Chevrolet NIVA.
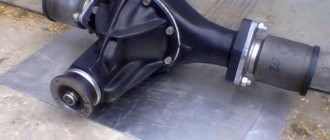
Therefore, most car owners prefer steel brackets made independently or in the factory. For cars taking part in off-road competitions, a version of the RPM steel body has been developed. This gearbox is structurally equipped with lugs for independent suspension. There are also additional subframes for extreme conditions of use of the NIVA. When installing the latter, the question: “how to untie the front axle” does not arise, since the gearbox is mounted in the subframe.
Installation process
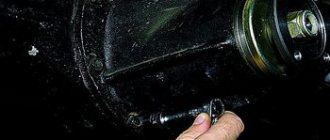
In accordance with the specific brand of Niva, a device is purchased that allows you to disable the front axle drive. The installation process itself does not cause any particular difficulties for car enthusiasts. First, the transfer case on the Niva is dismantled. This procedure is not provided for the Niva-Chevrolet car. Then you should unscrew the nuts that secure the position of the cover on the front axle drive housing. Remove the crankcase cover together with the clutch and shaft.
Now the question of how to disable the front axle on the Niva disappears by itself, since all that remains is to install the axle disabling device on the seat of the dismantled cover.
Sequence of work.
1. We purchase (make) a kit for untying. When making it yourself, we drill holes in the pan in accordance with the diameter of the studs. 2. We securely install the car on supports, preferably above the inspection hole. 3. Drain the oil from the gearbox. 4. We dismantle the CV joint drives, having first freed the steering knuckles of the wheels. 5. Disconnect the front driveshaft from the flange. 6. We remove the axle gearbox from under the car. 7. On a flat working surface, separate the bottom tray and side covers of the RPM. 8. On top of the CV joint drive covers, using elongated studs, screw the earring brackets. It is possible to replace the installation sequence of covers and brackets, depending on the kit you choose.
9. Instead of a standard pan, we attach a reinforced one, with installed clamps for attaching the anti-roll bar to the beam. In addition to the factory gasket, we use sealant. The pallet will experience additional loads, so the tightness needs to be improved. 10. We hang the RPM with the rear mount on the stabilizer beam. We center the axis of the propeller shaft and the axis of its flange in the gearbox. 11. On the bridge beam we mark the fastening eyes for the brackets for the front suspension of the gearbox housing. 12. We weld the eyes to the bridge beam and perform anti-corrosion treatment. 13. We fix the earrings in the eyes using polyurethane or rubber silent blocks. 14. Check the vertical . 15. Attach the axle shafts and driveshaft, secure the steering knuckles. 16. Fill the gearbox with oil according to the operating instructions. 17. Without starting the engine and without removing the car from its supports, check the free rotation of the wheels and the front driveshaft. 18. We make a test drive, after which we re-inspect the car in the inspection pit.
Adjustment
It will not be possible to adjust the drive gear without a torque wrench and mandrel A.70184. You will also need:
- level;
- calipers;
- flat feelers for measuring gaps;
- adjusting rings with a pitch of 0.05 mm;
- perfectly straight metal rod.
The drive gear is adjusted as follows:
- Align the crankcase mating plane horizontally (you will need a level);
- Install a metal rod onto the bearing bed.
- Place the adjusting rings and measure the distance from the rod to the mandrel.
- Install the adjusting ring. Its thickness is calculated as the difference between the actual clearance and the deflection value indicated on the new gear.
- Install the shaft and related parts in place, secure the drive gear flange.
- Using a torque wrench, tighten the nut with a force of 12 kgf.
- Using a dynamometer, check the moment at which the drive gear shaft begins to rotate. If this value does not correspond to 7.6 to 9.5 kgf, the nut needs to be tightened.
Important: the tightening torque should not exceed 26 kgf. If it is not enough, the spacer sleeve must be replaced. Adjusting the gap between the parts of the main pair is carried out in several stages:
Adjusting the gap between the parts of the main pair is carried out in several stages:
- Tighten the nut located on the driven gear side to completely eliminate the gap.
- Using a caliper, measure the distance between both covers.
- Tighten the second nut.
- Check the distance between the two covers. It should grow by 0.1 mm.
- By rotating the first nut, achieve a gap between the gears in the range of 0.08-0.13.
All that remains is to turn the gear while checking the clearance. If it remains unchanged, the adjustment is complete. A decrease or increase in backlash during gear rotation indicates deformation of the differential housing. You can try to trim it on a lathe, but it is better to replace it with a new one.
Disabling the front axle by removing the cardan
One of the cheapest and easiest ways is to simply remove the front driveshaft. Niva becomes rear-wheel drive. Removing the cardan will take no more than 10 minutes, but this method has its own drawback - it is inconvenient, because to do such work you need to crawl under the car, and carrying the cardan with you when you suddenly need the front axle is not a very good idea. However, if the front axle is not needed in summer, then this method has a place to be.
General rules for revision:
1. The untethered bridge must be fastened at three or four points that do not have a rigid connection with the engine. 2. The front axle beam and anti-roll bar are used as supports. 3. When determining the new position of the RPM, it is important to prevent horizontal displacement of the axes of the propeller shaft and axle shafts. The bridge can be uncoupled using a gearbox suspension kit from Chevrolet NIVA.
Therefore, most car owners prefer steel brackets made independently or in the factory. For cars taking part in off-road competitions, a version of the RPM steel body has been developed. This gearbox is structurally equipped with lugs for independent suspension. There are also additional subframes for extreme conditions of use of the NIVA. When installing the latter, the question: “how to untie the front axle” does not arise, since the gearbox is mounted in the subframe.
General information
- A transmission is a set of mechanisms that connect the engine to the wheels.
- The front axle is the part of the transmission that connects the front wheels of the car to the frame or to the car body.
The latter will be discussed in the article. The front axle of a passenger car can be different in design, but in cars like Niva-Chevrolet, the front axle is continuous and rigidly connected to the crankcase, since the car is equipped with permanent all-wheel drive. The main advantage of a continuous axle is that due to the rigid fixation, the tires wear out much less, but at the same time all the vibration from the wheels is transferred to the car.
Even such an element as the front axle can help you stand out; Niva used all its resources - unlike the rear axle, the front axle is not only driven, but also steered. The cross-country ability of both cars under consideration, the Chevrolet Niva and Niva 2121, makes many prestigious “SUVs” envious, since many modern cars, although called SUVs, do not have permanent all-wheel drive.
Some useful tips:
• Since the engine no longer bears additional load, you can replace the standard hard cushions of the power unit with softer ones, from VAZ classics. • When attaching the lugs to the front axle beam, welding should be carried out by an experienced welder who is familiar with the technique, which allows not to “release” the metal. The beam is a load-bearing structural element of the car, and its strength should not be reduced. • The welding areas should be cleaned of scale, then the joints should be thoroughly primed and painted. • After untying, the RPM should not touch the engine and beam either in a static position or while the vehicle is moving. • If you are producing a suspension lift, you should select a decoupling kit that takes into account the increased angles of the CV joint and driveshaft. • The silent blocks of the brackets of the untethered gearbox are subject to wear in the same way as the cushions of the power unit or suspension elements. The replacement of these elements should be included in your list of operations during maintenance.
Kit options
On sale you can find several different options for ready-made kits for decoupling the VAZ 2121 front axle gearbox. Let's look at some of them.
Ready-made kit kit ZSTehnology OPM-1 for untying the Niva RPM, which includes a steel front gearbox housing cover and brackets connected through silent blocks and welded to the front beam. The retail price of this complex is 3100 rubles. Among the disadvantages: you will have to buy additional clips and stabilizer bushings.
A more durable and complete ZSTehnology OPM-2 Ultra-PRO kit. Unlike the previous one, the package includes all the necessary parts and can be used on all modifications of the Niva. The price in stores is 4,000 rubles.
The kit for independent mounting of the VAZ 2121-2131 front axle gearbox from SONDA is a similar set of brackets and a steel plate for additional protection. The cost of such a set is 4100 rubles.
There are companies that are engaged in the modification of Niva cars; they can custom make a decoupling kit with better quality parts, which will increase the reliability of the unit. Some owners of domestic SUVs prefer to make homemade parts for decoupling the front axle.
Sequence of work
- We purchase (make) a tying kit. When making it yourself, we drill holes in the pan in accordance with the diameter of the studs .
- We securely install the car on supports, preferably above the inspection hole.
- Drain the oil from the gearbox.
- We dismantle the CV joint drives, having first freed the steering knuckles of the wheels.
- Disconnect the front driveshaft from the flange.
- We remove the axle gearbox from under the car.
- On a flat working surface, separate the bottom tray and side covers of the RPM.
- On top of the CV joint drive covers, using elongated studs, we fasten the earring brackets. It is possible to replace the installation sequence of covers and brackets, depending on the kit you choose.
- Instead of a standard pan, we attach a reinforced one, with installed clamps for attaching the anti-roll bar to the beam. In addition to the factory gasket, we use sealant. The pallet will experience additional loads, so the tightness needs to be improved.
- We hang the RPM with the rear mount on the stabilizer beam. We center the axis of the propeller shaft and the axis of its flange in the gearbox.
- On the bridge beam we mark the fastening lugs for the brackets for the front suspension of the gearbox housing.
- We weld the eyes to the bridge beam and perform anti-corrosion treatment.
- We fix the earrings in the eyes using polyurethane or rubber silent blocks.
- We check the vertical alignment of the propeller shaft and CV joint drives.
- We attach the axle shafts and driveshaft, and secure the steering knuckles of the wheels.
- Fill the gearbox with oil according to the operating instructions.
- Without starting the engine or removing the car from its supports, check the free rotation of the wheels and front driveshaft .
- We make a test drive, after which we re-inspect the car in the inspection pit.
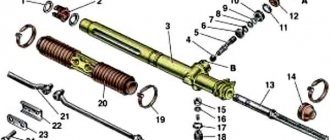
Replacement procedure: step-by-step algorithm
There is no point in repairing a worn-out unit, so the outer CV joint of a Niva Chevrolet is always replaced. Replacing a damaged “grenade” is a labor-intensive operation. You will need a set of wrenches, pullers, and experience in performing plumbing work.
Outer CV joint
The damaged unit is replaced using an axle shaft with grenades removed from the vehicle. The body is raised with a car jack, a reliable stand under the car and wheel chocks are installed. This helps protect the repairman from possible injuries. Before lifting the car body, loosen the hub nut. You will need a head and an extension for the key. Next, you need to remove the wheel and unscrew the lower mount of the front shock absorber. Take it to the side and secure it with improvised means. Also unscrew the bolts on the ball joint.
Then they completely remove the nut on the hub and, pulling it towards themselves, take out the “grenade”.
Release the boot mounting clamp and move it as far as possible on the axle shaft. A hammer with an extension is used to hit the body of the “grenade” until it is removed from the axle shaft. Before installing a new part, be sure to change the retaining ring on the axle shaft, since it is disposable. Installing the hinge is done in the reverse order.
Inner CV joint
This faulty unit on a Chevrolet Niva can only be replaced after the axle shaft with constant velocity joints has been completely removed. The “ear” and skis are released, which will allow you to rotate the bridge when removing the axle shaft. For ease of operation, the dismantled axle shaft with “grenades” should be clamped in a vice. Replacing the internal CV joint of a Niva Chevrolet occurs as follows:
- Remove the clamps securing the protective boots and move them as far as possible.
- Use a hammer and extension to remove the damaged “grenade”. A few blows are enough to dismantle the faulty part.
- Before installing a new hinge, carefully clean the splines and install a new retaining ring, since it is disposable.
- A new CV joint is installed on the axle, the protective cover is additionally filled with lubricant, and the boot is clamped with a clamp.
The axle shaft with new grenades is assembled and mounted in the reverse order. The process is fully presented in the video:
It will be possible to extend the service life of constant velocity joints if you monitor the condition of the protective covers on the grenades, avoid bad roads and use only high-quality spare parts.
Each car has equal angular joints, which are called grenades; they have this name because of their similarity to a military object. Thanks to it, when turning while driving, torque is transmitted from the engine to the wheels. This element in the car appeared when they began to produce cars with front-wheel drive, and before that, torque was transmitted through a conventional cardan. The main problem with this design was that it had a short service life, and it constantly broke down, which led to the creation of a new, improved design, resulting in the appearance of the outer and inner CV joints of the Niva Chevrolet
Thanks to the CV joint, the torque occurs evenly, taking into account the fact that the wheels relative to the car at this moment can be at different angles. This part, like any other part in the car, can fail and will need to be replaced.
The main reasons why it may break may be the following:
- Long service life. As a rule, it is advisable to replace it after reaching 10,000 kilometers.
- Aggressive driving. Sharp turns, fast driving on a bad road.
- Dust, dirt, and water get into the device.
Do-it-yourself Niva front axle decoupling drawings
Tipitop 02 Feb 2010, 02:06
Before I get around to welding, tell me: is it worth tearing the gearbox off the engine and what does it give?
I bought spare parts, climbed under the car with tools. I'm waiting for opinions.
So, after collecting information and listening to opinions, I did it!
I needed to make a pair of shaped brackets from a 40X40 corner, bending them with a hammer in a vice, trying them on in place.
So the oil is filled, a tube is put on instead of a breather and off to testing.
IMPRESSIONS: it hasn’t gotten worse - that’s for sure! The gearbox was cleaned - I dreamed about it! Otherwise, nothing revolutionary has happened (perhaps the vibrations somewhere in the front part of the car have decreased, but this is subjective - it is also possible self-hypnosis, and before there were no special complaints about vibrations) in the near future I will sleep peacefully - the plan for separation has been completed
front gearbox from the engine, is it worth it?
Paulus 02 Feb 2010, 03:10
front gearbox from the engine, is it worth it?
skat 02 Feb 2010, 03:14
If you're going to install locks, then you need to. This is implemented on the Shevik. reduces vibrations. I read it somewhere on the internet.
PS and in general. wow, your thoughts come at 2 am, but
front gearbox from the engine, is it worth it?
Tipitop 02 Feb 2010, 21:55
PS and in general. wow, your thoughts come at 2 am, but [/quote]
bad thoughts do not give rest to the head, and the SRPM is, as I understand it, a steel gearbox? Is it sold as an additional option or does it have to be made from something? and after the mounts under the engine come off, should they be replaced with softer ones?
Many people make their own stretchers. First, a design drawing is made. Then the old device is dismantled and a new one is attached. The installation process will be almost identical for both factory and home-made structures.
The design can be of two different options:
- With a removable bolt-on subframe. Then it will be possible to repair fasteners without dismantling the device. Such a transfer case can be installed to the side members, which will reduce the risk of damage during movement. But the disadvantage is that the bolts will have to be constantly tightened.
- You can assemble the structure similar to the factory one. The fixation will be reliable, but repairs will not be possible without dismantling the box. In addition, the box will have to be attached directly to the bottom, so problems with the base may arise.
Tools and materials
The following tools will be required:
- Bulgarian;
- drill and drill bits;
- ruler;
- calipers;
- hammer;
- center punch
You also need to prepare materials:
- sheet of steel 0.4 cm 52×35 cm;
- corner 3.5x3.5 cm - 70 cm;
- corner 7x5 cm - 40 cm;
- corner 7x7 cm - 40 cm;
- channel No. 16 – 73 cm.
Bolts of various sizes are also needed for connections.
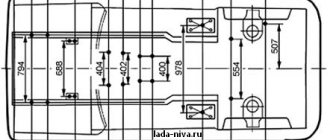
Drawings for manufacturing
The drawings can be seen in the following photos:
According to the drawings, we need to make blanks for the basic structure. They do the following:
- The edge of the channel is processed. Using a grinder, cut out the windows and make oblong cuts with a large angle grinder, and across with a small one. The cuts must be completed 0.8 cm from the edge, since this distance is the same as the walls of the side joints. Having cut out the windows, they draw out the contours and chamfer them. They make holes.
- Using a corner, install fasteners to the side members. It is necessary to make holes for bolts in the products in advance.
- Now bolts are used to mount the steel sheet to the subframe. To drain the oil, appropriate windows are cut out in the plate.
Leverage
All SUVs actively use all their resources, including the front axle. At the same time, Niva manages to use such resources as people’s nerves. In addition to the familiar gear shift lever and handbrake, Niva boasts another lever that serves to control the transmission - downshift, return to upshift, lock and unlock the differential. At the same time, those who got behind the wheel of this car for the first time may have big problems - after engaging a lower gear, the lever does not want to return to an upshift! The secret is that return is only possible with the clutch depressed and at low speed. Some drivers neglect the instructions and remain unaware of the generally accepted method. Through trial and error, they figure out that shifting is possible when driving in reverse in a circle at extremely low speeds. And although this method works, its convenience is highly questionable.
General rules for revision
1. The untethered bridge must be fastened at three or four points that do not have a rigid connection with the engine. 2. The front axle beam and anti-roll bar are used as supports. 3. When determining the new position of the RPM, it is important to prevent horizontal displacement of the axes of the propeller shaft and axle shafts.
The bridge can be uncoupled using a gearbox suspension kit from Chevrolet NIVA.
Therefore, most car owners prefer steel brackets made independently or in the factory.
For cars taking part in off-road competitions, a version of the RPM steel body has been developed. This gearbox is structurally equipped with lugs for independent suspension. There are also additional subframes for extreme conditions of use of the NIVA. When installing the latter, the question: “how to untie the front axle” does not arise, since the gearbox is mounted in the subframe.