A radio is an indispensable attribute of any modern car. As a rule, more functional equipment is purchased instead of a standard device. In any case, the radio must be connected correctly. Note that there are several options for solving this problem. In this article we will list the main methods for connecting a car radio.
Almost all devices of this type today are equipped with a universal connector, thanks to which even a novice car enthusiast can handle the connection. There are also various adapters on sale that can make the task easier. Another option is to connect the wires according to a color scheme (usually it comes with the radio).
How to install a car radio
Installation of a car radio is most often carried out in a standard place on the front panel of the car. Otherwise, installation of the radio is done using a special mount that you can make yourself. Since 1 DIN radios are the most common, the seats have a height suitable for installing these devices. For 2 DIN sizes, additional modifications to the dashboard will be required to install a player in the car.
You should check the package contents of the device before installing the car radio to make sure you have all the necessary parts. Installation of the standard radio is done using a special frame that is included with the device. It is used to fix the radio in the car. First, the box for small items is removed, which is located in the standard place for installation. Then the metal frame is inserted.
Using the supplied special tool, pick up and bend the fixing tabs.
The next stage of installing a car radio with your own hands is securing it to the seat. Some devices have a threaded hole on the back wall. A pin is screwed into it, with which you can further secure the player. To do this, attach a special strip to the back of the dashboard.
To install a non-standard radio, you will need to check which mount is used and whether it fits the seat. If there are threaded holes on the side walls of the device, then installation of the radio on the car is carried out by screwing it to the dashboard with bolts.
Shutdown
This is done in the following order:
- Press button 2 and enter MENU. Then select SISTEM, at the next stage press PW SAVE
, all that remains is to turn off the radio with the OFF button. This is how we switch to energy saving mode; - Turn off the radio with button 1. At the same time, a clock indication should appear;
- We press button 4, eventually the display goes out.
Having completed this procedure once, you can subsequently turn off and turn off the radio with the standard button 1. Sometimes, resetting the settings can occur after disconnecting the speaker system from the power supply. In this case, you should repeat the steps described above.
How to properly connect a car radio
Connecting the car radio is done in several ways:
- Using an ISO connector.
- Without using chips by splicing wires.
- By directly connecting the power wires to the battery terminals.
- Via the ignition switch or a separate switch.
- Through a security alarm.
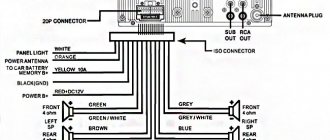
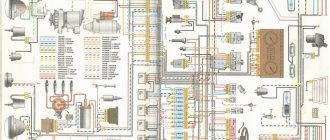
Car radio diagrams, which help with the correct connection, are printed on a label on the top cover of the device. They indicate the color marking of the wires established by the generally accepted standard:
- red - power management;
- yellow - power supply to memory and amplifier;
- black - mass;
- blue with a white stripe - power supply to the antenna with amplifier.
For reliable fixation, the wiring can be secured using cable ties.
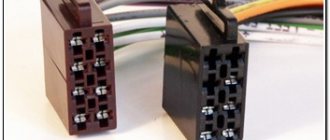
Connection with and without chip
The first option for connecting the radio to the car is suitable if you have an ISO connector, which is built into recently released devices. If the tape recorder is equipped with a proprietary connector, then you need to purchase an adapter suitable for it, which may or may not be equipped with an additional feature. In the first case, if there is a mating part in the car wiring, the connectors are inserted into each other.
In the event that the proprietary adapter or the radio itself does not have a chip, the cable is connected by twisting or soldering the wires. The last connection option without a chip guarantees a more reliable connection. The car radio circuit determines the purpose of the wires by color and the presence of additional contacts. Some car video players have a parking line. It connects to the parking brake button. This feature allows you to watch movies in the car while the handbrake is on.
Connection via battery
If the tape recorder has a high output power, then it can be connected directly to the battery. Such radio tape recorders are usually equipped with subwoofers and all this together reduces the capacity of the ignition contacts, and reliable operation of the device becomes impossible. This method can also be used if all devices are turned off when the engine is turned off. The car radio is connected using a cable whose thickness must be at least 3 mm2.
First, the wiring is laid under the hood, avoiding heated and moving parts. And then the cables are led through a special hole under the dashboard, and after installing the tape recorder, everything is carefully sealed to prevent moisture from entering.
To connect to the battery terminals, you need to unscrew the nuts from each of them and insert the stripped car radio wire under the bolt, and, accordingly, tighten the nuts again.
Connection via ignition switch
The positive side of connecting the tape recorder through the ignition switch is to prevent battery discharge during prolonged inactivity. This occurs due to the fact that the yellow wire of the tape recorder, which is responsible for power supply during operation of the equipment, is disconnected. And the red one must be connected to a continuous current source.
The yellow wire, starting from the diagram, must be screwed to the ignition switch terminal, which is under voltage if the ignition is on. This can be determined thanks to the control lamp. This method will ensure that the car radio works if the ignition is turned on.
Via a button instead of an ignition switch
It is possible to connect the car radio via a button, which can turn off the power supply if the tape recorder is not used for a long time. This will help prevent rapid battery discharge.
To connect the car radio, you need to connect the output to any of the wires of the car's power supply network. To turn on the radio, you will need to press a button. And if you need to leave the car for a long time, you need to turn off the power with the switch.
Via alarm
A security alarm can be used to connect a multimedia head unit to a car. An additional 5-pin relay is included in the equipment circuit, which breaks the power supply circuit of the radio when the security mode is activated. The switching unit is placed in the gap in the power supply wire to the amplifier; a protective fuse rated for a current of 10-15 A is installed in front of the relay. To turn off the power to the musical equipment, the external blocking control output (negative pulse) is used.
Installation of the radio and connection to the on-board network through the alarm unit is recommended to be carried out in a specialized service. If switching is incorrect, the head unit continues to consume current up to 200 mA, which leads to a decrease in battery capacity. Some security systems require the installation of an electronic unit built on low-current transistors and additional resistances. The design of the module depends on the output logic of the car alarm.
Method of connecting head equipment via a double relay and a security complex unit:
- Connect the yellow cable from the battery through pins 30 and 85 of the first relay, and then route the cable to the player.
- To contact 86, located on the first relay, lay the signal cable from the central locking control unit (negative pulse).
- Connect contact 87A of the first relay to plug 30 located on the second switching block. Contact 86 from the second relay is connected to the car body.
- From plug 85 on the secondary relay, the wire is routed to an external amplifier or antenna.
- The red wire goes through the ignition switch and the diode. Then the circuit is connected to pin 87, located on the second relay, and output to the head unit block.
Speaker wheezing
Some drivers encountered a situation where the speakers began to wheeze. At the same time, this does not happen all the time, but only from time to time. Of course, the problem could be a faulty speaker. But, often the reason turns out to be unsuccessful configuration of the system itself. Therefore, troubleshooting should begin by viewing the settings. You are interested in the balance menu. Here you can evaluate how the sound is distributed between the speakers. Pay attention to the uniformity of its distribution. Most often, unbalanced low frequencies cause wheezing.
If everything is correct in the settings, then it makes sense to pay attention to the wire connections. There may be a bad connection somewhere. That is why the speaker wheezes. This may be indirectly indicated by the irregularity of wheezing. Especially if the speakers are in the doors. When you open the door, you move the wire, one time the contact may be normal, another time, not so much. The cause of wheezing may be a broken capacitor.
. In this case, you need to check it.
Take a radio component with the same capacity. You need to connect it in parallel with the standard one. After that, turn on the radio and check the result. The absence of wheezing indicates a problem with the capacitor. In this case, the current passed through the additionally installed part. Unsolder the faulty air conditioner and install a new one in its place.
Pioneer DEH-1600UB
Short description
DEH-1600UB is the purest sound with a power of 4 x 50W. To amplify it, you can connect other stereo components - front, rear speakers or a subwoofer via the RCA preamplifier output.
Play CD or CD-R/RW with support for MP3, WMA and WAV files, or use backlit USB or auxiliary input to connect external devices.
Characteristics
| Radio | yes, digital tuner |
| CD player | There is |
| MP3 player | There is |
| DVD player | No |
| Blu-ray player | No |
| Amplifier | There is |
| Equalizer | There is |
| Navigator | No |
| TV tuner | No |
| Peak power | 4×50 W |
| Standard size | 1 DIN |
| CD changer interface | No |
| Color | black |
| Formats | CD-Audio, MP3, WMA |
| Carriers | CD-R, CD-RW |
| Display type | monochrome |
| Infrared remote control | No |
| Joystick on the steering wheel | connection possible |
| Auto search for stations | There is |
| Inputs | USB |
| Front USB | There is |
| Front panel audio input | There is |
| Exits | PreAmp rear, PreAmp subwoofer |
| Bluetooth support | No |
| Removable panel | There is |
| Range support | FM, NE |
| RDS support | RDS, RDS/EON, RDS/PTY |
| Long range tuner | There is |
| Adjusting the tone | There is |
| Number of equalizer bands | 5 |
| ID3 tag support | No |
| CD text | No |
| Russian-language menu | There is |
| Dimensions (WxHxD) | 180x50x160 mm |
| Peculiarities | rear speakers or subwoofer |
Clicking noises when the engine is running
{banner_content}Many owners of standard radios are faced with the appearance of periodic clicks when the motor is running. To begin with, you need to understand the reason for the appearance of such a not entirely pleasant phenomenon. It's all about the car's energy system. When the power unit operates, small voltage surges regularly occur. This results in interference.
In principle, the radio tape recorder has protection against this. But the standard noise suppressor does not always cope with the problem. Sometimes this happens due to its failure, which is not a rare occurrence. You can fix the problem by simply connecting power to the radio through a noise filter. This is guaranteed to save you from clicking acoustics.
Connection
The Pioneer car radio can be connected in two ways. The first of them will be presented below. The first connection method involves using a standard connector, and the second involves connecting without standard connectors.
Note. It is worth knowing in advance that the use of the second connection method is not supported by car radio manufacturers and the warranty will no longer be valid. In addition, there is a slight chance of making a mistake in the process of connecting the wires.
On the other hand, the second connection method is popular among motorists due to the fact that there is simply no other choice. In particular, if the vehicle does not have an appropriate connector for connection, you have to use this method.
Attention. Even if you use the first connection method, you need to be extremely careful and do everything very carefully. It is first recommended to make sure that the wiring of the terminals on the connector is carried out correctly.
Pioneer car radio connection algorithm
Pioneer instructions for car radio
ISO plugs are an internationally accepted connection standard for all car radios. So, to connect the car radio in the first way you will need:
- Plugs;
- Adapters;
- Insulating tape.
Let's get started:
- We cut the wires from the radio plug or car wiring.
- We connect the car radio according to the color pinout given above.
- All wires are carefully insulated with tape.
Note. Some experts believe that insulating wires will not look very aesthetically pleasing or even reliable. This is especially true in the winter season, when electrical tape on the wire does not provide adequate reliability. Such connections may cause a short circuit. On the other hand, you can use heat shrink tubing or specialized clamp terminals and solve the problem.
Installing contacts according to the ISO standard makes it possible to subsequently install a new pioneer car radio without laying wires. It will be enough to pull out the old radio on the slide, switch the plugs and that’s it.
Instructions for the pioneer car radio
If you have never connected a car radio to your car, you will have to do the following:
- Route the speaker wire for the speakers in accordance with the pinout above.
- Attach the car radio frame to the console panel.
Note. As a rule, modern cars already have places cut out by the manufacturer for connecting the car radio.
- After installing the frame in the finished slot, the metal petals on the frame are bent (this is done with a screwdriver and thus the frame sits securely in its place).
- We connect the radio to the plugs.
- We insert it into the socket until a characteristic click appears.
- We check the operation of the radio.
When dismantling the car radio, it will be enough to unclench the side lobes.
Note. The Pioneer car radio comes with special plates that are inserted on both sides of the radio until it stops. When you need to remove the car radio, they are used to move the side lobes to the sides, thereby allowing the device to move.
The above instructions for connecting a Pioneer car radio are not the only ones. Here the process is described in general terms, and for detailed information it is recommended to use not only step-by-step recommendations, but also photos and videos - materials where everything is carefully shown and explained. The cost of installing a car radio with your own hands will be very low, because you will only have to spend money on a couple of plugs and electrical tape.
Installation method using alarm
Using two five-pin relays and several diodes, you can configure the operation of the radio using an alarm. The sound system is blocked automatically after the alarm is turned on - the power to the radio is turned off.
For the correct operation of such a circuit, it is necessary to familiarize yourself with the wiring diagram in the car and a detailed illustration of the operating principle of the device and the security system.
Power monitoring using an alarm helps prevent battery current leakage during long-term parking. Such control leaves only memory power in working condition.
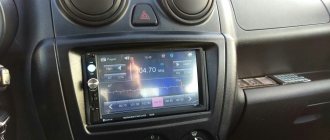
Characteristics and connection of the Pioneer Mosfet 50wx4 radio
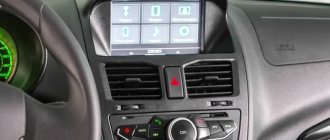
The radio tape recorder meets all modern technological standards, both visually and in terms of technical equipment. It is equipped with a touchscreen, thanks to which all operations on it have become even faster and easier - with just a few taps on the touch screen. At the same time, the design of the radio is not devoid of classic “decoration” in the form of buttons responsible for accessing the main functions. It must be said that externally Mosfet 50wx4 is in no way inferior to factory devices even from the most famous automakers, and therefore is suitable as an alternative for any car, even for some representatives of the business class.
Connection diagram
general characteristics
In terms of functionality, the new Pioneer is also not inferior to its competitors. With its help, you can listen to all radio stations available in the region where the car is located, music from various external media, from classic CDs/DVDs to SD and flash cards, and watch videos. Thanks to the large diagonal size and fairly high resolution of the display, the user can enjoy the startup screen and colorful menu design instead of the small monochrome backlight typical of most car radios.
Technical features
Thanks to the combination of qualities such as compactness and technical equipment, the new Pioneer Mosfet 50wx4 boasts excellent information content. It’s not difficult to understand the functionality; it’s enough to understand the meaning of each key, with the help of which the adjustment is carried out. The inscriptions on the buttons and the device menu itself are not Russified, so they will have to be read in English.
However, there should be no difficulties:
- The “Audio” button allows you to switch from the radio station drying mode to music recorded in the device’s memory or on external media;
- “Func” is responsible for accessing the function menu;
- The “Repeat” key, when pressed, replays the song that was played last in the queue;
- The volume button has the classic appearance of a rotating joystick; with its help, the playing track can be made quieter or louder by systematically rotating it down or up, respectively;
- The number keys “1”, “2”, “3”, “4”, “5”, “6” are responsible for switching radio frequencies - for each frequency, thanks to the large amount of internal memory of the device, there can be up to six radio stations, and among them Supported formats include both FM and AM. Using these buttons, switching occurs as quickly as possible, without the need to search and configure again;
Pioneer Mosfet 50wx4 is equipped with a built-in headset, so you can talk on your mobile phone even while driving, without holding it in your hands. In addition, all SMS/MMS notifications received on the phone when the “hand's free” mode is turned on are instantly duplicated on the radio screen, where they can also be opened and read.
Of course, there are connectors for all modern media. It is possible to connect headphones and enjoy the music alone - this will be useful when it is extremely important for the driver to concentrate on the road, and the front passenger prefers to ignore these worries.
The integrated tuner is responsible for searching for frequencies. The range can be selected by the user independently, through a manual search, or this process can be automated. In most countries of the world, the tuner works very well - it regularly picks up all existing radio stations that are available for listening. The exception is US frequencies.
Other nuances
Installation of the Pioneer Mosfet 50wx4 radio tape recorder occurs in accordance with all standards for connecting such devices; as a rule, it comes with instructions in which this process is described step by step. More details about the installation of this model can be found in the video:
All malfunctions, as a rule, can be resolved either by rebooting the radio, or by returning it to factory settings through several manipulations through the menu. It should be remembered that the settings must be partially or completely reset after disconnecting the entire electrical network of the car from the power source - i.e., after disconnecting the battery. To prevent breakdowns and malfunctions, you should prevent various liquids and mixtures from coming into contact with the surface of the radio, do not connect devices to it that have computer viruses that can disrupt normal operation, and use it as carefully and carefully as possible.
How to install and connect
In many cars, the car radio is installed in the center console. Installation of the device does not cause any difficulties. The standard location corresponds to 1 or 2 DIN standard size of the receiver. If the previously used head unit was connected via an ISO connector, then you simply need to connect it to the block on the back of the radio. Otherwise, you need to buy a chip suitable for this model and resolder the wires.
To prevent the receiver from consuming energy when the ignition is turned off, a button is installed in the gap in the supply wire to break the circuit. Most often, power to the device is taken from the on-board consumer connected after the ignition switch.
Car radio pinout
Today, as a rule, identical ISO connectors are installed. Therefore, replacing it will not be difficult: you just need to rearrange the plug. If a plug gets lost or broken, remember or label each wire to connect the device. The pinout is shown in detail in the schematic drawings. If you follow the instructions, you can easily do everything yourself, and then enjoy music on the road at any time.
Dimensions and connectors
This can be a single-block or double-block (1 and 2 din) device. The 2 din version is twice as high as 1 din, so it is worth calculating the size of the niche in advance. The connector found in the car may differ from the one installed in the radio. If it is missing, install an adapter. This method of connecting a new Pioneer car radio is very simple. We provide you with a complete list of recommendations to make things easier for you.
1 din connection
To carry out the work, you will need a screwdriver and plastic clamps.
If you use a standard pioneer car radio connection diagram with the appropriate ISO connectors, then there will be no difficulties.
If you don’t have them inside your car, connect the wires this way:
- dismantle the panel;
- remove the plugs from the wires, connect the wires as shown in the picture;
- insulate all wiring connections;
- secure the clamps.
2 din connection
It is better to connect a Pioneer brand car radio so that the power comes from the batteries.
This way the device can be turned on at full power. This will significantly reduce interference. Note:
- If your car does not have battery wiring, use stranded copper wire. Those sold together with a Pioneer brand car radio are not suitable. It is important that the wire is long enough to reach from the niche to the battery. Install a fuse (20 A) at a distance of half a meter from the battery.
- Do not twist the wiring from the 2 din device due to possible interference and low power.
- Insulate each wire.
Safety
Regardless of which car radio connection scheme you choose, you will have to pull at least one cable from the battery through the partition into the passenger compartment. A standard hole is sometimes provided for this purpose. In theory, the edges of this hole should be covered with a plastic or rubber bushing. Because even a non-sharp metal edge will wear out the insulation due to friction. We check the condition of the rubber or plastic and change it if necessary.
Standard hole edge protection
At the same time, inspect the other wires that are already lying here. Contact between exposed (damaged) wiring and the car body should not be allowed.
We stretch the wiring throughout the cabin so that the risk of damage is minimal. All areas where damage is possible (even theoretically) require additional protection. Use plastic or rubber pads, bushings, etc. Even 5–10 A is already serious.
Do not connect the negative speaker terminal to the car body. Modern amplifiers in a tape recorder have a different design. By attaching a speaker in this way to save on wires, you can damage the amplifier.