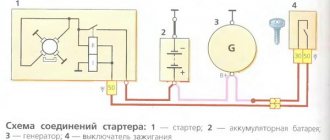
Why do you need a voltage regulator in a car?
This small, simple device performs an important function - voltage regulation. That is, if the voltage is greater than set, the regulator should reduce it, and if the voltage is less than set, the regulator should raise it.
What voltage does the generator relay regulate?
When the engine is running, the generator operates, which generates and transmits electric current to the battery.
If the voltage regulator does not work correctly, the car battery quickly drains its life. The regulator is sometimes called a pill or a chocolate bar.
Types and types of relay regulators
Depending on the type of relay, the method for determining performance also depends. Regulators are classified into 2 types:
Combined relays - this means that the relay itself with the brush assembly is located in the generator housing.
Separate relays - this means that the relay is located outside the generator housing and is mounted on the car body. You've probably seen a small black device attached to the fender of the car, wires go to it from the generator, and from it to the battery.
A distinctive feature of regulators from other devices is that the relays consist of a non-separable housing. During assembly, the body is glued with sealant or special resin. There is no point in disassembling and repairing it, since such electrical appliances are inexpensive.
Winding destruction
It is not very pleasant if the excitation winding is suddenly destroyed. If such a malfunction is present, the generator will not work completely, since there is no magnetic field. The fact is that the operating principle of any generator is based on the presence of a moving magnetic field. This malfunction can be identified very simply. Firstly, if you touch the generator housing during operation, it will turn out to be too hot. Secondly, a light with a battery drawn on it will definitely light up on the dashboard. It indicates that the battery is not charging. You can also use the multimeter in resistance measurement mode. To do this, you need to measure the resistance value between the rings. But these are not all the reasons why the generator does not charge well.
Signs of trouble
If the voltage is low, the battery will not be able to charge. Thus, the battery will quickly run out.
If, after the relay-regulator, the voltage goes to the battery at a high level (higher than set), the electrolyte will begin to boil and evaporate. At the same time, a white coating appears on the battery.
What signs of a breakdown of the car generator voltage regulator may be:
- After turning the ignition key, the warning lamp does not light up.
- After the engine starts, the battery indicator does not go out on the instrument panel.
- In the dark, you can observe how the light becomes brighter and dimmer.
- The car's internal combustion engine does not start the first time.
- If the engine speed exceeds 2000, then all the dashboard lights may turn off.
- Loss of engine power.
- Battery boiling.
Causes of relay malfunction
The reasons include the following observations:
- Short circuit (SC) on any line of automotive electrical wiring.
- Diodes are broken. The rectifier bridge has closed.
- The battery terminals are not connected correctly.
- Water got inside the relay.
- Mechanical damage to the housing.
- Brush wear.
- The relay resource has expired.
Symptoms of loss of battery charging on a Priora
The very first thing that many people pay attention to is that the battery charging light on the dashboard came on. If you have a multimeter at hand, you can measure the output charging current by connecting the contacts to the “+” and “-” terminals, respectively
If even without a load the device readings are less than 13 Volts, this indicates that there are certain problems with charging.
Of course, it is possible (although it is highly not recommended) to remove the “-” terminal from the battery while the engine is running, thereby checking the functionality of the generator. If the engine stalls, this will indicate that there is actually no charging, and accordingly, the generator is faulty.
Also, the charging lamp may glow at half-glow, which also indicates insufficient charging current. If one of the symptoms listed above occurs, it is necessary to diagnose the generator and its parts. If necessary, replace them with new ones. If you have anything to add to this article, you can comment below.
If the battery discharge indicator lights up in the instrument cluster, it means that current is not flowing from the generator to the on-board network and the battery's energy reserves are being consumed. Once the battery is discharged to its minimum value, the engine management system will stop working and the engine will stall. Let's look at the main reasons why charging from the generator to the battery does not occur.
A car has two power sources: a battery (battery) and a generator. The battery is used when starting the engine (to power the starter), as well as for other consumers when the engine is not running. After starting the engine, the main source of current is the generator. It supplies current to all consumers, including the ignition system, and charges the battery.
How long can you drive without a battery-powered generator?
To save battery energy, turn off unnecessary electricity consumers: audio system, heated seats, etc. Also try not to stop and start the engine unless necessary. Under normal conditions, a fully charged battery in the absence of charging current lasts for approximately one hour of driving. See experiment with Lada Largus.
How to find the reason why the generator does not charge the battery
:
1. Check to see if the accessory drive belt (or alternator belt) is broken. If the belt is intact, check its tension.
2. If the belt tension is normal, but the warning light is still on, check that the wiring harness block and the positive wire terminal are securely connected to the generator
Please note that wires may be broken or broken within the insulation
3. Check the reliability of the wire connections to the battery terminals.
4. Check the integrity of the generator fuse in the engine compartment mounting block. Replace the blown fuse if necessary.
If, after all the measures taken, the charging lamp continues to light up while the engine is running, then most likely the generator is faulty (for example, the voltage regulator is faulty). We told you how to check the generator earlier.
The battery and generator are the two sources of electricity. The battery is used to start the engine and to recharge the vehicle's systems if the generator cannot cope with the load. The role of the generator is to provide power to current consumers in the on-board network when the engine is running and recharge the battery. It is this last function that will interest us. During operation, it is not uncommon for the battery to not charge during a trip or to receive insufficient charge. Let's look at the reasons for this.
How to quickly and easily check the voltage regulator
Take a multimeter or voltmeter and measure the voltage at the battery terminals. The check is done in the following order:
- Put the device in voltage measurement mode at up to 20 V.
- Start the internal combustion engine.
- At idle speed, measure the voltage at the battery terminals. In XX mode, engine speed is from 1000 to 1500 rpm. If the generator and voltage regulator are working properly, then the voltmeter should show a voltage of 13.4 to 14 Volts.
- Raise engine speed to 2000-2500 rpm. Now the voltage value with the generator and relay working properly, the multimeter (voltmeter, tester) should show a voltage from 13.6 to 14.2 V.
- Next, step on the gas and increase the engine speed to 3500 rpm. The voltage of working devices should be no more than 14.5 Volts.
The minimum permissible voltage that a working generator and voltage regulator should produce is 12 Volts. And the maximum is 14.5 Volts. If the device shows a voltage value less than 12 V or more than 14.5 V, then the voltage regulator must be changed.
In new cars, mainly the relay is combined with a generator. This helps avoid pulling separate wires and saves space.
Stories from our readers
“Fucking basin. "
Hi all! My name is Mikhail, now I’ll tell you a story about how I managed to exchange my two-wheeler for a 2010 Camry. It all started with the fact that I began to be wildly irritated by the breakdowns of the two-wheeler, it seemed like nothing serious was broken, but damn it, there were so many little things that really started to irritate me. This is where the idea arose that it was time to change the car to a foreign car. The choice fell on the melting Camry of the tenth years.
Yes, I had matured morally, but financially I just couldn’t handle it. I’ll say right away that I am against loans and taking a car, especially not a new one, on credit is unreasonable. My salary is 24k a month, so collecting 600-700 thousand is almost impossible for me. I started looking for different ways to make money on the Internet. You can’t imagine how many scams there are, what I haven’t tried: sports betting, network marketing, and even the volcano casino, where I successfully lost about 10 thousand ((The only direction in which it seemed to me that I could make money was currency trading on the stock exchange, they call it Forex. But when I started delving into it, I realized that it was very difficult for me. I continued to dig further and came across binary options. The essence is the same as in Forex, but it’s much easier to understand. I started reading forums, studying trading strategies. I tried it on a demo account, then opened a real account. To be honest, I didn’t manage to start earning money right away, until I understood all the mechanics of options, I lost about 3,000 rubles, but as it turned out, it was a precious experience. Now I earn 5-7 thousand rubles a day. I managed to get the car buy after half a year, but in my opinion this is a good result, and it’s not about the car, my life has changed, I naturally quit my job, I have more free time for myself and my family. You’ll laugh, but I work directly on the phone)) If If you want to change your life like me, then here’s what I advise you to do right now: 1. Register on the site 2. Practice on a Demo account (it’s free). 3. As soon as you get something on the Demo account, top up your REAL ACCOUNT and go to REAL MONEY! I also advise you to download the application to your phone, it’s much more convenient to work from your phone. Download here.
Checking the voltage regulator after dismantling it
The removed generator voltage regulator is checked according to the following diagrams: (the first diagram for the old-style LV): It is better to check the relay-regulator assembled with the brush holder, since in this case you can immediately detect breaks in the brush leads and poor contact between the terminals of the voltage regulator and the brush holder. You need to turn on the lamp 1. 3 W, 12V between the brushes. To terminals “B”, “C” and to the regulator ground, connect a power source first with a voltage of 12.14V, and then with a voltage of 16.22V. (a 12V power source can be a battery, and a 16. 18V power source can be the same battery, but with 2..4 of the cheapest AA batteries connected to it in series.)
If the voltage regulator is working properly, then
- in the first case, the lamp should be on,
- in the second - go out.
If the lamp lights up in both cases, then there is a breakdown in the regulator, and if it doesn’t light up in both cases, then there is a break in the regulator or there is no contact between the brushes and the terminals of the voltage regulator.
An example of a practical test of a 54.3702 voltage regulator using a 21W lamp: By the way, a three-level voltage regulator can also be installed on the “ten”.
Checking the generator voltage regulator may be necessary when problems with the battery begin to occur. In particular, it began to undercharge or overcharge. When such a malfunction occurs, it’s time to check the generator voltage regulator relay.
The relay should turn off at 14.2-14.5V
The task of this simple device is to regulate the voltage of the electric current that is supplied from the generator to the battery. When it fails, the battery is either not charged enough or, on the contrary, overcharged, which is also dangerous, since this significantly reduces the battery life.
Agree that such a prospect is not very good because of one small detail. This is why it is so important to monitor the operating condition of the voltage regulator (it can also be called a pill or a chocolate bar). But in order to properly check the voltage regulator, you need to know its type and several important features.
Checking the VAZ 2107 regulator
Until 1996, classic VAZ 2107 cars with a cipher generator 37.3701 were equipped with an old-style voltage regulator (17.3702). If such a relay is installed, then it should be checked as on the top ten (discussed above).
After 1996, they began to install a new generator of the G-222 brand (there is an integrated regulator RN Ya112V (B1).
Checking the regulator separately
- 1 - battery;
- 2 - voltage regulator;
- 3 - control lamp.
To check, you need to assemble the circuit shown in the figure. At a normal operating voltage of 12 V, the light bulb should just glow. If the voltage reaches 14.5 Volts, then the light should go out, and when it drops, it should light up again.
Checking relay type 591.3702-01
Relay test diagram:
Such old relay models are sometimes installed on the classic VAZ 2101-VAZ 2107, on GAZ, Volga, Moskvich cars.
The relay is mounted on the body. It is checked according to the same scheme as the previous ones. But, you need to know the contact markings:
- “67” is the minus (-) contact.
- "15" is a plus.
The verification process is the same. At normal voltage, 12 Volts and up to 14 V, the light should light. If lower or higher, the light should go out.
PP-380
The RR-380 brand regulator was installed on VAZ 2101 and VAZ 2102 cars. Adjustable voltage at the temperature of the regulator and the environment (50±3) ° C, V:
- at the first stage no more than 0.7
- at the second stage 14.2 ± 0.3
- Resistance between plug “15” and ground, Ohm 17.7 ± 2
- Resistance between plug “15” and plug “67” with open contacts, Ohm 5.65 ± 0.3
- Air gap between armature and core, mm 1.4 ± 0.07
- Distance between contacts of the second stage, mm 0.45 ± 0.1.
Testing a three-level relay
As the name suggests, such relays have three voltage levels. This is a more advanced option. The voltage levels at which the battery will be disconnected from the voltage regulator can be set manually, for example: 13.7 V, 14.2 V, 14.7 V.
How to check the generator
To check functionality, you need to:
- Disconnect the wires going to terminals 67 and 15 of the regulator.
- Connect a light bulb to the wires. Bypassing the relay.
- Disconnect the positive terminal of the battery.
If the car does not stall, then the generator is working.
GU or generator
The generator in any automotive electrical circuit performs the dominant functions. The normal functioning and operation of the machine depends on it. Reliable PG is installed in all foreign cars and models of the domestic automobile industry.
For example, a GU is placed on the “six”, the charge of which satisfies the need for electricity of any standard component. If you do not overload the generating device of the “six”, then the car is capable of driving many, many more kilometers
However, it is important to carry out preventive procedures in a timely manner - monitor the belt tension and the condition of the brushes
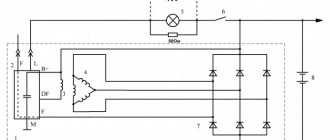
The GU is connected according to the classical scheme. Using the VAZ 2106 generator as an example, let’s consider its functioning. This GU is marked as G-221. It is an AC synchronous electric machine with ELMG excitation. A VB (rectifier) with 6 diodes is built inside the GU.
| 1 | generator rotor winding |
| 2 | generator |
| 3 | generator stator winding |
| 4 | generator rectifier |
| 5 | accumulator battery |
| 6 | ignition switch |
| 7 | battery charge indicator lamp |
| 8 | battery warning light relay |
| 9 | fuse box VAZ -2106 |
| 10 | throttle |
| 11 | temperature compensation resistor |
| 12 | additional resistors |
| 13 | voltage regulator |
A simple and understandable scheme that does not require any subtleties or specific knowledge. On the “six” the PG is located on the engine on the right. It is attached to the tension bar with a nut and to the bracket with its claws.
As you can see, the diagram shows an external regulator. It is marked with the number 13. The generator is indicated with the number 2, the fuse box is indicated with the number 9.
Separately, I would like to consider the relay, which plays an important role in the “six” generator circuit. First of all, it serves to provide information to the driver about the charging status. As is known, it is created by a generating device.
The relay is made on the same principle as all devices that function according to the same properties. The connection is made to terminal 30 of the generator. A separate wire goes through the fuses to the 3Z (lock).
The action of the relay boils down to the following: as soon as the voltage of the BS decreases (falls below the 12-volt value), the relay contacts open, the indicator is activated, giving a sign to the driver.
To better understand the connection diagram, it is recommended that you also familiarize yourself with the principles of battery charging:
- as soon as the key is turned into the 3Z, an electric pulse is supplied to the relay regulator through the fuse (pin 15);
- in the regulator the voltage is transformed and goes further to the positive brush of the GU;
- then, through the brush, the voltage goes to the excitation winding of the GU;
- then - to the negative brush, through which it is brought to ground.
After the relay is activated or after the normal voltage value has been reached in the BS, the GU begins to generate current with the required value. The indicator lamp goes out, and the circuit starts working in factory mode. But when the total voltage drops, the current is not enough, and the contacts open, which leads to the discharge lamp burning.
The constant switching on of the charge indicator lamp indicates that the gene is not working properly. This happens for various reasons. First, you should check the fuses: if they are active, then both relays deserve attention: the regulator and the charger. If they are also in order, then faults must be looked for in the generating device itself.
Before proceeding with replacing the relay, it is recommended to carefully check the functioning of the regulator. The car starts, the speed is kept within the range of 2500-3000 rpm. After this, you need to turn off all current consumers, except the ignition. Then you need to measure the voltage at the battery terminals.
Charging may disappear in the following cases:
- If the generator brushes are worn out.
- In case of malfunction of the generating device.
- If the charging relay is faulty.
- If the rectifier unit (diode bridge) fails.
Thus, installing an external relay-regulator instead of a built-in one will bring a lot of benefits. The fact is that modern charging systems have much more power. Thus, modern memory systems are much more complex than old-style systems.
- Absolutely legal (Article 12.2);
- Hides from photo and video recording;
- Suitable for all cars;
- Works through the cigarette lighter connector;
- Does not cause interference to radios and cell phones.
The VAZ 2106 voltage regulator relay ensures the normal functioning of important vehicle mechanisms and devices. In particular, the adequate operation of the car’s ignition system and its generator, as well as the condition of the battery, depend on it.
Video
Useful video for auto electricians.
How the generator and voltage relay work.
If you find problems with charging the battery from the generator, you need to check the regulator relay. This device is directly responsible for the normal operation and efficiency of battery charging. Moreover, the overall service life of the battery will depend on the health of the regulator relay.
The job of the regulator relay is to accurately maintain the voltage produced by the vehicle's alternator. In other words, the relay regulator functions as a voltage stabilizer. The device keeps the voltage within strictly specified limits, limiting the possible decrease or increase in the value. This regulation occurs constantly and does not depend in any way on the speed of the crankshaft and generator, as well as on the degree of load created by various consumers in the on-board network. It turns out that the relay regulator controls the “plus” of the battery, supplying or stopping the supply of electricity depending on the voltage reading at the battery terminal.
Read in this article
What is it, where is it located, how does it work
This part of the car is responsible for maintaining the voltage of the on-board network within certain limits. The regulator controls the ambient temperature, rotor speed, electrical load level and other parameters. It also protects the sensitive elements of the generator from overloads and is responsible for activating the field winding and other systems.
The product is located directly in the generator. Regardless of the machine model, the principle of operation of the regulator is the same - when the voltage increases or decreases, the component reduces or increases the excitation current to return the indicators to the desired level.
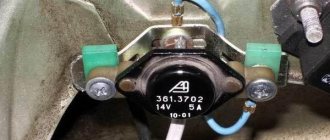
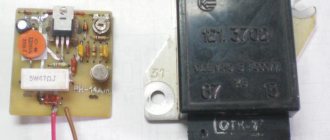
This is what the voltage regulator looks like
How to check the relay regulator yourself
To check the proper operation of the regulator relay, you can remove the device from the car. The second way would be diagnostics directly on the car. To perform the work you will need a test lamp and a multimeter tester.
It is also necessary to prepare a special power supply or charger, wires in advance, and also make sure that the battery is in working condition.
- To check the relay regulator, you need to set the voltmeter mode on the multimeter to be able to measure direct current in the range from 0 to 19 volts.
- Next, connect the multimeter probes to the “poles” of the battery with the engine turned off. Record the data that the voltmeter shows. The voltage should be between 12 and 12.5 volts. After this, the engine starts, and the voltmeter readings are recorded again. Normally, there should be an increase in values after starting the internal combustion engine to an average of 13-13.5 volts.
- Additionally, it is worth considering that as the engine speed increases, the voltage should also increase. In the middle range this figure is about 14 volts, at high speeds it reaches 14.5.
Technical specifications
If the old generator fails, many motorists wonder which generator they should now replace the old one with.
There is no need to invent anything here. The most correct solution is to install the same generator as before, or a more powerful one.
Today, the VAZ 2110 provides for the use of three types of power supply devices:
- Katek 5102.3771. The generator produces 80 Ampere power and its voltage is approximately 14V.
- Katek 94.3701. This is a device with the same parameters. They are not seriously different.
- Catek 120 amp. A generator that is more adapted to modern realities, when in addition to standard electrical equipment, motorists install many additional devices.
If you have a powerful audio system in your car, you use an electric pump powered by the car, as well as a number of other additional consumers, it is recommended to install a 120-amp unit instead of a standard 80-amp generator.
If we take into account the size of the devices, then we can distinguish between ordinary and compact ones. They have a certain difference in design
To be specific, the differences are in the following components:
- Brackets;
- Anchor;
- Excitation wire;
- Drive pulley;
- Number of mounting bolts.
But in reality this does not play a special role. After all, the structure of all generators used for the VAZ 2110 is the same. Therefore, let's look at the circuit and structure of this unit.
| Element | Functions |
| Rotor | He's an anchor. It is a rotating element of the generator, which creates a magnetic field due to the excitation winding located on the shaft. The field wire receives power from the slip rings. They are mounted on the same shaft. There was also room for a drive pulley, field winding wire, bearing assembly and fan impeller. There may be 1-2 last ones |
| Stator | This is a stationary three-phase element that includes three windings. They provide the creation of alternating current. The windings are connected to each other using a triangle or star |
| Frame | A lightweight non-magnetic aluminum alloy is most often used to make the generator housing. The body looks like a pair of covers connected by a bolt. The front cover is located near the drive pulley, and the rear cover is located on the side of the slip rings. Each connecting bolt must be tightened. To disassemble the housing, simply unscrew the mounting bolts. |
| Fasteners | The upper mounting bracket for the generator uses two bolts, while the lower bracket is predominantly mounted on one bolt. In some cases there are two. It is not recommended to modify the brackets, since the factory one performs important functions. The purpose of the brackets is to hold the generator. It is recommended to monitor the condition of the brackets as they are subject to wear and breakage |
| Brush unit | It consists of a pair of graphite brushes, springs that press the brushes, as well as a brush holder |
| Brush holder assembly and voltage wires | This design is typical for modern Katek generators. Therefore, if the regulator fails, you will have to replace the entire assembly |
| Rectifier block | Equipped with 6 diodes, it is responsible for converting alternating current into direct current. It is direct current that is required for the operation of all auto equipment. This element charges the battery, among other functions. |
| Belt drive transmission | The belt drive allows you to increase the speed at which the crankshaft rotates. If the pulley has a small diameter, then the V-belt will wear out faster. Therefore, for small driven pulleys it is recommended to use a poly-V-ribbed drive. It is most often found in modern generators |
Internal organization
The presented device is relevant for all generators used on the VAZ 2110, regardless of their power - 80-120 Amperes.
Margin of safety
If we take into account the standard Katek generator, which is installed on domestic dozens, then its resource is enough for about 10 years of operation or 140 thousand kilometers. The specified safety margin of the device can only be relied upon if it is handled properly
The specified safety margin of the device can only be relied upon if it is handled properly.
Many people fear that a powerful 120 A generator can negatively affect the condition of the battery. In practice, nothing like this happens. Moreover, installing a more powerful unit is recommended if you plan to install an impressive audio system or video equipment on the car.
Tips and tricks
A common culprit for malfunctioning regulator relays may be oxidation of its terminals. This oxidation results in significant voltage loss. In this case, it is necessary to thoroughly clean the contacts and recheck. The voltage reading at the contacts should be similar to those given by the battery itself, that is, there should be no noticeable losses. Reduced voltage at the contacts indicates that they should be cleaned, and the regulator itself is often in working order. After cleaning, the terminals can be additionally treated with special chemicals that prevent further oxidation.
Finally, I would like to add that the cost of the regulator relay is not high. One of the surest ways would be to replace it with a new element if malfunctions are detected in its operation. Moreover, integrated relay regulators are a part in a monolithic housing that cannot be disassembled for repairs. Savings on this device are not justified, since rapid battery failure or a significant reduction in battery life will entail more serious costs when it is necessary to replace the battery.
Correctly charging a car battery with a charger. Before charging, check what current to charge the battery with. How to charge a battery without a charger.
The principle of operation and design of a car generator. The components of an alternator in a car: rotor, stator, windings, regulator.
How is the density of electrolyte in a battery measured, what does this indicator depend on. Affordable ways to increase the density in battery “banks” with your own hands.
For what reasons does the electrolyte in the battery become cloudy, gray or black? In what cases and in what ways can you restore battery functionality?
Why the starter may not work after turning the key in the ignition. The main causes of starter malfunctions: bendix, traction relay, brushes, winding.
Purpose, design features, installation location of the fuel pressure regulator of an injection engine. Signs of RTD malfunctions, checking the device.
A relay regulator is installed on cars to maintain stable voltage from the generator. This element protects the battery from overcharging, extending the battery life. It is the breakdown of the generator voltage regulator relay that is one of the most common malfunctions of the vehicle’s on-board network.
Recommendations for increasing the service life of the regulator
In order to increase the service life of the voltage regulator, it is necessary to adhere to several simple rules aimed at implementing preventive measures. Among them:
- do not allow excessive contamination of the generator, periodically inspect its condition, and, if necessary, dismantle and clean the unit;
- check the tension of the alternator belt, tighten it if necessary (either yourself or in a car service);
- monitor the condition of the generator windings, in particular, do not allow them to darken;
- check the contact on the control wire of the relay-regulator, both its quality and the presence of oxidation on it;
- Perform periodic voltage checks on the vehicle battery with the engine running.
Following these simple rules will allow you to increase the resource and service life of both the generator and the vehicle voltage regulator.
Results
Checking the voltage regulator relay is not a difficult task, and almost any car enthusiast with basic repair skills can handle it. The main thing is to have the appropriate tools for this - a multimeter, a power supply with a voltage regulator (although you can connect it to a battery with a charger), a 12 V lamp and pieces of wires for mounting the appropriate circuit.
If during the inspection you find out that the regulator is out of order, then it must be replaced (repair work is usually not carried out). The main thing is not to make a mistake when choosing it and purchase the part that is suitable specifically for your car.
Problems of “undercharging”, as well as “overcharging” of the battery in principle, can be caused by many reasons, but the very first and most common on many cars (our VAZs are no exception here), as well as on many motorcycles, is the output of the generator relay-regulator from building. This device, despite its compactness, will protect your battery and make its service life much longer. However, if they fail, it can simply kill the battery in a matter of weeks, so if you see white streaks, and also, the engine does not start after night, even the starter does not “turn” - it’s time to check the relay regulator of your car, and here’s how it works do it yourself, and today I’ll tell you in detail...
To begin with, the definition
A relay regulator is a device that regulates the current from the car's generator, preventing the battery from overcharging, protecting it from overcharging, which is detrimental to the battery. Thus, this device greatly extends the battery life.
Essentially, this is just a voltage stabilizer that prevents the voltage from the generator from exceeding the threshold of 14.5 Volts; it is a very accurate device and is required for all types of cars. However, it can be distinguished into two types.
Possible causes of failure of the regulator relay
Modern relay models have a relatively long service life. But some factors can lead to premature failure of the element, namely:
- Low quality of the part itself.
- The occurrence of a short circuit.
- Mechanical damage to the part.
The problem may also be caused by water ingress.
On some generator models, replacement of the electronic regulator relay will be necessary if the brushes are worn out. Under normal conditions, the life of the voltage regulator exceeds 60,000 km.
Main symptoms of a malfunction
There are two main “symptoms” of a relay failure. This is an undercharge or overcharge of the battery. Also, a malfunction of a part can be determined by the dim glow of the headlights or by a change in their brightness when the engine speed increases.
If undercharged, the car will start with great difficulty. However, the manifestation of this “symptom” may not be related to the generator. Therefore, first of all, you should make sure that the battery is in good condition.
If the battery is overcharged, there is no doubt that the problem lies in the damaged relay. There are other possible causes of overcharging, but they are extremely rare. Overcharging may cause the battery to boil over. This can be determined by the decrease in the amount of electrolyte in the jars and the appearance of a white coating on the battery.
If you suspect that the battery is overcharged or undercharged, you should diagnose the generator.
Checking with a multimeter without dismantling
You can check the condition of the relay using a multimeter. In this case, the generator is not dismantled. Before starting diagnostics, it is enough to clean the battery terminals (their oxidation can affect the operation of the car and the readings of the measuring device).
The diagnostic procedure is as follows:
- First you need to start the engine and let it warm up for a few minutes.
- Next, you need to connect the multimeter probes to the battery terminals. The device displays a value of 20V.
- After this, the voltage is measured. It should be within 13.2-14V. Such readings are considered normal for most cars.
- Now you need to increase the engine speed (up to 2-2.5 thousand). The voltage should increase by about 0.2V.
- If it exceeds 3,500 rpm, the multimeter should show 14-14.5V, but no more.
Serious deviations in the readings of the device indicate the presence of breakdowns of the relay regulator.
Methods for self-checking performance
There are several methods for checking the functional state of the regulator. The easiest way is to contact a car service, but you can check the functionality of the device yourself. The simplest way, which is carried out without removing the relay, is to test the on-board current using a multimeter.
Checking with a multimeter without dismantling
The essence of the method is to measure the voltage that goes to the battery to recharge it. During testing, you will need an assistant to use the accelerator pedal to regulate engine speed. The check is carried out as follows.
- Start the engine and warm it up for about 5 minutes.
- With the engine running, open the hood and connect the multimeter contacts to the battery terminals, observing the polarity. Set the tester switch to the 20 volt position.
- The charging voltage coming from the generator is assessed with the low beams on (other current consumers are turned off) and the crankshaft speed within 1.5–2.5 thousand rpm. If the potential difference exceeds 14.8 V, the regulator is faulty and must definitely be replaced. When the incoming current is less than 13.5 V, in addition to the relay, you can suspect a fault in the wiring or the generator itself.
To fully test the relay, it must be removed.
Testing the removed regulator (with circuit)
The electronic relay is usually located on the surface of the generator and is covered with a plastic cover. Removal is done using a screwdriver, the shape of the tip of which depends on the car model (cross-shaped, hexagon). There is a high probability that the regulator forms a block with the generator brushes. For testing, in addition to a multimeter, you will need a 12 V test lamp (no more than 3 W) and an adjustable current source.
We connect the contacts of the wires from the current source:
- “minus” to the regulator mass;
- "plus" to the terminal marked "B".
The test lamp wires are connected to graphite brushes (polarity does not matter).
First, a voltage in the range of 13–13.5 volts is applied to the relay. With such a potential difference, the light bulb should light. If this is not the case, then there is an open circuit in the regulator, which can be anywhere: in any case, the device is faulty.
When the light is on, you need to gradually increase the incoming voltage. If the relay is working properly, within 14.2–14.5 V the light goes out. When the control lamp lights up with a further increase in the potential difference, the relay is faulty (a breakdown has occurred) and must be replaced. An unsatisfactory test result is also when the lamp goes out at a voltage of less than 4 volts. This current will not be enough to provide power to electrical appliances and at the same time efficiently charge the battery.
How to test a relay with a lamp
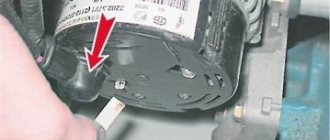
On many modern cars, the relay is combined with brushes. In this case, you can check the regulator using an incandescent lamp. The procedure will be as follows:
- To get to the part, you need to unscrew the mounting bolts and remove the terminals. The relay is located at the rear of the generator.
- To check, you need to prepare a 12V light bulb with a socket, wires, a voltmeter, and a power supply (no more than 20V).
- Next you will need to assemble the following circuit.
- After connecting the light bulb, it should light up. At the same time, the voltage gradually increases. When it reaches 14.5V, the light should go out. If this happens later, it means the relay regulator is faulty.
When the voltage decreases, the lamp should light up again.
This test method can also be used for some models of regulators that are not combined with brushes.
Technical specifications
If the old generator fails, many motorists wonder which generator they should now replace the old one with.
There is no need to invent anything here. The most correct solution is to install the same generator as before, or a more powerful one.
Today, the VAZ 2110 provides for the use of three types of power supply devices:
- Katek 5102.3771. The generator produces 80 Ampere power and its voltage is approximately 14V.
- Katek 94.3701. This is a device with the same parameters. They are not seriously different.
- Catek 120 amp. A generator that is more adapted to modern realities, when in addition to standard electrical equipment, motorists install many additional devices.
If you have a powerful audio system in your car, you use an electric pump powered by the car, as well as a number of other additional consumers, it is recommended to install a 120-amp unit instead of a standard 80-amp generator.
If we take into account the size of the devices, then we can distinguish between ordinary and compact ones. They have a certain difference in design
To be specific, the differences are in the following components:
- Brackets;
- Anchor;
- Excitation wire;
- Drive pulley;
- Number of mounting bolts.