A constant velocity joint (CV joint) or grenade is installed on all front-wheel drive or all-wheel drive vehicles, including the VAZ 2109 - 21099 models. Through it, the engine torque is transmitted to the drive wheels. The rotation of the front wheels is transmitted through the axle shafts and occurs at an angle that is constantly changing, and the task of the outer CV joint is to transmit it with minimal losses. This part has a complex design and can fail if not properly maintained. As a result, the car becomes immobilized and the outer CV joint needs to be replaced.
What is the dust cover used for?
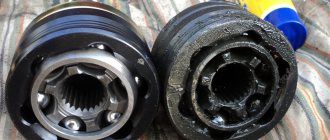
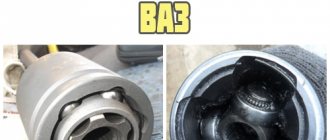
The outer boot of the CV joint reliably protects the elements of this mechanism from dust and dirt getting into it. It is made of durable, elastic rubber that is resistant to wear, temperature fluctuations and aggressive environments and can last quite a long time, but over time it will still crack or rupture.
If the outer boot breaks, dust and dirt get inside the grenade, acting as an abrasive. And since the moving parts of this mechanism work under high loads in different planes at different angles, this leads to rapid failure of the hinges. Therefore, it is necessary to monitor the integrity of the boot so that the CV joint does not break over several hundred thousand kilometers.
Types of CV joints
Before you begin repairs, you need to find out exactly how the unit is designed.
The pair of drives on the VAZ 2109 is equipped with a total of 4 CV joints.
| CV joint type | Peculiarities |
| Interior | There are 2 of them. They transmit torque to the axle shaft from the gearbox |
| Outer | There are also two of them. Installed on the ends of the axle shafts and transmit torque directly to the wheels |
Outer
This arrangement of grenades allows the wheels to rotate during turns and constant operation of the suspension system. To put it simply, the outer CV joints are responsible for transmitting torque when cornering, and the inner ones are responsible for the vertical movement of the wheels. These are collisions with bumps, holes, roll in turns, etc.
Interior
How to identify the problem
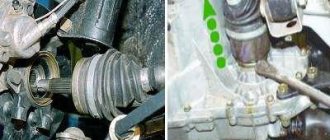
To avoid this problem, it is necessary to inspect the CV joint boots at least once every five thousand kilometers. It is better to do this from a pit or on a lift to carefully inspect the corrugated rubber. If you suspect damage to the material or the appearance of deep cracks, you need to clean it and carefully inspect this place. If the suspicion is confirmed, it is necessary to replace the torn boot; it cannot be repaired. At the same time, the hinge is thoroughly cleaned and new lubricant is added to it.
Another sign of a ruptured boot is a CV joint crunching when turning when the load on it increases. In this case, the insides of the grenade may simply disintegrate, it will jam and fail. Then it will have to be changed, which will cost much more. In the most severe case, the needles of the bearings of the internal grenade get into the gearbox housing and disable it. And the reason for this is often the destruction of the outer boot.
Video: Replacing the outer boot of a VAZ 21099 grenade
Replacing the CV joint boot on a VAZ 2109
While operating the vehicle, it is necessary to periodically monitor the condition of the CV joint boots. A constant velocity joint that ensures the transmission of torque from the VAZ 2108 2109 21099 gearbox to the front wheels. Very often you come across the fact that by this concept, people understand slightly different things. Some call the entire transmission mechanism a CV joint, some divide these concepts into internal and external. If you think a little, it is clear that the common people call the entire mechanism a CV joint. However, the instruction manuals divide it into internal and external, as well as the drive shaft. The inner CV joint is inserted into the transmission, the outer CV joint into the hub, and the drive shaft connects both CV joints. Now let's get back to the anthers. The boot prevents dirt and moisture from getting inside the hinge. Therefore, if a torn boot is not replaced, its lubricant will be washed out and dust will get in. The CV joint will begin to crunch when cornering and may eventually jam and fall apart. A torn boot can be easily identified by the appearance of grease on its surface, or it often happens that it breaks in half. Before replacing, you need to go to an auto store and purchase a new CV joint boot, price $3. You will also need lubricant for CV joints, the price is about $1. It is also necessary to pay attention to what clamps will be used to tighten the torn boot, and if necessary, buy new crimp clamps. Replacing the boot of the outer CV joint on a VAZ 2108 2109 21099: The outer boot breaks more often than on the inner CV joint. This is because it deforms more strongly and more often during use. From the tool you need to prepare: - A 30mm socket to unscrew the hub nut. — Head 13 to unscrew the ball. -Hammer. — Mounting bar and pieces of thin pipes. — Screwdriver for clamps. 1) The very first thing you need to do before replacing the boot is to drain the oil from the gearbox. How to do this is described in detail in the following article. The oil is drained because the entire CV joint will have to be removed, including its inner part inserted into the gearbox. Accordingly, if the oil is not drained, then after removing the CV joint it will spill onto the ground. 2) Before jacking up the car, you need to loosen the hub nut.
Unscrew the hub nut
We adjust the brick under the rear wheels, unscrew the hub nut, then put a 30mm socket on it and try to unscrew it. The hub nut is tightened with great force, so you need a good lever to unscrew it. Usually a piece of pipe about half a meter long helps with this. Under no circumstances should you try to loosen the hub nut on a gear or a jacked machine - you may damage the gearbox differential. 3) After you remove and slightly loosen the hub nut, you need to jack up the car. And only then unscrew the hub nut and remove its washer. Remove the wheel from the hub.
The hub nut is unscrewed
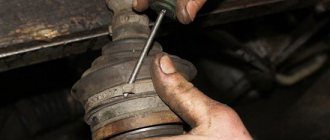
4) Then, using a 13mm head, unscrew the two bolts securing the ball to the hub.
Unscrew the ball VAZ 2109
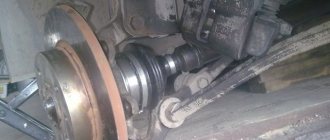
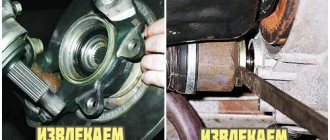
After this, it becomes possible to move the hub together with the front strut. Moving the hub away, we remove the outer CV joint from the hub.
We take out the VAZ 2109 CV joint from the hub
5) Now you need to knock out the inner CV joint from the gearbox. This is done by hitting a pry bar attached to the inner CV joint with a hammer.
We knock out the CV joint from the VAZ 2109 gearbox
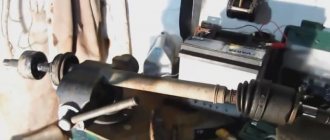
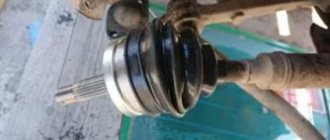
If you don't have a pry bar, you can use a piece of pipe. 6) We take out the CV joint from the gearbox and take it to a vice in which we clamp its shaft.
Clamp the CV joint in a vice
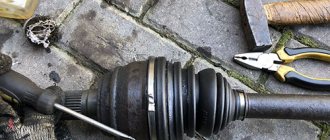
7) Now you need to remove the clamps from the torn boot. Then we bend the boot back towards the shaft, or simply cut it with a knife and remove it. By the way, the inner and outer CV joints are often called grenades. Well, that's because when they're not on the shaft they look like grenades. On the Internet you can find articles “Replacing the external grenade of a VAZ 2109”, or something similar. After removing the boot, knock down the outer grenade with a hammer.
Outer grenade knocked down
You need to hit right at the edge so as not to damage it. It is necessary to remove the old grease from the shot down grenade VAZ 2108 2109 21099, since it is already covered in sand and dust.
External grenade VAZ 2109
Then you need to bathe the grenade in gasoline or kerosene and wipe it thoroughly again, removing the old grease.
Removing old grease from the CV joint
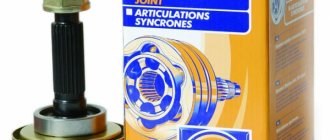
9) We put a new boot on the drive shaft and bend it back. Using a hammer, hammer the outer grenade into place. And now, carefully lubricate the insides of the grenade, each ball, clips, and the insides of the boot with lubricant for CV joints.
New boot and lubricant for CV joints
Then we put the boot on the grenade and tighten it with a large clamp.
The new boot is on
10) Now you just need to install the entire CV joint assembly back on the car. First, of course, we insert it into the gearbox. Before doing this, do not forget to wipe the oil seal from dust. And we hammer the CV joint into the gearbox again using a hammer. 11) We put the CV joint into the hub and screw the ball joint in its place. We tighten the hub nut, not forgetting the washer, but do not tighten it with great force. 12) Reinstall the wheel and lightly tighten the bolts.
We install the CV joint in place
We lower the car from the jack, place a brick under the front wheel and firmly tighten the hub nut. The pin on the nut should be in the same place where you originally unscrewed the wheel.
We tighten the hub nut
We tighten the nut to prevent it from unscrewing spontaneously. 13) All that remains is to fill the gearbox with oil.
Of course, if your gearbox is maintenance-free, you will have to struggle a little with pouring oil into the box. I always fill the oil through the speedometer drive hole, it is much easier to get to. If you are doing this work for the first time, then pay attention to the following points: - Do not forget to drain the oil from the gearbox. — Unscrew the hub nut on the ground (not on a jack). — Have a piece of pipe ready, since the hub nut is unscrewed and tightened with great effort. — You don’t need to be afraid to knock out the CV joint; when you do it for the first time, it seems like you’ll break it with a hammer. After you change your anthers a couple of times, you will remember your first experience with laughter.
Drive shaft assembly process:
- take a new dust cover and put it on the shaft;
- we drive the CV joint onto the splines, after filling it with new lubricant;
- put the boot on the bearing and tighten the clamps;
- We install a plastic plug at the end of the inner CV joint shaft;
- Before mounting the drive in place, install a new retaining ring on the inside of the drive shaft;
- insert and snap the shaft into the gearbox by lightly tapping the shaft with a hammer, preferably through the spacer;
- We insert the outer side of the drive shaft into the splined joint of the hub. We put on the thrust washer;
- be sure to install a new hub nut;
- tighten the nut tightly. If you have a torque wrench, the tightening force should be 25 kg/cm;
- We tighten the nut with a chisel, jamming its edge. To prevent spontaneous unscrewing of the nut;
- reinstall the protective cap of the hub nut;
We carry out the entire procedure for replacing CV joint boots on a VAZ-2109 on the other side of the car, in the same sequence.
After installing the drives, you need to check the reliability of the connections by holding the drive with your hand and shaking it in different directions. In this case, no backlash should appear. Also, play is unacceptable in hub bearings. The wheel should rotate freely, without any difficulty.
With timely detection of defects and replacement of boots, the service life of components and drive mechanisms of your car increases.
Source: mashinapro.ru
Shall we get started?
- Before replacing the mechanism, you need to drain all the oil from the gearbox. Let's not touch the jack yet! You need to place a brick under the rear wheel of the car, after this procedure we take the 30 socket and, accordingly, loosen the nut. Don't be alarmed, you may need about a half meter long piece of pipe half a meter long as a lever. Remember, we only need to loosen the nut, not remove it yet!
- Everything worked out? Go ahead! We lift the car with a jack, and only now completely remove the hub nut along with the washer. Now you can safely remove the wheel from the hub.
- Take the 13mm head and remove the two bolts that secure the ball to the hub. After this, we move the hub and remove the outer grenade from it. Then we attach a pry bar to the internal grenade and, using hammer blows, knock it out of the gearbox. By the way, if you still don’t have a pry bar at hand, a piece of pipe can replace it.
- When the grenade is removed, we clamp its shaft in a vice.
- We remove the clamps from the unusable boot. After that, we shoot down the outer grenade. Attention! In order not to damage it, you need to hit it along the edge. When this operation is completed, remove all old grease from the mechanism, wash it in gasoline or kerosene and wipe it well again, this way you can better remove traces of grease.
- Now we put a new boot on the drive shaft, and using a hammer we hammer the outer CV joint back, after thoroughly lubricating all the parts of the product. After that, we put it on and tighten it with a collar.
- Then we insert the grenade into the gearbox, driving it there. We place it in the hub and return the ball to its place. We put on the hub nut.
Attention! The hub nut does not need to be tightened with great force. After installing the wheels, tighten the bolts without applying much physical force.
- We remove the car from the jack, place a brick under the front wheel and tighten the nuts tightly.
- Well, now pour oil into the gearbox.
That's all. Congratulations! Replacing the boot on the VAZ-2109 is complete!
Source: ladaautos.ru
Replacement
If problems arise with grenades, you should determine which ones have problems. Next we will look at how to change the drive and how to remove it. Additionally, we recommend watching the repair manual video.
The procedure for replacing inner and outer CV joints differs from each other, therefore each stage should be considered separately.
Let's start with the internal.
Inner CV joint
Rubber boots are a vulnerable element of the grenade design. It is not uncommon that by replacing the boot, washing the grenade with gasoline and applying new lubricant, it is possible to solve the problem. If the wear of the CV joint is insignificant, such measures can replace a full repair.
But if you discover the breakdown late, you will have to completely replace the inner CV joints.
- Apply the handbrake and install chocks under the wheels.
- Unscrew the hub nut using a wrench and a socket. Carefully remove the punching elements from the nut with a punch. This way you will be able to preserve the carving on the garnet. The nut itself will need to be replaced with a new one during reassembly.
- The main thing here is to unscrew the nut, lowering the wheels to the ground. Otherwise, you risk breaking the differential and other gearbox components.
- Raise the car using a jack on the desired side, first loosening the wheel nuts. Remove the wheel.
- Drain the gearbox oil. This can be done earlier, at your convenience.
- Release the steering knuckle from the ball joint at the bottom. To do this, unscrew a pair of mounting bolts.
- Since you have already removed the hub nut and unscrewed the ball joint from the steering knuckle, proceed to removing the splined part of the grenade. To do this, pull the brake disc and strut assembly towards you. She has a decent ride. Just remember to turn the steering wheel all the way so that the tip of the steering wheel extends as far as possible.
- Pry the inner grenade with a pry bar, which will allow you to remove the drive.
- Having taken out the CV joint, look at the condition of the oil seal in the gearbox. If you find traces of leaks, be sure to replace the element.
Causes of CV joint failure
Unlike other cars, it is especially difficult for the VAZ-2109 to keep the grenade boot in working condition for a long period. The main reasons for its failure, first of all, can be unfavorable climatic and external factors. As a result, cracks will form on the parts, and further operation will be impossible. Through the torn mechanism, dust and dirt get inside the hinge, and because of this, the grenade parts wear out. It is not difficult to detect this: when the car is moving and when turning, the car makes a “crunching” sound, and this is already the first signal.
If, after you heard a suspicious crunch in your VAZ-2109, you came to the garage and found traces of grease on the hinge, then you immediately need to completely replace the CV joint along with the boot, since the parts of this mechanism cannot be interchanged.