What is a charging relay
The entire electrical system is powered from two sources:
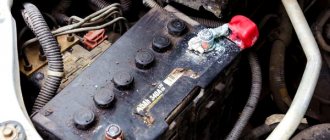
- Battery - with the engine stopped. It is from the battery that power is supplied to the starter windings when the engine starts.
- Generator set - it is designed to power all consumers when the engine is running. But the primary task is to restore the battery’s charge level, since after starting it loses capacity, and significantly.
The battery voltage is always the same - it can only decrease if charging is not performed.
But a car generator can produce voltage in the range of 10-30 Volts. This is a large range; the electrical system will not be able to cope with such differences. It is the VAZ-2106 charging relay that allows you to stabilize the voltage and prevent overvoltage.
Symptoms of a problem
So, in case of low voltage, the battery simply will not charge. That is, in the morning you will not be able to start the car, the lights on the dashboard may not even light up, or troubles will arise while driving. For example, dim headlights at night, unstable operation of the electrical system (problems with electrical appliances - wipers, heaters, radio, etc.).
In case of increased voltage, there is a high probability of a decrease in the electrolyte level in the battery banks, or its boiling. A white coating may also appear on the battery case. When overcharging, the battery may behave inappropriately.
Signs, malfunctions and repair of the generator and voltage regulator
In addition, you can also identify the following signs of a faulty voltage regulator (in some cases, some of them may or may not be present, it all depends on the specific situation):
- the control light on the dashboard (although this may be a sign of other malfunctions, for example, that it has burned out, the contact has fallen out, and so on);
- after starting, the battery indicator on the dashboard does not go out, that is, there are obvious malfunctions in charging the battery;
- the brightness of the headlights becomes dependent on the engine speed (you can check this somewhere in a deserted place by placing the car against a wall and accelerating - if the glow changes, then most likely the voltage regulator is faulty);
- the car stopped starting normally the first time;
- The battery is constantly ;
- when the engine speed exceeds 2000 rpm, the indicators on the dashboard turn off ;
- the dynamic characteristics of the car decrease , this is especially noticeable at high engine speeds;
- In some cases, the battery may boil .
Generator design
In any car, including the domestic “six”, the generator consists of the following components:
- The stator is a stationary part; it is attached using threaded connections to brackets on the engine block. The stator has a winding (power), consisting of three equal parts - an alternating three-phase voltage is generated on it.
- The rotor (armature) is a rotating element; it has a winding and two slip rings. Driven by a belt drive from the crankshaft.
- Covers are installed on the rotor at the front and rear. To ensure rotation is as smooth and free as possible, bearings are used.
- The pulley is designed to transmit rotation to the rotor. It is installed on it and is kept from turning by means of a key.
- Brushes allow voltage to be transferred to the winding of the rotating rotor. The VAZ-2106 charging relay circuit also contains a lamp located in the dashboard. Please note that when it burns out, the voltage supply to the excitation winding is stopped.
- Semiconductor diodes rectify three-phase alternating voltage. The output appears as a constant unipolar one.
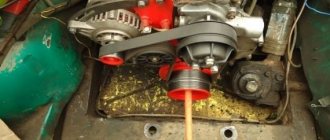
The charging relay on the VAZ-2106, unlike most other cars, is installed on the body, and not in the generator housing. On many modern machines, the voltage regulator and brush assembly are combined in one housing.
Reasons for failure of the relay regulator
The reasons for the failure of the voltage regulator may be:
- short circuit in the circuit, including interturn short circuit of the excitation winding;
- failure of the rectifier bridge (diode breakdown);
- reverse polarity or incorrect connection to the battery terminals;
- penetration of moisture into the housing of the regulator and/or generator (for example, when washing a car or driving in heavy rain);
- mechanical damage to the unit;
- natural wear and tear of the unit, including brushes;
- poor quality of the device being directly tested.
There are a number of simple methods for checking the regulator, regardless of whether the unit is removable or not.
Why do you need a voltage regulator?
The main function of the battery charging relay on the VAZ-2106 is to prevent voltage surges at the generator set output. But stabilizing a large current turns out to be not so easy - for this you need to use very massive elements. If in low-current circuits you can get by with installing a zener diode, then with a current of 50-60 Amps this is problematic. But there is a way out - you can stabilize the voltage supplied to the rotor excitation winding.
If you turn to a school physics course, you can find out that the voltage value at the output of the generator completely depends on two parameters - the speed of movement and the magnitude of the magnetic field. In other words, it is necessary that the rotor rotation speed or the magnitude of the magnetic field be constant. Only in this case the voltage at the generator output will not change. But it is impossible to maintain the rotor speed at the same level without the use of special means; one thing remains - to stabilize the supply voltage of the excitation winding.
Possible generator malfunctions, their causes and methods of eliminating VAZ 2101
| CAUSE | REMEDY METHOD |
| The warning lamp lights up or lights up intermittently when the vehicle is moving. | |
| Alternator drive belt slipping | Adjust the belt tension |
| Break in the connection between plug “85” of the charge warning lamp relay and the center of the generator star | Check and restore connection |
| Charge warning lamp relay misaligned or damaged | Check the relay, adjust it or replace it |
| Open circuit in the power supply circuit of the excitation winding | Reconnect |
| The voltage regulator is misaligned or damaged | Clean contacts, adjust or replace regulator |
| Worn or stuck generator brushes; oxidation of slip rings | Replace the brush holder with brushes; wipe the rings with a rag soaked in gasoline |
| Open circuit or short circuit to ground of the generator excitation winding terminals | Connect the winding leads to the slip rings or replace the rotor |
| Short circuit of one or more "positive" valves of the generator | Replace the generator rectifier unit |
| Open circuit in one or more generator valves | Replace the generator rectifier unit |
| Break in the connection between plugs “86” and “87” of the charge warning lamp relay | Reconnect |
| Open circuit or interturn short circuit in the stator winding | Replace generator stator |
| The warning lamp does not light up when the ignition is turned on | |
| Burnt out filament | Replace the lamp |
| Charge warning lamp relay misaligned or damaged | Clean contacts, adjust or replace relay |
| Open circuit in the connection between plug “87” of the charge warning lamp relay and plug “I” of the fuse box | Reconnect |
| Short circuit of one or more “negative” generator valves | Replace the generator rectifier unit |
| Short circuit of the stator winding to ground | Replace stator |
| The generator is running, but the battery is charging poorly | |
| Weak belt tension; slipping at high speeds and when the generator is running under load | Adjust the belt tension |
| The fastening of the wire lugs on the generator and battery is loose; battery terminals are oxidized; wires are damaged | Clean the battery terminals from oxides, tighten the clamps, replace damaged wires |
| Battery faulty | Replace the battery |
| The voltage regulator is misaligned or damaged | Clean contacts, adjust or replace voltage regulator |
| The battery is being recharged | |
| Poor contact between ground and voltage regulator housing | Reconnect |
| The voltage regulator is misaligned or damaged | Adjust or replace voltage regulator |
| Battery faulty | Replace the battery |
| Increased generator noise | |
| Generator pulley nut loose | Tighten the nut |
| Fan blades are bent | Align the fan or replace it |
| Generator bearings are damaged | Replace bearings |
| Interturn short circuit or short circuit to ground of the stator winding (generator whine) | Replace stator |
| Short circuit in one of the generator valves | Replace the rectifier unit |
| Brushes creaking | Wipe the brushes and slip rings with a cotton cloth soaked in gasoline. |
Video about “Possible generator malfunctions, their causes and methods of elimination” for VAZ 2101
The generator does not charge, how to find and fix the problem.
The reason for the lack of battery charge on the VAZ 2101. How to find
https://youtube.com/watch?v=EGoltTS4LuM
Signs of a faulty car alternator or a quick check of the alternator
Contact regulators
You can still find cars that have mechanical voltage regulators installed. They are extremely imperfect and have a lot of shortcomings, but the owners of such cars are confident that “old is always better.” And every three days they crawl under the hood to adjust the gap and clean the contacts. But using contact systems as an example, it is convenient to consider the principle of operation of regulators as a whole. The essence of the ongoing processes in semiconductor and mechanical ones is somewhat similar.
The design is based on a winding - it magnetizes the metal core. The winding consists of 1300 turns of thin wire. When diagnosing such a relay, you need to know that the resistance of this coil is 17 Ohms. The contacts are made of tungsten. The design includes a shunt and an adjustment plate. There are also several springs and resistors, the latter are switched by mechanical contacts.
Relay installation and connection
Always work from the device to the batteries. First connect the cables to the relay, then install the fuse, and only then connect the cable to the battery. This sequence is safer than connecting from batteries to the device
All cables running directly from the batteries must be fused. They protect the cable from fire, which can occur when a damaged positive conductor comes into contact with the hull of a car or boat. Fuses are placed as close to the battery terminals as possible so that most of the cable is protected.
The fuse rating is chosen to be 30-50% greater than the relay rating. For example, a device rated at 100 amps will require a 130-150 amp fuse. Many relays are designed to withstand an overload of 600% of the nominal value, but withstand this current for only a few milliseconds
| Charging current | Minimum cable cross-section, mm2 | Fuse rating, A |
| 50 | 10 | 75-80 |
| 70 | 16 | 80-90 |
| 90 | 25 | 125-130 |
| 110 | 35 | 150 |
| 120 | 50 | 150-175 |
To protect the cable from batteries, fuses ANL, MRBF, MIDI / AMI are suitable for the relay. A 5 amp fuse is sufficient for the signal conductors.
Electronic voltage regulators
The VAZ-2106 charging relay was connected to the generator excitation winding. And regardless of whether an electronic or mechanical system is used, it has one purpose - to maintain the voltage at 13.6 Volts. Electronic devices are more stable than mechanical ones and do not require frequent intervention - they do not have mechanical contacts, which sometimes burn out.
One minus is that when using relays and brushes enclosed in one housing, two units will have to be changed at once. But there are regulators that are attached separately from the brush assembly.
How to check the generator yourself
How to check a VAZ generator using the example of model 2109. Generator type 94.3701 alternating current, three-phase, with a built-in rectifier unit and an electronic voltage regulator, right-hand rotation.
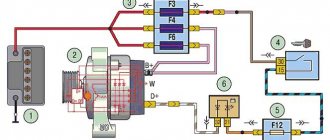
Generator connection diagram . The voltage to excite the generator when the ignition is turned on is supplied to terminal “D+” of the regulator (terminal “D” of the generator) through indicator lamp 4 located in the instrument cluster. After starting the engine, the excitation winding is powered by three additional diodes installed on the generator rectifier block. The operation of the generator is controlled by a warning lamp in the instrument cluster. When the ignition is turned on, the lamp should be on, and after starting the engine, it should go out if the generator is working. If the lamp is brightly lit or glows half-lit, it indicates a malfunction.
The “minus” of the battery should always be connected to ground, and the “plus” should always be connected to the “B+” terminal of the generator. Failure to turn the battery back on will immediately cause increased current through the generator valves and damage them.
It is not allowed to operate the generator with the battery disconnected. This will cause short-term overvoltages to occur at the “B+” terminal of the generator, which can damage the generator voltage regulator and electronic devices in the vehicle’s on-board network.
It is prohibited to check the functionality of the generator “for spark” even by briefly connecting the “B+” terminal of the generator to ground. In this case, significant current flows through the valves and they are damaged.
How to check the regulator
Every motorist should know how to check the VAZ-2106 charging relay. Main conditions:
- A voltage of less than 14 Volts must pass through the device. For diagnostics, power from the car battery is connected to it.
- If the voltage is above 14 Volts, then it should not pass through the regulator. To check the circuit, the elements are connected, and the car battery and, for example, two AA batteries connected to it in series are used as power.
The main sign that the VAZ-2106 charging relay has failed is the voltage at the battery terminals is below 13.6 Volts.
Each car is equipped with a voltage stabilization device. On the “sixes” a VAZ 2106 generator voltage regulator relay is installed. The task of the device is to maintain the voltage level of the on-board network.
Recommendations for increasing the service life of the regulator
In order to increase the service life of the voltage regulator, it is necessary to adhere to several simple rules aimed at implementing preventive measures. Among them:
- do not allow excessive contamination of the generator, periodically inspect its condition, and, if necessary, dismantle and clean the unit;
- check the tension of the alternator belt, tighten it if necessary (either yourself or in a car service);
- monitor the condition of the generator windings, in particular, do not allow them to darken;
- check the contact on the control wire of the relay-regulator, both its quality and the presence of oxidation on it;
- Perform periodic voltage checks on the vehicle battery with the engine running.
Purpose of the device
The generator voltage depends on the following factors:
- Rotor speeds.
- Current load.
- Magnetic flux values.
A sufficient condition for the generation of electrical energy is the rotation of the rotor of the VAZ 2106 generator in a magnetic field. Magnetic flux crosses the stator windings. AC voltage is generated. The generator diodes rectify the current.
The role of the electromagnet is performed by the excitation winding. It is laid in the grooves of the rotating part. The excitation voltage is supplied to it through the brush assembly. By changing the strength of the current passing through the winding, generation is controlled.
The VAZ 2106 (RR) voltage regulator controls the rotor winding current. The block changes the resistance of the excitation circuit depending on the network voltage level. The generator responds as expected. This way the device returns the generator voltage to normal.
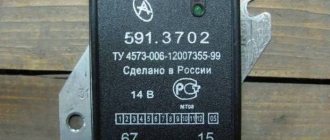
Increased demands are placed on the operation of the control unit. They are determined by working conditions and technical characteristics of consumers. All equipment that is connected to the passenger vehicle network is designed for 12 volts (V). The VAZ voltage regulator must maintain a range from 13.2 to 14.4 V. This gap should not depend on the number of rotor revolutions and ampere load.
The voltage regulator relay should turn on automatically after starting the engine. In addition to its main purpose, the device performs additional functions:
- protects the generator from overloads;
- recharges the battery;
- protects devices from overvoltage.
Checking the combined relay-regulator
Checking the VAZ 2110 voltage regulator
To perform the corresponding check, it is necessary to assemble the circuit shown in the figure. To do this, use a charger or power supply with an adjustable load (it is important that it be used to regulate the voltage value in the circuit), a 12 V light bulb (for example, from a turn signal or headlight, with a power of 3.4 W), a multimeter, and the regulator itself voltage (this can be from a Bosch, Valeo or other generator). It is advisable to have the wires used for switching with “crocodiles”.
Checking the voltage regulator of the generator 37.3701: 1 - battery; 2 — ground terminal of the voltage regulator; 3 - voltage regulator; 4 – terminal “Ш” of the regulator; 5 — output “B” of the regulator; 6 — control lamp; 7 — terminal “B” of the voltage regulator.
If you assemble a circuit in which the voltage is at a standard value of 12.7 V, then the light bulb will simply glow. But if you use a voltage regulator to raise its value to 14.14.5 V, then if the relay is working, the light should go out. Otherwise the regulator is faulty. That is, when the voltage reaches 14.14.5 V (depending on the model of the machine and, accordingly, the regulator) and above, the light goes out, and when it drops to the same level, it lights up again.
Checking the VAZ 2107 voltage regulator
Checking the voltage regulator on VAZ 2108/2109 cars
Until 1996, a VAZ 2107 with a 37.3701 generator was equipped with an old-style voltage regulator (17.3702). The verification procedure is given above. After 1996, a more modern generator of the G-222 brand was used (integrated regulator RN Ya112V (V1).
As you can see, the verification algorithm for all regulators is almost the same. The only difference is the cutoff values when the relay is activated.
Types of structures
There are 2 types of regulators: old and new. They replace each other, although they contain different fillings. The old design is equipped with a mechanical relay. VAZ cars are equipped with a voltage regulator of the PP-380 type. Devices of this series use moving contacts to switch on resistors.
This spare part has been removed from mass production. Nowadays such specimens are rare. The vibration regulator PP-380 also has a number of disadvantages. Let us point out the difficulties in operating the contact option:
- need for customization;
- step adjustment;
- periodic cleaning of the contact group;
- low reliability;
- creates radio interference;
- short service life.
Today, semiconductor technologies have replaced the outdated model. Cars produced by VAZ, GAZ, UAZ are equipped with electronic developments. The innovation is a huge merit and success of Russian manufacturers.
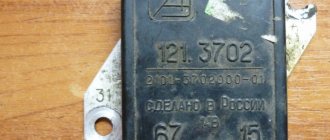
Regulators based on transistors are classified as non-contact relays. VAZ 2106 received a block of type 121.3702. The radio components are housed in a rectangular plastic case.
Device diagnostics
A malfunction of the charging circuit elements can be detected while driving. With the engine running, look at the instrument panel. When the voltage drops, the charging relay turns on the light. The alarm indicates a possible failure of the PP.
To check the voltage regulator, you need a voltmeter. The tester can be purchased at a store or borrowed from a familiar electrician. The mode switch is set to the limit of 20 V. The common wire (black) is connected to the ground of the passenger car, and the red probe is placed on the “+” sign of the battery.
You can check the relay regulator with the engine running and the battery fully charged. The sequence of actions to diagnose the device should be as follows:
- Use the ignition key to start the engine.
- Turn on the load (high beam headlights).
- Warm up the engine for 15 minutes.
- We set the rotation speed to 2.5 thousand using the tachometer.
- We take tester readings at the battery terminals.
After completing all the points, an analysis is carried out. If the needle on the instrument scale is within 14.2 V, then the regulator copes with its task. In this case, the voltage should not significantly depend on the number of revolutions.
Deviation of indicators from the norm indicates a breakdown of the regulator.
Remember that the electronic relay does not allow the terminals to be removed from the battery while the engine is running. This leads to voltage surges and failure of electronic devices.
How to replace the battery charge lamp relay on a VAZ 2101-VAZ 2106?
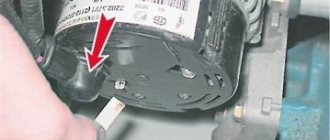
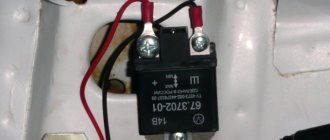
Removal: There is nothing complicated in the removal relay, you see in the photo below the screws are indicated by red arrows, turn them out and under one screw there are still wires, carefully disconnect this too after the screws are turned out and, if necessary, from rust or something else or carefully clean it with sandpaper, also the blue arrows indicate the wires that are connected to the relay, the most important thing to remember once and for all, before you start disconnecting the wires, mark which one fits where with a marker, or remove everything on the phone and in reverse order each Connect the wire in its place, otherwise the relay simply won’t work and the lamp will be constantly on.
Installation: The entire installation occurs in the reverse order; by the way, if your wires are disconnected quite easily, then slide the rubber tips along them and tighten the terminals themselves a little with pliers so that the wires hold better.
Additional video: If you want to know how to disassemble this relay and how to check its serviceability, then watch the video below:
Connecting the unit
Before discarding the device, you should make sure that other parts are in good condition. The belt, alternator, battery, and wires are subject to inspection. The lack of charging of the VAZ 2106 may be caused by a loose belt. If the unit was removed before checking, you should make sure that the wires are connected correctly.
Replacing the voltage regulator is done in a garage. Even an inexperienced driver can do this. You will need a tool, skillful hands and a little knowledge.
Open the hood to find the remote relay. In the Zhiguli, the box is attached with lugs to the left wing. We find the object near the brake fluid reservoir. Some relays are built into the generator housing. People call them integrals.
Do not rush to remove the wiring from the terminals. Experienced car enthusiasts are advised to first mark the wires with a marker. There are 2 gray and orange wires suitable for the VAZ voltage regulator. They are attached to terminals numbered 67 and 15. Do not mix up the wires. The gray color corresponds to the number 67, and the orange color corresponds to 15.
Replacement and removal of the electric generator
The generator on a VAZ car is removed either for complete replacement in case of failure or to carry out repair work to replace faulty parts. To perform dismantling, prepare a standard set of tools; it is advisable to drive the car into the inspection hole.
- Disconnect the battery.
- Remove the protective rubber cap from terminal “30” and unscrew the nut and remove it from the wire stud.
- Disconnect the block with wires from the generator connector.
- We loosen the tightening of the generator to the adjusting bar, then lift it all the way up to the cylinder block and remove the belt from the pulleys.
- Completely unscrew the bolt securing the adjusting bar to the cylinder block, then from the bottom of the car unscrew the 2 bolts securing the lower bracket to the block and remove the generator, pulling it out of the engine compartment.
Diagnosing charging relay faults
- Worn generator brushes. If the length of the generator brushes of the VAZ-2106 car becomes insufficient, the charge may be lost. When diagnosing a malfunction, you should first carefully check the condition of the brushes in the generator. Their length should not be less than 12 millimeters. If it does not meet the minimum requirements, then they need to be replaced.
- The diode bridge of the generator does not work. Failure of one or more elements of the rectifier unit may cause a charging malfunction. You should use a tester to check the serviceability of all diodes.
- Circuit breakers. If there is no charging current in the VAZ-2106 car, it is worth checking the fuses. If a burnt one is found, it should be replaced.
- Alternator belt and its tension. The generator belt is made in the shape of a wedge, so it is bursting between the cheeks in the pulley. When the pulley wears out, the generator belt may slip in the cheeks. Because of this, charging problems sometimes occur. In this case, it is necessary to immediately replace the generator pulley and belt.
- Battery terminals. If there is oxidation on the battery terminals, it may prevent the battery from charging. In this case, you should clean the terminals with soda dissolved in water. This product can remove plaque. After completely cleaning the terminals from oxidation, wipe them well with a dry cloth and then lubricate them with thick lubricant.
Replacing the battery charge lamp relay on a VAZ 2101-VAZ 2106
Welcome! Battery charge lamp relay - this relay works on the following principle, from the generator, namely from the diode bridge that is located in it, a current of 12 volts is supplied to the relay, the strength of this current is enough to open the two contacts that are located inside the relay, that is, to coil that is located in the relay from the generator (When the car is started), current flows and a core is still installed inside this coil, so this core attracts the plate to itself and thereby the contacts open and the lamp that indicates that the battery charge is low does not light up after that , but if the contacts for some reason do not open, then the lamp that indicates that the battery charge is low will be on constantly, so take this into account and charge the battery first, and then turn your attention to the relay.
Note! In order to replace this relay, you only need one screwdriver!
Summary:
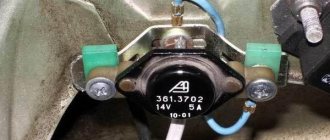
Where is the battery charge lamp relay located? It is located on the right side of the car if you look in the direction of its movement, this relay is actually very easy to find, the main thing is not to confuse it because there are several more relays installed next to it, in general, open the hood of the car and this is attached to the right front part of the body the very relay that bears the index “RS-702” (It is indicated by a red arrow), above this relay there is a cutout in the body, a blue arrow is also directed towards this cutout, so we figured out the location in a few more words, let’s say, we clarified about the index specifically because it is known what inscriptions will remain on the relays that are installed on old cars, you may not actually have them at all, but if you have a relay installed with some other inscriptions (Other markings) and you have driven it for quite a long time and it will has not failed yet (always showed when there is not enough battery charge), then install exactly the same relay and not any other.
When do you need to change the battery charge lamp relay? Regarding the lamp, we would like to talk to you more, there are people who do not know about all the devices that are present in the car, over time a person begins to understand after he studies his car, but at the beginning a lot is not clear, so below is the example of the instrument panel car VAZ 2106, we pointed with an arrow to the very lamp that notifies at the moment when the battery does not have enough charge and needs to be recharged, first of all, charge accordingly, then check the relay (There are some people who never look at the relay and fuses, but they go to a car store and immediately buy a new battery, there is no need to do this, especially if your battery is relatively new), if all the instruments on your panel have gone out, then look at the corresponding fuse, if it is blown, then replace it on new.
Note! When this relay fails, as you already understood, the main malfunction is that the battery charge lamp will light up, which will be indicated by an arrow in the photo above, and it will light up because the contacts will be connected to each other and cannot be disconnected, or some wiring may be connected to the relay jumped you, check them too!