Types of ball joints for VAZ 2107
Automotive repair specialists characterize ball joints for the VAZ 2107 according to several criteria.
- By place of use of the part:
- upper - specially designed for the upper chassis unit and work to compress the structure;
- lower - designed for placement in the lower unit of the front suspension and operate when a special spring is stretched.
- By type of construction:
- filler (for installation on the upper suspension arms) - the peculiarity lies in the manufacture of this part, in which the ball pin is filled with durable plastic, and the rotation fixes only a certain angle;
- with metal-ceramic bearings (for mounting on the lower arms of the chassis) - characterized by a rather large angle of rotation, because the pin is fixed in an oval hole made in the cover of the part.
Based on the above functional features of ball joints of various types, we can conclude: the main part in this design is the ball pin. It is he who is responsible for the quality of work of the entire design of the part and the stability of the car when cornering as a whole.
Auto repair school - Do-it-yourself car repair
May 24, 2016 VAZ 2101, VAZ 2102, VAZ 2105, VAZ 2106, VAZ 2107, Zhiguli, Classics by admin
UPD. 10/30/2016
The lower ball joint can be called the weakest and most capricious/problematic part of the front suspension of VAZ 2101-2107 Zhiguli cars . Owners of Classics Do you agree with me? I think we agree. Since the picture on the road - immobilized Zhiguli with the front wheel turned out, for example at an intersection or turn, is not uncommon. Therefore, it is better to check the condition of the front suspension regularly or unscheduled, at the first appearance of a creaking or knocking sound in the vehicle’s chassis. And if the technical inspection reveals wear of the ball joint, then it is better not to delay the repair. Since the ball coming out on the road is a serious problem! And, if it happens, then you will be provided with repairs on the roadway (you will not be able to replace the support on your own, without training and tools) with a call to the auto repairman to the scene (however, not every master will agree to work in the open air; there are those who refuse reasons) or transporting the car to a service station using a tow truck. Who needs such adventures? Moreover, even a novice motorist can easily replace the lower ball joint on VAZ-2101, VAZ-2102, VAZ-2104, VAZ-2105, VAZ-2106, VAZ-2107, Zhiguli cars The main thing is to seriously prepare for work, that is, read this photo report to the end)))
Tool. In photo No. 1 you can see the main arsenal of tools, without which I, for example, will not undertake the replacement of the lower ball joint on the VAZ-2101, VAZ-2102, VAZ-2104, VAZ-2105, VAZ-2106, VAZ-2107 cars . The main list, in addition to the wheel wrench, jack and VD-40, includes: socket and ring wrenches 13, open-end wrench 22, metal brush, sliding pliers and BALL JOINT PULLER for VAZ 2101-2107 cars. A ball joint remover is essential. I understand that it is not cheap and you can replace the ball joint without a puller (I will describe how to do this below), but believe me, working with a puller is much easier, more convenient and faster.
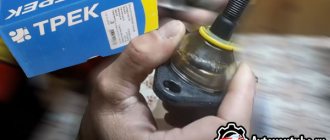
Spare parts. Everything is simple here. I personally recommend buying and installing only reinforced lower and upper ball joints . Since the stock ball joints have long been out of confidence. Yes, the ball pin can also be pulled out from the reinforced support, but this will be at least twice as difficult. And this is no longer enough. Next, I’ll go through the manufacturers whose ball joints inspire confidence: TRACK TRS SPORT (expensive, but the best and most reliable ball joints for Classics), AvtoVAZ , Kedr , Belebey , Belmag .
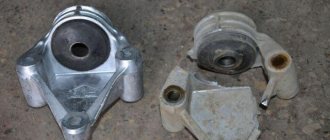
It is very good if the ball joint comes with fasteners (ball pin nut, three bolts with nuts and engravers). Let's look at photo 2. Why did I write “good”? Because manufacturers often supply ball joints to the market in two versions: with and without fasteners. With fasteners, the support is naturally more expensive. But, I advise you to still take it with fasteners (upon further reading, you will understand that this advice will be useful).
What else can I say about spare parts? Yes, here it is: the stock upper and lower ball joints for the VAZ 2101-2107 are externally different from each other. Therefore, during installation it is quite difficult to mix them up. What can not be said about the ball joints of the reinforced version. Therefore, manufacturers stamp the designations “B” (top) and “H” (bottom) on the supports. Let's look at photos 3 and 4. I think these signs are put up for a reason. Therefore, it will be correct to install the ball joints according to the designations.
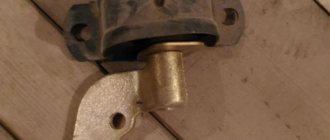
There is one more addition))). Before installing the lower ball joint, regardless of the manufacturer, check for grease under the boot . This is not difficult to do on stock supports. On reinforced ones, you will have to tinker a little: using a screwdriver, remove the crimp ring securing the boot, remove the boot and check for the presence of lubricant (photos 5 and 6). If necessary, add lubricant; Litol-24 or ShRB-4 are suitable for these purposes. And, most importantly, do not overdo it when adding, since an excess of lubricant is just as bad as its absence. If you fill the boot with lubricant “to capacity”, then after installing the ball on the workplace, the boot will rupture immediately or after a very short time - this is 100%. Therefore, in this case, the saying “you can’t spoil porridge with butter” is not appropriate!
Detailed photo report describing the replacement of the lower ball joint on VAZ-2101, -2102, -2104, -2105, -2106, -2107, Zhiguli, Classic cars:
Let's get down to business. We put the car in “gear” and the handbrake. We install anti-roll stops under the rear wheels. Loosen the wheel bolts, jack up the car, finally unscrew the wheel bolts and remove the wheel. Do not forget to install insurance under the car body, for example, a wooden block or a removed wheel.
We twist the steering wheel to its extreme position (for example, if we are replacing the lower support on the left side, then we turn the steering wheel to the left).
Clean the ball joint with a metal brush. We spill WD-40 or brake fluid (photos 7 and 8).
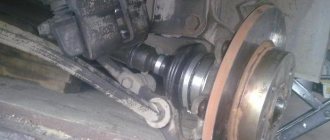
Using a 22 wrench, unscrew the ball pin nut. It will not be possible to unscrew it completely due to the design of the steering knuckle. Again we spray the nut and thread of the ball stud with WD-40. Tighten the nut. Let's use VD-40 again. And unscrew the nut again. We repeat the “unscrew-wd40-tighten” process until the nut unscrews without effort (photos 9 and 10).
If you have a special puller for ball joints for VAZ 2101-2107 cars , then you can skip this paragraph. So it will talk about removing (unpressing the ball pin) the ball joint without a puller . And so, we take a sledgehammer and an extension (preferably made of soft metal, copper or aluminum). We begin to apply strong blows to the eye of the steering knuckle (photos 11 and 12). If you're lucky, two or three blows will be enough and the ball joint will be pressed out. If not, then you will have to be patient and time. And methodically tap the eyelet until the bitter end! The method works and allows you to achieve the desired result. At the same time, by swinging a sledgehammer, you can also warm up))).
If you have a puller, dismantling the lower ball joint is much faster and easier (photo 13).
After unpressing the ball joint pin, all that remains is to finally unscrew the fastening nut. At this point, work can go in one of two directions. In the first, the nut is easily unscrewed from the ball joint pin (the above-described “unscrew-wd40-tighten” process should serve as the key to success), you lift the steering knuckle up, and only a few moments remain until the end of the ball joint removal. Or, luck “turns its back on you” and events begin to move in the second direction. In a very “interesting” direction, where you have to fight with a stubborn nut. I even wrote a separate article on this topic. Therefore, if in your case the nut refuses to unscrew properly, I advise you to follow the link, read the article and emerge victorious in the battle with the nut))). True, in this case the nut will have a “cover” and the advice about buying a ball joint with fasteners will no longer seem useless!
The nut has been removed! The final part remains. Using keys 13, unscrew the fastening bolts of the ball joint to the lever (photos 14 and 15). We remove the support.
Remove dirt from the lower arm. We inspect the seat of the support on the lever for cracks and breaks (photo 16). If cracks are found, the lever should be replaced. If everything is ok, then install a new lower ball joint, be sure to lubricate the pin (nigrol, engine oil, lithol) and carry out the assembly in the reverse order (photo 17).
The work on replacing the lower ball joint on the VAZ-2101, VAZ-2102, VAZ-2104, VAZ-2105, VAZ-2106, VAZ-2107 cars has been completed.
When using an article or photographs, an active direct hyperlink to the website www.avtorem.info is required!
Did you like the article? Share it on your page!
Ball joint selection criteria
To choose high-quality ball joints for a VAZ 2107 car, you should take into account a number of characteristic features of this part and its design as a whole:
- all safety requirements are met so that the vehicle maintains course stability in all situations;
- corrosion resistance;
- the possibility of operating this part under extreme driving conditions is provided;
- it is impossible for moisture, dust, and various small objects to get into the support structure, which could damage the main mechanism of this part;
- integrity of the body and reliability of the entire structure;
- ball pin manufacturing material;
- warranty period of operation.
Functionality check
Every car enthusiast should know the basic methods for diagnosing ball joints. The main ones are:
| Aurally | The simplest diagnostic option. Diagnostics is carried out by two people - one rocks the car with the engine turned off, the second listens for the presence or absence of squeaks or knocks from the wheels (if any, replacement is inevitable) |
| Presence of play | One of the wheels needs to be jacked up. The partner must get into the car and press the brake pedal all the way. The second partner must swing the wheel vertically and horizontally. If there is play, it immediately manifests itself in this way, which indicates the replacement of the ball joint |
| Finger wear | In the latest models of the “six”, supports were installed with special diagnostic holes, using which you can independently determine the wear of the pin. If wear of 7 mm or more is detected, replacement is required. |
Everyone decides for themselves how to check the ball joints on a VAZ 2106.
Market overview of manufacturers of ball joints for VAZ 2107
It turns out that on the Russian market there are about 35 brands of companies that produce ball joints specifically for the VAZ 2107. The most popular of the domestic ones are BelMag, BZAK, and Kedr. Let's look at the distinctive features of the parts they produce:
- "BelMag" - produces parts of several series ("Original", "Comfort", "Favorite"), their characteristics:
- the lubricant is included under the protective cover at the factory;
- The part is designed for use in difficult road conditions.
- "Cedar":
- have a solid forged body;
- labyrinth design of protective boot;
- cold landing of the ball pin;
- rolling the ball surface with diamond rollers;
- anti-friction liner to preserve lubricant;
- It is not equipped with factory lubricant, so before installing it on the car it must be placed under a protective cover.
- “Track” produces parts from several series – “Classic”, “Champion”, “Sport”, “Master”, “Style”. Their features:
- suitable for use in Russian off-road conditions;
- have a reinforced structure;
- with additional aluminum coating.
- "BZAK" has established itself as a high-quality and reliable manufacturer, product features:
- reinforced ball joint housing design – all-metal, forged;
- with a warranty period of 50 thousand kilometers;
- increased anti-friction and wear-resistant properties, thanks to the patented additive “Lugam”;
- the finger is made using the cold heading method, which gives it additional strength;
- the presence of a rubber cover to protect the structure.
As you can see by reading the descriptions of ball joints from various manufacturers, their quality largely depends on the production technology of the structural components. Therefore, try to also visually inspect the part: it should not contain sharp edges, especially on the ball pin. Be careful in your choice, as your safety depends on it.
We're sorry, but the requests coming from your IP address appear to be automated. For this reason, we are forced to temporarily block access to the site.
Procedure for replacing the upper support on a VAZ 2106 - photo report
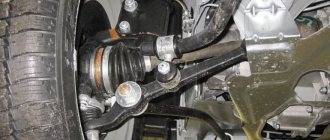
The upper ball joint is much easier to change than the lower one, so we’ll start with it. The first step is to jack up the front of the car on the side where the replacement will be made. We turn the steering wheel all the way to the left to make all this easier to do.
Then remove the wheel and unscrew the nut securing the ball joint to the hub. You can rest your foot on the brake disc to keep that part of the front suspension stationary. The procedure is clearly shown in the photo below:
I won’t unscrew the nut all the way so that I can rest against it later. Now you need to insert the pry bar between the support nut and the hub, and jerk it down with good jerks, applying a lot of effort. You may have to jump on the mount with your foot to get the ball to pop out of its place. The result is shown in the photo below, where you can see that the support pin has come out of the hub hole.
Now you can completely unscrew the lower fastening nut, after which you need to unscrew the three bolts that secure the support to the lever:
After everything is unscrewed, you can safely remove the ball, since the hub will move to the side:
We lift it and everything is ready:
Installation is carried out in reverse order. First, insert the support into the lever and tighten the three bolts:
Now we lift the hub and combine the support bolt and the hole, as clearly demonstrated in the photo below:
Now we press the lever on top with our hand, pressing with enough force so that we can tighten the nut, and tighten everything thoroughly.
Now I’ll tell you a little about the replacement from the bottom side, although by and large this procedure is carried out in a similar way, but a little more complicated.
Why did it happen so?
Perhaps the automatic requests do not belong to you, but to another user accessing the network from the same IP address as you. You need to enter the characters into the form once, after which we will remember you and be able to distinguish you from other users exiting from this IP. In this case, the page with the captcha will not bother you for quite a long time.
You may have add-ons installed in your browser that can make automatic search requests. In this case, we recommend that you disable them.
It is also possible that your computer is infected with a virus program that is using it to collect information. Maybe you should check your system for viruses.
If you have any problems or would like our support team, please use the feedback form.
How to change the lower ball joint on a VAZ 2106
From below everything is more problematic, although the meaning remains the same. Unscrew the fastening to the hub:
It is quite difficult to knock it out, since there is practically nowhere to insert the pry bar, so you can do it in the following way - by hitting the place where the support pin is inserted with a hammer. After prolonged blows, it should pop out. Then it remains to unscrew the three bolts securing the lever:
Installation occurs in reverse order. The price of new parts is about 500 rubles per pair.
Preparing for replacement
After you have checked the ball joints on the VAZ and found that they are damaged, be sure to replace them. During the preparation phase, you will need to complete the following steps:
- Place a jack under the side of the car that is being repaired.
- Place wheel chocks under the rear wheels.
- Loosen the bolts on the wheels, then lift the side of the car. Remove the wheel and place it under the bottom of the engine.
That's it, the preparation is over. Now it is necessary to dismantle the old ball joints and install new ones.
Gaps in the upper hinges of VAZ 2101-2107
To independently diagnose the condition of ball joints, you will need a special device for measuring play and a torque wrench.
The diagnostic procedure looks like this:
- Before checking the ball joint, you need to place the car on a level surface and raise the side on which the diagnosis is being carried out.
- Loosen the bolts on the wheel in advance, and after lifting, unscrew them.
- Remove the wheel and place it under the engine.
- A wooden block must be installed under the lower ball joint. Its height should be 19 cm.
- Lower the car onto the block. The surface on which it is installed must be hard. Work cannot be done on the ground.
- Install the device bushing on the upper ball fastening nut, which is located closer to the brake disc protective casing.
- Place the device on the sleeve and secure it with a bolt.
- Move the tool to position the lever in a vertical position. Its lower edge should rest against the brake disc housing. After this, tighten the bolt.
- Install the indicator in the base stand until it stops. The interference should be no more than 2-3 mm.
- Attach the bracket to the wheel hub using two wheel bolts.
- Install the torque wrench on the hex head.
- Turn the key with a torque of 196 N*m (or 20 kgf/m) in one and the other direction.
- Add up the readings that will appear on the indicator.
The sum of the readings should not be more than 0.8 mm. If it differs from this value, then the ball joint needs to be replaced. Driving with a broken one is not only uncomfortable, but also dangerous - at any moment your finger can be torn out of the clip. And if this happens at high speed, a fatal outcome cannot be avoided.