The serviceability of the braking system on any car is, for obvious reasons, of paramount importance, since overall driving safety directly depends on the effectiveness of the brakes. Taking into account the above, any deviations from the norm (even minor ones) in the operation of this unit are a reason to immediately identify the cause of the malfunction. In this article we will talk about what to do if the brake pedal fails while the engine is running, problems arose after replacing the brake fluid, bleeding the brakes or other elements of the brake system, etc.
We also recommend reading the article about why engine speeds fluctuate. From this article you will learn about the causes of “floating” idle speed, as well as ways to determine the malfunction.
Car brake system: types, general structure and principle of operation
To better understand why the brake pedal fails when pressed, it is necessary to consider the general operating principle and design of the brake system. This system is usually hydraulic, and problem areas are often common on many car models. Brakes operate on the principle that there is incompressible brake fluid in a closed volume.
Note that the machines previously also used a mechanical braking system with cables and other drive elements, but engineers abandoned such a device long ago. The fact is that although mechanics were not inferior in reliability, but were superior to hydraulics, the performance and smooth operation of such a solution turned out to be insufficient, taking into account the rapid development of the auto industry, the increase in the power of installed internal combustion engines, etc. Mechanical brakes simply no longer cope with increasing speed limits and effectively and safely slow down the car.
There is also a pneumatic braking system, which is used on special vehicles (trucks, large buses, various equipment). Air brakes are no worse in efficiency than hydraulics, but the system itself is too heavy and bulky to be installed on compact passenger cars. So it turns out that the hydraulic braking system has become widely installed on civilian and commercial vehicles, as well as on many other types of wheeled vehicles.
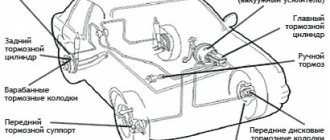
Hydraulic brakes have the following elements in their design:
- GTZ (brake master cylinder)
- RTC (brake wheel cylinders)
- Hydraulic lines
- Compensatory device
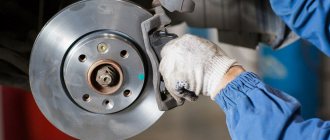
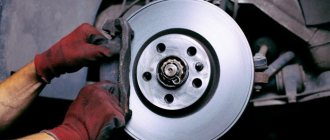
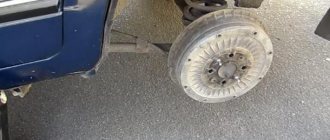
- Brake discs and brake pads
The working fluid for the brake system is brake fluid, which has certain properties. At the moment when the driver presses the brake pedal, the force is transmitted to the GTZ, which is filled with working brake fluid. The GTZ device has a piston that exerts pressure on the liquid. Through the working fluid, the force is transmitted to the RTC, which are installed in the area where each of the vehicle wheels is located. As a result, the brake pads are pressed against the brake discs or brake drums. If the force is maximum, then the pads completely block the rotation of the wheel. Let us add that depending on the type of brakes installed, the latter are divided into drum or disc. There is also a combination where the front wheels have disc brakes, while the rear wheels are equipped with drum brakes.
The main advantage of hydraulics is smooth and predictable force; the pads are pressed evenly against the brake discs. As for the force on the brake pedal itself, it is proportional to the force that compresses the pads. It turns out that the driver can clearly measure the applied force, thereby determining the degree of wheel locking and the intensity of braking. After releasing the brake pedal, the return springs, which are present at the place where the pads are installed, move them apart, that is, they allow the pads to take their original position. At the same time, the brake fluid is forced back into the master cylinder. This is the general operating principle of the entire system. At the same time, modern cars have additional elements: a vacuum brake booster, a brake force compensator, an ABS system, etc.
Now a few words about the brake circuit. This solution allows you to reduce the risk of complete failure of the braking system in the event that the brake mechanism on one of the wheels is faulty. This is very important for hydraulics, since a leak in one of the RTCs is a common malfunction. There are several schemes of multi-circuit brakes, according to which the circuits of brake systems are implemented. Let's look at some of them. The axial design allows the braking system to be divided into circuits for the front and rear axles. If the brake wheel cylinder leaks on one axle, then the other will be able to operate normally. There is also a pattern where the braking force distribution pattern is made diagonally relative to the rear and front wheels. There are also solutions that combine the wheels of the front axle and one rear wheel; RTC pistons are additionally installed (double-piston and multi-piston brakes), etc.
How to properly bleed the brakes on a VAZ 2109 (Procedure, video)
Vehicle pumping procedure
Why pump
Bleeding is a frequently carried out measure aimed at restoring and increasing the efficiency of the braking system.
If air is in the system, at some point (as practice shows, this always turns out to be the most inopportune moment) the pedal simply will not respond to pressure. Therefore, you will not be able to slow down or stop the car. And this despite the fact that you have new brakes after replacement.
Tank with TJ
Cast and stamped wheels, summer tires for Lada Vesta - Characteristics and sizes, which ones to buy?
Rules for performing work
The VAZ 2109 is equipped with a brake system divided into two circuits - rear and front.
If you replaced only the front or only the rear cylinders, or other components, bleeding may well be carried out only along one of the circuits where the repair was carried out. All other situations related to removing the master brake cylinder and replacing pipes require mandatory bleeding of the entire system.
Order
Before you bleed the brakes, you should learn about the bleeding procedure. If you do not follow it, the work will not give the desired effect, and therefore the pedal may not work again.
Leveling procedure
Wheel
Rear right wheel
Front left wheel
Rear left wheel
Front right wheel
Follow this correct bleeding sequence, starting with the rear right and ending with the front right. A similar recommendation is indicated for all VAZ 2109 operating manuals.
The process is in full swing
Preliminary activities
By properly preparing for the upcoming brake system bleeding, you can seriously save on car service costs. Watch the video, read our instructions to gain the necessary experience and upgrade the vehicle yourself
Why the brakes disappear and the pedal fails: symptoms, causes and what the driver should do
Having examined the general structure of the hydraulic brake system, you can understand why the brake pedal sinks to the floor or why the pedal slowly sinks when you press the brake. There may be several reasons for such a malfunction. Quite often, diagnostics must begin with checking the brake fluid level in the reservoir. Any hydraulic system has the specified compensation tank. The tank has “min” and “max” marks, which determine the normal amount of fluid in the system.
The fact is that although the brake fluid is incompressible, the volume of fluid in the system changes. This occurs due to the fact that brake pads tend to wear out during use. As a result, the RTC pistons extend further to move the pads, which requires more fluid in the system. For this reason, the minimum level of working fluid in the tank is determined. When the amount of fuel fluid drops below the minimum, then air enters the brake system circuit, that is, airing occurs.
It turns out that if the brake pedal fails, the causes of such a malfunction can often be a critical decrease in the fluid level or air ingress. When pressed, the brake pedal goes to the floor all the way, the brakes do not work completely or barely work. To prevent possible consequences, the level of brake fluid in the expansion tank must be checked visually, without waiting for the moment when the emergency lamp lights up on the instrument panel in the cabin.
It should also be added that airing of the brake system is possible for other reasons. If the ABS brake pedal suddenly fails or the pedal falls to the floor on cars without an anti-lock braking system, and checking the fluid level in the reservoir does not give anything (the level is normal), then overheating of the brakes may be the culprit. Brakes overheat in cases where there is intense and frequent braking at high speeds, constant and prolonged driving at low speed with the brake pedal pressed (for example, descents on mountain serpentines). More often, deterioration of the system in such modes occurs in conjunction with high outside ambient temperatures.
In other words, the brake fluid boils under such conditions and the brakes are overheated. As a result, the brake pedal fails, since the intense release of air during boiling of the fuel fluid disrupts the operation of the hydraulic system, regardless of the circuit implementation scheme. Taking into account the above, it is necessary to avoid sudden, constant and intense braking in the heat on cars that are not prepared in advance for such operating conditions. For the same reason, it is recommended to modernize and modify the brake system on cars whose engine has been seriously boosted for driving in aggressive mode. To avoid overheating of the brakes, you need to install ventilated brake discs and use special brake fluid, which requires operation in high-heat conditions.
We also recommend reading the article about what a boosted engine is. From this article you will learn about various methods of modifying and tuning the engine.
As for topping up, it is necessary to use the type of brake fluid recommended by the vehicle manufacturer. Mixing different types of liquids, as well as products from different manufacturers, is highly not recommended. For example, if the use of DOT4 is allowed, then you need to pour such a liquid, and use a product from the same brand. Ignoring this rule may lead to seals in the brake system becoming unusable, lines may become clogged, etc.
In parallel with this, at each maintenance the wear of the brake pads and brake discs/drums on each axle should be checked. Try not to drive on heavily worn pads, as wear and heat on the discs/drums will also increase. If the brake discs themselves are worn out, then they should be replaced or sharpened to remove wear. Elements should be changed and sharpened in pairs, that is, on each axis.
After replacing the brake pads, the brake pedal fails
A fairly common occurrence after certain work related to the brake system is that after replacing the brake fluid, the brake pedal fails. The malfunction may also appear after replacing pads, discs, and drums. Drivers quite often encounter the problem of pumping the brakes, but the pedal falls through. Let's figure it out.
Let's start with the fact that after replacing the pads/discs, replacing the fluid and bleeding the brakes, the system may malfunction for some time. You need to be prepared for this in advance, that is, you cannot immediately operate the car in the usual way. The point is that new brake discs and brake pads need to get used to it. While the grinding is not completed, the car may jerk after pressing the brake, the brake pedal begins to vibrate, and when braking, light vibrations can be transmitted to the steering wheel. Let us add that the general grinding in of new pads and discs takes from 250 to 400 km. mileage If the symptoms do not stop, then you should check the quality of the parts and the correct installation of the elements.
A common cause of brake problems, where the brake pedal slowly sinks, is a damaged or misaligned brake caliper that is present in the design of the brake system. The displacement of the vertical axis of the caliper relative to the axis of the brake disc does not allow the system to work normally. Also, the caliper may be in good working order, but poorly secured. In such cases, the brake pads are simply not able to properly rub into the disc.
The fact is that in case of problems with the caliper, the new pad is not pressed against the disc over the entire area of the antifriction lining. As a result, parts of the lining wear out quickly and severely, and the brake system is ineffective. The brake pedal slowly goes lower and lower when pressed. For this reason, when replacing pads, you need to check the condition of the caliper, its axial relationship to the disc. This is necessary in the case when only the pads, pads and discs are changed, as well as the pads, discs and calipers at once.
When the engine is running, the brake pedal falls down
The most common reasons for the brake pedal to fail when the car is running are air in the system, problems with the turbocharger, low fuel fluid level, critical wear of the pads/discs, overheating of the brakes, etc. We also note that if symptoms appear, when the brake pedal does not fall, but remains very tight after starting and the effectiveness of the brakes is greatly reduced, then you should check the vacuum brake booster. Additionally, its malfunction is indicated by the fact that the engine speed fluctuates when you press the brake, although the fluid does not leave the brake system reservoir, and also when the engine is turned off, the brake pedal always remains elastic, and not after several presses.
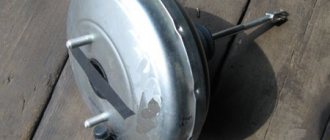
Let's return to the so-called “vacuum tank”. This device helps the driver by reducing the force applied to the brake pedal during braking. A common cause of problems is damage to the brake booster vacuum diaphragm. The specified pneumatic brake booster operates only when the engine is running. Damage or wear of the diaphragm does not allow vacuum to be achieved in the amplifier chamber, as a result of which the brake pedal is difficult to press after starting the internal combustion engine. This is easy to believe by pressing the brake when the engine is not running. After 2-3 pumps the pedal should become elastic. Afterwards the engine starts. If the pedal does not become a little softer, then diagnostics of the vacuum booster is needed.
Why do you need a “sorcerer” (brake force regulator)
Greetings! In this article we will talk about the “sorcerer”. What is it for, how is it designed, is it worth repairing.
Many motorists know the design of their car well. They can easily find the part or assembly they need. However, not all of them will be able to tell where the “sorcerer” is located and how it works.
Drivers call this the part responsible for regulating braking force. This mechanism increases the reliable operation of the vehicle's braking system. The function of the “sorcerer” is simple - taking into account the roll of the car, it regulates the brake fluid pressure on the rear wheels. It is usually mounted at the rear axle on the underbody.
What is a “sorcerer” for?
The braking system has a complex structure. Each part performs its specific function. Many cars have disc brakes on the front wheels and drum brakes on the rear wheels.
On such vehicles, when the driver brakes sharply, then the front of the car is pressed to the ground, and the rear part rises up. At such moments, the “sorcerer” begins to work.
Due to the rise of the bottom, the distance between it and the rear axle increases. The lever located on the bridge stops acting on the “sorcerer” piston. It moves and blocks the flow of fluid to the brake cylinders of the rear wheels. They don't slow down and keep spinning. The car doesn't skid.
Despite the fact that the “sorcerer” is a reliable part, some motorists remove it. It is strictly prohibited to dismantle the regulator. It will be very difficult to predict how a car will react when braking. If the rear wheels are blocked, the car can easily go into a skid, which will most likely create an emergency situation.
The design of the “sorcerer” is simple. There is a cylinder that has fittings for inlet and outlet of brake system fluid. Inside the mechanism there is a piston with a rod.
The piston is supported by a spring, which prevents the flow of brake fluid from being completely blocked. With the “sorcerer” working, the braking distance of a fully loaded vehicle, whose speed is 70 km/h, will be 14 meters, and an empty one – 12 meters. The vehicle brakes smoothly and does not skid.
If the driver is sure that the pressure regulator is faulty, then it is necessary to replace it with a new mechanism. The cost of this part of the brake system is low. It is not advisable to repair it, because there will be no guarantee of its operation, as well as safety on the road.
Source
The brake pedal fails: the brake fluid does not drain
In practice, quite often car owners are faced with the fact that the brake pedal fails the first time they press it. In this case, a superficial inspection of hoses and cylinders does not reveal leaks, there is no noticeable change in the level of brake fluid in the reservoir, etc. Please note that it only takes a few drops of brake fluid to leak for the brake pedal to start to sink when pressed.
If there is a leak, the brake system inevitably becomes airy. It turns out that if the brake pedal sinks, but the fluid does not leave, this does not mean that the system is sealed. Two or three drops of fuel oil will not affect the level in the reservoir, the leak itself may be difficult to detect, but the brakes will not work properly.
We also note that brake fluid can leak through the main brake cylinder, and the leak can only be detected by disconnecting this cylinder from the brake booster. It often happens that the cylinder is not completely filled.
A little theory
To transmit force, one of the properties of the fluid is used - its incompressibility. That is, when a force is created on a liquid, its volume does not change, and it acts as a transmitter.
A hydraulic brake drive is more practical than a mechanical or pneumatic one, but it has one drawback - if air gets into the fluid, the transmission of force will be significantly reduced. This is because air, like any gas, is compressible. As a result, the presence of air leads to a change in the volume of the liquid when creating force (due to gas compression). Because of this, the force is no longer transmitted to the actuators, since it is absorbed by the volume change.
It turns out that effective operation of the brakes on a VAZ occurs only until air enters the drive system. And this can happen for several reasons.
After changing the brake fluid, the brake pedal fails
Another common problem is when the pedal fails after bleeding the brakes. In other words, the owner has just changed the brake fluid and bled the car's brakes, and the pedal is falling out. First of all, this may mean that air remains in the system.
Often, two people bleed the system (one person works with the pedal, and the other opens and closes the bleeder fittings). So, problems with the brakes appear if the one who pressed the pedal released it early, while the assistant did not have time to close the bleeder fitting.
Let us also add that if, in addition to replacing the brake fluid, the calipers were also repaired/replaced, the brake pads were changed at the same time, and the brake pedal fails (usually on the first press), this happens as a result of the “breaking in” of the parts.
The pistons of the working cylinders are positioned in such a way that the gaps between the pads and the brake discs/brake drums are minimal. In this case, the reverse stroke of the piston is blocked in one way or another (depending on the design features).
When all the parts are in working position, the brake pedal will stop falling. If the brake pedal fails after repair, then there is a high probability that errors were made during assembly, the system is not pumped well enough, there are brake fluid leaks, etc.
How to replace
To change the brake adjuster, we will arm ourselves with the following tools:
- Use a metal brush and WD-40 penetrating lubricant or rust converter. If we run out of such liquids, then we make them ourselves; read how to do this in this article.
- Special wrench for unscrewing brake pipes.
- The key for “10” and “13”, which can be used to disassemble the floor of the “seven”.
Before dismantling, it is advisable to clean all threaded connections from dirt; due to their location, there will be enough of it there. We use a metal brush and carefully remove dirt without damaging the thread. We wet it generously with rust converter so that the nuts and bolts can be easily unscrewed. We wait a while for WD to take effect.
- Disconnect the governor control rod from the axle and body.
Using a “10” wrench, unscrew the nut securing the lever to the rear axle bracket. Using the same wrench, unscrew the nuts of the bracket holding it to the body.
- Use a special wrench to remove the brake pipes from the mechanism. Unscrew the “sorcerer” mounting bracket.
- We free the muffler from the rubber suspension and lower it down so that it does not interfere.
- Carefully pull the brake adjuster with traction from the car and get out of the hole.
- We lay the structure on a workbench and move aside the boot that protects the junction of the torsion bar and the “shaman” valve. We unscrew the bolt holding the lever locking ear from the body and remove it.
- We throw away the non-working “sorcerer”, because there is no point in repairing it.
Assembly is carried out in reverse order. After installation, do not forget to adjust it, as stated above.
Brakes lost after heavy braking
It happens that the brake pedal falls when pressed hard. Typically, this can happen because there is a brake fluid leak. The reason may be a break in the brake hoses, tubes, or breakdown of the brake cylinders (main or working). The brake pedal also drops sharply when there is severe wear on the discs or brake drums or brake pads. In this case, the piston of the working cylinder is pushed out.
Another reason may be overheating of the brake fluid during very active braking (brake overheating). This occurs due to heavy loads on the braking system (active braking) at the same time that the fluid in the system has lost its properties, “pulled” moisture, etc. It is precisely taking into account the fact that the TZ has a limited service life, it must be changed at least once every two years (preferably once a year).
It is also necessary to inspect the brake hoses and pipes every 6 months. If cracks are noticed, the hoses need to be replaced. In this case, for replacement, you should purchase “fresh” hoses according to the date of manufacture. Usually, if the product is more than 24 months old from the date of release, then it is better to refuse to purchase such a spare part. The fact is that rubber dries out and cracks on its own over time.
What to do in such a situation
If you were able to diagnose creaking and signs of wedging in this unit, you need to perform a number of measures.
And here it is not necessary to contact a car service. You need:
- put the car on a jack;
- remove the wheel;
- unscrew the caliper;
- remove it;
- unscrew the problematic piston;
- remove the piston from the cylinder;
- visually inspect the element;
- check for chips, damage, corrosion;
- if there is rust, clean it;
- if severely damaged, replace;
- drain the working fluid from the element;
- remove the sealing ring;
- clean all surfaces;
- dry;
- fill in new hydraulics;
- assemble in reverse order.
When putting the assembly back together, pay special attention to not accidentally damage the old boot. If you notice cracks on it, then no restoration will help. Replacement only.
When it is necessary?
As a rule, if all brake components are in good working order and the brake fluid paths are sealed, then they do not require any bleeding. But if a fuel fluid leak occurs due to damage to the “overpasses” and a drop in its level, both brake repair and mandatory bleeding will be required.
This is a vitally necessary procedure, because airiness in the system can lead to the fact that at the very moment when everything is decided by seconds, the brakes will not work. And there will be nothing left to pump, and no one...
Therefore, let’s take care of this immediately, if we find that the brake pedal has increased travel, it has begun to “go limp,” as car enthusiasts say – the brakes are “wobbly.”
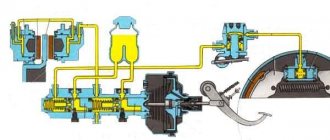
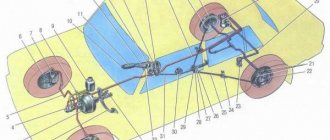
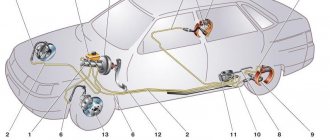
Hydraulic brake circuit diagram
In addition, there are other reasons why pumping is necessary:
- You had to interfere with the operation of the system;
- There were cracks in the hoses, leaks of fuel fluid;
- The brake fluid turned out to be of poor quality and needs to be completely changed;
- Have you changed the brake discs (sooner or later this needs to be done);
- The water content in the fuel fluid has increased (it is hygroscopic, i.e. it absorbs and accumulates water), so it sometimes has to be changed.
How to tighten the handbrake
- We park the car on an overpass or inspection hole. (You can also place the rear of the car on a curb or use a jack).
- We put the car in 1st gear.
- We put the car on the handbrake and count the number of clicks. If there are less than 2 clicks, then you need to lengthen the drive, if there are more than 6, then reduce it accordingly.
- Lower the handbrake all the way.
- Take 2 keys to “13”.
- We climb under the car.
- We remove the rubber holders of the muffler and manifold for convenience.
- We find the cable equalizer (number 11 in the diagram).
- Use one key to unscrew the lock nut, and use the other to secure the nut from turning.
- We adjust the stroke of the lever: when screwing it in, the stroke decreases, when unscrewing it increases. (remember that the lever stroke should be from 2 to 6 clicks).
- We hang the rear wheels of the car on a jack and check the rotation of the wheels. The brake pads should not interfere with the rotation of the wheels, and when the handbrake is raised, the wheels should stop firmly.
- Tighten the nut with a counter nut.
You will have to tighten the handbrake quite often due to the design of the handbrake. You will also have to adjust the handbrake when replacing the cable, repairing the handbrake, replacing brake pads (How to replace rear brake pads?) and replacing the rear brake cylinder.
It should be noted that the parking brake must be held on an uphill slope of at least 23%.
Results
To avoid the situation described above, you need to periodically diagnose the condition of the brake system: add fluid, change it, install new pads, check the brake discs, monitor the condition of all components: the hydraulic vacuum booster, the working and master brake cylinders. If you suspect that they are malfunctioning, immediately carry out repairs or contact a service center.
The vehicle brake system must always be in technically sound condition and any malfunction
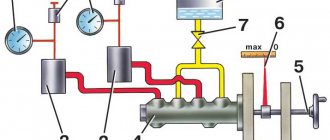
| The numbers indicate: 8 – brake pedal; 7 – brake light switch; 6 – brake light fastening nut; 5 – brake light switch buffer; 4 – brake pedal bracket; 3 – vacuum booster; 2 – tank; 1 – main cylinder; |
it is necessary to eliminate it immediately after its discovery, without postponing the issue until a saving tomorrow. Tomorrow, with faulty brakes, may not come!
One of the obvious signs of a failure of the car’s braking system is that the brake pedal of the VAZ 2110 fails . Such a malfunction can be caused by several reasons. It could be:
- Leakage of the main or working cylinders of the brakes;
- Broken brake pipe or brake hose;
- Consequences of replacing brake pipes or hoses;
- Malfunction of the vacuum brake booster;
- Malfunction in the main or working cylinders of the brakes;
- The brake pad tension spring has broken.
The appearance of traces of brake fluid in the area of the main or working cylinders of the brakes tells the driver that the cylinder cuffs need to be replaced. Sometimes traces of fluid cannot be visually detected, and there are actually no brakes. This is often due to a faulty brake master cylinder causing brake fluid to leak into the brake booster cavity.
The main cylinder must be repaired or replaced, the brakes must be bled according to the diagram, and the fluid must be taken from the cavity of the vacuum booster using a medical bulb or syringe.
| The permissible free play of the VAZ 2110 brake pedal should be approximately 3-5mm. |
This can be conveniently done through the inlet holes of the vacuum hose into the amplifier housing.
If defects are found on the cylinder mirror, then the cylinders themselves must be replaced. These could be deep scratches on the mirror, sinks, or deeply ingrained rust.
One of the most dangerous malfunctions when the brake pedal of a VAZ 2110 fails is a burst brake pipe or brake hose. The car instantly remains without brakes, which can lead to unpredictable consequences.
Therefore, it is necessary to periodically inspect the entire brake system, paying special attention to the condition of the brake pipes and hoses. Even a small trace of brake fluid should immediately alert the driver and it is necessary to immediately find the cause of its appearance. It is generally not recommended to operate a car with any malfunction of the brake system, and when the brake pedal fails, it is better to cancel any trip until the problem is fixed.
The brake hose is not allowed to have any, even minor cracks or deep abrasions. After a mileage of 80-100 thousand kilometers, it is recommended to replace even seemingly serviceable brake hoses.
If the brake pedal fails after an operation to replace brake pipes or hoses, then this “indicates” that the brake system is not fully pumped, in which there is air left, or there is a leak of brake fluid in some of the connections.
A malfunction of the vacuum brake booster can be caused either by worn diaphragms, springs, or air leaks in the hose connecting the intake manifold to the vacuum booster housing, or a malfunction in the mechanical part of the booster. Hissing in the cabin when you press the brake pedal, as well as changing engine speed when you press the brake pedal, “indicates” that the amplifier needs to be repaired or replaced.
Checking the serviceability of the vacuum booster is quite simple. You need to press the brake pedal several times and hold it down to start the engine. The pedal should noticeably move forward, which will “speak” about the serviceability of the vacuum booster.
If the tension spring of the brake pads breaks, the piston of the working cylinder “losing” the stop is squeezed out, which leads to brake fluid leakage and air entering the brake system.
It is also worth noting that brake system malfunctions can be caused by the use of low-quality brake fluid. The liquid can have an aggressive effect on both the cuffs themselves and corrode the inner layer of the brake hoses, sometimes completely blocking them.
Also read other reviews
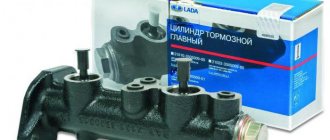
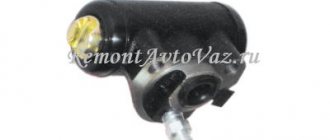
- Rear, front and main brake cylinder VAZ 2109, price
The serviceability of the braking system on any car is, for obvious reasons, of paramount importance, since overall driving safety directly depends on the effectiveness of the brakes. Taking into account the above, any deviations from the norm (even minor ones) in the operation of this unit are a reason to immediately identify the cause of the malfunction. In this article we will talk about what to do if the brake pedal fails while the engine is running, problems arose after replacing the brake fluid, bleeding the brakes or other elements of the brake system, etc.
Read in this article
Communities › Lada 2110, 2111, 2112, 112, Bogdan › Blog › The rear right wheel does not bleed
Tell me how the tubes on the sorcerer should be connected, well, exactly from the GTZ they go to the sorcerer and which ones go to the wheels. The left rear one is pumped, but the right rear one doesn’t matter. The brake fluid reaches the sorcerer, but the wheel does not reach the tube (Maybe I think I connected the tubes incorrectly
Comments 25
SOLVED THE PROBLEM! THE NEW PIPE BEHIND THE TANK PROVED TO BE DEFECTIVE! I found the old one, installed it, everything is pumped)))
painted on it
It’s visible from below, not visible from above, but it looks like everything is connected properly, maybe someone can post a diagram
Did the sorcerer put a screwdriver in it?
There, on the sorcerer you can see arrows indicating the entrance and exit of the liquid flow.
throw this sorcerer out of the picture! all my friends threw it out and connected the tubes with front brake hoses. now at least you feel that there are rear brakes too and you feel how the rear is slowing down. before this, it seems like only one in front was braking.
the opinion is erroneous) 1) the rear wheels will brake uncontrollably (not very good) 2) in a situation if the main pipe bursts, it will be no better (the system will fail completely)
It’s okay. I’ve been driving without a sorcerer for 2 years and nothing. In winter, you still change your driving style to a softer and more predictable one. People don’t call the regulator a sorcerer for nothing. It still won’t work correctly. In any case, it will quietly fail.
Didn't you read the comment about “system failure” carefully? )
And he always doesn’t care about other people’s opinions)))
BrodyagaUSSR
Didn't you read the comment about “system failure” carefully? )
Well, if you think like that, then it’s not worth driving. But you never know what can fail in the car? The beam will burst, the wheel will bounce off completely.
If you follow the sorcerer, then he works normally, but if you wait for everything to rot, then the stump is clear and it’s not noticeable that it will work
Well, if you think like that, then it’s not worth driving. But you never know what can fail in the car? The beam will burst, the wheel will bounce off completely.
there is no need to take the idea to the point of absurdity (you need to monitor the equipment, and the regulator too), the easiest way is to throw out everything “unnecessary”))
BrodyagaUSSR
the opinion is erroneous) 1) the rear wheels will brake uncontrollably (not very good) 2) in a situation if the main pipe bursts, it will be no better (the system will fail completely)
Even if one tube bursts, the system will fail! I checked! I mean even if there is a sorcerer standing.
Listen, my colleague is a little tense about this question, is it a “panacea”? )
Sorry, I'm limited in my answers, ask the right questions.
throw this sorcerer out of the picture! all my friends threw it out and connected the tubes with front brake hoses. now at least you feel that there are rear brakes too and you feel how the rear is slowing down. before this, it seems like only one in front was braking.
with the rear hoses, not the front ones.
Yes, the rear ones didn’t fit. I later changed them to the front ones in the store.
Strange. A sorcerer threw it out on the neighbor's property a week ago. I took two rear hoses! The tubes cannot be connected with front hoses. Even from the photo you can see that they were connected with rear hoses.
ok, I give up. I remember I just bought a set of hoses, in my opinion the front ones. The man looked and said: they need to be replaced with others. Perhaps the rear ones. Then he added: the hoses need to be changed. You shouldn’t leave them in stock, as they bend over time .so I went to the store and changed some hoses for others.
If there is no assistant, it is quite possible, although not so convenient, to bleed the brakes on a VAZ 2110 yourself.
There is a special device - an aerator, which you can buy or make yourself.
For this you will need:
- brake reservoir cap (“classic”) – without sensor, plain black;
- auto nipple;
- 14 mm drill (you can use a round file).
We make a hole in the lid and insert the nipple into it tightly without a gap. That's all the device is. With its help, you need to connect the valve of the wheel (spare wheel, or removed from a jacked car) with the valve of the tank.
Adjusting the braking forces of Lada Vesta
The operating principle of the system that regulates and distributes brake fluid pressure on Lada Vesta cars is fundamentally different from previous models, and there is no “witchcraft” in it. The Lada Vesta brake pressure regulator is directly connected to the ABS system and is electronically regulated depending on the speed of each wheel.
The ABS control unit transmits signals from speed sensors and analyzes the situation. The system “understands” any skidding and allows you to distribute the braking force with maximum efficiency. The pressure is controlled by the valves in the ABS hydraulic block, and there is no need for any magic. In addition, the electronics itself detects all malfunctions and reports them to the driver using a special lamp on the dashboard.
Why do you need a sorcerer on a car? The answer to this question is simple.
If car owners install a sorcerer instead
If the sorcerer is removed from the brake system, the following happens: braking will occur synchronously with all four wheels. There is a sequential blocking of the wheels: first the rear pair of wheels, then the front pair of wheels. The risk of a traffic accident increases, since a driver driving a car behind your car is unlikely to be able to react to such sudden braking. As a result, a collision is inevitable. Therefore, a sorcerer is necessary on a car, and it is not recommended to remove it from the brake system. This is usually done by people who understand well what they are getting into. In this case, race car drivers drive sports car models. But there are situations in which car owners do not think at all about the consequences of such modernization. At the same time, they stupidly claim that the car brakes much faster and better, but it only seems so. This problem lies in the fact that during sharp braking, both pairs of wheels jam in succession. It is better to adjust the sorcerer on the car at a service station. The gap between the rod and the spring plate should be one or two millimeters.
For the first time this mechanism, called a pressure regulator, which is abbreviated as RD, appeared on domestic VAZ car models in 1970. The licensed pressure regulator was intended to enhance the safety of VAZ car models. Such a novelty in the car’s braking system could not help but attract the attention of the entire design corps of the USSR automobile industry. New models of pressure regulators appear at AZLK, manufactured under the Girling license. Less than ten years have passed since the RD of the same modification appeared on Volga models. Today, all production of domestic cars are equipped with this pressure regulator, except for the Tavria model.
At various factories of the domestic automobile industry, different names for this mechanism appear: In addition to the usual name of this device, AZLK and GAZ sometimes use such names as “braking torque regulator of hydraulic systems”, “braking force regulator”, “hydraulic pressure reducing valve”. To which the automotive people responded with their unique name for the pressure regulator, expressing their personal attitude towards this incomprehensible mechanism,
Conducting a comparative analysis of the operation of the pressure regulator and the anti-lock braking system, better known by the abbreviation ABS. The realization comes that the RD in no way performs the functions of ABS, but only imitates them, since it does not have the ability to take into account the coefficient of adhesion of the road surface and tires. The adjustment of the pressure regulator on a dry asphalt surface, on an empty passenger car, ensures operation when there is a pressure in the line of at least thirty kgf/cm2. Another value is the force applied to the brake pedal itself, which is 50 kgf. In slippery road conditions, both pairs of wheels will lock under lower pressure conditions.
Posts 6
1 Topic by Deathmish 2014-03-26 15:29:54
Topic: Resolved: Right rear wheel does not brake.
Hello, I noticed that the rear right wheel was not braking, I thought about what the reasons might be and decided to change the pads and cylinders on both wheels. After the replacement, when bleeding the brakes, I saw that the right cylinder was NOT getting any fluid. What could be the reason? Has the sorcerer really flown?
2 Reply from sergo9531 2014-03-26 17:15:01 (2014-03-26 17:27:42 edited by sergo9531)
It's such an idiotic system. Perhaps the sorcerer himself is poorly regulated. I tried to adjust it for a whole month, but it didn’t work (there was a similar situation, maybe I did something wrong). Or the valve is stuck/clogged. You can try to disassemble and clean it. in this case, it is advisable to replace the copper ring.
3 Reply from Sergey VAZ 2111 2014-03-26 21:55:12
Change the sorcerer or go over it. Although I heard that the tubes get clogged.
4 Reply from kapelkaK 2014-03-26 22:11:08
And the hoses delaminate due to age.
5 Reply from AntoxA 2014-03-27 21:36:31
YES, look, the sorcerer, well, such a problem will set him up, I tried for a week more than once a day, I couldn’t stand it and threw it out straight and replaced it with a tee.
6 Reply from Deathmish 2014-03-31 18:24:55
Thanks to all. I solved the problem. The reason was indeed the incorrect adjustment of the sorcerer.
The rear right wheel of the VAZ 2110 does not bleed: reason
malega View profile Tol466 View profile Thyssen View profile Tol466 View profile Thyssen View profile Boris View profile Tol466 View profile Thyssen View profile krecc View profile leo View profile krecc View profile Tol466 View profile krecc View profile The flap floats and does not freeze
if you fill even more than max. . then the spring does not allow it to open. What I did was written above. Yesterday it was normal, what happened is unclear.
Added: After all, I topped it up to max., when braking, the light blinked.
Troubleshooting
We recommend that you always check the brake system before driving, especially on older vehicles or if the brakes have already been repaired. However, if the pedal fails while driving, the first thing you need to do is stop the car. To do this, you can use the handbrake (do not overdo it to avoid skidding), and also, if you install a manual transmission, brake the engine - shift to lower gears with throttle shifting
The main thing is to remain calm, act carefully and carefully
Now let's talk about repairs. If you find that air has entered the system, you need to accurately determine the cause. If there is no depressurization, you can limit yourself to bleeding the brakes to remove air pockets, otherwise more complex repairs will be required. Bleeding can also be done at home, but if you do not have experience in such work, it is better to contact qualified specialists. In addition, if the system has boiled, you should think about changing your driving style, installing ventilated discs, and using high-temperature brake fluid.
If the problem lies in a ruptured amplifier diaphragm, it is usually enough to replace it with a new one. This is a fairly simple and cheap type of repair. Another thing is problems in the wheel brake mechanisms. Their installation must be carried out with precise observance of alignment and clearances, and the result of the work must be carefully monitored.
How to bleed brakes on VAZ cars
This is a procedure performed after repairs, replacement of individual system elements, or when replacing fluid. Pumping needs to be done by two people. But first, check the car's operating instructions, which should indicate the order of actions with the wheels. If there is no such point, start pumping from the rear right and left, then do the same with the front ones. You will also need to prepare:
- a thin hose or plastic tube with a diameter suitable for the bleeder fitting;
- a suitable small transparent container 0.5-1 l;
- key for unscrewing the fitting.
Next, place the car on an inspection hole so that you can get to each wheel from the inside. Have an assistant sit behind the wheel. Further actions:
- Fill the brake fluid reservoir to the maximum level.
- Clean the fitting, put a spanner on it and insert a tube, one end of which is lowered into a container containing brake fluid.
- Have an assistant press the pedal several times and keep it pressed.
- Unscrew the fitting and, holding it with a key, watch the nature of the liquid pouring out. If there are bubbles, tighten the fitting and instruct an assistant to repeat the operation.
- Pumping should be carried out until bubbles stop coming out.
How to bleed the brakes without an assistant is shown in the video below.
If air comes out despite repeating the procedure many times, the reason should be sought in depressurization of the system.