The braking system of a car as a whole is one of the most important elements that allows you to protect the driver and passengers from many troubles. For this reason, it is extremely important to maintain it in working order and carry out regular maintenance.
In this article we will talk about how the brake system works on the VAZ-2115 car (injector).
Device
The VAZ-2115 uses a brake system in which the operating circuits are divided diagonally. This can significantly increase the degree of reliability and safety of people. In particular, the first of them controls the operation of the front right and rear left brake mechanisms. If it fails, the second circuit is switched on.
In addition, the hydraulic drive operating diagram also includes:
- vacuum booster;
- a dual-circuit regulator whose task is to maintain pressure in the brakes located behind.
A sensor is installed on the VAZ-2115 that signals a decrease in brake fluid volumes. It's mechanical. In addition, there is also a parking brake system, which, in turn, has a separate drive that blocks the rear axle if necessary.
As can be understood from the diagram, the system in question is quite complex, and from time to time certain breakdowns occur in it.
To understand what kind of problem arose at one time or another requires quite a lot of experience. However, it is not difficult to make the diagnosis yourself if you use the recommendations below.
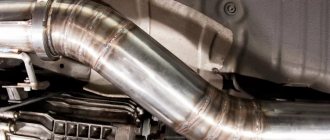
Diagram of the front wheel brake system of the VAZ 2114
The design of the front brake mechanism on the VAZ 2114
The front brake mechanism consists of the following components:
1
.
Brake disk. Directly connected to the wheel hub and rotates with it. Slowing down the rotation and stopping the disk leads to the slowing down and stopping of the wheel. 2
.
Pad guide. Serves as a holder for the pads and a base for the guide pins. 3
.
Caliper. It combines the pads, cylinder, and piston into a single unit and ensures uniform transmission of force from both pads to the disc. 4
.
Brake pads. They directly act on the disc, squeezing it on both sides and slowing down the movement. 5
.
Cylinder. A sealed cavity in which the piston moves. 6
.
Piston. Under the influence of hydraulic fluid pressure, the pad is pressed against the disc. Thanks to the “floating clamp” system, the second block is pressed simultaneously. This ensures uniform wear of their linings and discs and guarantees effective braking. 7
.
Seal ring. Prevents fluid leakage and ensures system tightness. 8
.
A cover to protect the guide pin from dirt, allowing for unhindered movement of the pads. 9
.
Guide finger. Allows the pads to move evenly and adhere to the disc with their entire plane. 10
. Protective cover. Protects the disc from road dirt. The front wheels are equipped with disc brakes. They automatically adjust the clearance from the pad to the disc. The caliper and cylinder form a floating caliper, which creates the same even force on both pads. This ensures uniform wear of the linings. To monitor their wear, there is an indicator on the inner block.
The brake pedal has too much travel
In this case, one might suspect that:
- air has entered the hydraulic drive;
- the rear cylinder piston thrust ring lost elasticity, as a result of which it shifted inward;
- Brake fluid has leaked from the system;
- There is too much clearance between the main cylinder piston and the vacuum booster adjusting bolt.
Respectively:
- in the first case, you will need to bleed the system;
- in the 2nd - you will need to completely change the cylinder;
- in the 3rd - eliminate the leak by replacing seals or hoses that have become unusable.
Useful video
You can get more information from the video below:
Published September 17, 2019Contents
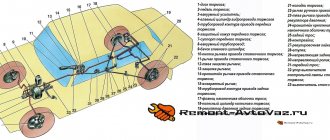
The braking system is one of the most important in a car, because it ensures safety while driving and guarantees timely stopping of the vehicle. In today's article we will talk about how the VAZ 2114 brakes are designed, what main components they include and how to set them up correctly.
Brake system VAZ 2114
Brake performance is low
The most common reasons for this problem are:
- brake pads are oily;
- pistons jam in wheel cylinders;
- the linings on the blocks have become unusable;
- the brake system mechanisms overheated;
- the pressure regulator was set incorrectly;
- one of the circuits has lost its tightness.
The linings on the brake pads will need to be cleaned using a wire brush, warm water and washing powder.
If the pistons jam, you will have to change the cylinders and bleed the system.
When the linings wear out, they need to be removed and new ones installed.
Overheating of the system is eliminated by immediate shutdown. It will take some time for it to cool completely.
Diagram of the rear wheel brake system of the VAZ 2114
The design of the rear brake mechanism on the VAZ 2114
1
.
Hub nut 2
.
Hub flange. 3
is attached to it .
Lower tension spring 4
.
Left block 5
.
Thrust spring 6
.
Cylinder 7
.
Upper tension spring 8
.
Guide bar 9
.
Eccentric 10
.
Right block 11
. Pad cover.
Tip: when driving through deep puddles or fording a river, the brakes get wet. This dramatically reduces braking efficiency. Immediately after overcoming a water obstacle on a straight section and at low speed, brake several times. The pad linings, discs and drums will become hot and dry. The system's efficiency will be restored.
In general, the braking system of the VAZ-2114 is simple and reliable. For a person who has experience driving cars of other brands, servicing it on a “fourteen” will not be a problem. But even those drivers who got behind the wheel of a car for the first time can easily understand the operating principle and operating features of the VAZ-2114 brake system. But remember: it is better to service the brake system at warranty service stations from experienced technicians.
Why the wheel mechanisms are not fully released
Most likely, this malfunction will cause the brake pedal to stick. In this case, you will have to adjust it.
In addition, the disappearance of the gap between the piston in the master cylinder and the vacuum booster adjustment bolt may also be the cause. The problem is eliminated by increasing the lumen.
If fuel or oil gets into the brake fluid, the gaskets in the master cylinder sometimes swell. You will need to flush the entire system with new brake fluid and replace seals that have become unusable.
A little history
The first to create such a model of brakes (disc type) was Frederick Lanchester (Great Britain). It was in its design that a caliper was used that pressed the pads. However, technology at that time did not allow the creation of reliable disc brake systems.
Disc brakes were revived in aviation, and in the 50s they began to be installed on cars - first on sports models, and then on production ones. The first car with serial front disc brakes was the Chrysler Crown Imperial (in 1949).
The importance of this component is difficult to overestimate, because the brake disc and pads are passive components, while the caliper plays an active role. Due to this, the pads are pressed. Therefore, the brake caliper is the most important component.
Braking of one of the wheels is observed when driving
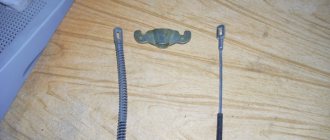
Most often, such a breakdown is caused by the destruction of the tension spring on the rear brake. The damaged one will have to be removed and a new one put in its place.
It is also common for pistons in wheel cylinders to not function properly if dirt has gotten inside or they have begun to rust. Cleaning and rinsing will eliminate the problem.
Sometimes braking occurs due to loosening of the bolts that secure the guide pads directly to the steering knuckle. If they are re-tightened or replaced with new ones, the problem will be eliminated.
And finally, this can happen because the parking brake system has not been adjusted correctly.
Symptoms of a problem
There are several common signs of a failing brake caliper:
- increased force - this is what needs to be applied to completely stop the machine;
- the car pulls to the side during braking;
- the pedal becomes “soft” - pressing it requires a fairly weak force;
- brake pedal pulsation;
- slight resistance in moving the pedal to the floor;
- brake sticking;
- blocking the rear brakes with great force, etc.
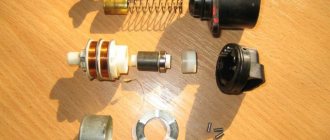
Caliper repair methods
Caliper malfunctions can be different. However, we can highlight the most common cases, as well as recommendations for eliminating them.
Brake pads jam in caliper
This is noticeable when, with the caliper removed, the pads do not move freely. Usually the reason is rust on the stationary caliper pads, which prevents the pads from moving.
To eliminate the problem, you should arm yourself with sandpaper, a metal brush and a file (but only a small one). Then you need to clean off the corrosion from the metal, and then lubricate the surface with a high-temperature type lubricant. However, there should be no wear on the caliper - pits from corrosion. If they are present, cleaning will not help - the pad will not be pressed tightly enough or will not move away from the surface of the brake disc quickly enough.
Sometimes such a defect can be eliminated with a file (subject to insignificant wear), but usually you have to buy a new part of the caliper (fixed).
Something else useful for you:
Video: Passat front caliper rebuild
Corrosion on the caliper piston
It can be triggered either by a defective boot or a long downtime of the machine.
To eliminate the problem, it is recommended to remove and disassemble the caliper. Remove the rust-damaged piston from it and polish it with a special paste or fine rust. After this, thoroughly wash the piston seat with WD-40 and reassemble the caliper. Installing new cuffs won't hurt either. But the best option would be to buy a new piston or caliper assembly.
Why change brake discs
Brake discs can be replaced for various reasons. First, replacement is required if the original rotors are worn out. Almost every rotor has a minimum thickness or throw characteristics cast or stamped somewhere in the center section of the rotor. When replacing brake pads, the rotors should always be measured with a micrometer to determine their thickness. If the rotors are worn too badly and are at or below the minimum thickness (or cannot be aligned without exceeding the limit), the disc will need to be replaced (all at once is recommended).
Measuring the thickness of the brake disc (rotor)
Worn rotors are dangerous for two reasons: thin rotors cannot absorb and dissipate heat as well as new rotors, increasing the risk of the pads getting too hot and fading under prolonged or heavy braking. Additionally, thin rotors are more likely to crack and break, which can lead to brake failure.
Another condition that usually requires this part to be replaced is when the rotors are "warped" and cause vibration or pulsation when the brakes are applied - called rotor runout. When the thickness of the disc is more than a couple of hundredths of a centimeter, it pushes the pads during braking. The force is transmitted back through the caliper pistons, brake lines and master cylinder all the way to the brake pedal, creating a vibration or pulsation that can be felt by the driver. The greater the change in rotor thickness, the greater the vibration or pulsation. This is a truly annoying condition, although not necessarily unsafe. The vehicle owner may mistake these vibrations for a problem with the anti-lock braking system.
Unevenly hewn marks on the brake disc due to its runout - the reason for replacing the disc with a new one
Uneven wear and thickness can be caused by severely overheating of the rotor (brake pad or seized caliper), rotor distortion caused by uneven torque or over-tightening of the arm nuts, or even metallurgical defects in the rotor casting itself. High spots on the rotor are often discolored with a dark bluish tint. Regrinding the rotor can restore flat, parallel surfaces, but often hard spots caused by overheating or uneven wear extend to the metal surface. Over time, this will again cause uneven wear and return of pedal pulsation or vibration. Replacing the rotors with new ones eliminates any such problems.
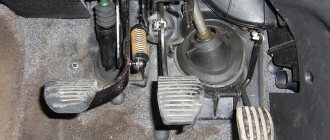
Features of pedal settings
The driver controls this entire complex assembly with just one pedal.
That is why it is very important to monitor the condition of these mechanisms and correct errors in a timely manner.
It is necessary to pay attention to the following features:
- Each owner of this vehicle must remember that when the engine is not running, the pedal must have free play. The adjustment can be made with the vehicle turned off. This can be done by moving the brake light switch and lowering its nuts.
- When the switch at the brake light is very close to the pedal itself, this risks the fact that it will not return to its original state. But even here there is a possibility of only partial release of the wheels when the pedal is released.
- When it was not possible to correct errors using a brake light and eliminate incomplete release of the brakes, you can simply disconnect the master cylinder at the brake drive and double-check that the adjusting bolt is not too far from the plane to which the flange of this cylinder is attached (the difference can be from 0.2 to 0.25 mm). This size will be optimal for adjusting the pedal.
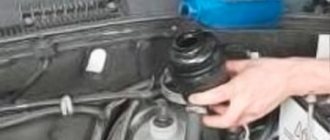
Installing new pads
In order to install the stops, it is necessary to place the piston in the area of the brake cylinder.
Here it is important to balance your strength and not overdo it, because this work is hard, requiring not only effort, but also caution, since the part is made of aluminum, which, as is known, is not very strong
The second step is to install the pads in the caliper. The caliper itself is installed in its place and secured with a bolt. Installation of parts is carried out in the reverse order of dismantling.
The job is done, all that remains is to put on the wheel.
For an experienced motorist, replacing pads is not a complicated procedure that takes a little more than fifteen minutes. It is necessary because the pads primarily affect the safety of the car, because they are directly connected to the braking system.
Therefore, you should not neglect this type of repair work; it is better to spend some time in the garage and a certain amount of money on buying new parts than to suffer more serious losses in an accident, which is what worn pads lead to.
We wish you good luck and a bon voyage!
The brake system worked well, but still not perfect. I was especially infuriated by the beating of the pedal when I pressed the brake in the middle, and I wanted to carry out preventative measures: replace the fluid, replace the vacuum seal, bleed it.
I didn’t choose wheels for a long time, I couldn’t financially cope with the transition to R14, so the stock is from Autoreal (cost: 1200 rubles per pair)
The process of replacing discs is generally simple; all difficulties arise from stuck bolts and the discs themselves to the hub. You can change in one helmet, no assistants are required, if only to save you from boredom.
As usual, we place the wheelbarrow on the platform, do not forget to provide a reliable support for the car, so that during the work it does not fall on our heads! We remove the wheel, for easy access to the bolts we turn the caliper towards ourselves. We unscrew the two bolts securing the caliper, move it to the side, securing it or placing it on some kind of support so that it does not hang on the hose.
Then unscrew the caliper bracket from the steering knuckle and remove it, thereby freeing the brake disc.
All that remains is to unscrew the last two studs, and you can begin to knock down the brake disc. This activity is very interesting. Here, depending on your luck, it happens that the discs come off after just a couple of hits, and sometimes you have to suffer because the discs are no longer needed. I hit the work surface, naturally it was all chipped. If the disc is needed, we hit it on the inside of it, using the pointed bit. It is more convenient to perform this procedure from the pit. I cleaned the disk landing area with a metal brush. As you can see in the photo, there is paint and dirt, and WD40 was poured in generously.
Before assembly, I started painting work, I didn’t bother too much, I sanded the discs lightly, but I had to tinker with the calipers and brackets a little longer, I didn’t sand them to perfection. I didn’t want the usual color, I was already pretty tired of red and silver, and since there isn’t much choice in the village, I took the paint: Auto enamel 1K repair, alkyd, Adriatic color 425, I’ve already driven more than 5 thousand km, the paint is spot on))
In order to seat the new disk evenly, I tightened all the wheel mounting bolts and began to gradually tighten it with a cross, the disk sat smoothly, without distortions...
Everything else is in reverse order. And don’t forget to bleed the brakes, this is where you will need an assistant. There are plenty of pumping methods on the Internet and I don’t see the point in describing my own.
The color turned out to be very unusual, some people like it, while others are drawn to red.
And now, after several days of repairs, happy as an elephant, I jump behind the wheel and go to check the brakes, and at the first braking I fell into a stupor! NO BRAKES! (I didn’t brake all the way, but in a smooth, gentle mode, so as not to ruin the disks). At first it seemed to grapple, and then it swam. In shock, I check all connections for leaks - everything is normal. I touched the discs, and they were boiling water, and it was just a couple of smooth stops! I didn't expect this. Go home straight away and let the discs cool. After some time, leaving again - the same thing, but a little better. At this rate I drove 80 kilometers, and each time the brakes grabbed better and got less hot.
https://www.drive2.ru/l/7951803/
https://youtube.com/watch?v=1M8iKMFVM0k
Sources
- https://vaz-russia.ru/remont-vaz-2113/zamena-perednih-tormoznyih-kolodok-na-vaz-2113-vaz-2114-vaz-2115.html
- https://mylada.net/remont/zamena-perednix-tormoznyx-kolodok-na-vaz-2110.html
- https://spike.su/index.php/Replacing-brake-discs-VAZ-2113-2114-2115.html
How to replace stabilizer struts on a Chevrolet Aveo
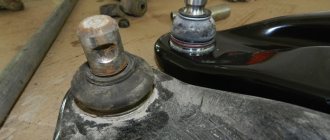
- Stabilizer struts are one of the elements of the Chevrolet Aveo anti-roll bar.
- Their main purpose is to ensure the connection of the main structural elements with the hub or steering knuckle.
- Structurally, the stabilizer strut is a rod with fasteners at both ends.
- The main purpose of the Chevrolet Aveo anti-roll bar, the element of which is the strut, is to minimize the horizontal vibrations of the car, including cornering.
- Symptoms of a malfunction are:
- A knocking sound occurs when driving, especially on bad roads.
- The car pulls to the side, which leads to the need for constant steering.
- The appearance of a noticeable roll of the car when cornering.
- Strong rocking of the car, especially when making sudden starts or braking.
Particular attention must be paid to the hinge and boot used. In most cases, it is the failure of these components that leads to the need to replace the Chevrolet Aveo stabilizer bar. There are two ways to check the condition of the rack:
- Rock the car. To do this, it is enough to apply force to one of the sides, and if the vibration turns out to be excessive, then the problem exists.
- Using the lever, try to influence the rack, first turning the wheel to the side. If play appears, the rack should be replaced.
If a malfunction is detected, it would be more advisable to replace the stabilizer link rather than repair it.
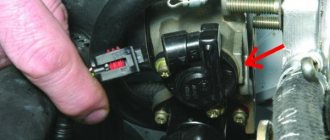
What to do if the caliper creaks or jams
If the brake caliper creaks or jams, and the part is in good condition, you can try to fix the problems yourself. To do this, it is recommended to perform the following set of actions:
- The first step is to unscrew the brake caliper; to do this, you need to put the car on a jack and remove the wheel. It is worth noting that in some car models the caliper can be unscrewed counterclockwise;
- Having removed the caliper, unscrew the piston using a wrench, then it must be pulled out of the cylinder;
- The removed parts must be carefully inspected for chips, rust, corrosion and various damages. If rust is found, it needs to be cleaned well. When the calipers are heavily worn, problems may arise with cleaning the rust with improvised means; in such a situation, the part will need to be sanded;
Important: When reassembling the caliper, pay special attention to the boot so as not to accidentally damage it. If there are cracks on the boot, be sure to replace it.
Installing rear disc brakes, adjusting braking forces on the rear axle
- First, the drum brake system is unscrewed and removed.
- Next, the four bolts are unscrewed and the hub is removed.
- After this, the brake pipe is unscrewed from the cylinder.
- Next, the hub is installed using the appropriate faceplates (left and right). The tabs on the adapter must be on the outside.
- There is no need to place a grommet under the bolt indicated by the arrow, as it will make it difficult to install the caliper.
- The hub bolts must be replaced with new ones, 5 mm longer than the old ones.
- Six bolts are needed on each side: four to secure the hub and two to install the calipers. A total of 12 new bolts will be needed. If it was not possible to find bolts of the required length, then you can take longer ones and cut them to the required length: the thread to the head should not exceed 13 mm.
- The corner of the beam will have to be crushed with a hammer, and, if necessary, the surface will have to be refined with a grinder. The metal here is soft enough, so there will be no difficulties. This is done in order to prevent the caliper from touching the beam. If rear 14-inch wheels and calipers are installed, then this operation is not necessary.
- There is a protrusion around the circumference of the hub that prevents the VAZ disk from seating. The internal diameter of the disc, like the hub, is 58 mm, but where there is a protrusion, the diameter is 60 mm.