The “Seven” has a fairly simple and modest interior design by modern standards. Therefore, car owners transform the interior of the car on their own, making its appearance individual and bright. Tuning the instrument panel of a VAZ 2107 is one of the primary ways to improve the simple and discreet appearance of the car’s dashboard.
Why is special attention paid to “tidying up” a VAZ when tuning? It is the dashboard that draws the attention of the driver and passengers during the trip. Therefore, tuning the interior should start with refining the “tidy”.
The simplest option
Owners of the “Seven” injector who have a certain amount of money and do not have enough free time should pay attention to ready-made kits containing everything necessary for tuning. Each set comes with instructions, following which it will not be difficult to improve the functionality and appearance of the dashboard.
But for those who are not looking for easy ways and dream of a completely unique design, the method described above is definitely not suitable.
Choosing a belt for the machine
I will try not to pour water, but will briefly look at what to look for when choosing an LED strip.
LED Matrix Type
Firstly, we get an average power of 4.4-4.8 W per linear meter with a luminous flux of about 250-300 Lm. With such power, LEDs do not require heat dissipation and the LED strip can be easily mounted on plastic elements. And the luminous flux is sufficient to fully illuminate any interior elements.
If you don’t have enough brightness, take 120 pcs/m.
Secondly, this is the most common tape on sale, we buy it in the first store we come across.
Options like SMD 5050, 5630, 5730 are not suitable due to their high power. Unpleasantly high brightness and the need to mount a heat sink make them not the best choice for LED car interior lighting.
Exterior car lighting. Here we turn on the head. If there is LED lighting under the bottom of the car, you can choose more powerful LEDs - SMD 5050 30/60 pcs/m. The aluminum profile will be our heat sink (more about installation later). For LED illumination of license plates or (God forbid) headlights, this is a bad choice. Such LED lighting will be a bait for traffic police inspectors (read about installation rules and fines at the end of the article).
Regular LEDs or RGB - there is no difference. RGB is a little more expensive, it is more difficult to connect and requires an additional control controller (read more about connecting an RGB strip). But it allows you to change the backlight color.
Protection class
There are mainly three protection classes on sale - IP20, IP65, IP68.
- IP20 – open tape without protective coatings, suitable for use indoors in dry rooms. Afraid of moisture, dust, and any mechanical influences.
- IP65 – with a protective silicone layer that can protect against condensation.
- IP68 - sealed, waterproof LEDs that can be placed on the bottom of the car.
For LED illumination of the glove compartment or the bottom of the dashboard, IP20 is also suitable if no one pulls it or pours water on it.
For illumination of other elements, IP class 65-68 is desirable.
Do-it-yourself tuning
In this case, you can save a lot of money. You will also have to spend a lot of time. But the panel will look completely unique.
First of all, you need to decide on the design. It makes sense to look at the photographs, of which there are quite a lot on the Internet.
The easiest way is this:
- replace factory needles on instruments;
- install new stickers with scales;
- change the lighting.
All these require only accuracy and basic knowledge of electrical engineering. At the same time, you can order a set of arrows and backgrounds for instruments in any studio that specializes in finishing cars. The professionals there are able to make them according to your design or develop it themselves. This will, of course, cost a pretty penny.
Removing the instrument panel
This is the first stage of any tuning, which will have to be performed in all cases.
Before you begin, please read the instructions. The procedure is as follows:
- disconnect the negative terminal from the battery;
- remove all heater handles on the panel (tread carefully - they break easily);
- unscrew the nut holding the lever in place that resets the readings;
- push it inside;
- remove the plugs from the screws securing the dismantled element;
- unscrew them with a screwdriver;
- remove the panel from the elephant.
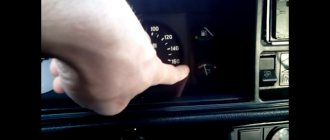
Backlight
LEDs are now commonly used. The beauty of them is that installation is very simple and quick. Plus, there are quite a few colors available. Choosing one of them that best matches the interior design or body paint will allow you to turn your “seven” into a real masterpiece.
As a rule, it is enough to install only a dozen diodes on one panel to radically modernize its appearance. They are connected to each other by a loop of wires. Additionally, they are matted with fine sandpaper - without this operation they will burn too brightly.
Optimal location:
- four pieces in the corners of the dimensional devices;
- one diode for two small sensors;
- the rest is your choice.
After completing the work, connect the panel to power and make sure everything is functioning as it should.
Along with the backlight, it makes sense to install new hands. There will be a lot of work to be done here. Signs can be purchased ready-made or cut out of plexiglass. Do not do this unless you are confident in your ability to disassemble and reassemble the mechanisms.
Front lights
The front part of the car usually attracts more attention, so amateurs begin to tune primarily the headlights.
Evil headlights
It’s very easy to give your car a menacing, gloomy and even evil look: just perform tuning like “evil headlights”. This is one of the easiest ways to give the “seven” an unusual appearance.
Depending on the owner’s capabilities, tuning can be done using a variety of materials:
- thin plywood;
- sheet metal;
- tinting film;
- paints.
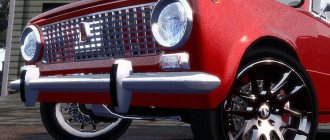
The car's "angry" squint gives you goosebumps
The essence of this tuning is as follows: cover part of the headlight so that the remaining uncovered headlight resembles evil eyes. If any materials from plywood or metal are selected, then a blank is cut out in advance and glued into the cavity of the headlight. Using film or paint is even easier - just remove the headlight and apply darkening on the inside.
Tuning headlights from plywood painted black
Angel eyes
In tuning, angel eyes are the luminous rings on the “face” of a car - like a BMW. Today everyone can afford this lighting option - it’s inexpensive and fast. In addition, the body of the VAZ 2107 will somewhat resemble an expensive BMW and thereby increase the status of the owner.
Headlights that are very unusual for the “Seven”
There are several technical solutions for making angel eyes with your own hands. The easiest option is to use LEDs. To work you will need:
- white LEDs 5 mm - 2 pcs.;
- 0.25 W resistor;
- wiring;
- transparent rod made of organic glass or plastic (diameter 8–10 mm);
- auxiliary materials (soldering iron, hair dryer, drill and glass jar).
The work is quite painstaking:
- Take the rod and clamp it in a vice.
- Using a drill, drill holes for the LEDs at both ends of the rod.
- Give the rod the shape of a ring - bend it around the jar and heat it with a hairdryer so that the workpiece remains in this shape.
- Solder wires to the LEDs, connect a resistor to one of the wires.
- Assemble an electrical circuit similar to the circuit of lighting devices that is already available on the “seven”.
- Insert the LEDs into the holes of the workpiece and glue them with superglue.
Video: how to make angel eyes
You can buy ready-made angel eyes at a car store - this will make it much easier to connect new lighting fixtures to the standard equipment of the car.
Using LEDs of different shades, you can achieve an even more impressive effect.
Expansion of functionality
The VAZ-2107 is equipped with a minimum of instruments, and therefore installing new ones will significantly increase the information content of the panel. Most often they add:
- light and temperature sensors;
- fuel consumption indicator per kilometer;
- ECU;
- TV, etc.
Additional holes are cut for them. It is also necessary to install wiring and make changes to the design of the machine (in particular, to provide it with missing sensors).
Source
Additional Description
Designation - 621.3710 Name - instrument scale lighting switch
Applicability
— cars: VAZ-2104. 2107 and modifications, IZH.
Specifications:
— turning on and adjusting the lighting of the instrument scale; — number of positions: 2; — nominal voltage: 12 V; — rated load current: 1.5 A; — weight: 0.049 kg.
The main manufacturer is JSC LETZ
Information used: Avtokomplektatsiya LLC
The parts data presented on this page is for informational purposes only.
Download price lists
To download price lists, you need to log in. If this is your first time on the site, please fill out the registration form.
How to tune the instrument panel of a VAZ 2107 yourself
The VAZ 2107 car is distinguished by its simple interior design, so very often owners resort to alterations and modernization. One of the most popular devices undergoing modernization is the dashboard. The easiest way to improve it is to install an electronic panel. It is only suitable for injection-type cars. On a carburetor-type VAZ 2107, you can change the instrument panel by doing tuning yourself.
How expensive is it
The cost of modifying a car entirely depends on what exactly needs to be improved, what spare parts you will have to buy for this, whether you buy the service at the appropriate car service center or do the tuning yourself. The price of the same change may vary several times depending on your requests. For example, a simple installation of fog lights can cost no more than a thousand rubles if you take inexpensive lamps and do everything yourself. If you want to install it yourself, and even entrust this task to specialists, then be prepared to spend several thousand on it. On the other hand, tuning is not repair. The car can easily survive without these optional modifications. Therefore, you need to take a simpler approach to cost: if you have a desire to improve something and have enough money for it, that’s great; there is no desire or money - well, let it remain as it is.
How to install a ready-made tuned device on a seven
Car owners who do not want to redo the dashboard on a VAZ 2107 themselves choose the modernization method by purchasing ready-made kits. This kit contains everything you need to tune the instrument panel on a VAZ 2107. Moreover, such kits are suitable not only for carburetor sevens, but also injection ones.
Even a beginner can cope with installing a tuned device on a VAZ 2107. The kit comes with instructions so you can carry out the work without contacting specialists. To carry out work on upgrading the tidy on the seven, you will need a minimum set of tools, in particular a screwdriver.
The principle of tuning the tidy is to perform the following manipulations:
- Dismantling with disconnecting connectors. When disconnecting connectors, it is recommended to make appropriate marks so as not to make a mistake when connecting.
- Install new hands and scales from the purchased set.
- Reinstall the tidy.
This option is simple, but it is not always popular. This is due to the fact that only the sticker is installed, that is, the design changes, but the backlight remains the same. This simple upgrade can be complemented by installing LED lighting. We will consider in detail how to do this in the material.
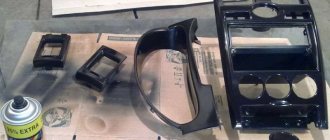
Self-production of arrows and instrument stickers
Buying ready-made arrows and stickers for the dashboard of a VAZ 2107 is the easiest way of tuning. A more difficult option is to develop your own custom sticker design. The result will be a truly unique tidy on the seven. Making stickers yourself is a more labor-intensive method, and if you decide to use it, then you will need to make templates for implementation. Using these templates, cut out and draw stickers. As practice shows, it is much easier to buy ready-made stickers and, if necessary, upgrade them.
If you have difficulty making scales yourself, there are many options for ready-made templates on the Internet. They can not only be downloaded to your computer, but also, if necessary, modified in graphic editors. After the scales are ready for printing, all that remains is to print them in a professional photo center. Install printed stickers on the dashboard yourself.
The development of the original design of the dashboard can be entrusted to the designer, which will ultimately result in a truly unique design of the tidy. Arrows can also be purchased from foreign cars, but for this it is important to take into account the fastening, which must be suitable in diameter. Knowing how to make overlays for a VAZ 2107 panel, you should get down to business.
It is important! When removing the indicator arrows from the instrument panel, you must first make marks on the back side. This will eliminate the possibility that they will show incorrect values after assembly.
Installation of LED lighting for VAZ 2107 devices
The seven's instrument panel can be upgraded by replacing the backlight. You can also do this yourself by replacing the standard light bulbs with LEDs. Moreover, you can not only replace the standard lamps with LEDs in the design of the shield, but also install additional LEDs. It is important not to overdo it here, otherwise the tidy will look like a Christmas tree. The backlight should not be bright, otherwise it will dazzle the driver, which will lead to decreased attentiveness and rapid eye fatigue.
Connection.
The diode-type backlight can be connected in two ways, the first of which is to connect directly to the battery. This method is considered more reliable. But it’s worth mentioning the second proposal - connecting to the wires that are located on the dashboard of the car. Despite the higher reliability of the first method, the second is also widespread and often used, due to the possibility of activating the backlight during ignition. You need to start work by disconnecting the battery. This moment is mandatory.
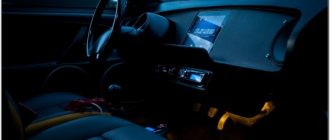
Next, you need to decide on the area where you want to place the luminous elements, if, of course, you haven’t decided yet. We can give advice on the fact that such a ribbon looks simply unique over a torpedo. In this area it will also be perfectly fixed and will not be subject to physical stress, that is, it will not tear or fray. You can also place this object under the seats; it will not only be beautiful, but also useful at the most unlit times of the day. For proper installation, you must prepare a fuse, a switch and two wires that will be connected to the battery in the future. When you get to installing the fuse, make sure it is located closest to the battery, as it must be accessible at all times. If you do everything exactly as we recommend, the type of LED system in the interior of your car will be most correctly arranged. Next, you will need a wire protector tube, which should be used on one of the cables. After soldering the wire, it should be coated well with silicone and a tube should be placed on it. Heat it before it starts to shrink. Now you can connect the second wire to the car battery and start connecting it to the case. If the products you purchase have a controller, you can use it to control the colors while sitting in the car. When you complete all of the above steps, you will be able to enjoy the updated design of your VAZ car.
What is tuning and how is it useful?
Car tuning (from English tuning - setting, adjustment) is a modification, technical improvement of a car, making changes to the factory characteristics in order to improve its characteristics. In simple words, tuning is a modification of a car to suit individual needs and tastes.
Almost everything in the car is subject to tuning: engine, transmission, suspension, wheels, brakes, seats, steering wheel, dashboard, lights, headlights, bumpers, mirrors and much more.
Tuning the appearance of a car (painting it in unusual colors, installing cast or forged wheels, stickers, airbrushing, tinting windows, installing spoilers, changing headlights, etc.) is also called styling, as it allows you to create an individual style for the car, making it stand out in traffic.
According to my observations on the city streets, “classics” are often subject to tuning of both external elements and the interior. There were “sevens” that were almost as good as modern foreign cars in terms of comfort: with air conditioning, electric windows, powerful acoustics, comfortable seats, and beautiful dashboard lighting. I believe that tuning offers almost unlimited possibilities that are worth using; it gives a second life to an old but beloved car.
Tuning the interior of the VAZ 2107
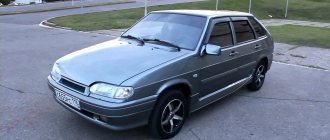
Probably every owner of the “Seven” has ever thought about tuning his car. VAZ 2107 is the last model in the series of VAZ “classics”, discontinued relatively recently - in 2012. And now more than a million Russians continue to use it. The level of comfort of the “Seven” does not reach modern cars, which is why there is a desire to improve it. VAZ 2107 , like other “classic” models, is one of the most tuned Russian cars due to its outdated design and lack of many modern amenities.
Tuning the engine, suspension and other hardware is useful for those who want to turn their car into a racing car, or simply like to accelerate well on the track. In principle, the VAZ 2107 has a reliable engine, the power of which is sufficient for normal trips in city mode or on the highway. More attention should be paid to the interior, because the comfort of the driver and passenger directly depends on the quality of its design.
My brother drove a VAZ 2107 for 5 years. A classic “seven” with classic shortcomings: dim dashboard lighting, sticking window lift, freezing door handles in winter, creaky seats. For some reason, thoughts about tuning did not occur to me at that time, but it’s a pity, the car could have been made much more comfortable and interesting.
What applies to tuning the interior of a VAZ 2107
Interior tuning is making changes to its elements: seats, doors, ceiling, steering wheel, dashboard, power windows, etc. It may consist of:
- replacing elements with more comfortable ones;
- reupholstery with special materials (leather, velor, etc.);
- connecting additional functions not provided by the factory - electric windows, heated seats, air conditioning, heated windows, instrument panel lighting, sound insulation.
There are many options for tuning the interior, so you can make the interior of the car look the way you really want.
Photo gallery: examples of the tuned interior of the “Seven”
What to watch out for
After looking at photos of cool tuned sevens, some car enthusiasts begin to look at their “horse” differently. If just yesterday he seemed like a magnificent handsome man, then today I already want to do a little auto tuning on him. Price often doesn't matter. Some “hot guys” install a transparent glass sunroof on their classics, doors that open like a Lamborghini, install a heavy non-original engine, which has an expensive price... How reasonable is all this? In fact, the price of extensive body and engine modifications is extremely inflated. If you have a lot of money and want a cool car, isn’t it better to buy another solution? Fortunately, today there are many good options on the car market for every taste and color. But you should think about your own safety. Proper tuning for the VAZ 2107 is a good thing and often even very useful. It’s not bad when your cabin is warm, there is no unnecessary noise and beautiful music is playing. But many tuned sevens are good only at first glance. Incorrectly set adjustments, unsuitable spare parts, too heavy doors and other “foreign” objects can turn your car not into a means of transportation, but into a real death machine. And what difference will it make to you how your car accelerates if this car gets into a terrible accident? Therefore, before tuning your car, you need to think carefully several times about what exactly should be done and what should be avoided. Don't trust everything they write on the Internet. Consult with experts who really understand these issues. And make only those changes that are truly safe for you and your passengers.
Torpedo tuning
The “Seven” is known for its interior, which is very modest by modern standards. Therefore, VAZ 2107 owners change the internal structure of the car in various ways, trying to make it stylish and ergonomic.
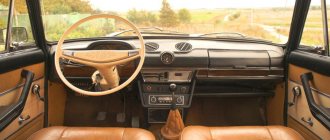
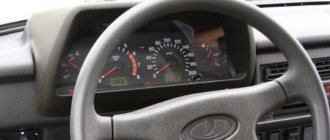
The dashboard (colloquially referred to as a dashboard or dashboard) is the part of the car that both the driver and passengers see most often, so it is the part that receives the most attention when tuning the car’s interior.
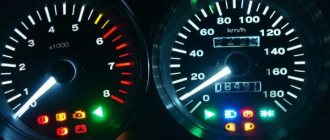
The dashboard of a car is a set of arrows and light indicators that allow the driver to monitor the technical condition of the car, control the performance of devices and systems, as well as the speed of movement.
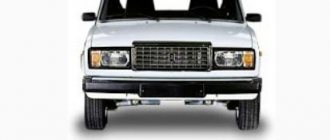
The standard “seven” torpedo looks quite simple and mean. In addition, it has a serious drawback - very weak backlighting, which is why at night the driver has to be distracted from the road, looking closely at the numbers. This is extremely unsafe when driving on the highway at high speed.
Directions for improving the “Seven” torpedo could be as follows:
- purchasing tuned elements and installing them instead of standard ones;
- introduction of additional mechanisms and systems (thermometer, parking sensors, on-board computer, etc.);
- independent installation of instrument scales, lighting, etc. - both “native” and from other car models.
Installation highlights
Before deciding which panel you can install, you should take into account that the original VAZ 2107 torpedo can be returned at any time. If such a procedure is carried out independently, it is recommended to use a book on repairing classics. It will take a lot of time to complete the work.
When connecting the wires, you need to remember that one goes to ground, and the second goes to the panel to the corresponding contact. It is recommended to label which connector goes where. To operate the speedometer, a speed sensor from model 2110 with 6 pulses is installed. If the “seven” is equipped with an econometer, it is recommended to install a tee from 2106 on 2 sensors, including a pressure sensor from engine 402..
Video: tuning the “Seven” dashboard
Replacing the beard
Between the passenger and driver's seats of the "seven" there is a console where various equipment is located (radio, clock, cigarette lighter socket). This part of the panel is briefly and figuratively called the beard. Car owners pay increased attention to this element, increasing its originality, visual appeal and functionality.
Improving the “seven” beard involves the introduction of various mechanisms and elements:
- radios with improved characteristics;
- backlight buttons;
- hours;
- switches for low and high beams, side lights;
- electric fan control buttons;
- USB connectors for connecting additional devices;
- devices for monitoring the operation of the electrical network;
- storage places for small items, usually placed below near the gearshift lever.
In addition, the panel is covered with trim from various materials, which performs a decorative function, improving the classic interior of the car.
Typically, tuning a “beard” is the manufacture and installation of a new console with provided cells for securing switches, indicators and covering it with decorative finishing materials. The simplest and most affordable material is plywood with a thickness of 6 mm or more. For decorative finishing, artificial leather or carbon fiber of the selected color is traditionally used. Replacing the “beard” can be combined with the trim of the doors, ceiling and dashboard.
To make a tuned VAZ 2107 “beard” you will need the following tools:
- electric jigsaw;
- screwdriver;
- Bulgarian;
- locksmith tools;
- pencil or marker;
- ruler or tape measure;
- glue;
- furniture stapler.
The work is performed in the following order:
- Dismantle the old beard.
The tuned “beard” differs from the standard one in its excellent ergonomics, economical use of space and stylish design.
Video: making your own “beard” for the “seven”
Warning lamps
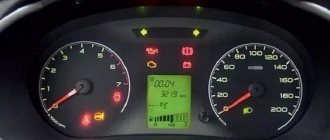
The block of indicator lamps on the VAZ-2107 dashboard, the tuning of which we will consider below, includes the following indicators and sensors:
- Activation of the turn signals, as indicated by a flashing green indicator.
- Battery charge indicator lamp. When the engine starts, the indicator lights up red and goes out. If the glow continues, you need to check the battery charge. Among the main causes of the malfunction: weak timing belt tension, faulty chain or generator.
- Sensor for turning on side lights.
- High beam activation indicator (in active mode it lights up blue).
- Oil pressure level controller. An insufficient indicator is indicated by a red constantly glowing lamp.
- Indicator of malfunction of the power unit control mechanism. The sensor lights up orange in normal mode, but goes out after starting. A flashing or steadily lit lamp indicates a malfunction in the system. This function is used on the VAZ-2107 dashboard (injector).
- Engaging the parking brake – the sensor lights up red.
- There are also indicators for the distance traveled, fuel reserve, and fuel level.
Tuning seats VAZ 2107
Unlike earlier VAZ Seven models, the factory was equipped with anatomically shaped seats and headrests connected to the backrest. The front seats of the VAZ 2107 are quite fragile and quickly fail - the frame breaks, the backrests warp, and the upholstery wears off.
On our “seven” the seats were exactly like this: wobbly and creaky. The adjustment mechanism also constantly jammed - before adjusting it to suit you, you had to spend a lot of effort.
The easiest way to tune seats is to install covers. Covers for VAZs are sold in almost any auto store; custom-tailoring is also possible.
Seat trim for VAZ 2107
After upholstering the seats, the interior of the car becomes very attractive. For this you can use:
Natural leather is undoubtedly the most durable. But as you know, this is a very expensive material, and in hot weather it is uncomfortable to sit on leather seats. The most budget-friendly and fairly reliable upholstery is made from Alcantara and velor. Therefore, these materials are most widely used among car enthusiasts.
Based on the purpose of tuning and financial capabilities, you can do a complete reupholstery of the interior, including the ceiling, door trim, sun visors, steering wheel, and dashboard.
After you decide on the type of material, you need to choose its color. Traditionally, seat upholstery is made in the same color as the interior upholstery, but a harmonious combination of different shades can make the car interior more original and attractive.
Video: self-upholstery of VAZ 2107 seats
Changing seat mountings
When installing non-original seats on the “seven”, a situation may arise that the seats do not fit the mounts. In this case, you will have to resort to welding.
Experts believe that any seats that fit the dimensions can be installed on the “seven”. However, changing their mounting is a very labor-intensive job, so if possible, it is better to choose seats that do not require welding for installation.
Anyone who has ever driven a classic remembers well and knows which seats are in the front. In my case, taking into account the fact that the car is 20 years old, the seats have become unsuitable for use. After some thought, I decided to take a more complicated and expensive route, namely installing seats from a used foreign car. In general, I ended up taking it from the Passat, but only the front ones. In general, when I bought the chairs, I basically knew that the fastenings of the vv and the vase were different and very, very different. As you already understood, there were problems with this. We thought for a long time about how to get out of the situation and came to the conclusion that we needed to make some kind of swap of the sleds from the old chairs with new seats. In general, we started by completely cutting off the stand, the one near the tunnel, and making a new one in order to achieve the same level as the one near the door. When I brought them to the chairs, there were ears for fastening wheels for the sled, but they were too long (to be installed to the floor) and I had to cut them off and sacrifice the driver’s seat elevator mechanism. It’s unpleasant, of course, but what can you do?
RyslanZinchenko
https://www.drive2.ru/c/288230376152277729/
Installation of seats from another car on a VAZ 2107
Seat covers are a great tuning option, but if they are already loose, they will have to be replaced. On the “seven” you can install both new original seats and seats from foreign cars. Seats from a 1996 Mercedes W210 and a 1993 Toyota Corolla are suitable. Seats from SKODA and Fiat are suitable, but to install them you will need to make two additional holes.
In addition to the above, Peugeot and Nissan seats are used, but they do not match and require modification of the fastening. The seats from Volkswagen fit almost without modifications, but they are too high for the VAZ 2107, therefore, despite the increased comfort, installing them is not recommended.
Replacing seats is considered a change to the design of the vehicle and, in accordance with Russian legislation, requires mandatory registration with the State Traffic Safety Inspectorate.
How to properly connect an LED strip in a car
You can connect the LEDs in your car to the on-board network or directly to the battery (not advisable, more on that later).
The on-board electrical network of the car does not correspond to the nominal power parameters of the LEDs, since the voltage taken from the battery reaches 14.5 Volts. This is not fatal for LEDs, but it significantly reduces their service life.
The second risk factor for direct connection to the on-board network is significant current drops. Any car has units with significant power draw from the battery - starter, head lighting, air conditioning, electric power steering. They consume hundreds of watts, and currents reach tens of amperes.
You've probably noticed how, when starting the engine, the headlights go out, the radio and on-board computer turn off, and turning on the air conditioner "cuts down" the volume of the music. And this is when the wiring lines are separated through a distribution box and there are current stabilizers in the equipment.
Use stabilizer
Any LED can operate for a long time only in a narrow range of currents and voltages. For example, an SMD 3528 LED element requires 2.8-3.4V and 0.02A for power supply. Thanks to the limiting resistors on the tape itself, they only feel comfortable at a mains voltage of 12V.
To connect the LED strip to the 12V of the car, use a stabilizer; it is connected to the gap in the positive wire from the battery. You can assemble it yourself. Below is a diagram using the example of a voltage stabilizer LM 7812. It has an output voltage of 12V and produces a current of up to 1A. This is an outdated model and requires additional cooling.
More modern switching stabilizers will be a good replacement for outdated analogues. Here are the characteristics of a regular switching stabilizer from Aliexpress:
- Wide range of input voltage (4-36V) and adjustable output (1-36V);
- adjustable output current (0-5A);
- protection against overheating and short circuit;
- a wide range of operating temperatures is declared -40 +80 degrees;
- Conversion efficiency 96%;
- They cost around $3-4 on Ali (220-270 rubles).
Connecting RGB strip
Remember, there is a list of lighting colors that can be used on a car. Violation of the rule entails deprivation of rights, with confiscation of lighting devices. Read below about the legality of installing the backlight.
When connecting an RGB strip, an RGB controller is added to the circuit, which regulates the power of each color LED and allows you to obtain any color. It is connected after the stabilizer, before the RGB strip.
Connection diagram for RGB tape in a car
When connecting the diode strip to a car, you should avoid bending it. Any break will lead to a rupture of the conductive coating. If you need a sharp turn, make a break and connect the ends with connectors.
Use connectors
They clamp the contacts tightly and are quite reliable even in conditions of constant vibration. But it is better to fill the places of such connections located outside the car with sealant or hot-melt adhesive. If you had to make additional holes in the machine body to route the LED strip wiring, carefully treat them with an anti-corrosion compound and, if possible, seal them. The connection points of the wires should be covered with heat-shrinkable tubing for reliable insulation.
Steering wheel improvement
The steering wheel is the main control element of the car, so it must be comfortable to operate and suitable in size. In the VAZ 2107, the main disadvantage of the steering wheel is its large size, which slows down the steering speed and impairs maneuverability.
I got behind the wheel of my brother’s “Seven” several times when I was studying at a driving school, and there was a catastrophic lack of lessons with an instructor. In my opinion, the steering wheel is really uncomfortable. It is large, but the rim is quite thin, and it is uncomfortable to hold. And it is not located very well - in the turning position it noticeably covers the dashboard and, unfortunately, is not adjustable. Our steering wheel also had a feature - either constructive, or the wheel alignment was poorly adjusted - the car drives straight not with the steering wheel in a straight position, but with the steering wheel turned slightly to the right.
The easiest type of tuning that will help cope with external defects of the steering wheel, for example, abrasions, is to install a braid on its rim. It also makes control more convenient, since your hands will no longer slide on the steering wheel.
To replace the steering wheel, the old steering wheel must be removed. Car stores sell sports steering wheels for the VAZ 2107. You can also install a steering wheel from a foreign car on the “Seven”, but not from just any car; it must fit the mounts. Alternatively, you can go to an auto-disassembly shop with your steering wheel and choose the right one there.
A more technically complex tuning option is to install hydraulic or electric power steering.
Introduction to the matter.
Such lighting appeared on the markets not so long ago, but it has managed to gain a secure foothold there and acquire a whole army of fans who decorate its elements of their cars. The tape is equipped with a silicone shell, which provides protective functions, so that external factors, dirt and debris, water, do not affect it. This fact makes such a “garland” a unique tuning element, which is applied to both headlights and car interior elements.
Tuning the gear knob
The gear shift lever is used to control the movement of a car with a manual transmission. This device is like a connecting link between the engine and the wheels.
To avoid rattling and vibration of the gearshift lever, instead of the installed bushings and rubber bands, insert a piece of hose of suitable diameter.
Additionally, you can make it easier to control the gears by reducing the length of the handle. To do this, the lever is removed, about 5 cm in length is cut from it with a hacksaw and the same thread is cut at the end.
When installing a gearshift lever from foreign cars on a VAZ 2107, it is important to make sure that it can be securely fastened, otherwise an incorrectly mounted mechanism can lead to an emergency. Proper tuning of the gear shift lever will increase the comfort and safety of driving.
Tuning the interior of a VAZ 2107 is an almost limitless topic. The main directions for improving the interior of the “Seven”: tuning the front panel (torpedo), instrument panel, center console (“beard”), seats, steering wheel, gearshift lever, as well as installing acoustics. By tuning the interior, you will make your favorite car not only individual and original, but also truly comfortable.
Source
snyatie-paneli-vaz-210754.jpg
Removing the “tidy” of the presented car is carried out in the following sequence:
1. First, you need to prepare the car for operations (to do this, you should review the corresponding material called “Preparing the VAZ 2107 car for repair and maintenance”).
2. Then you need to disconnect the wire on the car from the negative terminal of the battery.
3. After this, use a screwdriver and carefully remove the handles from the stove control levers.
4. The next step is to unscrew the nut that secures the meter reset handle. We remove the nut together with the washer and push the handle into the space that is located behind the instrument panel.
5. Using a thin screwdriver, carefully pry and then remove the screw plug that secures the instrument panel.
6. Using a Phillips screwdriver, unscrew the fastening screw.
7. Carefully remove the “tidy” of the VAZ 2107.
8. Disconnect the cable after the union knurled nut of the car speedometer drive cable has been unscrewed.
9. After this, remove the vacuum supply hose from the econometric fitting.
10. Carefully disconnect the blocks (three colors) of the wiring harnesses.
11. Now you can remove the panel from the car. After this, you can safely perform the following operations:
-replace the backlight lamps;
-if necessary, replace the control lamps.
Installation of the “tidy” should be carried out in the opposite order of its removal.