Today, cars are mainly equipped with two types of brake systems and most of them have a hydraulic one. This means that it has a vacuum brake booster (VUT). Like all other components of a car, it is of great importance - the braking speed, and, consequently, the safety of the driver and other road users depends on its serviceability or malfunction. Today we will talk about the design and principle of operation of the VUT, how to check the vacuum brake booster for malfunction, looking at simple methods for such checking.
What is a vacuum brake booster
Let's figure out what VUT is. Ensuring that the brake pedal is pressed when braking, especially if it is braking in emergency situations, requires serious force, which is equal to 80 kg . Such an effort when pressing the brake pedal is a decent amount of physical activity for the driver.
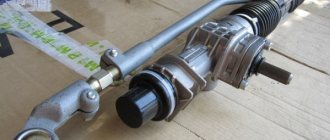
Vacuum brake booster
That is why since the 70s of the twentieth century. Almost all cars have a vacuum booster installed. It reduces the required effort by 3-4 times. In fact, this decrease may be greater.
But in this case, the information content of the brake pedal is lost, acceleration during braking increases, and the controllability of the vehicle is greatly reduced.
How does a vacuum brake booster work?
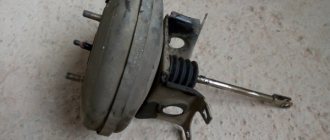
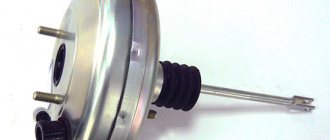
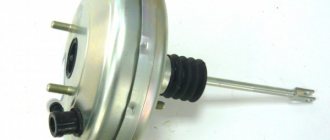
The amplifier is a cylindrical block. Let's see how it works. Its design includes:
- Membrane.
- Atmospheric chamber channel.
- Follower valve with pusher.
- Stock.
- Vacuum chamber channel.
- Piston.
- Return spring.
The amplifier has 2 chambers separated from each other by a membrane. In the center of the diaphragm there is a special patch, with the help of which pressure is applied to the rod. The rod, for its part, presses on the piston of the brake head cylinder. When the brake pedal is released, the return spring returns the diaphragm to its original position.
The vacuum chamber is located near the central brake cylinder, and low pressure is always maintained inside it. The atmospheric chamber is located at the brake pedal. Using a monitoring valve, this chamber is connected to a chamber in which an airless space is created or to an environment where atmospheric pressure is at a certain and fairly high level. The VUT has a pusher directly connected to the brake pedal.
VUT device diagram
How does VUT work?
A separate hose connects the vacuum chamber to a device that is capable of discharging. This device can be the power unit itself (when it comes to a gasoline engine) or it can be a special pump that pumps the vacuum. It is required for diesel vehicles. But today vacuum amplifiers for gasoline cars have also begun to be installed. This is done to ensure constantly high and efficient operation of the VUT in various operating modes of the power unit.
When the vehicle moves without braking, a discharged state remains inside the chambers. But when the brake pedal is depressed, the valve closes the junction of the chambers and the entrance to the atmospheric box opens to allow air to flow in at the required pressure. It is this air and the force of pressing the brake that affects the piston of the central brake cylinder, which ensures the injection of brake fluid into the system. To summarize, VUT ensures the use of pressure to increase the braking process. But, if we talk about VUT with a vacuum pump, then such an option, in addition to stabilizing the operation of the amplifier, is invariably used for the operation of vehicle control electronics. For example, this pump powers ESP, which is responsible for the stability of the car during sharp (and not so sharp) turns.
Design and operating algorithm
The first passenger cars produced in the last century were not equipped with “vacuum seals”. To sharply slow down the car in case of emergency braking, the pedal had to be pressed with a force of about 80 kg. The device of the vacuum brake booster installed on modern vehicles makes it possible to reduce the mentioned force to a light press.
To diagnose malfunctions of this unit, you need to know its design and operating principle. The amplifier is a cylindrical metal housing, inside of which the following elements are located:
- a diaphragm pushed by a return spring;
- air valve with two channels - atmospheric and vacuum;
- in the center of the body there is a rod connected at one end to the brake pedal, the other to the main cylinder, and a diaphragm is attached to it;
- vacuum supply pipe from the engine intake manifold connected to the check valve.
In fact, the body of the “vacuum generator” is divided by a membrane into 2 separate chambers. The first is supplied with vacuum from the power unit, while in the second the air pressure is equal to atmospheric pressure. The chambers communicate with each other through the channels of the air valve, which alternately open when the driver presses and releases the pedal.
The classic vacuum brake booster works according to the following algorithm:
- Until the driver activates the brake system, both chambers communicate via a vacuum channel. Since the pressure in them is the same, the pusher and rod remain motionless.
- After pressing the pedal, the rod moves forward and the connection between the two chambers through the vacuum channel is interrupted. The valve opens another passage connecting the atmospheric chamber with outside air.
- Due to the pressure difference, the diaphragm bends towards the vacuum, thereby helping to put pressure on the pusher and the piston of the main hydraulic cylinder.
- When the driver takes his foot off the pedal, the valve produces the opposite effect - it closes the atmospheric channel and opens the vacuum channel. The pressure in the chambers is equalized, the spring pushes the membrane back to its original position.
Reference. In diesel and some gasoline cars, the vacuum is created not by the intake manifold, but by a separate vacuum pump in the brake system. Such a scheme operates reliably in high altitude conditions with low atmospheric pressure, where a conventional membrane amplifier loses its functionality.
If the brake pedal is held down by the driver, the diaphragm also stops and exerts a constant force on the rod. Thanks to the described operating principle of the VUT, the driver’s work is greatly facilitated, and the system responds to the pedal much faster.
Causes of VUT malfunction
A vacuum amplifier, like any other device, has its own working life . But there are some reasons why the VUT may fail much earlier. Here they are:
- the vacuum hose has lost its tightness;
- the diaphragm is faulty;
- the valves have lost their properties;
- the seals in the chambers are broken;
- The return spring has failed.
Although it is important to say that from a technological point of view, the device of the vacuum brake booster has been worked out for a long time. Thanks to this, many car owners practically do not encounter problems with its malfunctions.
But, because of the importance of maintaining a reliable brake system, it is necessary to regularly check it for correct operation, especially if you have a long trip ahead of you.
Basic device malfunctions
There are not so many types of vacuum seal failures, namely:
- Loss of tightness of the pipeline through which the vacuum is supplied, or its connection points;
- Failure of the check valve;
- Depressurization of the working chambers of the amplifier.
The first two faults are the main ones, but the third is very rare.
It is also worth noting that in most cars the vacuum pump operates from the vacuum created in the intake manifold (the pipeline connects them together).
But on some models, the amplifier is additionally equipped with a vacuum pump to increase operating efficiency. Moreover, this element can be either mechanical (driven by a camshaft) or electrical, with its own electric motor.
But these pumps are only an auxiliary element that increases the efficiency of the amplifier. In this case, the main vacuum is still taken from the intake manifold.
In cars equipped with this unit, the pump is another component that may become unusable. In this case, the booster will continue to operate, although in some driving modes the pedal force will increase.
What are the signs to identify a faulty VUT?
During the operation of a vehicle in which a vacuum brake booster is installed, one should not ignore the tightness of the structure of the booster itself and the hoses leading to it. Here are some signs of a malfunction that will help the driver always keep the situation under control:
- the driver has a need to apply more effort when braking in order to achieve the same efficiency;
- reducing the brake pedal travel;
- the car continues to brake even after the brake pedal is returned to its original position;
- there is a “suction” in the vacuum hose, and therefore there is unevenness in the speed of the power unit;
- when braking, extraneous sounds like hissing are heard;
- VUT completely “refuses” to work;
- fuel consumption increases when operating the vehicle in normal mode;
- the car suddenly begins to “tweak”;
- Candles don't work.
VUT
Sometimes a brake booster malfunction may manifest itself in a slightly different way, but if you feel one of the mentioned symptoms, then this becomes a reason to check the brake system.
Checking engine vacuum using a vacuum gauge
However, you may have noticed during testing or daily driving that there is something wrong with it. And you may be right.
If your amp barely passed the previous tests (or failed), make sure it's getting the right amount of vacuum. For this test you will need a vacuum gauge.
- Disconnect the vacuum hose from the brake booster and connect it with a tee so that you can also connect the vacuum gauge.
- Start the engine.
- Your gauge should read between 16 and 21HG (inches of mercury). If you get less than 16HG, check for vacuum leaks at the hose, intake manifold (gasket leak or crack in the manifold itself), your engine (valve(s), head gasket); or possible vacuum restriction in the vacuum hose, intake manifold or exhaust system (catalytic converter).
How to check VUT
In reality, checking the correct operation of a vacuum device is quite simple , which even a beginner can handle. We will give three ways to check the vacuum seal for serviceability.
Option 1
- Start your car and let it idle for about 7 minutes.
- Stop the engine and fully depress the brake pedal to create a vacuum in the brake system.
- First release the pedal and then press it again.
If the vacuum brake device fails, then the second time you press the pedal, you will feel a significant reduction in its travel (compared to the first press). This occurs because airless space can no longer be created. But if when you press again you do not feel a difference, then this indicates that the brake system is working normally . Let's move on to the second verification option.
Option 2
- With the car engine turned off, press the “brake” 6-8 times.
- Depress the brake pedal to the maximum and start the engine.
If there are no problems in the vacuum brake device , airless space begins to create in the system. For this reason, the diaphragm begins to press on the rod, which will pull the pusher connected to the pedal. And the brake pedal (even when it is fully depressed) will go down a little.
If this does not happen after starting the power unit, it means that there is no vacuum in the brake system. And, this means that there are malfunctions that impede this process.
Option 3
This vacuum brake test helps determine if there are air leaks.
- Start the engine.
- Depress the brake pedal all the way and immediately turn off the engine.
The depressed pedal should remain in this position for approximately 30 seconds. This shows that there are no problems . But if it begins to move to its original position, it means that the pressure in the working chamber increases. This indicates problems with the mechanism.
Checking the vacuum booster
Typical breakdowns and their symptoms
The Kalina vacuum brake booster fails for three reasons:
- depressurization of the main working chamber;
- depressurization of lines providing vacuum;
- violation of the functional state of the working valve.
Regardless of the type of problem, the “symptoms” are always the same - extremely tight squeezing of the brake pedal. If a clear hiss is heard when pressed, this means that the system has lost its tightness. Another sign of a broken vacuum booster is a sharp drop in engine speed when the brake pedal is pressed.
VUT replacement procedure
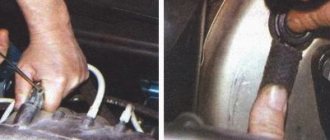
To make it easier to replace the vacuum brake booster, you need to remove the battery and the air supply pipe from the air filter to the receiver. Otherwise, nothing will work out or you will waste a lot of nerves.
The next step is to remove the brake master cylinder. It is attached with 2 nuts to the vacuum unit itself. There is no need to remove it completely. It is enough just to pull it out of the amplifier and carefully move it to the side without bending the brake pipes.
Now you need to climb into the car interior. Here you need to disconnect the brake pedal and unscrew the VUT mounting bolts. To disconnect the pedal, simply pull out the locking bracket and pin. Unscrewing the nuts of the vacuum booster should also not cause problems if you use a sufficiently long wrench, since they are located in a very inconvenient place.
To pull the already unscrewed VUT out, I used a small pry bar, all because it is mounted on a sealant and it is quite difficult to tear it off with your hands.
The sealant is needed to prevent water, dirt, dust, etc. from entering the interior. For these reasons, the new vacuum brake booster also needs to be coated with sealant and installed in place of the old one in reverse order.
Today's article about checking and repairing a vacuum brake booster will be useful to many motorists. This mechanism is designed to reduce the force that the driver has to apply when pressing the brake pedal. Experienced car enthusiasts remember the times when they had to press the pedal hard to stop the car. However, a lot has changed since then. How to detect malfunctions of the vacuum brake booster?
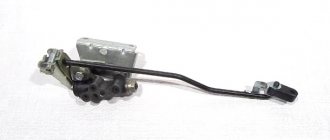
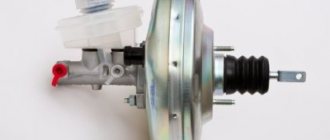
Master brake cylinder
Now let's talk about the master brake cylinder on a VAZ 2110 car. If you do not want to allow the brakes to fail while driving, they should be checked periodically, and if problems arise, take appropriate action immediately.
A common reason for replacing the master brake cylinder of a VAZ 2110 is precisely the fact that the brakes are lost.
Symptoms of a problem
Of course, brakes can completely lose their effectiveness for various reasons, but now we are talking specifically about the master cylinder. If the reason lies therein, then it can be determined by the following signs:
- The master cylinder shows signs of brake fluid leakage;
- The pedal has an idle motion, that is, when it is pressed, no force is created;
- The brake pedal simply won't press.
Replacement
To repair the master brake cylinder of a VAZ 2110, you will need to first disassemble it and then install a new element.
The most difficult process is disassembly. Therefore, let's talk about it in more detail.
Carefully disconnect the master cylinder from the pipeline. Disconnect the block, which is equipped with wiring, from the emergency brake fluid indicator. The connection to the “ten” is made by terminals. Cover the pipe and assembly openings with something to prevent brake fluid from leaking. It will pollute the interior space, which is undesirable. Now remove the cylinder along with the reservoir. To do this, simply unscrew the fastening nuts that connect the element to the vacuum booster. After removing the brake fluid level sensor, drain the brake fluid present from the cylinder and the cylinder itself. If there is no serious need, you should not remove the tank. But for complete assembly, the tank is removed and then installed in place in strict order. Before reassembly, each element is washed with purified brake fluid.
Common breakdowns of the vacuum brake booster - diagnostics in the garage
There are several methods for such diagnostics, so we recommend using different solutions to obtain the most accurate result.
- We start the engine, wait a few minutes, and turn it off. Press the brake pedal several times. If the vacuum booster is working properly, the first time you press it, you will be able to press the pedal all the way down. During further presses the stroke should be reduced. If you do not feel this difference, you can conclude that the brake booster is faulty.
- Depress the brake pedal all the way and start the engine, holding it in this position. If the brake booster is working properly, the pedal should drop slightly. If the position of the brake pedal has not changed, this is another sign of a faulty vacuum brake booster.
- We start the engine and press the brake pedal, hold it and turn off the engine. Without changing the position of the pedal, wait about 30 seconds. If air enters the system, pressure will begin to increase, causing the brake pedal to rise.
In some cases, the problem of system tightness can be solved using a vacuum brake booster repair kit, which includes the appropriate boots. But sometimes a complete repair of the vacuum brake booster may be necessary.
Sometimes a faulty brake booster is indicated by the fact that the engine starts to stall. As a rule, motorists do not even realize that the reason may be the appearance of excess air. To check, you need to close the vacuum booster hose to stop the air supply to the engine. If the engine eventually stops running, the problem lies in the brake system.
Checking the amplifier and related elements
Checking the performance of the amplifier is not difficult, and it does not require any equipment.
One of the simplest ways to check without the need to “climb” under the hood is done like this: with the engine off, pump up the brake system (press the pedal 4-5 times and fix it with your foot in the pressed position).
Then we start the engine. Immediately after starting, a vacuum will go to the vacuum chamber of the amplifier, as a result the pedal should go down a little. If this happens, the vacuum seal is working properly and there is no air leak.
If the brakes seem to be working, but when they are applied, the power plant changes its operating mode, you can check whether the booster is to blame for this: disconnect the pipeline from the intake manifold, and plug the fitting with a rubber plug (for this you can use a piece of a tube of suitable diameter, which needs to be clamped).
The improvised plug must be securely secured with a clamp.
Then we start the engine, let it run a little, and begin to press the brake pedal (you can do this on the road, but you should definitely take into account that the booster will not work).
If the engine functions normally when braking (without changing speed), it means that there is an air leak in the amplifier.
How to adjust the vacuum brake booster
Essentially, adjusting the brake booster is adjusting the travel of the brake pedal. To obtain optimal results, you simply need to adjust the length of the rod. To control the gap or protrusion, a special bolt is used.
It is also necessary to adjust the position of the adjusting screw, which will allow you to determine the optimal moment of operation of the atmospheric and vacuum valves. The ability of the clutch pedal to return to its standard position depends on this indicator. If you tighten the screw too much, the pedal will return very slowly, and overtightening it will make it quite difficult to press the pedal.
How to change the vacuum pump on a Lada Kalina
A new part will cost the owner of Kalina at least 2,000 rubles. A used element is sold on the secondary market at an average price of 1000 rubles per copy in near perfect condition. There are vacuum amplifiers from third-party manufacturers on the market:
- DAAZ - average price 1800 rubles;
- VolgaPromMarket - average price 1,700 rubles.
If the priority is not price, but durability, then you can order higher quality analogues with an increased resource of domestic and imported production. For example, the manufacturer TRIALLI assures that their device remains sealed in the temperature range (-55°C) - (+155ºC). Price: 2500 rubles.
The highest quality analogue is offered by Lucas. Its model “Lucas TRW-10” will fit most modern VAZ cars. The amplifier is assembled from high-strength materials, the main chamber has an increased diameter. The price is appropriate: 13-15 thousand rubles.
Preparation for repair of the vacuum brake booster
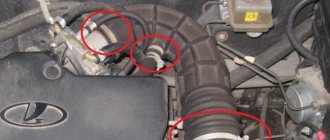
First of all, it is necessary to dismantle the upholstery in the engine compartment and remove the windshield trim. To prevent air from entering the system, it is not recommended to remove the pipes that go to the brake master cylinder. After this, unscrew the brake cylinder from the vacuum booster and carefully tilt the element forward to avoid deformation of the brake pipes. First, the hose must be disconnected from the vacuum booster fitting.
In order to dismantle the amplifier, unscrew the mounting bolts, having studied the manufacturer's recommendations in the operating instructions. Also remember to disconnect the wire going to the brake light.
At the final stage, you need to disconnect the pedal itself, for which a special pin and nuts are used. If you have a good understanding of automotive components and mechanisms, you can repair the vacuum brake booster. We advise you to first find a diagram of this device on the Internet, which will significantly facilitate the implementation of the task.
Methods for diagnosing VUT
If one of the above symptoms is detected, you should immediately check the vacuum brake booster for functionality without removing it from the car. Diagnosis is simple:
- Start and warm up the engine.
- Leaving the engine idling, use your hand or pliers to press down the vacuum outlet pipe leading from the manifold. Another option is to disconnect it from the fitting and plug the latter with a wooden wedge.
- Constant behavior of the motor indicates the tightness of the system. The serviceability of the air valve is checked in another way, described below.
- If the speed of the power unit has stabilized or increased, air is leaking through the VUT or supply hose.
Having determined that the amplifier is faulty, exclude the vacuum transmission hose from the list of “suspects”. Disconnect the pipe and inspect for cracks and tears. Check the condition of the clamps, install new clamps if necessary.
If sealing the pipe does not produce results, proceed to checking the “vacuum tank” itself:
- Without starting the engine, sit in the driver's seat and apply the brake 3-5 times. The first presses will be light, but on the last ones the stroke will be greatly reduced. In this case, the diaphragm draws air through the hose and pumps it inside the housing; a check valve prevents it from coming out. Remember, the atmospheric channel is closed.
- Having completed the last movement, hold the pedal depressed and start the engine.
- After starting the engine, the pedal should go down about halfway.
This brake booster test identifies problems with the check valve or air valve.
If the first one is faulty, then it will not be possible to pump air into the housing - the pedal will sag all the way. A worn air valve will not open the air passage while the engine is running and the pedal lever will remain in the up position or drop very slowly. The tightness of the VUT housing is checked as follows:
- Start the power unit.
- Squeeze the brake all the way.
- Without releasing the pedal, turn off the engine.
If the amplifier housing or diaphragm does not allow air to pass through, the pedal lever will remain depressed. Otherwise, it will return to its original position under the action of the spring. Then you need to remove the mechanism and replace it with a new one. Repairing a VUT in a garage is a rather difficult task, since the body of the element is held together by factory rolling.
The design of the brake system of any car must include a booster. The most widely used in transport is the vacuum type amplifier, which provides additional force due to vacuum.
Other section materials
| Lada Kalina with 1.4 engines |
| Description of design |
| VEHICLE SPECIFICATIONS |
| CAR DETAILS |
| SAFETY DURING MAINTENANCE AND REPAIR |
| KEYS TO THE CAR |
| FRONT AND REAR DOORS |
| HOOD |
| TRUNK LID |
| FUEL FILLER PLUG |
| SEATS |
| SEAT BELTS |
| REAR VIEW MIRRORS |
| INTERIOR LIGHTING LIGHT |
| LOCATION OF CONTROLS AND INSTRUMENTS |
| IGNITION SWITCH (LOCK) |
| INSTRUMENT CLUSTER |
| STEERING WHEEL ADJUSTMENT KNOB |
| STEERING SWITCHES |
| HEADLAMP CONTROL UNIT |
| VENTILATION AND HEATING SYSTEM CONTROL UNIT |
| LOCATION OF THE MAIN VEHICLE UNITS |
| CHECKING THE CAR BEFORE DEPARTURE |
| MAINTENANCE REGULATIONS |
| CHECKING THE CONDITION OF WHEELS AND TIRES, REPLACING THE WHEEL |
| ADDING FLUID INTO THE WINDSCREEN WASHER RESERVOIR |
| REPLACING THE WINDSCREEN WIPER BLADES |
| CHECKING THE OIL LEVEL IN THE ENGINE PAN |
| CHANGING ENGINE OIL AND OIL FILTER |
| CHECKING COOLANT LEVEL AND REPLACING COOLANT |
| CHECKING THE LEVEL AND CHANGING THE OIL IN THE TRANSMISSION |
| CHECKING THE BRAKE HYDRAULIC FLUID LEVEL |
| BLEEDING THE HYDRAULIC BRAKE DRIVE |
| ADJUSTING THERMAL CLEARANCES IN THE ENGINE VALVE MECHANISM |
| CHECKING THE CONDITION AND REPLACING THE GENERATOR DRIVE BELT |
| CHECKING THE CONDITION AND REPLACING THE TIMING BELT |
| CHECKING THE CONDITION AND REPLACING SPARK PLUGS |
| REPLACING THE FUEL FILTER |
| REPLACING THE AIR FILTER ELEMENT |
| REPLACING THE FILTER ELEMENT OF THE VENTILATION AND HEATING SYSTEM |
| Kalina. Increased oil consumption (more than 500 g per 1000 km) |
| Checking the condition of the brake system |
| Battery faults |
| The low battery indicator light is on |
| The vehicle's on-board voltage is higher than 15.1 V |
| The low battery indicator does not light up |
| Headlights and headlights do not light up |
| The wiper motor does not work |
| The wiper motor does not operate intermittently |
| The brushes stop in any position |
This is interesting: Replacing spark plugs for a 1.6 (16V) Lada Largus engine
Signs of problems at work
Malfunctions of the vacuum amplifier and the components that ensure its operation are sure to manifest themselves, and quite clearly.
If the vacuum reservoir does not function, this will be accompanied by a “stiffness” in squeezing the pedal.
If this element completely fails, it is very difficult to press the brake pedal (to verify this, it is enough to press the pedal 4-5 times with the engine not running; on the last squeeze, the resistance will be very high).
Since the vacuum is taken from the intake manifold, the loss of tightness of the vacuum booster may be accompanied by a change in engine operation during braking (although this should not happen).
Moreover, in some cases, the speed of the power plant may drop when you press the brake pedal (even to the point of stopping the unit), while in others, the speed increases.
Everything is simple here - if there is a leak in the vacuum seal, air will leak into the manifold, which affects the proportions of the air-fuel mixture, hence the change in engine operating mode.
Another obvious sign is the appearance of hissing when the pedal is depressed. The appearance of such a sound indicates the appearance of air leaks.
As for vacuum pumps, mechanical ones can make knocking noises, and constantly (the drive rod is usually to blame for this), while in electric ones the operation noise increases, and strong heating is also possible when the motor is running (here the fault usually lies in the drive motor).
The brakes stopped working
In the worst case scenario, the brake booster control valve fails completely, resulting in complete inoperability of the brake system. Fortunately, such an outcome is unlikely. But if suddenly it does occur, carefully stop the car, tow it home and contact a qualified specialist in the diagnosis and repair of brake systems. Depending on the severity of the case, the matter may be limited to only replacing the valve, but serious repairs of the entire brake system may be required.
The brake booster control valve is an important element of the braking system, ensuring driving safety. That is why the presence of the described symptoms should not be ignored or postponed “for later”. Contact a qualified mechanic who can professionally diagnose and repair your vehicle's brake system.
The vacuum booster is the most important element of the brake system of a modern car. Its operation is based on the principle of air discharge, which helps create additional force when braking. In this article, we will look at the causes of possible malfunctions and tell you how to independently diagnose this unit on your car.
Other blog posts
What it is?
We bought this car incognito at one of the Moscow car dealerships.
At the end of September 2010, the car set off on the route Moscow - Vladivostok, and on October 10, having covered more than 10,000 kilometers, it finished in Vladivostok. Now Kalina is operated in the usual mode for a city car.
In November 2013, our test drive was completed. At 78,000 kilometers, we sold the car at auction. You can read more here.
Note : Each blog post reflects the opinion of a specific person operating a car at one time or another, and may not coincide with the opinion of the editors as a whole. It is through the many opinions of different people that we try to get an overall balanced picture.