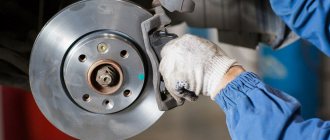
First you need to figure out what this vacuum amplifier actually is.
- This is a casing within which the valve is located. The element is structurally divided into two parts, which are separated by a layer of rubber - the diaphragm;
- One part of the amplifier is atmospheric, and the second is vacuum - it is connected to the inlet pipe from the power unit;
- The amplifier valve is a plastic casing containing the main elements that are subject to wear. It is because of them that the operation of the gearbox is disrupted. To be more precise, the gearbox begins to rattle;
- The composition of the valve is as follows: there is a rod on the bushing, adjacent to the buffer and piston. There is also the valve itself on the pusher and return springs with a filter.
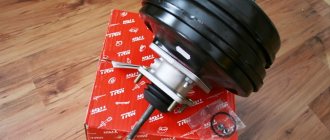
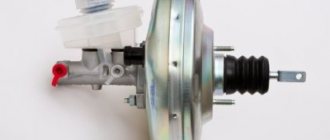
Appearance of the device
Signs of a malfunction of the vacuum brake booster of the VAZ 2114
Brake booster malfunctions have several fatal negative consequences:
- Significant reduction in vehicle control during braking cycles. In the absence of the amplifier, the load on the gas pedal increases proportionally - the pedal goes hard, and the braking effect is significantly reduced. For an unprepared driver, such behavior of the car can come as a shock and lead to a traffic accident due to the increased braking distance; If the brakes malfunction, a car loses significant braking potential and becomes practically uncontrollable;
- The gas pedal is slow. When moving, the pedal is very difficult to press. This is a clear sign of a malfunction of the amplifier housing diaphragm chamber. In this case, the car must be operated with great care, since it has lost a certain effectiveness of the braking system;
- A sign indicating a faulty brake system lights up on the dashboard at short intervals. This symptom may also relate to other malfunctions in the brakes, but in combination with a tight brake pedal it clearly indicates a faulty booster. The electronic unit of the car constantly monitors all systems for operability (and although on the VAZ 2114 model this unit has not been considered modern for a long time with its functions, it copes with its functions at a good functional level and with high efficiency despite the small number of sensors);
Deterioration in the braking performance of the system, along with other signs, indicates a direct involvement of a faulty brake booster in the risk of an accident. This symptom is the main one among all the others; however, operating a car with a very weak brake system is very dangerous - the circuits in this case do not receive additional force and cannot effectively brake.
Troubleshooting most often involves replacing the faulty element with a new unit - this will save repair time, since resuscitation of an old product will require no less time and a slightly lower cost of parts. That is why car enthusiasts most often resort to complete replacement of a failed part.
Design features and operating principle
The first thing you should understand is the design features of the vacuum brake booster and the subtleties of its functioning in the system. As a rule, the device is located in a common block with the main cylinder. In the initial state, the channel connecting the system with the surrounding air is closed.
In turn, the second channel remains open. At this stage, the diaphragm, which is located inside, receives identical pressure on one side and the other. In addition, thanks to the action of the return spring, it is always located in its original position.
When the driver presses the brake, a special rod moves, deflects slightly and closes the entrance to the channel. At the same time, another channel opens, connecting the VUT with the surrounding air.
After this, atmospheric flows converge on both sides and press each with its own force. Due to the pressure difference, the return spring is compressed, and the rod itself moves with the cylinder piston.
After reducing the force (while the foot remains on the pedal), the channels open so much that the movement of the piston assembly is completely blocked, and the VUT itself is in standby mode and ready for work. In such a situation, any change in the position of the pedal leads to an adjustment of the pressure difference in the device. As a result, the car stops if the driver presses on the pedal, or continues to move when the foot is released.
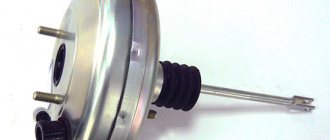
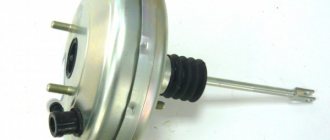
Vacuum booster device
When you press the pedal hard, there is a sudden change in pressure, causing the brakes to work at their limit. It is believed that thanks to VUT, the efficiency of the vehicle’s braking system increases by 5-7 times. As soon as the pedal is released, the diaphragm returns to its original position.
If the vacuum brake booster system does not work, diagnostics, identification of the cause and prompt elimination of the defect are required. How to do this will be discussed below.
How to check the vacuum brake booster of a VAZ 2114
The process of checking the vacuum brake booster on a VAZ 2114 is as follows:
- Press the brake to the floor 4-5 times with the engine not running. This will create uniform pressure in the two parts of the amplifier. When you press the brake, the valve will immediately show itself: if it squeaks, then you need to seriously think about it.
- After the pressure has become uniform, start the fourteenth. But at the same time you need to keep the brake to the floor. If everything is in order with the brake booster system, the pedal will rise after the engine starts. If this does not happen, then repair is definitely required.
- In the event that you realize that there is a problem with the amplifier, you need to look to be sure how the hose is secured and what condition the flange is in. If the fastenings at any point do not correspond to the norm, this may affect the fact that the pedal does not lift, and in fact the fault will be on a separate incorrect fastening, and not on the entire system as a whole.
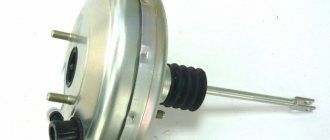
Operating principle
Golden rule: before you begin to restore or replace any unit or component, you should study its structure and operating principle.
The vacuum amplifier has the following operating principle:
- when the driver presses the pedal all the way, at that moment the piston and the pusher move, opening up free space between the two sections of the device;
- the vacuum section moves into the formed space, taking all the air;
- the air presses on the damper located between the elements of the amplifier, which provokes a pressure difference in the two parts;
- rod and valve - shift due to the resulting pressure difference;
- all elements return to their original positions when the pedal is lowered.
Any decision regarding plans to repair or replace an amplifier must be fully justified.
To do this, it is necessary to inspect the mechanism, which most car owners can do on their own.
Vacuum brake booster VAZ 2114 - which is better, selection criteria
In order to choose the best vacuum brake booster for the VAZ 2114, I recommend that you pay attention to the following points:
- Price. Price is one of the most important criteria for choosing a vacuum amplifier. You should not buy cheap Chinese options in order to save money, since they will not last long. It is advisable to give preference to products in the mid-price category - not the most expensive, but not the cheapest.
- Package. This packaging, used by a genuine manufacturer, is made by Point of Sale. You should not buy goods from market traders. There are plenty of good, trusted auto parts stores in any city. Ask to see certificates and documentation for the parts.
- Label. The label should be clearly legible - the date of production of the part, the production batch number and the name of the manufacturer. I am made of corrugated cardboard.
Unit cost
It is better to find out how much a vacuum brake booster for a VAZ 2114 costs directly from the stores. Since the regions are different, the price categories are different and it’s easier to navigate the area locally. The approximate cost is from 2,000 to 3,000 rubles. Installing it in the service will cost a third, or even half, of the cost. Despite the inaccessibility of the unit and some inconvenience, it is much easier to change the amplifier yourself. The frequency of breakdowns or replacements directly depends on the quality of the track, driving style and the general wear and tear of car parts, in particular the chassis. Therefore, it is difficult to say that there is any specific regulatory period. The only thing you need to remember is about timely diagnosis: sometimes it’s worth getting confused and going over your fourteenth with the eye of a caring owner. And, of course, you shouldn’t delay repairing or replacing the unit.
Replacing the vacuum brake booster of a VAZ 2114 - step-by-step instructions
To replace the vacuum brake booster of a VAZ 2114 you will need a certain set of tools and materials. It includes:
- Screwdriver Set;
- Pliers;
- Socket wrench for 13 and 17 millimeters;
- Special wrench for brake pipes;
- New plugs;
- New fittings.
And so let’s begin the replacement process itself:
- Removing the vacuum booster can be difficult due to the brake cylinder. Therefore, we advise you to remove it first. Another option is to disconnect the pipes from the brake cylinder and move them to the side for a while. Here you decide for yourself what is more convenient for you.
- The cylinder is not the main problem. It is difficult to cope with the mounting of the vacuum booster. It's just not very convenient to do this. This is the design of the VAZ 2114.
- Start with the valve - remove the hose fasteners from it, remove the support bush, after which you can pull out the brake pin.
- Next, using a 13 mm wrench, all four fasteners of the vacuum booster are dismantled.
- After all the inconveniences of the work done, you can remove the element and get ready to install a new amplifier in its place.
- To do this, you will have to install a special mounting frame. The frame is tightened with a 17 mm wrench, after which the new component is installed inside the car.
- If you want to make your work as easy as possible, do not forget to first connect the brake pedal to the booster with your finger when reassembling it. After this, it is much easier to cope with putting the vacuum seal back into place.
When replacing the vacuum booster, be sure to change the old vacuum hose at the same time. This element is far from eternal, therefore, as it wears out, it will negatively affect the quality and efficiency of the new vacuum cleaner.
Article: 2108-3510010-01, additional articles: 21080351001001
Order code: 003503
This model of vacuum cleaner has proven itself in the automotive market.
Applicable in the following cars:
Samara / VAZ 2108, 21081, 21083, 2109, 21093, 21099. Also used: Samara / VAZ 2113,2114,2115 Niva / 21213.
When purchasing a VUT (vacuum brake booster), you need to consider the following:
1. VUT must be equipped with a valve.
2. Look at the year of manufacture on the pusher fork, there is also the DAAZ marking.
3. When the pusher stops and the VUT is pressed. the latter should not poison the air.
4. No visible mechanical damage to the body.
During installation, do not forget to apply sealant between the brake master cylinder and the VUT.
Here is a video on how to replace the VUT:
The vacuum booster, using vacuum, creates additional force on the brake pedal. A malfunction of the VUT not only worsens the braking dynamics of the car, but can also cause interruptions in engine operation. Replacing the vacuum brake booster, as well as checking for faults, can be done by yourself.
Why does the vacuum brake booster of the VAZ 2114 hiss?
The car's braking system is subjected to constant loads, and with the so-called sporty style of city driving, it is also subject to overloads. This happens regularly even with a measured and leisurely rhythm - there is no escape from this problem.
Therefore, this unit must be regularly tested to ensure maximum driving safety for the driver and passengers. So it is in the story with vacuum brake boosters. As a rule, problems in its operation occur due to the failure of a special diaphragm located inside the device . It bursts, cracks, and ceases to perform its duties—to create a vacuum. Sometimes the exhaust valve also malfunctions - it is for these reasons that the vacuum brake booster begins to hiss.
Also check out
- It is often recommended to disconnect the tubes that complicate the process of removing the VUT, but you can do without this.
- Three of the four tubes coming from the brake cylinder make it difficult to remove the cylinder. To dismantle the cylinder, you can unscrew only one nut to “10”.
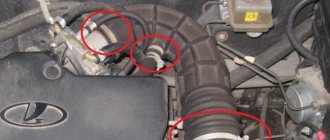
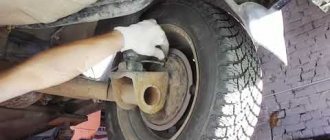
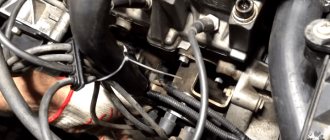
- Disconnect the hose that goes from the intake manifold to the vacuum booster valve.
- Remove the mounting bracket. It is better to use a special cardan (its image is in the photo). The VUT itself is attached to the body with four turnkey nuts “13”.
- Move the mounting bracket to the new vacuum brake booster (you will need to unscrew a couple of nuts to “17”).
Reassemble in reverse order.
Design and operating algorithm
The first passenger cars produced in the last century were not equipped with “vacuum seals”. To sharply slow down the car in case of emergency braking, the pedal had to be pressed with a force of about 80 kg. The device of the vacuum brake booster installed on modern vehicles makes it possible to reduce the mentioned force to a light press.
To diagnose malfunctions of this unit, you need to know its design and operating principle. The amplifier is a cylindrical metal housing, inside of which the following elements are located:
- a diaphragm pushed by a return spring;
- air valve with two channels - atmospheric and vacuum;
- in the center of the body there is a rod connected at one end to the brake pedal, the other to the main cylinder, and a diaphragm is attached to it;
- vacuum supply pipe from the engine intake manifold connected to the check valve.
In fact, the body of the “vacuum generator” is divided by a membrane into 2 separate chambers. The first is supplied with vacuum from the power unit, while in the second the air pressure is equal to atmospheric pressure. The chambers communicate with each other through the channels of the air valve, which alternately open when the driver presses and releases the pedal.
The classic vacuum brake booster works according to the following algorithm:
- Until the driver activates the brake system, both chambers communicate via a vacuum channel. Since the pressure in them is the same, the pusher and rod remain motionless.
- After pressing the pedal, the rod moves forward and the connection between the two chambers through the vacuum channel is interrupted. The valve opens another passage connecting the atmospheric chamber with outside air.
- Due to the pressure difference, the diaphragm bends towards the vacuum, thereby helping to put pressure on the pusher and the piston of the main hydraulic cylinder.
- When the driver takes his foot off the pedal, the valve produces the opposite effect - it closes the atmospheric channel and opens the vacuum channel. The pressure in the chambers is equalized, the spring pushes the membrane back to its original position.
Brakes part 2. Rod adjustment VUT 21214.
Hi Hi! And so, after installing the VUT and GTZ from Niva 21214, the brake pedal became soft, requiring practically no effort with the foot, while the “nine” stops dead in its tracks, but there is one point that I did not like, this is the large free play of the pedal, about 5-6cm, and it’s not just me, I could have hammered it in and gotten used to it, but I didn’t do that, I solved this problem by adjusting the VUT rod.
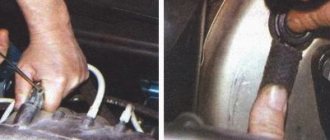
The rod is recessed, you need to depress the brake pedal and rest something against it:
Further., and then my phone died and I will tell you in words how it happened. -Take the rod and measure the original length of the rod. - We clamp the rod with pliers by the lock nut and with a 7 socket we unscrew the tip of the rod by about 1.2-1.5 mm, BUT NO MORE! -We take a tube of a suitable size, approximately 20 cm in length and diameter, so that it fits into the VUT hole, insert the rod into the tube and insert the whole thing into the VUT. -Gently hit the tube with a hammer and hammer the rod into place. Like that: