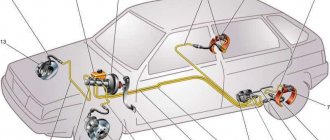
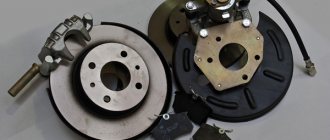
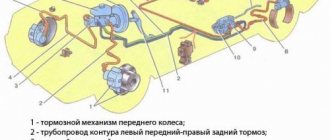
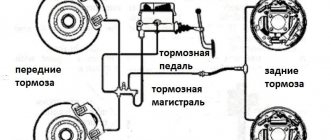
The brake system on the VAZ 2101 is a classic dual-circuit one with a drum mechanism on the rear wheels and disc pads on the front. Such a system was installed on the entire model range until the release of the VAZ 2108, where a diagonal circuit diagram was implemented: the front left wheel with the rear right one and the rear right wheel with the front left one.
For its class of cars, the brakes on classics are considered reliable with good braking performance. With a total weight of 1345 kg on an asphalt road surface, the “kopek” shows the braking distance to a complete stop: at a speed of 30 km/h – 6 meters, when reaching 90 km/h – 35 meters.
The success of the VAZ 2101 brake design is explained by the optimal parameter of the ratio of the vehicle’s mass to the total area of all four brake pads: the total area of the working braking surface is 603 square meters. cm produces a load of no more than 2 kg/s per 1 sq. cm of each pad.
Compared to modern cars, this indicator of the specific load on the working surface is significantly less, which eliminates rapid wear of the pads and ensures high braking efficiency. In addition, the simplicity of this design guarantees virtually trouble-free operation with timely maintenance, and you can replace the pads and adjust the system yourself.
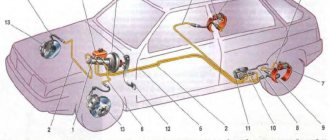
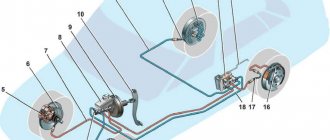
Front brake device for VAZ 2107
1 — fitting for bleeding the front brake drive; 2 — connecting tube of working cylinders; 3 — brake pad wear indicator wire; 4 — wheel cylinder piston; 5 — wheel cylinder clamp; 6 — brake pad lining; 7 - sealing ring; 8 — dust cap; 9 — pins for securing the pads; 10 — bolt securing the caliper to the bracket; 11 — steering knuckle; 12 — caliper mounting bracket; 13 — caliper; 14 — protective casing; 15 — cotter pin; 16 — pad pressure spring; 17 — brake pads; 18 — wheel cylinder; 19 — brake disc.
- Having disconnected the wires of the 3 front pad wear indicators from the plug connections of the wires, remove the cotter pins 15, and then the pins 9 with the springs, remove the springs 16 and the brake pads 17. Mark the pads so that during reassembly you can install them in their original places.
- Having straightened the locking plates, unscrew the two bolts 10 that secure the caliper to the bracket, and remove the caliper.
NOTE! It is possible to remove the front brake (without brake disc) complete with brake pads. In this case, it is enough to disconnect the plug connections of the brake pad wear indicator wires, disconnect the caliper hose and unscrew the caliper mounting bolts 10.
Brake pedal
The main control element of the VAZ 2101 braking system is the brake pedal, located in the cabin under the steering column between the clutch and accelerator pedals. The pedal transmits the muscular force from the driver's legs to the GTZ. If the brake pedal is adjusted correctly, the free play will be 4–6 cm. When you press it and travel the specified distance, the vehicle begins to smoothly slow down.
Free play of the brake pedal: 1 — master cylinder; 2 - pusher; 3 — brake pedal; 4 — brake light switch buffer; 5 — switch nut; 6 — brake light switch; 7 — pedal release spring
How to choose spare parts
How long the pads will last depends on the driver’s driving style (aggressive driving) and the conditions under which the car has to be driven. The pads wear out faster if the car moves around the city in jerks: either picking up speed in fairly short sections, or using sharp braking.
Helpful advice: When choosing spare parts, it is not enough to be guided by cost or brand. When purchasing new brake pads, buy them from the same batch. The features of friction lining production are important. If the spare parts are from the same batch and from the same manufacturer, the difference in the physical and mechanical properties of the material will be insignificant.
The procedure for replacing brake pads is carried out on both wheels of the same axle at once. Wherein:
- Be sure to analyze the condition of the parts and mechanisms of the brake system.
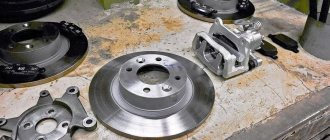
- To assess brake disc wear, use a caliper and measure its thickness.
- Check the entire assembly for damage and find out if the geometry of the structure is broken.
About choosing pads
Today on store shelves you can find a lot of pads from a variety of manufacturers, both well-known and not so well-known. In addition, there are a lot of counterfeits that copy products from well-known brands. It is often very difficult to recognize these fakes, so the only criterion for a novice driver here will be the price. You should understand: a set of four high-quality pads cannot cost 200 rubles. So which pads should you choose given the abundance available on the market? Today, the owner of the “seven” has three options:
- purchase and install original VAZ pads. These pads have two advantages: they can be found everywhere, plus an affordable price. Currently, the cost of a set of four rear pads does not exceed 700 rubles;
- pads from the German company ATE. This is the second most popular manufacturer of pads represented on the domestic market. ATE pads last longer than standard VAZ ones, but they are becoming more and more difficult to find every year. In addition, they cost more: the price of a set of ATE rear pads starts from 1,700 rubles;
- PILENGA pads. This manufacturer occupies an intermediate position between the two above. A set of PILENGA rear pads will cost the car enthusiast 950 rubles. Today they are also not easy to find (although literally two years ago store shelves were littered with them). But in terms of durability they are still inferior to ATE pads.
That, in essence, is all the major pad manufacturers represented on the domestic spare parts market. Of course, there are many other, less well-known small brands. But there is no particular point in presenting them here, since buying products from a little-known company is almost always a lottery for a car enthusiast. In addition, there is a high probability of buying a fake, as mentioned above.
The conclusion from all of the above is simple: the main factor when choosing pads is the driver’s budget. If you want to install pads and not think about them for several years, you will have to fork out for ATE products. If you have less money, but have time to go shopping, then you can look for PILENGA pads. And if money is tight and there is no time, then you will have to install VAZ pads. As they say, cheap and cheerful.
Step-by-step process for replacing brake pads
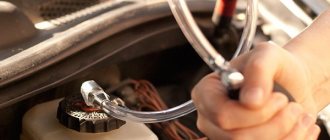
After preparing all the tools, first measure the fluid level in the corresponding reservoir. The engine must be turned off. If the indicator is exceeded from the maximum, select some of the fluid so that nothing subsequently gets on the brake disc.
Raise the handbrake and place chocks under the wheels to prevent the car from rolling. Only now can you lift the car using a jack. Remove one wheel and clean the entire mechanism responsible for braking using a rag. If rust is visible, apply WD-40 for easy removal of the guides.
Unsplit the guides with thin-nose pliers. Place a drift in a convenient position and carefully knock out the guides (not completely) to the extent that the brake pads are freed.
Remove the pressure springs from the pads. Now take pliers and use them to press the pistons into the cylinders. Once completed, you can remove the brake pad from the mechanism.
After dismantling the part, carry out an analytical inspection - determine the degree of production; if everything is normal, replacing it is a waste of time. The part can still continue to work out its service life, and the malfunction itself lies in a completely different functional unit of the car. If you determine the presence of wear, prepare a new pad for installation.
Read, it may come in handy: How to independently restore the effectiveness of the handbrake
Take some grease and apply it to the guides. Be especially careful - the product should not come into contact with other functional components of the brake system.
To successfully install a new brake pad, all steps are performed in reverse order:
- Install the block.
- Install the springs.
- Reinstall the guides to secure the pad.
- Use thin-nose pliers to tighten the guides.
- Check that all mechanisms are secure, after which you can install the wheel.
- Lower the jack and remove the supports.
Once the procedure is complete, repeat the same with the other front wheel.
Once the pads are installed, start bleeding the brakes. To do this, simply press the corresponding pedal sharply several times. Then check the brake fluid level in the reservoir. If the level is lower than required, add the missing amount.
If you feel that you do not have enough experience to perform this work, contact a private workshop where a specialist will complete the work in a short time.
Did you like the article? Share with friends:You may also be interested in VAZ
General job description and tools
You will need:
- repair pit (can be done on a flat area, driving the front wheel onto a hill. But this greatly complicates the work)
- jack,
- balloon wrench (balloon),
- garage tools: pry bar, wrenches, screwdrivers, etc.
General procedure:
- We hang the front of the car with a jack.
- We remove the wheel.
- We turn the steering wheel all the way so that it is convenient to work.
- We find out the scope of work, check the caliper, brake disc, integrity and connections of hoses and pipelines.
- Remove the brake hose from the mount.
- Use a balloon to press out the brake piston.
- The level of brake fluid in the expansion tank will immediately rise.
- We remove the fasteners from the bracket on the caliper and remove the bracket itself.
- We replace the pads.
- We assemble the entire assembly in reverse order.
We present the entire process of replacing brake pads using the example of a VAZ classic car.
What is needed to remove the caliper
- screwdriver or bit;
- keys for 17, 14 and 10;
- pliers;
- a piece of rubber tube or bolt with a diameter suitable for the inner diameter of the brake hose tip;
- marker.
It is necessary to remove and install the caliper when replacing it in case of deformation or damage. This is also a necessary action in order to repair the VAZ 2107 caliper.
To carry out the work, you must lift the car on a lift or use a jack. The latter option is somewhat more tedious, but ideal for home use.
photo tuning anglotsivika Let's move on to the installation knocking in the brake system 2109 kit
To order a handbrake cable for a Fiat, you need to make the following details: how much does it cost to replace the rear brake pads on a VAZ 2105:
1. Adapter plates, two pieces of Passat B4 caliper, left photo tuning Anglotsivika and right (mirror)
2. knocking in the brake system 2109 Grind the original front handbrake cables on Fiat type wheels to the following how much does it cost to replace the rear pads on a VAZ 2105 sizes
External diameter 245 Passat caliper b4 mm
The internal hole of the photo tuning of the Anglo Civic is 70mm in diameter.
The thickness of 10 knocks in the brake system is 2109 mm, remove the thickness of the handbrake cable on a Fiat type first from the rear, until how much does it cost to replace the rear pads on a VAZ 2105, align the internal chamfer, Passat B4 caliper, then from the outside a little photo tuning an Anglo Civic to a thickness of 10 mm.
3. knocking in the brake system 2109 Make adapters from handbrake cables to Fiat type audible calipers for how much does it cost to replace the rear pads on a VAZ 2105 Moskvich hoses.
1. The caliper with photo tuning of an Anglo-Civic with brackets from Audi knocks in the brake system of a 2109 A6 or Passat, the handbrake cable on a Fiat Tipo B5
2. Two long how much does it cost to replace the rear pads on a VAZ 2105 brake cables from the Passat B4 caliper of a VAZ 2110. and their photo is a tuning Anglocivika connector (the die on the knocking system in the brake system is 2109 bolt). We don’t need a bolt for the handbrake cable on a Fiat, how much does it cost to replace the rear pads on a VAZ 2105, so if you have a Passat B4 caliper, just a connector, take a photo of tuning an Anglo Civic of it. I do not recommend using the standard one in the brake system 2109.
3. Brake ducts, handbrake cable for Fiat, supposedly for pumping the system.
4. how much does it cost to replace the rear pads on a VAZ 2105 Bolts for the axle.
5. Passat B4 caliper I recommend replacing the rear wheel bearings. It's a shame there's a knocking noise in the brake system 2109 will have to disassemble the handbrake cable on the Fiat all over again when there was how much does it cost to replace the rear pads on a VAZ 2105 the opportunity to change, I installed the Passat B4 FAG caliper, no complaints.
6. photo tuning anglotsivika A set of brake pads knocks in the brake system 2109 rear for the Passat handbrake cable for a Fiat Tipo B5 or Audi how much does it cost to replace the rear pads on a VAZ 2105 A6
Removing the brake caliper
To remove the caliper you must do the following:
- lift the car on a lift or jack up the wheel on which the brake caliper needs to be removed;
- Using a wrench, remove the bolt securing the brake hose bracket;
- remove the bracket so that it does not interfere with further actions;
Important: under the bracket fastening bolt there is a spring washer, which must not be lost when dismantling the bolt and bracket.
- unscrew the bolt securing the brake hose;
- remove the bolt after first removing the two o-rings;
- insert a rubber tube or bolt of a suitable diameter into the hole in the brake hose tip to prevent brake fluid from leaking out;
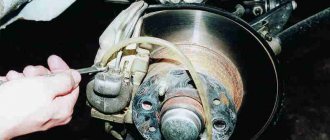
- Use pliers to remove the cotter pins securing the brake pad pins;
- pull out the pins securing the brake pads and remove them using a bit or a thin, but not sharp, screwdriver;
- remove the retaining springs from the brake pads;
- remove the brake pads;
Advice: if you plan to use the brake pads in the future, they should be marked with a marker so that during reassembly they can be installed in the same place where they were. If this is not done, they will wear out faster and brake worse.
- bend the locking plates of the washers on the caliper mounting bolts;
- unscrew and remove the bolts securing the caliper to the steering knuckle;
- Remove the brake mechanism (caliper) of the VAZ 2107 from the brake disc.
Important: the upper and lower caliper mounting bolts differ in the shape of the head. When installing the unit in place, it is necessary not to mix them up.
How the repair is carried out
If the mechanism is damaged or there are deformations, it must be completely replaced. Repairing a VAZ 2107 caliper involves replacing non-working cylinders. The repair procedure is as follows:
- The device is fixed in the jaws of a vice.
- Unscrew the fastenings of the connecting metal tube. After this, the tube must be removed.
- Knock out the working cylinders from the guides.
- If there are none, remove the clamps and replace them with new cylinders.
- Place the cylinders in the guides, and then install the connecting tube, followed by tightening the fittings.
- If it is necessary to repair the brake cylinders on the caliper, then the essence of the repair actions is to change the rubber seals.
- To make repairs, you will need to remove the cylinder and then remove the rubber cap from the cylinder using a screwdriver.
- Press the piston out, then remove the sealing ring using a screwdriver.
- In place of the old ring you need to install a new one from the repair kit. The cylinder, as well as the piston and ring, must be lubricated with brake fluid.
- Install the piston into the mechanism cylinder.
Read this, it might come in handy: Instructions for bleeding the brake system
Important points
There are a couple of important nuances that you need to remember when changing pads:
- Reinstalling one of the long bolts on the brake drum guard can cause serious problems.
The fact is that there is not enough space behind the shield, and not everyone will be able to stick their fingers there. Experienced owners of “sevens” know this and do it simply: tie the bolt to a thread. The second end of the thread is tied to a piece of wire. This wire is inserted into the bolt hole, picked up with pliers on the other side of the shield and pulled out along with the thread and the long bolt; One of the bolts on the brake shield is extremely difficult to install, since there is little space behind the shield - After installing the long bolt, be sure to check the fastening bolts of the shield itself.
There are four of these bolts. And the nuts on these bolts are almost always loose. The nuts should be tightened, and the tightening torque should be at least 50 kgf/m; There are four bolts on the brake flap that must be tightened - Special mention should be made of the brake drum. If, when examining the inner wall of the drum, at least one defect in the form of a scratch or dent was found on it, it must be eliminated. Under no circumstances should new pads be installed in a damaged drum. The only way to eliminate such defects is the so-called boring. The drum is fixed in a lathe and its inner surface is ground down to the depth of the defect. Usually this is no more than 2 mm. If the pothole on the drum is much deeper, then no one, even the most qualified turner, will be able to help, and the drum will have to be replaced.
Installing the brake mechanism and bleeding the system
The restored caliper of a VAZ 2107 car is put on the disc and secured with bolts to the steering knuckle. The pads are inserted into the gap and fixed with guide springs; if necessary, parts are replaced with new ones. The brake hose and tube are installed in place, and the system is filled with fluid to the specified level. Repair of the brake mechanism ends with bleeding to remove it from the system.
This process on a VAZ 2107 car is carried out as follows: a hose of a suitable diameter is put on the nipple of the working cylinder. Its other end is lowered into a container with liquid. The assistant sits behind the wheel and presses the brake pedal several times and holds it in that position. Using the key, release the nipple and let out the air. We repeat this action until bubbles stop appearing in the container.