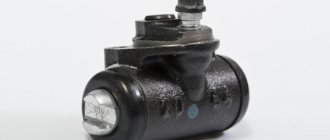
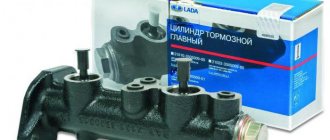
Welcome! Front brake cylinders - there are only two of them, each of their cylinders is located in a brake caliper, their real name is: “Brake wheel cylinders”, their operating principle is as follows: when you press the brake pedal, the fluid presses on the pistons, which are located in the brake cylinders, and the pistons in the meantime, the pads are pressed against the brake disc, when the foot is removed from the brake pedal, the fluid returns and the pistons stop applying pressure to the brake pads (Braking stops).
Note! To carry out the work, stock up on: Wrenches, copper O-rings for brake hoses (take about 4), as well as brake fluid, something to plug the brake hose with, hex heads, different types of screwdrivers, and spanners and of course, the tools needed to remove wheels from a car!
Where is the brake cylinder located in the caliper?
The easiest way to see the cylinder is when the caliper is removed from the car, but by simply pulling out the brake pads, the cylinder can be fully seen, the cylinder itself is sold and replaced as an assembly, it consists of several but very important things, firstly, the piston is located inside the cylinder and walking back and forth, thereby pressing and moving the brake pads away from the disc and of course the cylinder has a bleeder fitting, it is closed with a cap in the small photo with a blue arrow and the last element is indicated, this is the boot at the piston of the brake cylinder, it is indicated with a green arrow, thanks to it, the brake fluid is not squeezed out and into the cylinder, dirt, sand and moisture do not get in, they are very destructive for the cylinder and if they get inside, they will wash out all the lubricant (If it is water) or the lubricant will mix with sand (If sand gets in into the cylinder), and as a result the piston will barely move (braking efficiency will therefore drop).
When should a brake cylinder be replaced? The cylinder can be changed as an assembly, or it can be repaired by replacing parts in it such as the piston and boot separately, but we do not recommend going down this path, because firstly, the assembled cylinder does not cost that much money, but secondly, if you assemble something incorrectly (for example, don’t fasten the pin well), it will fly off and the brake fluid, if it’s missing, will all leak out (you’ll be left without brakes), so it’s better to change the entire assembly, the signs that indicate that the cylinder needs to be replaced are as follows: The bleeder fitting has broken and you cannot unscrew it in any way, also if the boot is torn, the cylinder must be replaced, if the piston in the cylinder becomes sour (This happens from time to time), it will also need to be replaced, but the piston can become sour in different positions, namely in braking mode (The wheel will constantly brake) or in its calm state (This wheel will not brake at all and the car will pull to the side when braking).
How to replace the brake cylinder on a VAZ 2113-VAZ 2115?
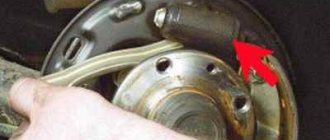
1. Remove the wheel first from the side on which you will change the cylinder (Read the article on “Replacing wheels on modern cars”, it describes how to remove the wheels correctly), when the wheel is removed, remove the brake hose from the bracket to which it is attached (the location is indicated by a red arrow) and using a wrench, tear off the nut that secures the brake hose to the brake cylinder (see small photo).
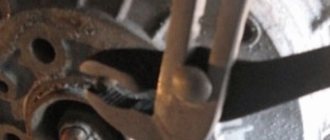
2. Now the brake caliper bracket assembly with the cylinder will need to be removed, to do this you will have to unscrew two bolts, but when unscrewing them, hold the guide pins with a second key so that the bolts in the guides do not turn (see photo 1), after which the bolts are removed from the guide pins and the bracket assembly with the brake cylinder is removed from the caliper, but the bracket cannot be completely removed, and the fault is the brake hose, which will have to be disconnected from the brake cylinder. To do this, completely unscrew the hose mounting nut (While unscrewing, hold the nut with a wrench and rotate the caliper assembly in the brake cylinder by hand, counterclockwise) and disconnect the hose, as soon as you disconnect it, immediately plug the hose with some kind of plug so that the brake fluid does not pour out through it, then firmly tighten the brake cylinder with the caliper you need a vice, but you can do without them, in general you will have to unscrew the two bolts that attach the brake cylinder to the caliper, they need to be unscrewed with a hex key or hex heads, after unscrewing, the caliper and the cylinder must be separated.
Note! When the brake hose is disconnected from the cylinder, the copper o-ring will fall, you don’t have to worry about it at all and don’t look for it on the floor, because this ring will need to be replaced with a new one!
3. A new front brake cylinder is installed in the reverse order, the copper rings must be replaced with new ones. If you decide to try to repair the brake cylinder, then in this case, read the article entitled: “Repairing the caliper on a VAZ 2109.”
Note! We also recommend that you lubricate the brackets assembled with the brake cylinder and the guide fingers of the bolts before installing them; you need to lubricate them by removing the boot from them, as shown in the photo below, lubricate the fingers with UNIOL-1 grease, when you assemble everything, bleed the brakes on a family car with an assistant Samara 2, detailed bleeding instructions, are on our website under the title: “Bleeding brakes on a VAZ 2114”!
Additional video clip: Below is a video about replacing the brake cylinder with a new one, familiarize yourself with it and you will clearly understand how to replace it.
Note! If you don’t yet know how the brake system works and works, then in this case, be sure to study the interesting video that we posted just below, after watching it, you will immediately understand why brake fluid is needed and why the car stops braking when the fluid pours out!
Examination
You should make sure that the master cylinder is the culprit for the malfunction of the brake system. This is easy to do; you don’t even have to go to a service center and spend money on it.
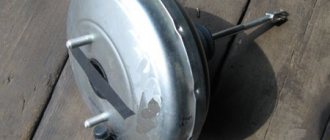
Unit location
- Press the brake pedal with the power unit off.
- Start the engine without taking your foot off the gas pedal.
- During normal operation, the gas turbine engine fails under the influence of vacuum.
- If the pedal does not fail, you will need to conduct more thorough diagnostics and restore the device to functionality.
Most likely, you will need to restore the tightness of the return regulator connection. It is located on the intake manifold amplifier housing.
Repair kit or new GTZ?
Many car owners face a question when the brake master cylinder fails: how exactly to repair the brake master cylinder. After all, there are two main options:
- Purchase a new GTZ;
- Use repair kit.
First, let's take a look at the price tags.
| Element | Price |
| New GTZ entry-level quality | from 800 rubles |
| New high quality GTZ | 4000 rubles |
| Repair kit | from 350 rubles |
Purchasing a repair kit and using it to restore the functionality of the brake cylinder entails uneven wear of old and new elements, breakage of rings and a number of other problems. In this regard, we advise you to eliminate the breakdown by completely replacing the gas turbine engine, and not by using a repair kit.
Replacing front brake cylinders on a VAZ-2115
Replacing the front brake cylinders of the front 2115 with your own hands. I am writing as I did.
- Remove the wheel
- Remove the brake hose from the holder on the rack
- The brake cylinder can be held to the caliper either by bolts with a 10mm hexagon socket or by TORX bolts. Yes, yes, in all the repair books, it is precisely “bolts with a hexagon socket” that are described, but in reality it turned out that I had Torx sockets. You need to unscrew the TORX bolts a little and loosen them. You need a TORX E14 head (buy a high-quality, good branded head!). If it doesn’t work out, it’s easier to go to a service center. Remove the bolts: head + knob, unscrew: head + cardan (or small extension) + ratchet. Access to the bottom bolt is good, to the top is difficult due to the brake hose
- Clamp the brake hose (you can use a small vise)
- Loosen the brake hose on the caliper with a wrench (14mm)
- Bend the plates, unscrew the bolts from the guides (hammer + screwdriver/punch, 13 socket, 17 wrench), remove the bracket with the cylinder
- Unscrew the TORX completely (head + ratchet), disconnect the cylinder from the bracket, it can be placed on the brake disc
- Twist the cylinder from the hose, place it in a plastic bag (because brake fluid will pour out of the removed cylinder)
- Change the washer on the brake hose, screw on a new brake cylinder, tighten it a little with a wrench
- Connect the brake cylinder and caliper. Tighten a little TORX
- Place the bracket in its place, insert the bolts into the guides, tighten them, bend the plates
- Fully tighten TORX
- Tighten the brake hose on the cylinder
- Loosen the bleeder valve (with the 8-head), screw it back in (I replaced it with the valve from the old cylinder, I liked it better)
- Remove the clamp (vice) from the brake hose
- Check whether the brake hose is kinked; if it is kinked, then loosen the brake pipe nut at the top with a special wrench, straighten the hose as necessary (I was lucky, the hose was not kinked)
- Put the hose back in the holder
- Bleed the brake fluid
Ready. It takes about an hour.
Simple step-by-step instructions for installing rear disc brakes
Step 1
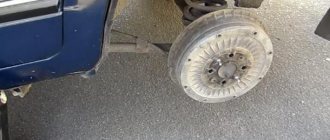
We loosen the tension of the cables and bring the rear pads together, then use a 12mm wrench to unscrew the guide pins. Use a metal brush to clean the seat and carefully knock down the brake drum. I recommend using a rubber mallet to avoid damaging anything. Truly super tuning of a VAZ 2114 car requires patience and strength. Using a screwdriver, pry up the spring that tightens the pads and remove it. We pull out the spacer bar and take out the upper tension spring. After this, remove the brake pad, first lowering the handbrake lever.
Step 2
When all the old parts have been removed, you can begin installing the HCD. Decide how you want the caliper to be placed - behind or in front of the axle. The effectiveness of the brakes will not change in any way from this operation. I put the axles behind. This is more symmetrical and the weight of the brake mechanism will help with braking. Now you need to join the hub and faceplate into one piece. This operation should be taken seriously. It will be useful to watch a video on this issue, where domestic masters show their tuning of Russian cars in order to share their experience and show some of the intricacies of performing this work. The centering process must be carried out very carefully.
Step 3
Now you can straighten the corners of the beam before placing the hub combined with the faceplate on the beam. This must be done so that the corners do not interfere with the caliper. Personally, I flattened them with a hammer. This work can also be done using a grinder. You should not install a grinder under the left hub bolt, otherwise you will have to work with the grinder again and file the head of the bolt. The brake caliper bracket may rest against it.
Step 4
Well, now the most important thing. We install the bracket on the faceplate and put the brake disc on the hub. Place spacers at the connection points. This must be done at connection points. It happens that the size of the washers may differ, then you need to buy them for a specific car, in our case it is tuning a 14 model car. We tighten the faceplates and the connection of the brackets (I recommend doing this with a force of 3-4 N.M). We screw the hose to the caliper, install the pads, and you can close the tube sealing line. Now we seal the brake line. We check the line for leaks by pumping up the pressure with the pedal. If everything works as it should, then you can begin installing the HCD on the other side.
Source
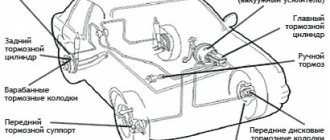
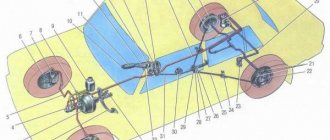
Device
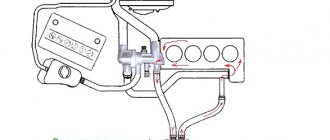
The VAZ-2115 uses a brake system in which the operating circuits are divided diagonally. This can significantly increase the degree of reliability and safety of people. In particular, the first of them controls the operation of the front right and rear left brake mechanisms. If it fails, the second circuit is switched on.
In addition, the hydraulic drive operating diagram also includes:
- vacuum booster;
- a dual-circuit regulator whose task is to maintain pressure in the brakes located behind.
A sensor is installed on the VAZ-2115 that signals a decrease in brake fluid volumes. It's mechanical. In addition, there is also a parking brake system, which, in turn, has a separate drive that blocks the rear axle if necessary.
As can be understood from the diagram, the system in question is quite complex, and from time to time certain breakdowns occur in it.
To understand what kind of problem arose at one time or another requires quite a lot of experience. However, it is not difficult to make the diagnosis yourself if you use the recommendations below.
The brake pedal has too much travel
In this case, one might suspect that:
- air has entered the hydraulic drive;
- the rear cylinder piston thrust ring lost elasticity, as a result of which it shifted inward;
- Brake fluid has leaked from the system;
- There is too much clearance between the main cylinder piston and the vacuum booster adjusting bolt.
Respectively:
- in the first case, you will need to bleed the system;
- in the 2nd - you will need to completely change the cylinder;
- in the 3rd - eliminate the leak by replacing seals or hoses that have become unusable.
Where and how to buy?
You can buy a caliper at any auto store that specializes in selling components for domestically produced cars. As a rule, in such stores all goods are in stock. You can select a suitable caliper either by writing out its markings, or rather the final index of the last 5 digits, or by providing the seller with a faulty caliper (the weight of the product is only 2.17 kg ). Approximately once every 3 years, the suspension of cars of the 2109-2115 family was updated, therefore, the location of the mating threaded seats (mounting bolts) may vary slightly.
New ventilated brake discs are compatible with all mentioned calipers for VAZ 2109, 2110, 2114, 2115. The installation is fully consistent with original components.
Sources
- skolkos.ru/skolko-stoit-support-na-vaz-2109-2110-2114-2115/
- drive2.ru/l/510984286187290783/
Brake performance is low
The most common reasons for this problem are:
- brake pads are oily;
- pistons jam in wheel cylinders;
- the linings on the blocks have become unusable;
- the brake system mechanisms overheated;
- the pressure regulator was set incorrectly;
- one of the circuits has lost its tightness.
The linings on the brake pads will need to be cleaned using a wire brush, warm water and washing powder.
If the pistons jam, you will have to change the cylinders and bleed the system.
When the linings wear out, they need to be removed and new ones installed.
Overheating of the system is eliminated by immediate shutdown. It will take some time for it to cool completely.
Why the wheel mechanisms are not fully released
Most likely, this malfunction will cause the brake pedal to stick. In this case, you will have to adjust it.
In addition, the disappearance of the gap between the piston in the master cylinder and the vacuum booster adjustment bolt may also be the cause. The problem is eliminated by increasing the lumen.
If fuel or oil gets into the brake fluid, the gaskets in the master cylinder sometimes swell. You will need to flush the entire system with new brake fluid and replace seals that have become unusable.
SOME SIGNS OF ITS MALFUNCTION
The driver should be alert to the following comments in the operation of the brake system:
- Liquid leakage from the tank;
- The brake pedal sinks when pressed;
- The appearance of air in the car brake system;
The manifestation of at least one of these signs should cause an immediate response from the driver to eliminate it.
Restoring the performance of the GTZ is impossible without removing it, so it will have to be removed from the car.
Braking of one of the wheels is observed when driving
Most often, such a breakdown is caused by the destruction of the tension spring on the rear brake. The damaged one will have to be removed and a new one put in its place.
It is also common for pistons in wheel cylinders to not function properly if dirt has gotten inside or they have begun to rust. Cleaning and rinsing will eliminate the problem.
Sometimes braking occurs due to loosening of the bolts that secure the guide pads directly to the steering knuckle. If they are re-tightened or replaced with new ones, the problem will be eliminated.
And finally, this can happen because the parking brake system has not been adjusted correctly.