Many cars have front brakes with disc brakes and rear brakes with drum brakes. But there are exceptions to this rule, and not only in auto racing, where all 4 wheels are equipped with disc brakes for the sake of reliability. Manufacturers in other countries equip only budget modifications of cars with drum systems; most of them have all disc brakes. But is it possible to equip a domestic car, for example, a Priora, with rear disc brakes and which ones are better?
Disc brakes
Disc brakes on Priora, according to car enthusiasts, are easy to install and are more efficient than standard drum brakes. Moreover, disc systems have another important quality: precise and uniform operation of the brakes front and rear. The use of disc wheels on the rear wheels reduces the braking distance several times; a brake system of this type does not require frequent maintenance. Excess heat generated during braking is quickly dissipated on the disc system.
According to production standards, Priora is not equipped with an HTD. Only front brake discs are installed on it. This means that by purchasing and installing new rear disc brakes, you are making changes to the design of the car that are not required by the standards. It should be taken into account that the installed brake system will require fine-tuning and tuning, which can only be performed by a qualified specialist and only in some cases by a very experienced driver who has tuned disc brakes more than once. Otherwise, uneven and unclear operation of the system, as well as its overheating, are guaranteed.
Rear disc brakes can be an obstacle to passing inspection because, for the reasons stated above, their installation is illegal. Replacing brake discs will require adjusting the brake force distribution system, often called a “sorcerer” among car enthusiasts. Otherwise, the car will skid sharply after braking.
Which drives are best to install to avoid problems? Experts advise purchasing only certified braking devices, and installing them only at a service station, which will also issue confirmation that the car’s braking system is fully configured and meets all standards. However, even in this case, the owner of non-standard brakes may be found fault with during the next maintenance.
You can install the rear disc brakes yourself, but be prepared for a long setup process and the fact that you will need to do a lot of test drives to find the optimal settings for your car. Well, decide which discs are best from the currently available brands, be it Brembo or Lucas. Brembo discs are very popular in our country and do not require in-depth knowledge in setting up such spare parts. In addition, Brembo kits and discs are compatible with brake units from other manufacturers.
Rear disc brakes: installation
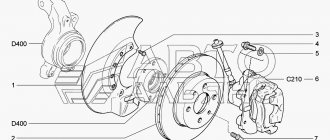
Naturally, you need to start by dismantling the standard brake system. If the brakes are on a Priora with ABS, then before that you need to remove a special sensor and the carrier shield clip. Next, you need to thoroughly clean the pressure controller, the hub axle, the trigger ring neck, and remove the handbrake cable. Then the adapter plate and protective casing are installed. The plate connects to the housing in the middle of the hub. All bolts must be carefully tightened with a torque wrench.
With the correct assembly sequence for rear disc brakes, the hub must be connected to the rear beam on both sides. It holds the brake disc. The brake disc caliper is also connected to the rear beam by a faceplate. To prevent the rear axle from skidding when braking the car, know that the diameter of the rear brake discs for the Priora should be smaller than the front ones.
In order for the new brake mechanism to work correctly on the Priora, you need to know that brake discs for VAZs with front-wheel drive have a size of 13 to 14 inches, and based on this you need to choose a caliper, complete with brake pads and a hose.
In order to install brakes on a Priora with ABS, you need to perform the above operations, and then install the traction control sensor on the standard mount. After this, installing the brakes continues in the same way as on a car without ABS:
- We mount the trigger guard guide on the adapter plate, observing the required tightening torque.
- The brake disc is secured to the wheel hub with two rods, and a caliper is mounted on top of it with the fitting facing up. The guide rod bolts are additionally attached to glue and then tightened. Next, you need to adjust the cylinder and install the brake pads.
- Lubricant is applied to the handbrake spring, after which the spring is inserted into the bracket. The bracket and cable are attached to the beam with a screw clamp.
- We install the brake hose and screw its tip into the caliper.
- The final stage is to assemble the brake line, securing the brake pipe to the handbrake.
This is how, in general terms, rear disc brakes are installed on a Priora.
Replacing braking systems yourself
You can replace one type of mechanism with another at any service station. This is not a cheap procedure. Pros - professionals will not need a lot of time for this and they will issue you an appropriate certificate of quality for the new brake system.
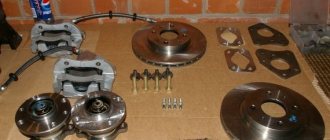
If you want to save on work, then you need to stock up on time and patience. Such structural manipulation of car brakes is not simple and certainly not easy. To carry it out, you first need to stock up on the necessary tools. In general, replacement of pads is carried out with a standard set. In addition to this kit, you will need a disc brake system installation kit. It includes:
- caliper;
- hose;
- pads;
- disks;
- faceplates;
- bolts, washers and other fasteners.
Video shows replacing drum brakes with disc brakes:
When purchasing a car, instructions for its operation should have been included. It describes in black and white point by point what needs to be done in order to replace the brake pads (from time to time they wear out and new ones need to be installed). Using these instructions, you can remove old drum mechanisms.
To install the disk system, you should read the instructions, which are also sold in the kit. In it you will find a detailed description, diagrams, etc.
Remember, for each model and brand of car, replacing brake systems is carried out differently, and to be more precise, it has its own characteristics. Next, we will present you with the main actions, which are as unified as possible.
So, first of all, you need to remove the drum brakes. To do this, remove all the fastening bolts that are on the rear wheels, fix the front ones with available materials and support the required side with a jack. Attention, for safe operation, securely secure the vehicle. Now unscrew the bolts and remove the rear wheel.
Next, you should unscrew the nut that secures the parking brake cable. Now you can remove the drum. Very often it sticks and needs to be torn off. For this you will need a hammer. For greater effectiveness, strike with medium strength and high frequency. After removing the drum, disconnect the brake hose from the brake cylinder. Remove it, the hub and the rear suspension arm flange.
Disc Brake Maintenance
Service
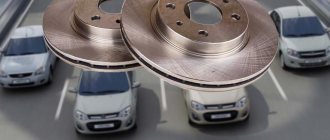
So, in general terms, we can describe how rear disc brakes are serviced. A set of rear brakes for VAZ, including Priora, will cost about 9,000 rubles. plus service. Disc brakes provide stable and safe driving at speeds over 100 km/h, unlike drum brakes, which can fail in a critical situation. Rear disc brakes are a significant investment in safety.
Priora meets high safety standards, and rear disc brakes significantly increase it even in extreme situations. Ventilated brake discs are particularly effective. This is all the same both when installing brakes on a Priora with ABS and one not equipped with it.
HOW TO CHOOSE GOOD DISC BRAKES FOR THE REAR AXLE
If, after weighing all the pros and cons, the owner decides to install the automatic transmission on the Priora with his own hands, then it is worth getting acquainted with such systems in order to choose the best option for himself. You will have a large number of options to choose from, from imported products from leading manufacturers to proposals for installing front brake systems from the same Priora. If frequent trips at high speeds are practiced. It is worth considering installing ventilated or drilled brake discs.
The nuances of installing the brake system
On one of the car blogs it turned out that removing the standard rear brakes does not cause any problems, except for the handbrake cables. To remove them, you need to lie down on the ground, otherwise you simply won’t be able to dismantle them without damaging anything.
In such conditions, ratchet wrenches and safety glasses come in handy to prevent dirt from the bottom from falling into your eyes. When installing ABS sensors in place, you need to take into account a small detail: the bushing into which the sensor must be inserted must be removed from the brake shield. All operations for installing brake discs on Priora take about six hours.
Brake hoses are often attached to calipers with banjo bolts. After assembly, the brake system needs to be bled so that an air lock, like the one that sometimes appears in the heating system of our houses, does not get in the way of the brake fluid. A simple device called an aerator allows you to bleed the brakes without an assistant: a tube with a fitting that fits onto the wheel nipple. But there may be problems with the tightness of the connections when using an aerator.
In general, everything works very well immediately after installation. You need to let the parts of the system get used to it, but after some time they can easily withstand emergency braking at 120 km/h. The brake fluid pressure in the rear disc lines, although less than that of the drum ones, is still significant. To prevent its accidental release when pumping on a car with ABS, discharge the pressure accumulator. Turn off the ignition, disconnect the connectors on the brake fluid reservoir.
We bleed ABS brakes only with the pedal depressed (that’s why an assistant is needed), an aerator can also help, as in the above case. If the ABS is of the second type, a scanner is needed that connects to the control unit of this system. Therefore, in this case, it would be more logical to contact a service station.
One of the popular braking systems for front-wheel drive domestic cars is called Tornado. Rear disc brakes of this design demonstrate excellent compatibility with the Priora, are equipped with a special adjustment mechanism, and work well with the standard hand brake and original hydraulics. That's all! Now you can pick up the HDT for the Priora, choose which ones are better, and dismantle it yourself. Good luck!
Source 1ladapriora.ru
Many drivers strive to modernize their car, especially if we are talking about fairly old models that they do not want to exchange for modern cars for one reason or another. When tuning the engine, we must not forget about the need to update the brake system. If your car has drum brakes, when increasing engine power, it is advisable to consider installing a disc system in their place.
Why are disc brakes better than drum brakes?
Replacing disc brakes with drum brakes is advisable if you want to increase the efficiency of the braking system. On most modern mass-produced cars, manufacturers install a disc braking system, and here are several reasons for this:
- The response speed of disc brakes from the moment you press the pedal is significantly higher than their drum counterparts;
- Disc brakes on all wheels operate simultaneously, which allows you to stop the car not only quickly, but also smoothly;
- Improved heat dissipation, which has a positive effect on the performance of the pads and disc.
These are just a few of the benefits of disc brakes that clearly indicate that replacement is worthwhile.
Installation Quality Check
Ventilated
When you complete the assembly process, be sure to check how airtight the installation was on each of the wheels.
- Press the brake pedal. If you did everything correctly, pressing will be accompanied by tightness and effort;
- You or your assistant press the pedal again, while the second person begins to turn the new disc brakes;
- If you couldn’t move anything, it means the assembly was done efficiently and reliably.
What to consider when replacing drum brakes with disc brakes
Replacing the brake system is a fairly complex job that requires attention. The safety of the driver, passengers and surrounding motorists depends on the effectiveness of the brakes. When changing the type of brake system mechanism from drum to disc, the following points should be taken into account:
- Along with replacing the brakes, it will also be necessary to replace the handbrake with a hydraulic one;
- When choosing a brake system, you need to pay attention to ensure that it meets all the standards required for similar structures on the car where the mechanism is installed. This is an important point, since an incorrectly selected disk system may be less effective, for example, overheating will occur during braking, which will affect the speed of stopping the car;
- When purchasing and installing disc brakes, please ensure that they are certified for use in the Russian Federation;
- After replacing the brake system, since it is one of the basic ones, you will need to undergo maintenance and note information about the design change.
Some features of replacing braking systems
Like any manipulations with automotive systems, working with brakes has its own characteristics. You must be clearly aware that by changing the type of mechanism, you are changing the factory design of the car. These changes can lead to various consequences for which you must be prepared. So, the features:
- Replacing drum brakes with disc brakes must meet all factory standards and requirements for your car model. Otherwise, you will skid while braking, the system may fail, the brake discs may overheat, etc. As you can see, the consequences of non-compliance are very different and quite unpleasant.
- New brakes must be certified for use in the Russian Federation. At the service station where you will install them, you must be given a certificate of their compliance with the standards and requirements.
- The handbrake system will need to be replaced with a hydraulic handbrake.
- After replacement, you will need to undergo maintenance, since you have rearranged one of the factory systems. If you do not make changes, then in the event of an accident you will automatically become the culprit.
If you are ready for such difficulties and they do not scare you, then you can safely replace the braking mechanisms on your car.
Replacing drum brakes with disc brakes yourself
The technicians of most private service centers are ready to take on the job of replacing the brake system for a fee. But you can do this yourself, if you have the necessary tools.
Please note: If the work is carried out by a professional service center, upon completion you will receive a certificate of quality for the new brake system.
To independently replace drum brakes with disc brakes, you will need a disc brake system installation kit, including: caliper, pads, discs, hose, face washers, bolts and fasteners. In addition, you will need a standard set of automotive tools.
Important: Before you begin, read the instructions that came with the purchased brake system. It contains a detailed description of the units included in the kit, necessary for the operation of the circuit and other information.
Let's look at the basic steps that will need to be performed when installing a disc brake system, but it is important to remember that for each car this instruction will have individual nuances that should be taken into account:
- The first step is to remove the old brake pads. To do this, just read the car's operating instructions. Since this kind of work is standard (the pads are a consumable component and therefore have to be changed frequently), information about it is necessarily contained in the instructions;
- Next, the drum brakes are removed. To do this, you need to loosen and twist all the fastening bolts of the brake elements on the rear wheels;
- At the next stage, it is necessary to remove the nut that holds the handbrake cable, after which you can proceed directly to dismantling the drum. It is worth noting that if the car has traveled more than tens of thousands of kilometers, most likely the drum has become stuck and will need to be torn off. This can be done, for example, with a hammer;
- When the drum is removed, it is necessary to disconnect the brake hose from the brake cylinder and then remove it;
- Next, remove the rear suspension arm hub and flange;
- After this, you can proceed directly to installing the disc brake system. At the beginning of work, secure the flange of the suspension arm, and then the hub with the disk to it. The next step is to install the brake disc, guide pads and the pads themselves. Before installing the caliper, press the pistons inward, which can be done using a large flathead screwdriver. Now you can install the caliper and secure the entire structure;
- Next, connect the brake hose, parking brake cable and caliper to the system.
After completing all the described work and fully installing the brake system, it is recommended to bleed the brakes before operation.
Source okeydrive.ru
Most Lada Priora owners know that the domestic car has front disc brakes and rear drum brakes. It is no secret that the drum braking system was developed a long time ago, back in the middle of the 20th century, and no longer meets current standards.
In the modern automotive industry abroad, you can hardly find drum brakes anywhere; many companies have switched to rear disc systems. The only exception is budget cars, which cannot afford to have a better braking system.
Rear brake discs can be installed on almost any front-wheel drive vehicle of the VAZ family, including modifications with ABS. If you care about your convenience and comfort, then it’s time to think about installing brake discs for the Priora. In addition to comfort, the ZDT system significantly increases the safety of the car, and this is very important on unreliable Russian roads. Let's consider whether it is worth installing disc brakes on the Priora, as well as their advantages and disadvantages.
Installation of ALNAS R-15 front brakes on Lada PRIORA!
I recently decided to switch to 15th front brakes! After googling for more than one day, looking through a bunch of tests and reading no less a bunch of reviews and various chats, I decided to settle on ALNAS brake discs and brackets! I arrived at the Belais store, and here it is, happiness, lying there, showing off on the counter. We take it without hesitation. I decided to paint the calipers with a set of Foliatec paint, the color is a classic red gloss. The paint set is designed specifically for calipers and can withstand temperatures of 300 degrees C+.
Everything was cleaned and sanded carefully, then painted. Let's start installation! We unscrew the wheel nuts (in my case, nuts) We unscrew the studs with a hexagon (some have guides) We unscrew the caliper (the working part with the cylinder), carefully paint it and place it at the bottom so that it does not interfere. We remove the bracket (the bolts are external sprocket, crap, change them to normal ones right away), then we remove the disk. There is free space for creativity. ))) 20:00 and then the fun began. the adapter does not fit on the bipod, the mounting ears are in the way!(((I’ll step back a little for some clarifications...! I came home from work and decided not to drive the car to my garage, but to install this device at home! Without a pit and a lift, in short everything that I have in the garage, in theory, was enough since the garage was fully equipped! I chose a medium jack and a stop. The car is on the rackXXX! But that was not the case! ((. 2 cigarettes, waste in my head collected in a heap. Thoughts! 20:30 call to neighbor Kolya! - Is there a Bulgarian?! - Of course there is. (Kolya is a jack of all trades) - Is there a sharpening stone for him?! - Also there ! (in principle, probably no one doubted it). Carrying, socket, power! The result of the work so that the staples fit. (it was difficult, but it gave in!) Everything fits in the holes, excellent! 21:40 We begin to fasten, bolts into the holes, the thread runs perfectly, tightening, control rotation of the disk. Nothing, stopper, bracket clamps the disk. Diagnosis, crooked contact plane(. remove the bracket! We start the Bulgarian, align ourselves, clearly, smoothly! 22:45 Everything was perfect after an hour of adjustment))))))! Stretch it out and spin the disk! what a stupor! Let's film again. The Bulgarian went again, the inside of the staple was sawed off! The whole village is level. Let's put it back together! Please note, the bracket for the ALNAS caliper is screwed not from the inside like the stock factory one, but from the outside, from the hub side. First, we screw the bracket adapter, then we attach the bracket itself to it (by the way, the bracket itself is factory-made, but is purchased complete with the adapter). put on the brake disc and center it. We fasten the bracket, wipe and coat the caliper guide fingers with lithol, then screw the working part of the caliper to the bracket, and bend the gussets. We coat all threaded elements of the brake system with thread sealant (IMPORTANT.). Let's install brake pads! These are the ones I chose.
Advantages and disadvantages of rear disc brakes
Rear brake discs are installed on foreign cars not only because of their high efficiency, but also to ensure simultaneous and uniform operation of the braking system. If any mechanism operates more sharply or slowly, this will entail a loss of control over control.
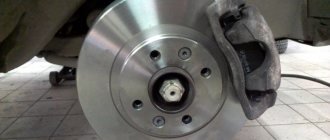
Disc brake unit
- The braking distance is reduced several times.
- Brake response time is noticeably reduced.
- Frequent maintenance is not required, brake pads can be replaced without much effort.
- Increased security.
- Uniform operation of the braking system.
- Unsprung masses are noticeably reduced.
- Fast heat dissipation, which is essential at high speeds or when cornering sharply.
- The need to constantly tighten the handbrake is eliminated.
- Aesthetic appearance.
- They do not freeze in the cold season after washing (a similar problem is observed in drum brakes).
It is worth remembering that the Volzhsky Automobile Plant does not install rear disc brakes on the Lada Priora, based on its standards. By replacing drum brakes with disc brakes, you will be making changes to the stock configuration of the car, which will affect its technical characteristics.
Rear disc brakes have their drawbacks. For each brand of car, good braking systems are developed over a considerable period of time, based on the technical characteristics of the model and certain standards. In other words, the stock brakes are always well balanced and tuned.
A typical mistake of inept installation
Buying a new brake system and simply installing it will not achieve the desired result. Rear disc brakes need to be adjusted and their functionality checked in the field. Otherwise, you will encounter problems such as uneven operation of the brake system, which will lead to skidding, whistling, squeaking and even overheating.
When to change pads
The frequency of replacing rear pads is 2 times less than the front ones. Since they have less load when braking.
On average, the mileage they can cover without replacement is 60-90 thousand km. Of course, these figures are approximate, since the operating conditions and driving style of each driver are individual. There are cases where the pads can be worn out by 30,000 km.
It is necessary to change the pads if:
- The thickness of the lining is less than 1.5mm. With such a thickness, the block no longer performs its functions and is simply not able to effectively brake the car.
- The overlay begins to peel off from the base. Using a pad with such problems is unacceptable. The pad can come off and get caught in the rotating parts, causing the wheel to wedge.
Lining Thickness
There is no need to remove the drum to check the thickness of the lining. You just need to remove the special rubber plug behind the drum and assess its condition.
Plug for checking the condition of the rear pads
What are the risks of installing a non-standard brake mechanism?
Installing brake discs on a Priora does not always have a good effect on the car. Of course, the costs will pay off and you will get the desired effect, but at the same time, some problems may arise.
- You may fail your MOT inspection as it is illegal to tamper with the car's standard equipment, although rear disc brakes have a number of advantages over drum brakes.
- Since the rear disc brakes are very conspicuous, a meticulous law enforcement officer on the road may well find fault with the presence of non-standard mechanisms installed on the car. But in most cases this is rarely paid attention to.
- There may be problems fitting a standard cable handbrake. Installing a hydraulic brake will help here, allowing you to brake at high speed, but weakening over time if used as a parking brake. Some car enthusiasts completely refuse to have a handbrake and even manage to pass MOT without any problems.
- If you get into an accident, the scales will tip against you due to the presence of non-standard spare parts in the car, even if you are not the culprit.
Having installed rear disc brakes on the Lada Priora, you need to start adjusting the brake force distribution system, which is called the “Sorcerer”. If this is not done, the rear brakes will apply faster than the front brakes. This will lead to unwanted skidding, worn tires, squealing and overheating of the disc brakes.
Sometimes skillful owners take on the grinding of brake pads themselves, reducing their contact with the brake discs by up to 50%.
Selecting rear brake discs for Priora
One of the main advantages of installing brake discs yourself is significant savings in money, about 10,000 rubles.
Important: when carrying out installation, it is better to purchase devices with a certificate and install them in specialized service stations, which also provide certificates stating that the brake system is adjusted and meets all standards. However, this will not provide any guarantee that you will not be picked on during maintenance.
If you still decide to install the brake system yourself, then you need to decide which brake discs are best to install. Of course, you can go to the auto parts market or look for suitable ones on the Internet. It is also possible to adapt front disc brakes from the same Priora or any other car of the VAZ family. If you're a speed enthusiast, you might be interested in ventilated brake discs, which provide much better cooling and help prevent overheating.
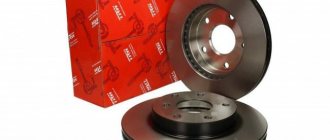
Spare part from a reliable brand
The most common and high-quality solution in Russia are Italian Brembo brake discs, which are widely used throughout Europe and are certified by the German Federal Bureau of the Automotive Industry. Brembo has a wide range of discs, among which you can find those that suit you, including price. In addition, Brembo has official technical support in Russia.
Brake discs from this company can be installed in conjunction with any other pair, since they do not require in-depth adjustment. If you have extra money, you can also buy Brembo MAX front brake discs, which are produced specifically for cars of the VAZ family, including Priora.
Thanks to the presence of a special wear indicator, brake discs will be replaced in a timely manner. There is a notch on the disc that completely disappears when the disc wears out, allowing you to determine its reliability at any time.
Main faults and signs of wear
You need to listen carefully to your suspension - sometimes it is the sounds that are the first signs of wear, and only after them is followed by “sluggishness” of braking and passing obstacles. Any extra sound is a reason to think carefully and start diagnosing. Don’t put off the problem - as soon as you have free time, try to inspect the chassis of your Priora.
Signs of wear on the VAZ-2170 brake discs may appear as follows:
- When braking hard (almost pressing the pedal to the floor), you can hear a sharp grinding or squeaking sound. This is not always normal behavior, but it can occur if the pads are installed incorrectly or simply do not fit the Priora. A grinding noise may occur if dirt or sand appears under the pad - upon contact, it will wear down the surface of the disc.
- The brake pedal feels soft, as if falling down, and feels bad.
- The car's braking distance has increased. It is measured, of course, during everyday travel, but it is advisable to compare its duration under equal weather conditions.
- Squealing pads. This sound clearly indicates that they have been erased - they, like a musical record, will produce a similar sound.
- When braking, you feel a bump in the steering wheel. If there were no bumps, it means that the pads “stumbled” in that sector of the discs, which was worn out and caused the pads to “sag” a little.
- Car skidding to the side when braking at speed. This is direct evidence of uneven wear. If it skids to the right, check the left brakes, and if it goes to the left, then check the right brakes.
- One side simply doesn't stop the wheel and it continues to roll.
- The brake pedal does not rise after being pressed. The pads are simply stuck to the wheel - the brakes will not work.
- One of the wheels is blocked. This is a serious enough problem that it is impossible to continue moving forward. A fairly wide crack can be found on the disk.
If you find one of these signs and then disassemble the front part of the chassis, you need to inspect the brake system. One part may interfere with the movement of another, and dirt may become clogged (after an off-road trip). Any malfunction should be corrected in a timely manner. The nature of these damages can indicate several facts:
- If the metal turns blue, it means it has oxidized;
- The surface should not be strewn with cracks, bumps, or pits. Riding with such brakes is dangerous for your life - the brakes can jam;
- Spin the rim after removing the wheel. If it moves in a figure eight, it means its fastening has become deformed.
Installation of the HTD on Priora
- Stage 1
The rear drum brakes need to be removed. If you have any difficulties, you can refer to the Lada Priora service manual. Carefully remove the hub from the lever while still assembled. The brakes on a Priora with ABS are removed by first removing a special sensor with a clip from the supporting panel. Disconnect the connector and prepare the necessary spare parts for installation along with the ABS sensor fasteners.
Clean the pressure controller, its spare parts, the disc release ring journal and the hub axle. The presence of dirt on the coating can affect incorrect balancing. Unscrew the screw that holds the cable brackets and remove it.
Installing new brakes
- Stage 2
Proceed with the installation of a special adapter plate, a cover with protection against dirt and the hub axle. It is necessary to connect the adapter plate to the housing right in the middle of the beam and the hub axle. There is no need to remove the hub from the axle. The bolts are attached to the flanges using screws with groovers. The bolts must be tightened using a torque wrench, which is designed to regulate the tightening torque. It should be 5.6 kgf/cm. If the tightening is less than necessary, this will eventually lead to deformation or even complete destruction of the disks, making it difficult to unscrew the bolts.
- Stage 3 (brakes on Priora with ABS)
Attach the 9 mm plastic sensor spacer. Install the ABS bracket and the sensor required for its operation using the standard fasteners and screws. Install the ABS sensor into the trigger connector and connect it. Check whether the sensor is touching the rotor coating; to do this, simply spin the disk. The gap should be about 1 mm.
The guide caliper bracket is installed on the adapter plate using screws with groovers and washers. The tightening moment should be 5.6 kgf/cm.
Attach the brake disc to the hub using two guide rods and begin installing the caliper. It must be installed with the fitting facing up. Apply glue to the rod bolts, insert the first one into the armhole and tighten thoroughly. Adjust the cylinder and attach the brake pads. Tighten the second bolt taking into account a tightening torque of 2.5 kgf/cm.
Apply lubricant to the handbrake cable spring and insert it into the armhole of the bracket. Attach the bracket and cable to the beam using a screw clamp, first disconnecting it and threading it into the bracket itself.
It is necessary to disconnect the cable from the handbrake and remove the mudguard. Remove the cable from the caliper and dismantle it by unscrewing the fastening hardware. The brake cylinder must be carefully brought in by turning it with a wrench and thus checking whether the pads pass freely between the caliper and the brake disc. It is worth taking a closer look to see if the protrusion on the block fits into the opening on the caliper piston. Pass the cable through the armhole of the holder and secure the protective rubber cover.
The cable loop is put on the handbrake trigger. The brake hose is attached parallel to the surface of the beam arm flange, and the hose tip is screwed into the caliper using a hydraulic rod.
- Stage 8
Finally, you need to connect the brake line. Bend the brake pipe so that the tip can be positioned at the hole in the handbrake cable bracket. Insert the tip of the hose into the opening of the bracket, fasten the brake pipe to it and securely fix the structure.
Check again to make sure everything is securely fastened and screwed down. All elements must be connected correctly.
Stages of work on installing brake pads on the rear of the Priora
Considering the structure of the HAZ assembly, the hub is connected directly to the beam of the rear of the car on both sides. It has a braking disc and ensures the necessary rotation of the wheel system. The caliper, consisting of a hydraulic brake system, is also connected to the rear beam using a faceplate.
The caliper includes an integrated parking brake system or no parking brake. For sport class vehicle models, a manual brake system is not provided.
To eliminate the disadvantages of braking with the rear axle of a vehicle, remember that the best solution would be to install braking discs that have a smaller diameter compared to the front ones.
To carry out a qualitative change in the mechanism of the rear wheel braking system of a Priora model car, it is necessary to take into account three features.
- Braking discs produced for models with front-wheel drive have sizes from 13 to 14 inches, are divided into types: ventilated disc size from 14 inches (2112), ventilated disc size from 13 inches (2110), non-ventilated disc size from 13 inches (2108 ).
- The caliper is also classified into the same types, which directly depend on the discs used for installation. It comes complete with brake pads and a hose.
- If it is necessary to carry out work to attach the beam located at the rear of the machine, a faceplate is needed.
We begin work on installing the disc braking system:
- The rear axle drum brake system is dismantled. If the work becomes difficult, you can refer to the instructions for servicing the Lada Priora vehicle. Then you need to remove the hub from the lever as carefully as possible. After disconnecting the anti-lock braking system sensor (which prevents the wheels from locking when braking) from the carrier panel, you can begin to remove the brakes. Be sure to make sure that the connector is disconnected; do not forget about the fastening of the anti-lock braking system sensor.
Be sure to remove dirt from the pressure controller and all its parts, the neck of the trigger ring disk, and be sure to clean the hub axle. Poor cleaning will negatively affect further balancing. Be sure to remove the cable by first removing the screws.
- First, you need to install the adapter plate, a protective casing to prevent contamination, and also the hub axle, having previously fastened the casing to the plate in the middle, on the hub axle to the beam. Using torque screws, the bolts are secured; you need to tighten them very carefully, no more than 5.6 kgf/cm using a torque wrench that regulates the tensioning process itself. If the tension is not sufficient, the integrity of the discs will subsequently be destroyed or deformed.
- We attach the washer of the remote plastic sensor, the parameters of which are at least 9 mm. Subsequently, an ABS bracket is mounted in the launch hole and connected. It is very important to ensure that the sensors do not come into contact with the rotor; to check, just spin the brake disc, if a gap of at least 1 mm is maintained, everything is in order.
- Installing the guide caliper bracket onto the adapter plate, using locking screws and the necessary washers, and the tension must be at least 5.6 kgf/cm.
- Braking discs are mounted on the hub using two pieces of rods as guides, and a caliper is also mounted. Be sure to make sure that it is installed with the fitting facing up. First you need to coat the rod bolts with glue, insert the first one into the armhole and tighten it well. Be sure to adjust the cylinders before attaching the brake pads. Moreover, the second bolt must be tightened to no more than 2.5 kgf/cm.
- Be sure to lubricate the spring from the handbrake cable and attach it to the bracket. Only after this procedure do we fasten the following parts using a screw clamp: cable and bracket to the beam.
- Then the handbrake cable is disconnected and the protective cover is detached. Remove the cable from the caliper structure; the mount must be dismantled. Be sure to make sure that the pads move freely without interfering with the brake rotor and caliper, and be sure to note that the protruding part of the pad fits exactly into the opening of the caliper piston. Then you need to secure the cable using a protective rubber cover. Place a cable loop on the manual drive trigger. Be sure to firmly attach the brake hose, keeping parallel between the top of the flange from the beam arm, and part of the hose is screwed into the caliper system.
- The final process in the work will be connecting the brake line. The brake tube must be bent slightly so that its tip is located next to the opening of the hand cable bracket. The end of the hose is inserted into the hole in the bracket, connected to the brake pipe, and the whole structure is fixed quite firmly.
Important! Be sure to check the correct assembly of the entire structure and the reliability of the connections.
After installing rear disc brakes, before all the new parts are ground in, the coating heats up and possibly grinds. Until the mileage of the vehicle with new parts is 300 - 500 km, you should not suddenly brake, because... new parts have not yet been processed properly.
Maintenance Recommendations
After the installation of the HCD is completed, grinding and heating of the working coating may occur, which is caused by the grinding in of new spare parts. Do not try to brake hard until you have driven 350-550 km so that the new parts can get the necessary break-in.
In combination with rear brake discs, it is advisable to install Brembo MAX front discs on the Priora. This will allow you to achieve the highest quality of uniform braking. In addition, front disc brakes will give an organic and aesthetic look to your car.
Source expertvaz.ru
| 1 | To service the rear disc brakes, the machine is placed on a jack and the rear wheels are removed. The caliper fingers are unscrewed, then the bracket is attached to the steering knuckle (to simply replace the pads, the bracket attachment does not need to be removed). Next, you need to check the working thickness of the brake disc. If it is no less than 17 mm, everything is fine. |
| 2 | The retaining plates of the brake pads are cleaned, and a special lubricant is applied to the pads themselves. |
| 3 | Lubricant is introduced into the brake caliper through special holes in it. |
| 4 | New pads are installed. |
| 5 | Reassemble the entire system in reverse order. |