Niva is the legendary VAZ SUV; the first car entered the market in 1977. The Niva Chevrolet modification during the pre-production stage since 1998 bore the name VAZ2123 (Niva). Most of the components and assemblies of the new SUV remain the design development of AvtoVAZ engineers and General Motors. The idle speed sensor of the Niva Chevrolet is not a frequent consumable of the fuel supply system, but after 4–5 years of operation, drivers are faced with the problem of replacing or repairing the idle speed sensor.
Purpose of the regulator
The idle speed sensor on a Chevrolet Niva, as well as for other cars with a gasoline engine and injection system, is considered a part of the fuel supply system. The main purpose of the sensor is to stabilize the air supply when the internal combustion engine is operating at idle speed.
In this operating mode, the throttle valve remains closed; a sensor helps to correctly form the fuel/air percentage ratio, which determines how much air should pass through the intake tract at low speeds.
While the engine is running at medium and low speeds, the DHX additionally stabilizes the operation of the internal combustion engine with a significant increase in voltage from the generator, when the media, fan (stove), lights and other electrical equipment are turned on in the cabin. The idle air control operates to increase the air intake into the cylinders.
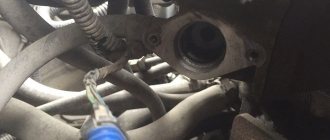
To see exactly where the idle speed sensor is located on a Chevrolet Niva, an inexperienced driver needs to study the intake manifold system. Rxx is installed on the throttle block, next to the throttle gate position controller or TPS. The unit resembles a barrel, the mounting flange is adjacent to the body and is fixed, depending on the car model, with 2-3 screws.
Types and designs of IAC in Chevy Niva
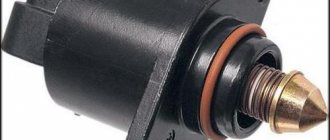
The idle speed sensor, also known as the valve or idle speed controller (IAC), is an actuator responsible for supplying air to the intake manifold to maintain idle speed within the limits specified by the manufacturer. As a rule, the IAC maintains from 700 to 900 crankshaft revolutions per minute at idle. In warm-up mode, the number of revolutions is higher.
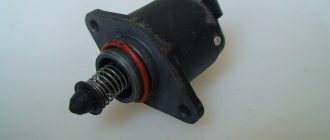
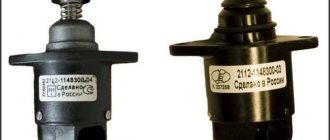
Chevrolet Niva is equipped with IAC with index 21203-1148300 , which is also suitable for other AvtoVAZ all-wheel drive models (4x4 and Nadezhda) with an engine capacity of 1.7 to 1.8 liters. The factory IAC is equipped with a stepper motor, which is connected to the valve responsible for the air supply. The valve tip is made in the form of a metal rod with a needle at the end. To increase reliability, the regulator is equipped with a steel tip, which increases its service life and allows the use of gas-cylinder equipment on the Niva.
Analogs from others, Starvolt, TSN, etc.) also have code 1148300 in the index ; the last digit is additionally added, indicating the specific manufacturer. They are also made according to a stepper motor design and may have minor differences only in appearance.
In addition to stepper IACs, there are regulators made according to a different design:
- Solenoid IACs use a solenoid that is energized with 12 volts, which retracts the core and opens the bypass channel. More air is supplied to the open channel, and the crankshaft speed increases. When the voltage drops, the channel closes and the speed drops. To maintain the desired speed, pulses are supplied at a high frequency, which causes the valve to vibrate and maintain the crankshaft speed in a given range.
- Rotary IACs have a similar operating principle to a rotary one, but instead of a core they use a rotating rotor.
Attention! Idle air regulators from other General Motors or AvtoVAZ models that do not have all-wheel drive will not fit on the Chevrolet Niva. Moreover, idle speed sensors are not suitable for engines that are not equipped with an injector.
Characteristic symptoms of a malfunction
The difficulty of diagnosing dhx for Niva is as follows - the node refers to actuators that are not stitched into the car's ECU. Hence, when a spare part breaks down, the “Check” signal on the driver’s panel does not light up. For the modification of Niva Chevrolet, VAZ2131, 2120, the original part is the sensor with catalog number 21203–1148300.
The technicians identify the most common signs of a malfunction of the supply unit; the symptoms clearly convey that the RFH is out of order.
- When stopping the car, the engine stalls.
- At idle speed when the ignition is activated, the crankshaft speed is unstable. The floating stroke is also maintained for higher gears.
- When you turn on the interior equipment (heater, air conditioning, lights), the engine speed drops significantly.
Description of IAC
Operating principle of the IAC The
idle speed regulator was installed only on Nivas with fuel injection and a mechanical throttle. When installing an electronic throttle, IAC is not used, since the entire IAC process is controlled electronically.
The regulator is designed to regulate engine speed at idle by adjusting the air supplied to the cylinder head. The IAC is a DC motor with a worm gear on the shaft, which has a cone installed that regulates the air supply through the IAC channel in the throttle assembly.
This sensor is quite unreliable, often subject to breakdown and replacement. Due to its unreliability, it was subsequently abandoned in favor of an electronic throttle.
Causes of malfunction and methods of elimination
Not always, when problems are identified, the idle speed sensor will need to be replaced; there may be other reasons that cause the actuator unit to operate incorrectly.
Lack of power. Oxidized contacts, connector failure, frayed wire stops the flow of voltage to the actuator. Before dismantling the sensor, the quality of the connection of all electrical wiring is checked, the battery terminals and connectors are cleaned.
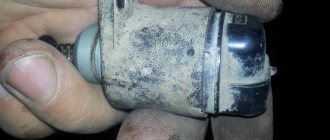
There is a dirty rod in the rxx. In 40% of cases when element failure was diagnosed, the reason was a dirty rod; dust and oil particles clog on the movable element of the regulator and stop it. It is necessary to change the air filter promptly and keep the throttle unit clean.
Electric motor burnout. This malfunction refers to a direct breakdown of the sensor, which in the circuit has a rod and an electric motor. The fault can be found after dismantling the sensor and checking it with a multimeter.
Regulator o-ring worn out. As a result, air is “drained” as it enters the cylinders of the internal combustion engine.
Rod wear. In the working unit, the rod moves smoothly with a large extension of the head; abrasion leads to incorrect air supply to form the fuel mixture.
To avoid wear and jamming of the rod, it is recommended to regularly clean the flaps with a carburetor solution; this will stabilize the operation of the internal combustion engine as a whole and prevent frequent breakdowns of the sensor.
Replacing the rear brake wheel cylinder
If during operation there are traces of brake fluid leakage on the brake drum and the inside of the wheel, replace the working cylinder.
Repairing the working cylinder often does not lead to positive results, and this requires special tools. Therefore, it is recommended to replace the cylinder assembly.
You will need: a 10mm wrench and a special wrench for the brake pipe nuts.
1. Engage first gear and install support blocks under the front wheels.
2. Remove the corresponding wheel.
3. Clean the brake pipe mounting area and the brake cylinder mounting bolts on the back side of the brake shield from dirt. To make it easier to unscrew the cylinder mounting bolts and the brake pipe mounting nut, apply WD-40 to the threaded connections.
4. Remove the brake drum.
5. Raise the parking brake lever until the upper ends of the shoes come out of the piston grooves.
6. Unscrew the nut securing the brake pipe to the working cylinder and...
7. ...plug the hole in the tube, for example with the cap of the air release valve
Unscrew the two bolts securing the working cylinder, holding it on the other side, and remove the working cylinder
After long-term use, the brake pipe nut “grows together” with the pipe into one piece, and when you try to unscrew the nut, the pipe twists and breaks.
In this case, just move the tube nut a little, then unscrew the cylinder mounting bolts and disconnect it from the tube, unscrewing the cylinder from its nut.
After disconnecting the cylinder from the tube, the mobility of the freed nut can be restored by moistening it with brake fluid and turning the nut with a wrench alternately in both directions.
10. Install the slave cylinder in the reverse order of removal.
11. Bleed the brake system (only the working cylinder on the wheel being replaced is allowed).
12. Be sure to install the protective cap on the air release valve.
Regulator diagnostics
The functionality of the unit is checked after its dismantling. Before work, turn off the power from the battery and place the car on a flat surface. Dismantling is carried out with the ignition turned off. Disassembly order step by step.
- Remove the power supply.
- Using a 19 mm wrench, remove the two fastening bolts.
- Carefully pull out the regulator.
Connect the power plug to the sensor and turn on the ignition. On a working unit, when the ignition is activated, the rod needle will noticeably move. If the rod remains in place, the element is faulty.
Procedure for removing the device
To remove this device, you need to stock up on a small set of tools, consisting of a size 13 socket wrench, a screwdriver and pliers.
- Place the car on a level surface and secure it with the parking brake.
- Next you need to disconnect the battery terminals.
- Unscrew the nuts and studs securing the receiver to the throttle valve. In this case, there is no need to disconnect the cooling and crankcase ventilation pipes.
- Disconnect the terminals from the wires.
- Using a Phillips screwdriver, unscrew the vents on the throttle valve.
- Once the device is unscrewed, you can take it out. Usually the O-ring can be removed along with it. But in some cases it may get stuck in the shock absorber.
- In this case, you need to carefully disassemble it.
But sometimes the device may work normally, but malfunctions are due to clogging. In this case, you can try cleaning it with carburetor cleaner. Typically, this method helps to revive a device that has no visible mechanical damage. But this measure does not guarantee 100% results; it is temporary, allowing you to get to the nearest service station or store with spare parts.
The idle speed of the Chevrolet Niva may be adjusted incorrectly if the sensor has a larger stroke between the valve and the supporting surface. When measured with a caliper, this distance should not exceed 23 millimeters.
Compliance with these parameters is necessary for proper installation and not damage to the throttle body.
Cleaning is required before installation. Alternatively, the O-ring can be lubricated with engine oil to facilitate installation.
Checking with a multimeter
More accurate diagnostics are carried out using a tester. First of all, the quality of the power supplied to the connector is checked. To do this, the multimeter probes are connected to the terminals of the block (chips). The voltage supplied to the dhx is within 20 V, the permissible deviation is 1–2%.
The regulator is checked by measuring the resistance on the winding. The multimeter is switched to resistance measurement mode, the tester probes are connected, the operating voltage is 52–53 Ohms, the permissible deviation is 1–3%.
In most cases, the DXH cannot be repaired, since the main malfunction is a breakdown of the electric motor and wear of the needle. The node is replaced with a new one. After replacement, it is necessary to “register” the regulator in the IAC control circuit. Original components are sewn into the ECU independently after the second engine start. It is necessary to reinstall the sensor, start the engine, stop the ignition and start the engine a second time.
Self-checking and replacing the controller takes up to 15 minutes and can easily be done in the garage. When choosing spare parts for the Niva, it is recommended to use only factory components or original replicas.
Replacing rear brake pads
The minimum permissible thickness of the friction linings of brake pads is 1.5 mm.
Replace the pads in the following cases:
– the thickness of the friction linings is less than permissible;
– the surface of the linings is oily;
– the friction lining is not firmly connected to the base;
– the linings have deep grooves and chips.
Do not use gasoline, diesel fuel or any other mineral solvents to clean brakes.
Replace the brake pads on both rear wheels at the same time. It is not permissible to replace the front and rear pads with each other, as well as between the left and right wheels. This may result in uneven braking.
Also interesting: How to remove a brake drum on a Chevrolet Niva
You will need: pliers or a screwdriver, two mounting blades.
1. Engage first gear and install support blocks under the front wheels.
2. Check: the parking brake lever must be lowered all the way down (the car is released).
3. Remove the wheel.
4. If the brake fluid level in the master cylinder reservoir is at or near it, pump out some of the fluid from the reservoir. Otherwise, when replacing the pads, it may splash out.
5. Remove the brake drum.
6. Remove the lower tension spring with pliers
7. You can remove the spring with a screwdriver.
8. Rotate the upper cup of the pressure spring 90° and...
9. ...remove it together with the spring and the lower cup.
Remove the pressure spring rod from the brake shield.
10. Remove the second pressure spring in the same way.
11. Remove the pads assembled with the spacer bar and the upper spring
12. Move the lever away and disconnect the parking brake cable.
13. Hold one of the pads with your foot, stretch the spring and remove the spacer bar.
14. Remove the upper tension spring.
15. To replace the rear shoe, unpin the parking brake lever pin.
16. Remove the washer and lever
Remove your finger.
18. Install the removed parking brake drive parts onto the new brake pad in the reverse order of removal.
To prevent the parking brake drive from seizing, lubricate the working surface of the pin with a thin layer of grease.
19. Install the pads in the reverse order of removal.
After installing the pads, bring them together by pressing them with two mounting blades.
20. Install the brake drum.
21. Press the brake pedal several times to set the wheel cylinder pistons to their working position.
22. Reinstall the wheel. Check that it rotates easily.
23. Replace the brake pads of the other wheel in the same way.
24. After installing the brake pads, adjust the parking brake system (see “How to repair the handbrake on a Chevrolet Niva”).
This is interesting: Adjusting and replacing the Chevrolet Niva throttle cable
How does the replacement take place?
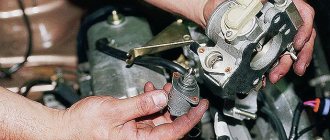
The design of the Chevrolet Niva engine allows for replacing the IAC without removing the throttle pipe . This is quite inconvenient, but possible.
Difficulties arise when unscrewing and replacing the rear regulator mounting screw . You have to work with a screwdriver at a certain angle. Therefore, you should not remove the screw after unscrewing; it is better to remove it together with the regulator. The same must be done when installing a new part: first place the screw in its hole and only then install the IAC in the damper body.
Important! We must remember that there is a sealing rubber ring. If, when dismantling a part, it remains in the socket, it must be removed. A new ring is included with the sensor. To avoid damaging it during installation, apply a few drops of clean motor oil to it.
The ability to simply replace the IAC without dismantling unnecessary parts does not mean that you always have to do just that . As a rule, the need for replacement arises after a significant mileage of the car, when the power system is already clogged with all sorts of foreign inclusions, and it is better to combine the work with flushing the throttle.
To do this, the throttle assembly is dismantled as an assembly , after which it is much easier to replace the faulty IAC, and all parts are thoroughly washed, for example, with carburetor cleaner in an aerosol can. A clean throttle will ensure high-quality and uniform engine operation at idle.
When replacing the regulator, you must remove the terminal from the battery . This is not only a safety issue during any work on the engine, but also to ensure normal calibration of the initial position of the IAC rod. Typically, sensors are sold in a cocked state, when the rod is recessed as much as possible. This can be checked by measuring the distance from its cap to the mating flange. It should not be more than 23 mm, otherwise the valve will be pressed into the seat after tightening the fastening screws and damaged.
By connecting the connector to the sensor and replacing the terminal, you can turn on the ignition . The engine control processor will immediately work out the initial position of the rod and ensure normal starting of the motor.
Smooth and stable operation of the engine at idle speed, controlled by a stepper regulator, is very important both for engine life and for traffic safety. A suddenly stalled engine can cause big trouble. Therefore, you should never delay repairs, that is, replacing this simple and inexpensive device.
Even if you manage to avoid undesirable situations on the road, subsequent breakdown and unscheduled engine repairs will cost much more than 500 rubles , which, to a first approximation, a good IAC can cost. The price, of course, is inaccurate, since the production of this device, the original number of which begins with the numbers 21203-1148300, has been mastered by many enterprises.
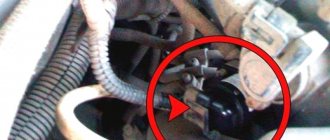
Where is the Chevrolet Niva located?
As follows from the description of the principle of operation, the regulator is located on the body of the throttle unit of the power system, at the bottom left in the direction of travel . It is located rather inconveniently, which can create problems when replacing it without a certain skill.
The IAC is placed in the housing socket and secured with two screws . Between the regulator and the body there is a sealing rubber ring that prevents air from leaking around the valve.
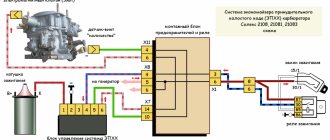
A clearly visible sector placed on the throttle axis will help you visually locate the regulator . A cable from the accelerator pedal connects to it, which is clearly visible when looking at the engine from above. There are two sensors located on the side of the throttle assembly opposite the cable. The upper one is on the same axis with the cable sector - this is the throttle position sensor (TPS). And the required IAC stands immediately below it, on the same side.