As you know, cars with an injector differ markedly from versions with a carburetor in terms of the design of the engine power system. This fully applies to both foreign and domestic cars.
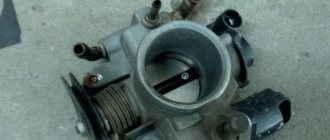
As for the popular VAZ 2110 model, the throttle valve on the VAZ 2110 is an important and critical element that requires periodic maintenance.
Next, we will look at how the VAZ 2110 throttle valve works and works and what malfunctions the throttle assembly may have. It is also necessary to pay attention to when you need to clean the throttle assembly, how to properly clean the throttle on a VAZ 2110, etc.
Throttle valve for VAZ 2110
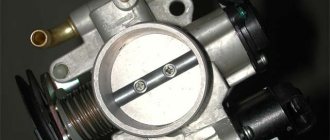
What is a throttle valve in a car? This is a regulator of the patency of the channel cross-section, which changes the amount of medium, gas or liquid flowing in the channels. It is part of the design of the engine intake system. The throttle valve is an element without which the air will not be adjusted to form a fuel-air mixture, that is, the car will not operate uninterruptedly.
At its core, it is a valve, which is also called a throttle. The design consists of the following elements: the throttle itself is presented in the form of a round plate; it can rotate 90 degrees, that is, at a right angle, fixing the closing and opening of the flow. The body of the device has a complex mechanism, since it is part of the cooling system.
The throttle valves on different types of carburetors are different:
- if the carburetor has a falling current or rapid discharge, then the damper will be in the form of a rigid plate;
- horizontal type carburetor - vertical gate valve;
- in the fuel injection system - represented as a separate unit.
The types of damper drives are: electric, mechanical. It is possible to imagine an electric throttle only in modern car models. Distinctive features characteristic of this type of drive: idle speed is adjustable, there is no mechanics between the damper and the pedal. Thanks to the use of such a drive, it is possible to influence the rotating element without any effort.
We recommend:
The VAZ 2114 starter does not turn - the main reasons
To increase the reliability and strength of the element, a module with two sensors is installed. With mechanics, things are completely different. This type of drive is found only in budget cars. There is a connection between the damper and the pedal through a metal cable. We will also warn drivers that if the position of the flap valve and its position sensor is violated, this will entail the following: the speed will fluctuate, the idle speed will increase, the car will stall when the gear is in neutral, and fuel consumption will increase. If a malfunction does occur, a signal on the dashboard will definitely let you know.
To correct this or that problem, you must turn off the ignition, remove the wiring from the sensor, and correct it using a probe. After full adjustment, be sure to check all bolts and nuts to ensure they are securely tightened.
Normal operation
Air enters through the gap formed by the damper, but the regulator does not work. A mixture formation process occurs in the fuel rail - gasoline is suspended (like fog) under high pressure. Its value is constant and is regulated using a sensor and an overpressure valve. After the mixture is formed, fuel is injected into the combustion chambers - the injectors open one by one (in fact, these are electromagnetic valves). They are controlled by an electronic unit. Their operation completely depends on the readings of the sensors and the fuel map (firmware of the microcontroller control system).
Evidence of pollution
Don't forget that the throttle valve can become dirty. Signs of this are the following criteria: the engine begins to stall, lose speed, the engine starts with difficulty, at the minimum speed of the car, jerking begins. Always check the throttle assembly for causes of problems. Damper contamination occurs in many cases. Settlement occurs on the walls of the mechanism, entering the assembly due to ventilation of gases. Another reason is poor filter performance.
We recommend:
Replacing the fuel pump VAZ 2107 - step-by-step instructions
Functions
In simple terms, without terminology unnecessary for most motorists, the throttle valve is nothing more than the gas pedal of your car.
By pressing or releasing this pedal, you thereby close or, on the contrary, open this damper.
The device provides a path for additional air to enter. When you press the gas pedal to the floor as much as possible, you open the throttle fully, so the engine speed increases.
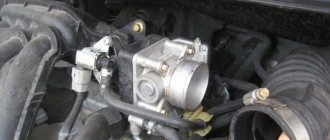
Location
Step-by-step cleaning instructions
If the damper does get dirty, it doesn’t matter; with the help of several cleaning steps, the car’s operation will be restored. Before cleaning, you must remove the throttle assembly according to the following instructions:
- remove the corrugation;
- turn off the power supply to the sensors;
- push out the “weight” that secures the pedal cable;
- disconnect the coolant pipe;
- remove the ventilation hose; unscrew the assembly fastening;
- Unscrew the idle speed control.
To clean mechanisms, special products are required, in most cases aerosol cans. The best solution for this task is a carburetor or brake cleaner.
Electronic gas pedal
On some modifications of the VAZ-2110, the throttle valve is driven by an electric motor. The idea is simple: a sensor system is installed on the pedal (most often based on a potentiometer - a variable resistor). When you press the pedal, the resistance changes, and the electronic control unit determines the position based on the signal level. Then a signal is sent to the throttle valve actuator, and it opens to a certain angle. Instead of rheostats, encoders are installed - sensors that record the angular movement of the axis. They are more accurate and reliable, but the cost is higher. In general, the reliability of an electronic damper drive is much higher than a cable drive.
Correction of a factory miscalculation
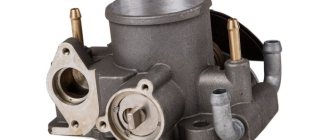
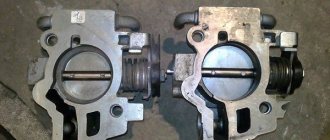
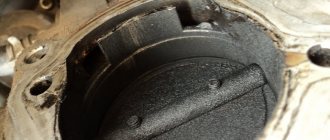
It is quite common for a throttle assembly to come out of the factory with something that cannot even be called a defect, but can still be attributed to design errors. In theory, air should flow into the space behind the throttle, for which a channel of approximately 2.5 mm is specially made.
But the whole problem is that this channel was pressed against the wall of the receiver, thus blocking the possibility of air flow. A slight modification of the throttle assembly can help in this case.
Bored channel for air flow in the throttle
To do this, just take a file and use it to make a small groove in the indicated place. 2 - 3 mm will be enough. But before doing this, it is necessary to remove the throttle.
Debugg
If you notice that the throttle has begun to perform its direct duties poorly, do not rush to go to a service station and hand over your money.
The problem with the damper can often be solved with your own hands.
Most often, a problem with the throttle occurs due to contamination, which leads to impaired functionality. To correct the situation, simply clean the element.
When Cleaning Is Required
The practice of "tens" car owners shows that on these cars the throttle becomes clogged literally just a few years after the start of active use of the car.
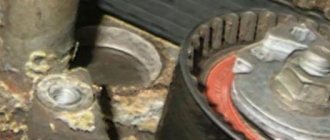
The biggest “pests” for the damper are particles of oil, dust and gases coming from the engine crankcase.
When the engine is running, dust mixes with air and oil, forming a kind of mixture that enters the throttle valve. Over time, this substance sticks to surfaces and accumulates on the idle rod.
Soon the thermal gap becomes covered with dirt, and access through the idle air regulator channel is significantly deteriorated. If you do nothing, the engine will begin to work incorrectly, the dynamics will drop, and the engine will respond late to pressing the gas pedal.
According to the recommendations in the operating manual for the domestic ten, the damper should be cleaned after every 50 thousand kilometers traveled. If you clean it in a timely manner, the throttle will last much longer and there will be no problems with the operation of the power unit.
Signs of contamination
Problems with the throttle valve can be identified by characteristic symptoms.
| Signs | Explanation |
| Engine has difficulty returning from high to low speeds | This happens when you take your foot off the gas pedal. Instead of a smooth return to the required parameters, the speed literally drops to the 400 rpm mark. The engine may stall and begin to shake. The speed can return to the desired level, but with difficulty |
| The engine is difficult to start when cold and even when operating temperature is reached | To start the engine normally, you need to turn the starter for a long time. You can identify the problem by smell. The characteristic aroma of unburned fuel will come from the exhaust pipe. Try pressing the pedal all the way down several times. This will open the throttle fully, air will flow in, and the engine will start. But in the first few minutes the engine will still stall |
Troubling the motor is a rather indirect sign, since this is how the engine can behave in various types of failure. But don't rule out problems with the throttle.
Cleaning procedure
In most cases, surface cleaning will help if the contamination is not significant. The spray is used to clean carburetors and injectors.
The process for cleaning the VAZ-2110 throttle valve (injector) is as follows:
- Remove the corrugation from the air filter and throttle valve.
- Apply the solution from a spray can to the valve.
- After 5-10 minutes, remove dirt with a brush or clean rag.
- Repeat cleaning if the dirt is not completely removed.
To completely clean the throttle valve of the VAZ-2110, you will need to dismantle it. When carrying out repairs, it is advisable to install a new O-ring and gasket. Cleaning procedure:
- Disconnect the negative terminal from the battery.
- Dismantle all pipes going to the throttle assembly.
- Unscrew the two bolts securing the damper. Remove it for further cleaning. Pay attention to whether the gaskets and o-rings are damaged and what condition they are in.
- Do not damage the sensors during dismantling. Remove them carefully, being careful not to destroy the housing and power wires.
- Spray all surfaces of the assembly, grooves and holes with an aerosol. Wait until the product gets into all hard-to-reach places.
- Wipe the body with a brush or rag. If necessary, repeat the procedure several times. This will allow you to clean the body and internal surfaces as efficiently as possible.
The platinum thread in the air flow sensor often becomes clogged, dust settles on it and interferes with normal operation. It is possible to clean the thread and grill using an aerosol. But you should not touch it with your hands or foreign objects - this will lead to disruption of the sensor. To prevent contamination of the fuel system, change the fuel and air filters promptly. The less dust gets into the mixture, the longer the fuel system elements will last - the VAZ-2110 throttle valve, injectors, air flow sensors, pressure sensors, idle air control.
Preparation
Let's start with the preparatory activities that will ultimately allow you to get to the throttle body and more and clean it properly.
- Remove the casing that is installed on the power unit.
- Unscrew the cap on the expansion tank. This will allow you to relieve excess pressure from the cooling system.
- Slightly loosen the tension on the mounting clamps, then remove the forced ventilation tube.
- Examine the current condition of the air pipe, which should also be removed and, if necessary, replaced.
- If there are significant traces of oil in the pipe, then you can be 100% sure that the throttle is definitely clogged.
- The problem is most likely in the forced ventilation duct. This is explained by the fact that contaminants in the form of gas from the crankcase and oil particles have no other way than through the ventilation branch.
- Next you need to remove the damper heating tubes. To do this, just loosen the clamps with a screwdriver.
- For a while, come up with plugs for them from improvised means - old spark plugs, some kind of non-hollow rubber bands. In short, anything that fits the diameter of the hole.
- Remove the fuel tank ventilation system hose. To do this, you must first unscrew the clamp, remove the cable and unscrew the throttle mounting nuts.
- Be sure to remove the connectors from two sensors - idle speed and throttle position. They are located on the unit being repaired, so there will be no problems with the search.
What you need for cleaning
To remove and clean the assembly you will need:
- Screwdriver Set
- Head "13" with ratchet
- Old toothbrush with stiff bristles
- Cleaner
- Cotton swabs
- Latex gloves
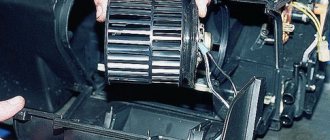
Removing the throttle on a VAZ 2110
So that you do not constantly run for the necessary tool, it is better to say in advance that to perform this procedure you will need the following:
- screwdriver with Phillips and flat blade
- 13mm wrench, or rather a socket head with a ratchet handle
- pliers if necessary
First of all, we open the hood of the car and unscrew the clamping screw of the inlet pipe - this is the same thick corrugated “hose” that goes from the air filter housing to the throttle assembly.
And also the second one - from a thinner hose that comes from the pipe:
Now you can slightly move the pipe to the side so that later, when removing it, it does not interfere with us:
Next, unscrew the three screws that are marked in the photo below:
And the fourth one, which is located below:
If for some reason the upper hoses are difficult to remove, you can use pliers, being very careful not to damage the hose.
Then you need to disconnect the plugs with power wires from the throttle position sensor and the idle speed control. This is clearly shown in the photograph below; more precisely, the result is already visible:
And all that remains is to unscrew only two nuts securing the throttle assembly to the receiver, as shown in the photo below:
We move it to the side and the assembly is removed without any problems:
And there are a couple more points - this is disconnecting and removing the throttle control cable. Everything is quite simple here:
- We remove the cable fixing bracket by prying it with a flat screwdriver
- We remove the cable from its engagement with the damper, turning it to the required torque
Cleaning Rules
Before removing and cleaning the throttle valve, you need to buy a special cleaner for it. There are many manufacturers, there is enough choice. Among the inexpensive ones, Abro is effective.
- You need to remove the engine cover (decorative plastic);
- Reduce the pressure in the cooling system by unscrewing the expansion tank cap;
- Loosen the clamps and remove the hose from the forced ventilation air pipe;
- Use a screwdriver to remove the heating hoses for the remote control (it is advisable to plug them for now);
- Disconnect the cable and unscrew the fastening nuts. Now removal of the throttle assembly is possible;
- Use a cleaner to wash everything very thoroughly. Most often, it is necessary to use a needle to check whether the forced ventilation channel is coked, and also to clean it;
- Cleaning is necessary for the idle air regulator, for which it must be removed and inspected. If you find that it is jamming and adjustment is impossible, then it needs replacement;
- After washing, reassemble everything as it was. Please make sure that the gasket is intact and in good condition, then you can leave it. If this is not the case, then only replacement.
Assembly
Installation of the remote control is strictly in the disassembly sequence, only in reverse. A cleaned remote control unit makes engine operation stable at idle, and the engine speed no longer fluctuates. There is a clear response when the gas pedal is operated. Additionally, the throttle assembly may need to be modified, but first study the video on such modifications.
Correction of a factory miscalculation
It is quite common for a throttle assembly to come out of the factory with something that cannot even be called a defect, but can still be attributed to design errors. In theory, air should flow into the space behind the throttle, for which a channel of approximately 2.5 mm is specially made.
But the whole problem is that this channel was pressed against the wall of the receiver, thus blocking the possibility of air flow. A slight modification of the throttle assembly can help in this case.
Bored channel for air flow in the throttle
To do this, just take a file and use it to make a small groove in the indicated place. 2 - 3 mm will be enough. But before doing this, it is necessary to remove the throttle.
On a VAZ 2110, the throttle assembly is removed in the following sequence:
- Disconnect the connectors of the sensor that regulates the position of the throttle valve, its drive cable and the XX regulator;
- We partially drain the coolant;
- Next is the removal of the air hose located on the body of the mass air flow sensor. Why do you just need to loosen the clamp;
- We also loosen the clamps: where the throttle pipe is attached to the air hose; where the hose of the 2nd crankcase exhaust circuit is attached to the cylinder head cover pipe. We remove the connected hoses - the air and 2nd crankcase ventilation circuits;
- Having loosened the clamp, remove the hose of the 1st crankcase gas exhaust circuit from the throttle assembly fitting;
- Having loosened the clamps, we remove the hoses supplying and discharging coolant;
- You will need a wrench with a 13mm head, with which you need to unscrew the nuts securing the throttle assembly to the receiver on a VAZ 2110;
- It is now possible to remove the throttle assembly from the studs;
- It remains to remove the sealing gasket and, if your VAZ 2110 has a system that traps gasoline vapors, disconnect the hose for purging the adsorber.
Even if the purpose of removing the throttle was to modify it, still do not forget that for stable operation it also needs periodic cleaning. To be honest, there is nothing complicated in this procedure, but it will help the engine run better, which is quite important.
For cleaning you will need:
- short and long screwdrivers;
- toothbrush (soft, or just old);
- cotton buds;
- cleaning agent;
- rubber or cotton gloves.
For cleaning to give the desired result, it must be carried out very carefully. First, you can go through all the cavities with a toothbrush, at the same time cleaning the idle speed control (it must also be removed). Further, more delicate, cleaning is done with cotton swabs. Pay special attention to the area where the throttle valve is located and the place where the XX regulator fits.
Please note that cleaning the crankcase ventilation duct with conventional means is not possible, but it can be easily done using the foot pump available in each trunk. The diameter of the fitting is similar to the wheel one, you just need to add cleaning agent and pump your foot several times.
If you have problems mentioned at the beginning that started recently, cleaning should fix them. If there were problems from the beginning, do not forget about improvements. Sometimes only replacing the throttle assembly helps.
Do-it-yourself throttle cleaning
Regarding cleaning or rinsing, very little can be said, since after removal everything is done in just a few minutes. It is enough to have a good carburetor cleaner on hand. From personal experience, I used a thing from Ombra (by the way, I also have such a tool).
I can’t say anything bad about the other products, since I haven’t used them, but with regards to this product, I have only positive emotions. Removes all soot and black deposits in seconds. The only drawback is the rapid consumption of liquid; the hole in the sprayer could be made a little smaller.
Also, it is worth noting that for high-quality cleaning it is better to unscrew and remove the TPS, as well as the IAC. After washing and cleaning, install everything in the reverse order. By the way, I forgot to mention the price of the cleaner: this volume of 500 ml can be purchased for 250 rubles.
Source
Checking the functionality of the sensor
With the ignition on, use a voltmeter to check the VAZ TPS voltage between the “minus” and the slider contact (it should not exceed 0.7 V). Open the damper by turning the plastic sector and measure the voltage again.
This time the sensor should output at least 4 V or a little more. With the ignition off, you need to pull out the connector and check the resistance between any terminal and the slider contact. As you turn the sector, watch whether the voltmeter readings change smoothly.
If they “jump,” then a replacement is necessary, preferably with a non-contact TPS.
As evidenced by the practice of a huge number of VAZ car owners, a contactless sensor will last much longer, it does not require additional adjustments, modifications, and inspection will be needed much less often.
Signs of a clogged element
You can independently verify that the damper needs cleaning based on several signs:
- car acceleration dynamics decreases;
- engine operation becomes unstable;
- when moving, peculiar jerks are observed;
- there is no smooth running.
If the above symptoms appear, the damper should be cleaned of dirt as quickly as possible. Cleaning, as we noted earlier, is quite simple, and besides, it will be much cheaper than purchasing a new element.
Dismantling
On a VAZ 2110, the throttle assembly is removed in the following sequence:
- Disconnect the connectors of the sensor that regulates the position of the throttle valve, its drive cable and the XX regulator;
- We partially drain the coolant;
- Next is the removal of the air hose located on the body of the mass air flow sensor. Why do you just need to loosen the clamp;
- We also loosen the clamps: where the throttle pipe is attached to the air hose; where the hose of the 2nd crankcase exhaust circuit is attached to the cylinder head cover pipe. We remove the connected hoses - the air and 2nd crankcase ventilation circuits;
- Having loosened the clamp, remove the hose of the 1st crankcase gas exhaust circuit from the throttle assembly fitting;
- Having loosened the clamps, we remove the hoses supplying and discharging coolant;
- You will need a wrench with a 13mm head, with which you need to unscrew the nuts securing the throttle assembly to the receiver on a VAZ 2110;
- It is now possible to remove the throttle assembly from the studs;
- It remains to remove the sealing gasket and, if your VAZ 2110 has a system that traps gasoline vapors, disconnect the hose for purging the adsorber.
Repair work
Now to the question of how the cleaning procedure is performed. For everything to go smoothly and without problems, it is enough to prepare all the necessary materials and tools in advance, place everything at hand and get to work.
To clean the throttle you will need:
- Screwdriver Set;
- 13mm wrench;
- Throttle valve cleaner.
Specialized preparations made from appropriate components are sold specifically for these purposes. Do not spare money on their purchase, since the funds will last for a long time. This is more profitable than changing the damper every time.
Preparation
Let's start with the preparatory activities that will ultimately allow you to get to the throttle body and more and clean it properly.
- Remove the casing that is installed on the power unit.
- Unscrew the cap on the expansion tank. This will allow you to relieve excess pressure from the cooling system.
- Slightly loosen the tension on the mounting clamps, then remove the forced ventilation tube.
- Examine the current condition of the air pipe, which should also be removed and, if necessary, replaced.
- If there are significant traces of oil in the pipe, then you can be 100% sure that the throttle is definitely clogged.
- The problem is most likely in the forced ventilation duct. This is explained by the fact that contaminants in the form of gas from the crankcase and oil particles have no other way than through the ventilation branch.
- Next you need to remove the damper heating tubes. To do this, just loosen the clamps with a screwdriver.
- For a while, come up with plugs for them from improvised means - old spark plugs, some kind of non-hollow rubber bands. In short, anything that fits the diameter of the hole.
- Remove the fuel tank ventilation system hose. To do this, you must first unscrew the clamp, remove the cable and unscrew the throttle mounting nuts.
- Be sure to remove the connectors from two sensors - idle speed and throttle position. They are located on the unit being repaired, so there will be no problems with the search.
Cleaning
There is nothing difficult about cleaning the throttle valve. This procedure can be easily done with your own hands, without involving specialists from car services and without spending extra money.
- Using the purchased throttle cleaner, clean the channels and the entire disassembled assembly;
- Rinse the engine's forced crankcase ventilation duct especially carefully, since this is where the largest amount of pollutants comes from;
- Use sharp objects if you want to carry out the work responsibly and as thoroughly as possible. A simple knitting needle will do;
- Remove the idle air control. To do this, simply unscrew a couple of bolts;
- Be sure to wash the unit thoroughly;
- Check the condition of the rod. If it is heavily soiled or there is play, the element is easiest to replace. It's not expensive;
- Inspect the current condition of the gasket. If the gasket is damaged, be sure to buy a new one. Even if it is in satisfactory condition, we advise you to make a replacement once you have begun to dismantle this unit;
- After washing the throttle assembly elements, return all its components to their places, proceeding in the reverse order.
If you follow the recommendations, use special cleaning products and do not rush, after the washing procedure all problems with the gas pedal will disappear, the engine will again clearly respond to your “commands”.
As you can see, cleaning the throttle is quite simple. The most difficult stage can only be called disassembling the unit. And then, in the confident hands of a master, even a beginner, everything will go smoothly and without mistakes.
Source
Superficial intervention or deep cleaning?
There are two ways to clean the throttle valve. The first is a superficial intervention that does not require complete removal of the entire device. And the second is a complete cleaning, which must be performed in cases where your car’s engine is not working well.
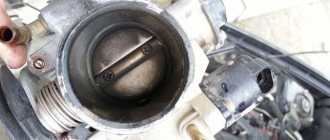
To perform the first type of cleaning, you will need a pre-purchased cleaning product and a fine brush. Open the hood, remove the corrugation, it goes from the air filter housing to the throttle valve. You will see a valve - it is easy to recognize by its completely round shape. Treat it with a chemical and let it sit for a few minutes, then remove the dirt with a brush. If necessary, use a rag. Repeat the procedure several more times until the flapper valve turns a bright color. This work can be carried out once every 3–5 thousand kilometers, fortunately, it does not take much time.
Removing the corrugation from the throttle valve
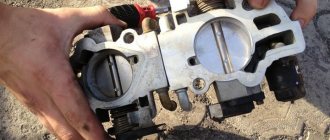
For more detailed cleaning of the throttle valve in a VAZ 2110, you need to completely remove the entire injector mechanism. It is also recommended to replace the gasket and O-ring, which are included in the throttle valve repair kit, which is easy to buy at any auto store. Before starting cleaning work, remove the terminals from the battery.
Then disconnect all air pipes connected to the throttle body. After this, remove the fastenings of the throttle cable and unscrew the throttle valve itself. It is attached to two bolts that are screwed into the engine housing. Electronic sensors must be disconnected carefully to avoid damaging them.
Disconnecting the air pipes of the throttle assembly
After that, take a chemical and treat the entire body and all the grooves of the throttle body. Do this until you completely get rid of the dirt. You can also clean the air flow meter sensor. To do this, carefully treat its hairs with a cleaning product and remove the dirt with a brush. Give the entire device time to dry completely before reassembling. Do not forget to change the gasket and ring, which are located in the corrugation. Also pay attention to whether all air pipes are intact. Perhaps some require replacement with new ones. For maximum effect, you can also replace the air filter.
Didn't find the information you are looking for? on our forum.