On the Lada Granta, the cable-driven clutch is a fairly reliable element. However, the drive itself wears out quite actively during the operation of the vehicle, resulting in:
- Grant's clutch cable stretches and breaks (the problem is solved by replacing the clutch cable);
- the Grant clutch is also adjusted (the required pedal travel and the moment of “grabbing” the clutch are set);
It is important to take into account a number of nuances both when removing the old cable and when installing and subsequently adjusting the new cable. Read more in our article.
Clutch cable: how the drive works
Cars can be equipped with two types of clutch engagement and release drives:
- mechanical cable drive;
- lever hydraulic drive.
At the same time, cable clutch release is widely used on budget cars with front-wheel drive. This is exactly the clutch cable installed on the Grant by the manufacturer. This cable is responsible for connecting the pedal to the fork.
On a Lada Granta, the clutch in good condition operates with medium hardness, as the manufacturer tried to balance the settings. The clutch pedal of the Lada Granta cannot be called too light, there is a certain rigidity, but the clutch is not too tight either.
When the driver presses the clutch pedal, the fork moves. In turn, the fork retracts the clutch disc (the clutch disengages), the engine and transmission are disconnected, due to which the Lada Grant’s clutch “opens”, and you can change gears softly and smoothly.
Review of Manufacturer Prices
| Manufacturer | Price, rub.) | Resource (Thousand km) |
| LADA 21901-1602210 Lada Granta hatchback liftback original | From 634 | 100 |
| ASPCC260210 | From 465 | 75 – 80 |
| BRAND 219011602210 | From 300 | 75 — 80 |
| Plastic cable lead 21901-1602266-00 | From 150 | 40 |
| 21901-1602210-00 clutch cable assembly | From 550 – 600 | 75 |
| 21901-1602210-00 clutch cable assembly | —/— | 75 |
| JSC "ProSport" 26594516 | From 500 | 80 – 85 |
| JSC Vortex 5465465 | From 550 | 80 — 85 |
*prices are current as of October 29, 2018.
Recommendations for the selection of parts and components
The vast majority of spare parts for the Lada Granta are domestically produced. Foreign analogues are not in demand due to their high cost. Compared to “our” products, imports are 10–15% more expensive. The workmanship is at the same level.
When purchasing spare parts and components, always give preference to high-quality, original parts. Check the correspondence of catalog items with the actual data specified in the operating instructions for the technical device.
If you have no experience in car maintenance, seek qualified assistance from service station specialists.
When is it necessary to change the clutch cable?
As a rule, replacing the cable is necessary when it breaks or is stretched too much (adjusting the cable does not allow normal operation of the clutch).
In this case:
- the clutch pedal becomes tight;
- the pedal stroke changes;
- squeezing the clutch is also difficult;
- the clutch pedal falls to the floor;
As a result, gears are difficult to engage, and a crunching noise may appear in the gearbox when shifting. Please note that ignoring the problem, as well as active attempts to “stick” the gear with a crunch while driving and other efforts that the driver makes when trying to change gears with a faulty clutch, can cause severe wear of the synchronizers and other elements of the gearbox. This means that there is no need to delay replacing the cable.
Moreover, this procedure is not complicated and can be done with your own hands in a regular garage. The only caveat is that you have to work in the area of the pedal assembly, which is not entirely convenient (the fuse box and power steering are in the way).
Symptoms of malfunction, diagnostics, solutions
| Sign | Cause and remedy |
| Short pedal stroke | Adjust the length of the cable. Check the integrity of metal fibers. Most likely delamination or bending. |
| The clutch drags at speed, it is difficult to shift into higher gears. | The flywheel is bent or damaged. The gripper teeth are worn. Replacing the flywheel and related consumables. |
| Slipping when activating first gear and increasing speed with the accelerator pedal. | Replace friction linings, disk, clean the drive from old grease |
| Sharp jerks when turning on / changing gears. | The pressure plate is damaged, replace the basket. |
| Whistle when activating first and subsequent speeds | Install a new release bearing |
| Crackling, knocking, crunching noise when shifting into up/down gears | Wear out the damper spring, replace it with a new one, lubricate the entire drive mechanism. |
| The lever falls, falls, rattles | Excessive stretch of tensioner. Replace with a new one, install bushings. |
Adjusting the hand brake of the Lada Granta
What tools will you need?
If the Grant clutch pedal is too tight or, conversely, has completely failed, and the Grant clutch does not work properly, you will need to change the cable. By the way, a breakdown of the clutch fork will lead to exactly the same symptoms.
To replace the clutch cable you will need:
- open-end wrench at “8”, as well as at “10”;
- a knob (for the end cap) and a knob attachment “10”;
- a pair of Phillips screwdrivers (wide and medium), a flat screwdriver;
- ruler and caliper or ruler
It is also necessary to purchase a new clutch release cable for the Lada Granta and prepare a Litol type lubricant. You may also need a bushing for the clutch cable adjustment mechanism if this element is severely worn or damaged.
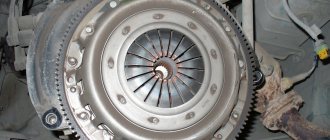
How do I replace the clutch assembly or its components?
Many are also interested in the question of how the clutch is replaced. Next, we will consider the features of replacing a disc or other elements in the clutch units of Lada Granta, Prior and Kalin. Choosing a clutch is not difficult, since the market is represented by many offers. This aspect is influenced not only by individual preference, but also by the price factor.
The disc replacement process is identical, regardless of the modification of the designated VAZ models, including the Lada Granta. Having decided on the choice of element, we proceed to the direct replacement procedure.
- The initial action will be to dismantle the LADA Granta transmission unit.
- If you plan to reinstall the pressure plate (basket), you will need to first mark the location of the flywheel and housing. This manipulation allows you to save balancing and install the disk in a position identical to the element previously located here.
- Next, we mount a special bushing (mandrel) into the central hole of the pressure element. If such a mandrel is not observed, then it is possible to dismantle the assembly without it, but you will need to hold the driven disk during removal in order to prevent it from falling out.
- To eliminate the risk of the flywheel turning, we arm ourselves with a locking component (screwdriver or mounting blade).
- We unscrew the 6 bolts that hold the basket on the flywheel. The action should be characterized by uniformity and without completely removing first one screw, then the second, etc.
- Now we remove the casing together with the driven disk.
- Having detected the presence of damage on the surface of the assembly elements, the next step is a complete replacement of the clutch.
- We focus special attention on the degree of wear of the friction linings on the disk in LADA Granta. When it is discovered that they are oiled or the rivets are deepening, we urgently replace such an element. We check the rigidity of the damper springs. If they are found to be damaged, the disk must also be recycled. We inspect the disc for runout. If its value exceeds 1 mm, then this fact means the part is unsuitable for use.
- We inspect the pressure element and the flywheel, especially the plane of their contact. Areas with scuff marks, signs of overheating and wear are strictly unacceptable.
- We study in detail the condition of the disc spring, on the surface of which traces of the indicated defects are also unacceptable. The contact points of the petals of this part to the bearing device (“release”), which carries out the process of disengaging the clutch of the disc with the flywheel, must be in a single plane. No defects are appropriate in this case, and the discrepancy should not exceed 0.8 mm. If this parameter is not maintained, then a complete replacement of the clutch is necessary.
- Don't forget to inspect the spring support rings. It also excludes the presence of any defects.
- When, based on the completed set of testing manipulations, the fact of the need to replace certain elements of the clutch assembly or the entire assembly structure has been identified, then before starting work it will be necessary to monitor the characteristics of the movement of the driven disk along the corresponding section of the transmission unit shaft. If, during movement, the fact of jamming, jamming, or other aspects that do not allow free movement of the disk emerges, then these negative factors must be eliminated without fail. When achieving such a result is not possible, you should resort to replacing the entire list of defective parts.
- When carrying out the installation procedure, it is imperative to take into account the issue related to the correct installation of the driven disk in relation to the pressure component of the basket.
- First, we center the disk, using the mandrel we previously designated for these purposes. This will require careful consideration to ensure the element is positioned correctly in relation to the flywheel.
- Now we fix the basket directly to the flywheel using the bolts indicated here. We proceed by analogy with the dismantling procedure in terms of ensuring reliable retention of the flywheel from the risk of turning.
- Do not forget about the correct tightening of the basket fixing bolts. The procedure involves an algorithm of actions with uniform screwing of each of the fasteners. It is impossible to fully tighten one particular bolt, since such an action may cause the basket to skew, thereby causing incorrect operation and uneven wear of the clutch elements.
- The next step involves removing the previously installed mandrel from the corresponding recess in the center of the flywheel.
- After this, you can attach the transmission unit to the engine block.
- Now we mount the lower end of such a part as the clutch cable to the corresponding bracket on the gearbox housing, after which we carry out the previously indicated adjustment. Do not forget to install the compensation device in its original position, which will allow you to return the clutch cable to its original position. This procedure is necessary so that the compensation device, shifted to its lowest position, can signal to the owner that the disc is worn out. Replacement of the clutch cable in the LADA Granta has been completed.
How to remove the clutch cable of a Lada Granta
Having prepared the tools and the Grant clutch cable for replacement, you can proceed to the replacement. The initial step is to remove the old clutch cable. To do this, do the following:
- First, in the cabin under the dashboard, using a 8mm wrench, unscrew the nut securing the cable braid bracket to the pedal assembly bracket. Then, using a Phillips screwdriver, you need to pry the spring bracket and remove it from the groove of the clutch pedal finger.
- The next step is to remove the eyelet of the automatic cable length adjustment mechanism housing from the clutch pedal pin, after which you need to remove the upper part of the cable from the pedal assembly bracket.
Now you need to move to the engine compartment, from where the cable is pulled forward, the cable lead is removed from the groove of the clutch release fork lever (for convenience, remove the air filter housing). - By rotating counterclockwise, the leash is unscrewed from the threaded end of the cable;
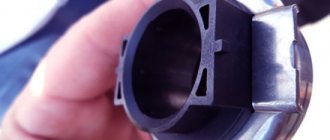
- Next, the protective rubber cover is removed from the tip of the cable, after which the tip of the cable sheath is removed from the hole in the bracket at the gearbox.
- Now, inside the car, the cable sealing cover is removed from the hole in the engine shield, after which you can pull the cable into the passenger compartment.
- After removing the cable, you need to check the general condition of the plastic bushing on the pedal pin. If the bushing is worn, it needs to be replaced. You should also lubricate your finger with Lithol.
Replacing the Grant clutch cable
Having completed the removal of the old cable and preparation, you can proceed to installing a new Grant clutch cable. Installation is carried out in the following order:
- a new cable is threaded through a hole in the shield from the passenger compartment and brought out into the engine compartment;
- then the sealing cover is installed in the hole of the shield;
- Next, you need to put the automatic cable length adjustment mechanism on the pedal pin, after which the mechanism is secured;
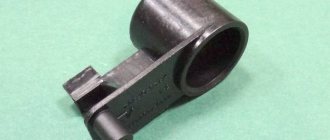
- Now you need to screw a plastic leash onto the threaded end of the cable (it is important to do this so that the end of the cable tip is flush with the end of the leash);
- After that, the leash is inserted into the groove of the clutch release fork lever.
Installation of clutch cable VAZ 2190
Procedure:
- Pass the cable through the hole in the bulkhead, secure the wear compensation mechanism housing to the clutch pedal pin.
- Attach the cable sheath stop to the pedal bracket stud.
- Install the cable sheath seal into the hole in the front panel.
- Pass the cable through the hole in the gearbox bracket and install the guide sleeve of the cable sheath into this hole.
- Screw the leash into the lower tip of the cable, ensuring that the tip protrudes relative to the end of the leash by 0-1mm.
- Set the clutch cable to its original position, for which, overcoming the force of the mechanism spring, move the lower tip of the cable all the way forward in the direction of movement of the car.
- Insert the end of the cable into the groove of the clutch release fork and lower it.
- Under the action of the spring, the tip driver should be installed on the fork without any gap.
Clutch drive adjustment
After installing the cable, it is necessary to adjust the clutch drive. To do this, the cable is pulled forward by the threaded end until it stops (you need to overcome the force of the clutch pedal spring). Next, the cable is held in an extended position.
The adjustment looks like this:
- Using a caliper, measure the distance from the end of the plastic guide to the clutch fork lever (the norm is 27 mm).
- If deviations are noticeable, you need to obtain the desired distance by rotating the leash.
We also recommend reading the article about why the clutch slips. From this article you will learn about the main causes of clutch slipping, as well as how to repair this problem. - When there is no load (the cable is released), it is necessary to ensure that the leash is adjacent to the fork lever without any gap.
- Next, you need to press the clutch pedal 2-3 times for the automatic cable length adjustment mechanism to work. Then you need to measure the full travel of the clutch pedal, which should not exceed 146 mm.
Having completed the adjustment, you can replace the air filter housing. After installation, you can check the quality of the clutch and drive while driving. Please note that if the clutch on the Grant is selected incorrectly or is badly worn, there are problems with the gearbox, etc., replacing the drive cable will not solve the existing problems with the smoothness and clarity of gear shifting.
Malfunctions of the clutch mechanism in a car
The most common cause of a malfunction in the clutch system is the clutch disc, since it is the most actively functioning part here.
Possible problems with the clutch mechanism are presented below:
- Pressure disk and release bearing: breakage/curvature of the diaphragm spring of the pressure, release disk;
- twitching when the clutch operates;
- instability of the pressure plate.
- Clutch drive:
- hydraulic drive – lack of tightness of the system, malfunction of the working cylinder;
- systems with a cable - the cable lengthened and it broke;
- Manual transmission with electric drive - software disorder in control, breakdown of the actuator electric motor.
- Driven disk:
- friction linings are oily;
- friction adjustments are out of order/damaged;
- Damper springs are broken/deformed.
It is noteworthy that the problems arising in the clutch system cannot be considered insignificant. They usually modify quite quickly from “the car is acting a little strange” to “the car is not moving.” For this reason, it is necessary to immediately eliminate existing problems in the system.
You can determine if the clutch cable is faulty by paying attention to the traffic:
- the clutch pedal starts to bother you;
- the free play of the clutch pedal increases;
- no gear shift when the engine is on.
After diagnosing the vehicle for possible causes of the malfunction, repair work must be carried out. To do this, it’s time to contact a special service center or carry out repairs yourself. In the second case, you will need to first study the necessary information regarding this topic.
Before carrying out work, it is recommended to remove the air filter housing for greater convenience.
Recommendations
- As a rule, the clutch “disappears” when the clutch fork breaks or the cable breaks.
In such a situation, you can drive your car to the service center without using the clutch pedal. To do this, turn off the engine, engage first gear, then start with the gear engaged. To upshift, you need to re-gear, and to downshift, you need to wait until the engine speed drops to suitable values. We also recommend reading a separate article on how to drive without a clutch. In this article you will learn how to get to the repair site with a broken clutch. - Usually the cable threads break at the base of the pinch.
Some car enthusiasts attach the clutch cable lead to bearings to avoid bending it. The result is increased reliability and increased service life of the cable. When replacing the cable, the plastic insert is removed from the old cable and placed on the new cable. If this is not done, the plastic on the new cable will quickly break. - If the Grant clutch is being replaced, the gearbox or engine is being removed, experienced car enthusiasts recommend replacing the clutch cable if the cable has traveled more than 30-40 thousand km. Also on the Granta, clutch adjustment and inspection are necessary if even minor problems appear with the clutch pedal or difficulties with gear shifting.
Replacing the Grant clutch cable: step-by-step instructions
So, the process of replacing a necessary part on a Lada Granta includes the following manipulations:
- Remove the nut securing the cable sheath holder to the pedal assembly holder, located under the instrument panel. An 8mm wrench is used here.
- Remove the spring clip from the clutch pedal pin groove by carefully prying it up with a Phillips screwdriver.
- Remove the eye of the cable length adjustment mechanism housing (automatic) from the clutch pedal pin. Pull the cable with its upper part out of the pedal assembly bracket.
- Remove the cable guide from the groove of the clutch fork lever, which is located inside the engine compartment. To do this, you will need to carefully pull the cable forward.
- Unscrew the leash from the thread of the cable end.
- Release the cable end from the protective cover. It is rubber, so this will not be difficult to do.
- The end of the cable sheath is installed inside the bracket on the gearbox. You need to get it.
- Remove the cable sealing cover located inside the front panel in the passenger compartment. Pull the cable slowly into the interior. At this stage, experts strongly recommend checking the plastic bushing on the pedal pin. If a part is worn out, it would be better to replace it. If it is in perfect order, just lubricate it with a plastic product.
- When replacing the Grant clutch cable, perform the following steps:
- insert the cable from the passenger compartment into the engine compartment, doing this through the hole in the front panel;
- close the shield hole with a special cover for sealing;
- attach a mechanism to the pedal pin that allows you to adjust the length of the cable automatically and secure it properly;
- screw the plastic leash onto the end of the cable so that the end of the cable end is located flush with the end of the leash;
- hide the protruding guide inside the groove of the clutch fork rod;
- Adjust the clutch drive as required.
- Remove the cable, holding it by the threaded end, until it stops. Here the clutch pedal will interfere with this process, so force must be applied. After removing the cable, you must hold it in this position.
- Determine the distance between the end of the plastic guide and the clutch release fork lever using a caliper. The distance should not exceed 27 mm.
- Remove the load or release the cable so that the leash takes its place near the fork lever. There should be no gap if installed correctly.
Having completed all the manipulations, press the clutch three times so that the cable length adjustment mechanism is automatically activated. Install the air filter housing.
Source
All steps from start to finish
Open the hood and find the gearbox. The starter will be located nearby. All nodes are covered with a filter that needs to be removed:
- Disconnect the negative terminal of the battery (key “10”);
- We disconnect in turn: the mass air flow sensor connector (oval), the adsorber valve (we press the tongue from below). We also loosen and remove the fastening tie for the “thick wire”;
Getting rid of unnecessary details
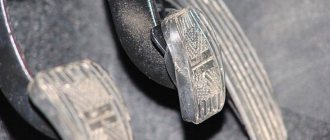
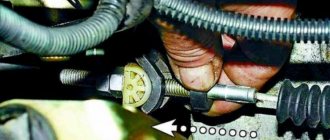
A “fork” will be attached to the top of the crankcase - a bent plate with a slot. This is the clutch fork (see photo).
Found the most important detail
Using pliers wrapped in electrical tape, try to pull the tip forward.
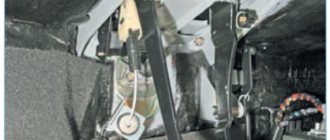
Clutch adjustment on Lada Granta (first method)
Here we will look at how to adjust the clutch on a Lada Grant:
- Grasping the end of the cable, pull it forward as far as it will go.
- Using a caliper, measure the distance from the fork to the plastic leash. The distance should be exactly 27 mm.
If everything is set up and checked, measure the clutch pedal travel.
We measure the free movement distance
The distance from the “top point” to the “bottom” should not exceed 146 mm.
If at the last stage it turns out to be more than 146, then the cable needs to be replaced.
Alternative clutch adjustment method (second method)
No calipers are needed here:
- Carry out step 1 as indicated above - pull the tip forward.
- Let go of the tip and look: if the leash does not fit tightly to the fork, screw it onto the rod.
- Press and release the pedal (3 times), repeat steps 1 and 2.
Reviews
| № | Positive |
| 1. | Vasily: I have been using the car for more than a year, there are no complaints about the quality of work, the mechanisms work properly. During the second maintenance, the technician lubricated the clutch cable because it began to squeak. |
| 2. | Kirill: Two years have passed since the purchase of the car, I have not made any investments, except for the purchase of consumables, oils, filters. |
| 3. | Ivan: at 55,000 km the clutch cable squeaked, I lubricated it myself, I didn’t contact the service center. I blame it not on the defect, but on the weather conditions, since the car is parked outside all year round. |
| 4. | Gennady: two years of driving a car without breakdowns or repairs. I am satisfied with the quality of manufacturing of domestic equipment, parts are available, wide range. My recommendations for Lada Granta drivers. |
| 5. | Vladimir: I have already completed four maintenances, no comments from the technician, only replacement of consumables, filters, oil, antifreeze. I believe that a non-aggressive driving style and high-quality spare parts are factors in the long life of the car. |
| 6. | Kirill: after 60,000 km, a metallic rattle of the cable appeared, I didn’t contact the service center, I fixed the defect on my own. The oil filling process is not complicated, and can be done by a motorist. To reinforce my knowledge, I read the recommendations in the operating instructions. |
| 7. | Dmitry: a year has passed since the purchase of the car, there are no comments on the work. I systematically carry out inspections, fill in high-quality fuel, drive carefully, and do not exceed the speed limit. |
| Negative | |
| 1. | Nikolay: my cable broke already at 35,000 km. Even for a domestic car this is too short a time. Comrades recommend purchasing a tensioner from a VAZ 2110. However, the standard fasteners do not match, you need to drill an additional one. |
| 2. | Gennady: the car began to fall apart already at 50,000 km. mileage In six months, I visited the service station three times for preventive maintenance, computer diagnostics, and replacement of worn-out elements. |
| 3. | Vladimir: over the two years of operation of the machine, he repeatedly carried out repairs, replacement of parts, and diagnostics. The quality of the components is low, I do not recommend purchasing a Lada Granta. |
List of online stores selling parts (Moscow, St. Petersburg, Kyiv regions)
| № | Name | Address |
| 1. | "Doka-Market" | doka-market.prom.ua/ |
| 2. | "Ukrparts" | ukrparts.com.ua/ |
| 3. | "Amperavto" | https://amperavto.ru |
| 4. | "Grantauto" | www.grantauto.ru |
| 5. | "How much" | www.avtostore.spb.ru |
| 6. | "Online auto parts store Z24" | z24.blizko.ru/ |