Print this article Font size 16
Replacing or adjusting the clutch cable is a fairly common, sometimes routine procedure for owners of the VAZ 2109. This article will help you save money and perform the operations yourself.
Where is the VAZ 2109 clutch cable located?
Part of the cable is attached to the clutch pedal. While the second part of the cable is attached to the left side of the engine compartment.
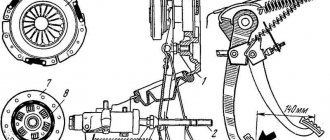
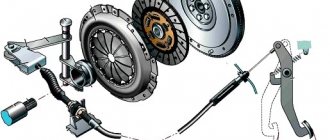
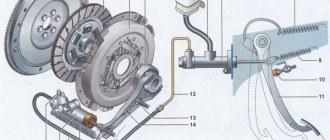
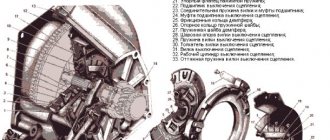
The AvtoVAZ clutch cable is one of the main components of the mechanical drive; it is the connecting element of the pedal and fork. The clutch cable itself is placed in a sheath that is protective from mechanical influences. When the driver presses the pedal, force is applied through the clutch cable to the lever transmission. The latter facilitates the movement of the fork and also allows for optimal clutch release.
Where is the VAZ 2109 clutch cable located?
The cable is a very capricious and unpredictable detail. It can work for years, but sometimes it doesn’t last even a week or two. It starts to creak or even breaks. Most questions about why this happens should be asked to the manufacturer who did not manufacture this part well. Naturally, no one is immune from such an unpleasant surprise.
A few words about the clutch cable drive
Foreign automakers extremely rarely equip their cars with such a clutch drive, preferring more reliable hydraulics that rarely fail. But on vehicles of Russian manufacturers, cable clutch mechanisms are standard. And this despite the fact that they have a lot of real shortcomings, which are well known to owners of domestic cars.
The clutch cable needs constant adjustment during operation, which is due to the natural operating wear of the clutch drive. It quickly becomes covered with rust, breaks off at the most unexpected moments, and so on. It is for this reason that every driver driving a car with a manual transmission is simply obliged to know what to do if the cable that interests us fails.
We will talk further about how to change and adjust the cable mechanism. Now let’s describe it in a few words. The cable is connected to the clutch pedal using screws, its other end is also fixed with a screw, but to a special bushing in the shield. In this case, the cable is screwed to the pedal as tightly and reliably as possible, and to the bushing more freely, due to which the described mechanism rotates on the axis without any serious difficulties. In addition, a stop must be installed under the pedal, which protects the cable from breaking.
Replacing the clutch cable of a VAZ 2109
The clutch cable may need to be replaced and adjusted. How do you know what to do with it?
- The cable will need to be replaced in this case: if it breaks (usually the break occurs near the clutch pedal). Everything is very clear here, the cable has broken, the clutch pedal is dangling back and forth, it is impossible to squeeze the clutch or engage a gear.
- The second reason why it needs to be urgently replaced is the breakage of some of the cable threads. In such cases, the gears will shift poorly (especially forward and reverse gears).
- Third reason: Characteristic creaking of the cable when pressing the clutch pedal. Since the protective sheath of the cable is released, moisture gets in, corrosion forms and, in addition to an unpleasant squeak, the clutch pedal becomes much harder than during normal cable operation.
- The clutch cable will need to be adjusted if: the clutch pedal moves incorrectly, that is, if the pedal moves too little or too much, which is not normal.
The cable also needs to be adjusted if the clutch pedal is located at a different level with the brake pedal, which also does not correspond to the norm.
Preparing for work
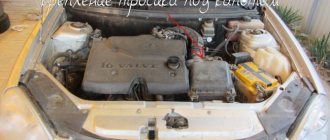
Initially, it is recommended to find a place where it is most convenient to inspect the car and replace the part. Since you will have to work not only under the hood, but also under the car, the best assistants will be a lift, pit or overpass. If you do not have the opportunity to use one of these options, you can simply raise the car using jacks.
Also, before starting work, you need to make sure that you have everything you need at hand. To replace the cable you will need:
- new part;
- set of wrenches;
- screwdrivers.
On average, you can replace this element on a VAZ-2109 yourself in 20 minutes.
Step-by-step instructions for adjusting the clutch cable
- Take 2 wrenches. With their help, you must loosen both nuts securing the end of the cable sheath.
- Next, by rotating these nuts, tighten the clutch cable so that the pedal stroke is 125-135 mm. The main thing is that it is level with the clutch pedal.
How to replace the clutch cable on a VAZ 2109 you ask. This is done in stages (further it will be written in stages): When replacing the clutch cable, you may need a plastic bushing from it!
Catalog number of the plastic bushing for the VAZ 2109 clutch cable: 2108-1602096. Of course, it is difficult to find such a bushing for sale. It will be easier to buy a repair kit.
- First we need to remove it. Let's get started: Using two wrenches, loosen both nuts that help secure the cable sheath to the bracket.
- Next, you should slightly lift the cable by hand and remove it from the socket.
- Then disconnect the clutch cable guide from the release fork.
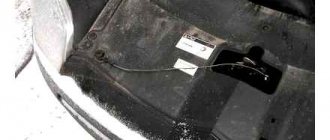
- When the cable is disconnected from the entire car system in the engine compartment. After this, go into the car interior, then use a screwdriver to pry the pedal pin bracket and then remove it.
- Now disconnect the upper end of the cable from the pedal pins.
- And at the end of the replacement, go to the engine compartment and remove the clutch cable through the front panel.
Reasons for replacement
Typically, on a VAZ 2109, replacing the clutch cable is necessary if:
- The clutch is not working properly. That is, it is difficult for the driver to press the clutch pedal, as a result of which the car is difficult to start.
- The gearbox is also acting up. In addition to the fact that it is difficult to switch, it also makes sounds that are not entirely understandable during its operation.
- The clutch pedal has fallen down and does not return to its original position.
Note: however, these “symptoms” may indicate the presence of other problems, so a complete diagnosis of the car is necessary.
Replacing the clutch cable of a VAZ 2109
Note: It is better if the cable breaks rather than the fork breaking. Indeed, in some cases, the pedal fails due to a faulty fork, and replacing it costs much more than replacing a cable (a new cable costs about 200 rubles, and a new fork costs about 2000 rubles)
How to install a clutch cable on a VAZ 2109
The note! The new clutch cable is installed in the reverse order as in removing it. But below we will provide you with a step-by-step installation.
- Insert the new cable through the hole in the shield.
- Next, inside the car, install the upper end of the cable onto your pedal pin, and secure it all with a locking bracket.
- Then, in the engine compartment, place the cable lead on the fork. After this, insert the cable between the bracket and then tighten both nuts securing the tip of the cable sheath. (After installation, you need to adjust the clutch cable. Instructions above).
After this, press the clutch pedal just a few times. If the position of the pedal has changed, turn the nuts again and adjust the pedal. Press again, if all is well, then tighten the nuts completely.
Don’t forget to also put the air filter and adsorber housing in place, if you removed it, of course.
The note! After replacing the clutch cable, it must be adjusted! And so let's move on to the next important issue about the clutch cable.
Adjustment
VAZ 2109 clutch cable
It is mandatory.
Clutch cable adjustment
VAZ 2109 clutch cable
You can adjust the cable like this:
- Loosen the locknut. This will allow the adjusting nut to move.
- Tighten the cable with the tension nut (pull until the machine wobbles). In this case, you can press the clutch from time to time.
Clutch pedal adjustment
The clutch cable on a VAZ 2109 broke
After any manipulation of the clutch pedal, it must be adjusted, otherwise it will jam. To do this, you must:
- Unscrew the nut located under the pedal.
- Tighten the locknut, which is located slightly lower.
- After this, tighten the first nut.
- Tighten the rubber washer to the fork as much as possible.
Note: The clutch pedal should be lower than the brake pedal. If it is higher, it will wear out too quickly.
Replacing the clutch cable can be done right at home. That is, everyone can fix this problem with their own hands. The price for home repairs will not hurt your wallet, as it will be significantly lower than what is offered in car services. However, before you start replacing it, you should review a lot of photos and videos on this topic. Detailed instructions describing this process will also be very helpful.
Add a commentAdd a commentWe recommend readingVAZ 2112: replacing the clutch cable quickly and easilyVAZ 2110: replacing the clutch cable in a garageReplacing the clutch cable on a VAZ 2110 on your own
Such malfunctions in the clutch operation as “the clutch is moving” and “the clutch is slipping” can happen due to a failed clutch drive cable (it is pulled out or frayed and stuck in the sheath).
In addition, a faulty clutch cable can cause the clutch to completely fail to operate (for example, a broken cable tip). On VAZ 2108, 2109, 21099 cars this is one of the most common malfunctions. In any case, the faulty clutch cable must be replaced.
The procedure for replacing the clutch cable of VAZ 2108, 2109, 21099
Remove the old clutch cable.
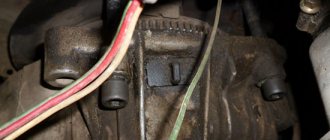
— Disconnect the end of the cable sheath from the bracket on the clutch housing
To do this, loosen the tightening of the nut (lock nut) securing the end of the cable sheath to the bracket (you will need two 17mm wrenches). And remove the tip of the cable sheath from the slot in the bracket.
Loosen the locknut
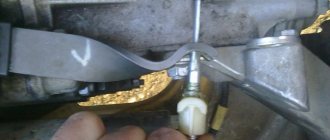
— Disconnect the cable lead from the clutch release fork lever
Disconnect the leash
— Disconnect the cable end from the clutch pedal
To do this, use pliers to pull out the spring retaining bracket from the pin on the pedal and remove the cable tip. There is a polyethylene sleeve on the finger; if possible, do not lose it.
Disconnect the cable tip Clutch cable tip and the “finger” on the pedal
— We remove the clutch cable through the hole in the front panel of the engine compartment
Installing a new clutch cable.
Removing the clutch cable
— The cable is installed in the reverse order
It is threaded through a hole in the shield, the tip of the cable is attached to the pin on the pedal, the leash is hooked onto the fork lever, the tip of the sheath is inserted into the slot on the bracket and secured with nuts.
After installing a new clutch cable, it is necessary to adjust its tension (See “Adjusting the clutch drive”).
Notes and additions
According to the technical regulations on VAZ 2108, 2109, 21099 vehicles, periodic checks and maintenance of the clutch drive are carried out once every 30,000 km, but it is recommended to reduce this interval to once every 15,000 km.
Twokarburators VK - More information on the topic in our VKontakte group, on Facebook Twokarburators FS , in Odnoklassniki - Twokarburators OK and in Yandex Zen - Twokarburators DZ
Progress
In order to quickly and efficiently replace a frayed or broken cable, you need to take several mandatory steps. We start by working under the hood, here the following actions are performed:
- Loosening of the fastening of the vehicle mounting bracket to the box.
- Removing the lower part of the cable from the clutch release fork.
So, a start has been made, and now we need to return to the salon. The following work is performed here:
- Disconnecting the cable from the pedal. To do this, you need to remove all the floor mats from the interior.
- Removing the lock washer. To do this you will need an ordinary minus screwdriver. Next, the pin connecting the part to the bracket is removed.
- Now you can get the cable itself. There is a special rubber cushion in the engine compartment, and under the steering wheel there is a hole through which the shell will need to be removed. We press on the pillow, remove the shell and remove the old element.
Dismantling work has been completed. Now we move directly to the procedure for installing a new vehicle. Installation begins from the interior. This is done as follows:
- We insert a new cable into the hole, mount its end on the pedal, and secure it with a lock washer.
- We secure the vehicle in the box. This must be done in such a way that the bushing is located on the bracket. Then the thread will be reliably protected.
- We insert the end of the cable into the fork. Here you can lubricate the cable with oil.
New cable installed. However, the work is not finished yet. For full operation of the clutch, it is necessary to adjust the vehicle and the pedal. Adjusting the cable is very simple. It is enough just to loosen the lock nut, ensuring free movement of the adjusting nut. This is what is used to tension the cable. However, be careful not to tighten it too tight. If the tension is excessive, the vehicle will soon break and you will have to carry out all the work all over again, but you also cannot tighten it too lightly. Then the clutch will not be adjusted.
The last step is adjusting the pedal. Under it there is a special nut that needs to be removed. Immediately below it there is a lock nut that is tightened. Then we return the first nut to its place and place the rubber washer on the fork
Please note that the brake and clutch pedals must be at the same level. Otherwise, the clutch pedal will wear out much faster.
Review of Manufacturer Prices
| Manufacturer, article | Price, rub.) | Resource (Thousand km) |
| Lada 21901-1602210 original | From 634 | 100 |
| ASPCC260210 | From 465 | 75 – 80 |
| BRAND 219011602210 | From 300 | 75 — 80 |
| 21901-1602266-00 | From 150 | 40 |
| 21901-1602210-00 | From 550 – 600 | 75 |
| 21901-1602210-00 | —/— | 75 |
*prices are current as of October 29, 2018.
Recommendations for the selection of parts and components
When choosing components, give preference to high-quality parts with original catalog numbers. Purchase spare parts from certified points of sale, official representative offices, and dealers. To a lesser extent, use the services of unverified intermediaries who sell products at reduced prices. Cheapness is the first sign of a fake.
Order of Operations
There are two ways to change this node: regular and simplified. The second one is more accessible for self-repair - replacing the VAZ 2114 clutch without removing the box. The procedure for performing the work in the usual way is as follows:
- It is better to put the car in a pit, but if there is none, then you need to lift it with jacks.
- We remove the front wheels and de-energize the car by disconnecting the minus terminal from the battery.
- Now you need to disconnect the speedometer cable from the gearbox, remove the clutch cable, and turn off the gear drive.
- From the gearbox side, the motor support is dismantled, and the flywheel is removed.
- The flywheel should be examined for chips, cracks and other defects.
- The oil should be drained from the gearbox; you can take advantage of the situation and change the working fluid.
- The internal CV joints are removed from the gearbox, unscrew the fastenings and remove the gearbox.
- Unscrew the fasteners between the flywheel and the basket.
- Now you can remove the unit completely - assembled.
- Now you can remove the bearing.
- Be sure to clean the shaft from working fluids, dirt and dust.
- Installation of a bearing with a coupling on the input shaft.
- We attach the basket to the flywheel.
- Subsequent operations are performed in the reverse order of the above.
Watch the DIY VAZ 2114 clutch replacement in the video:
Buying a unit is a rather complicated question, since it is sold both in parts and as an assembly. The manufacturer provides article numbers for each, since he lists them as different parts. He believes that these are completely different details. You can use analogues in your work. So, many VAZ owners prefer to purchase the SACHS collection (3000-951-211), but its cost is 3 times higher. Tuning analogues are offered by Brembo and ATI, the average price is about 10 thousand rubles.