02/04/2022 5 011 VAZ 2115
Author: Ivan Baranov
The purpose of the generator unit is to convert mechanical energy into electric current, which is used to power the electrical equipment of the machine. If the VAZ 2115 generator for some reason refuses to function or does not work correctly, this will affect the performance of the car as a whole. We will tell you more about malfunctions and repairs of the unit below.
[Hide]
The indicator on the dashboard does not light up
Regardless of which VAZ-2115 generator is used in the car, the symptoms of breakdowns will be the same. If, when you turn on the ignition, the lamp indicating the presence of charging does not light up, the following breakdowns are possible:
- The lamp burned out. Remove the instrument panel and replace the light bulb with a similar one.
- Oxidation of the slip rings on the rotor has occurred. You will need to completely disassemble the VAZ-2115 generator and clean the slip rings or replace them.
- The power supply circuit of the excitation winding is broken. Check all wires and replace the fuse.
- Severe brush wear or breakdown in the voltage regulator.
- Sometimes breakdown occurs in semiconductor diodes. The best repair method is to replace the rectifier bridge.
The indicator lights up constantly if the voltage regulator is faulty. If it is faulty, then it is better to completely replace it - its cost is low (about 200-300 rubles).
Symptoms of generator 2115 malfunctions and how to fix them
If, when the ignition is turned on, the sensors on the dashboard do not function and the indicators do not light up, the reason may be:
- Broken electrical wiring. Diagnostics is performed by checking the neutral wire for a break.
- Failure of the safety device. In this case, it needs to be replaced.
- Broken section of the circuit connecting the safety block and the ignition switch. In this case, check all wires.
If all the devices on the dashboard are functioning, but the indicator does not turn on, the reasons are as follows:
- The indicator itself is broken. Replace it.
- Break in the electrical circuit. Perform contact and wiring diagnostics.
- The slip rings have oxidized, the brushes are stuck or broken. In this case, clean the rings and replace the generator brushes.
- Damage to the voltage regulator. The device needs to be replaced.
- Short circuit in positive valves. Remove the generator and change the rectifier unit.
If the indicator lights up brightly when the ignition is on, and after starting the engine it becomes dimmer, the reasons may be as follows:
- The strap slips. In this case, you can try to tighten it. If it wears out, the only option is replacement.
- The valves on the unit have failed or the diode power elements of the excitation winding have been damaged. All elements are subject to replacement.
- Winding break or short circuit in the stator. The problem can be resolved by replacing the stator mechanism.
If the dashboard light remains on after starting the engine, the problem is most likely the voltage regulator. The device needs to be replaced.
Extraneous noise when the generator is running
If you hear extraneous sounds from the generator while the engine is running, this may be caused by the following breakdowns:
- Short circuit of semiconductor diodes. The rectifier unit will need to be completely replaced.
- Short circuit of the stator winding to the housing. It is useless to rewind; it is too tedious and difficult to do at home. And if you order rewinding in a workshop, this service will cost more than the entire assembled VAZ-2115 generator costs.
- Bearing failure is a common failure of generators.
The most common “disease” is the destruction of the bearing in the front cover. To change it, you will have to completely disassemble the generator. To increase the bearing life, it is enough to follow one requirement - do not overtighten the belt. It is due to excessive tension that the load on the bearing and front cover increases.
Why does the generator fail?
In fact, the generator has a simple design, if you want, it is an ordinary electric motor (only designed for high-generation current), try to turn the ordinary electric motor and attach a light bulb or LED, it will start to light up - that’s the elementary current of the alternator.
Someday I will have an article where I will tell you what a generator is. Today it is simple and redrawn - the rotor (the moving part), the stator (the static part), the brush assembly, the voltage regulator and, of course, the housing in which it is located.
And now the actual cracks.
- Seized bearings. This is a fairly common problem in already worn-out generators; the rotor in the housing includes bearings; over time and moisture (dirt), the banal wedge or lower clamping ring also wears out. If there is jamming, then one thing is that the rod stops rotating. But if there is wedging, it is hard to see - the rod may or may not rotate. In any case, with these symptoms, the belt that rotates the generator along with the engine is more likely to break. THIS IS THE FIRST WARNING SIGNAL.
- The stator or rotor winding has burned out. It is there in any case, and most likely it will be on the stator, which means that moisture (salt on the roads) can also eat up this banal short circuit or simply burn it, since copper wires are used. Accordingly, the current generation will stop.
- Damage to the hand node. This is also very common, the brushes are graphite (often square) rods that run along the stator tracks. Therefore, from time to time they wear out a lot and need to be replaced.
- The regulator relay is damaged. This relay prevents the alternator from overcharging the battery by ensuring the voltage and current are in the correct range. It also often fails and charging does not reach the battery at all! You should look at this.
Basically, these are the 4 main reasons why an alternator can fail, so you should definitely have it checked before purchasing a new battery. You may have problems with this.
How to diagnose?
You can check it yourself with just a multimeter. To do this, follow a few simple steps:
- Start the engine and let it warm up to 90 degrees.
- Turn on everything you can - the heater and radiator fan, tape recorder, high beams, heated rear window, heated seats. In other words, you need to load the electrics as much as possible.
- Set the multimeter to voltage measurement mode, limit 20 Volts. It is best to use a measuring device with an extended scale.
- Set the crankshaft speed to 3200 rpm.
- Check the voltage at the battery terminals. It should be above 13 V.
- If the voltage is too low, then look for a fault in the belt - increase its tension. The voltage regulator may not be working properly. Check its operation and replace if necessary.
Afterwards, it is necessary to turn off the power to all consumers and measure the voltage again. It should be at a level of 14.2..14.7 V, no more and no less. Only in this case can one judge the normal operation of the VAZ-2115 generator.
Replacing the generator on a VAZ 2113, VAZ 2114, VAZ 2115
Welcome! A generator is needed to generate current while the car’s engine is running and the stronger the engine runs (the more revolutions), the stronger the generator and produces current, but at the same time into the on-board network of the car (the on-board network includes various types of devices in a car) and it releases a current of a certain strength into the battery (it releases 13.2-14.6± volts), although it can produce much more (Any generator has a voltage regulator installed, so it prevents more current from breaking into the on-board network so as not to burn it, and also if the engine is running in tension, for example, you have engaged 5th gear and are driving 30-40 kilometers, then the current in the generator will be generated less than 13 volts, but the voltage regulator will correct this current and also level it to the desired value, but this is only if the current does not drop too little, if it even drops to 2 volts, for example, then the regulator simply will not be able to compensate for this and the battery will still work), this is why you need a generator, by the way, thanks to it, if you You don’t know yet, the battery is recharged when it produces current and therefore when the engine is running and the music is playing in the car, the battery’s charge is practically not wasted (It also depends on how the music will work, if the car is equipped with good acoustics, then even with the engine running the battery will start working, since the generator simply will not cope with the load).
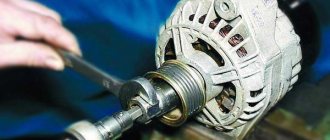
Removing the generator
To replace the brushes of the VAZ-2115 generator, you do not need to remove the entire unit - everything can be done with just one screwdriver, turning off the power to all electrics. But if you need to replace the diode bridge or bearings, the generator must be removed. The work algorithm is as follows:
- Disconnect the negative terminal from the battery, thereby de-energizing the car.
- Unscrew the nut from the contact bolt “30” and remove the power wire from it.
- Unscrew the screw securing the belt tensioner.
- Unscrew the two screws securing the tension frame.
- Pre-treat all threaded connections with a penetrating lubricant such as WD-40.
- Unscrew the top and bottom fasteners completely. Remove the pin from below.
You can then completely remove the generator to begin repairing it.
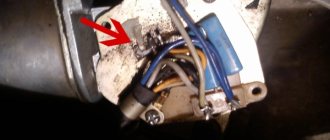
The voltage regulator is the basis of the generator
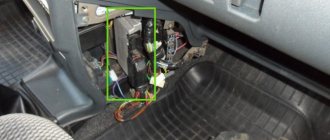
The voltage regulator is located in the car's generator and is responsible for distributing voltage from the generator to the car. This part consists of an armature, an electromagnet and a switch. If it fails, a complete replacement is necessary.
To remove the voltage regulator, you need a few standard wrenches and screwdrivers. You can remove this element in a VAZ car without dismantling the generator. Do not forget to remove the terminals from the battery before starting work. Next, unscrew the contact terminals on the generator - they are located under the cap. After this, remove the protective cover, this must be done carefully so as not to break the spring latches that secure it to the generator.
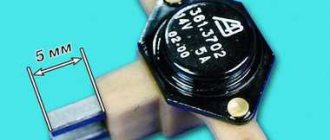
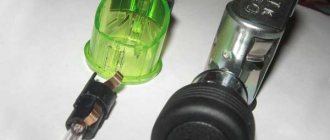
Then unscrew the fastenings of the voltage regulator and pull it out along with the brushes. Checking the voltage regulator should only be done with brushes. The length of normal working brushes should be at least 4–6 mm. To test the functionality of the voltage regulator at home, we will need a battery, several contact wires and a 12-volt lamp.
The light bulb must be connected to the generator brushes, and the polarity does not matter. Connect the negative contact of the battery to the regulator body, and the positive contact to the power contacts on the regulator. If all elements are properly connected and working, the light should light up. If this does not happen, then the voltage regulator needs to be replaced. There is another way out - give the regulator to an experienced electrician to check, perhaps he will fix the breakdown.
Replacing the voltage regulator in a VAZ 2114 car is a fairly simple procedure. The voltage regulator for the VAZ 2114 can be bought at any auto store, but it will not work with other VAZ models. Car owners have recently replaced the standard regulator with a three-level one. It is better to entrust its installation to an experienced specialist, since it requires minor changes to the generator housing, as well as correct reconnection of the contact terminals to the relay.
The three-level voltage regulator contains an improved relay. It makes the voltage more stable and of higher quality. However, at the VAZ 2114 plant this regulator has not yet begun to be put into mass production for cars. After completing all repair work, reassemble and connect everything in reverse order. It is recommended to charge the battery during repairs.
Home →
Device → Electrical system → Generator →
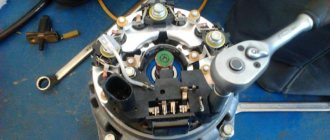
Disassembling the unit
Unscrew the bolts that secure the covers of the VAZ-2115 generator. After this, carefully unscrew the bolts securing the phase winding and capacitor to the rear cover of the unit. If necessary, the capacitor is disconnected from the rectifier. After that, do not forget about the four bolts, remove the back cover along with the rotor and stator.
The rotor is clamped in a vice and completely disassembled by unscrewing the nuts and removing the pulley. All elements that have failed must be replaced - bearings, capacitor, diode bridge of the VAZ-2115 generator, brushes and voltage regulator. After replacing faulty components, the entire unit is assembled in the reverse order.
How to test a generator with a multimeter
The diode bridge of the generator can be checked with a multimeter, but you can also use the stand that was used to check the regulator.
But before that, first of all, without removing the rectifier bridge from the generator, connect the red wire of the tester to terminal 30 of the generator, and the black wire to the housing. Set the tester operating mode to dial (diode icon). If it is not there, then set it to 1-2 kOhm. The multimeter should show infinity. If the readings are different, the diode bridge is faulty.
Then check the current rectifiers for breakdown. Leave the positive (red) probe on terminal 30, touch the negative one to the bridge mounting bolts one by one. The multimeter display should show infinity in all cases; any others mean a breakdown.
Next, connect the positive probe to the axle mounting bolts, and the negative probe to the generator housing. In this case, the tester should also output infinity.
But in practice, such verification is most often not enough. In most cases, it is necessary to ring the generator in more detail.
Careful testing
Attach one of the tester probes to the diode plate, connect the second to the central terminal of each diode fixed to this plate. Then swap the probes. In one case, the multimeter should show infinity, in the other - a nominal resistance of approximately 570-590 Ohms. Rectifiers are considered faulty if:
- In the first and second measurements (when the polarity was changed), the multimeter readings are the same;
- Diode resistance is greater or less than nominal values.
Perform the same actions with the second plate of the diode bridge. If a fault is detected in one or more diodes, it will be easier to replace the entire rectifier unit. True, there are craftsmen who replace failed diodes individually, but such work requires a certain skill and dexterity.
Checking the armature and stator windings
The armature winding should not clearly smell like burning. The color of the winding must be uniform and free of damage and breaks. To check the armature winding for a break, you will need a multimeter. Set the operating mode to continuity testing or resistance measurement and connect the probes to the brush rings. The winding resistance should be within 3-5 Ohms. Then leave one probe on the ring, connect the other to the body. The multimeter display should show infinity.
The generator stator is diagnosed after removal from the housing. First of all, carry out a visual inspection. There should be no visible damage to the wire or its insulation. Then connect the tester wire to the stator housing. With the second wire, touch the terminals one by one. There are only three of them. The tester must be in dialing mode. If the display shows infinity, this indicates that the stator is working properly.
Further testing consists of diagnosing the windings. The resistance of all three windings must be the same.
Before assembling the generator, you need to check and, if necessary, replace the bearings. When turning, they should not jam or make a creaking sound. This means that they are very worn out and will soon fail. Therefore, it is better to replace them immediately.
Source
Belt tension
Make sure that the VAZ-2115 alternator belt is installed correctly. If a whistle appears when you turn on the light, this indicates that the tension is insufficient.
To get rid of this problem, you need to follow these steps:
- Using a 17mm wrench, unscrew the nut that secures the generator to the top bar.
- Place the mounting blade between the generator housing and the engine block.
- Pull the blade towards the radiator, increasing the tension.
- Tighten the nut after tensioning the belt.
If the belt tension is insufficient, the charge control lamp on the dashboard will dimly glow when the engine is running. It also happens that the lamp either lights up or goes out. Check the condition of the wiring, brushes and voltage regulator.
DIY diagnostics of generator 2115 (details)
You can check the generator without removing the device from the car. For diagnostics, you will need a voltmeter or multimeter, as well as an assistant. Work order:
- We start the engine and let it warm up. We turn on all the electrical equipment that we usually use when traveling - DVR, radio, heater, optics, heated rear window, and so on.
- Then switch the multimeter to voltmeter mode and connect it to the battery. The assistant needs to press the gas pedal so that the engine speed increases to 3200. If the multimeter shows a voltage of at least 13 Volts, then the generator is operating in normal mode.
- If the voltage is below 13 Volts, most likely the reason is poor belt tension or damage to the electrical circuit; alternatively, the contacts on the ground could have oxidized, in which case they need to be cleaned. The reason may also be hidden in wear of the brush assembly and breakdown of the voltage regulator. Much less often, the problem lies directly in the unit itself, however, this option cannot be ruled out.
- Then turn off all electrical equipment and check the voltage level again at the same speed. As a result, the voltmeter should show no more than 14.7 Volts.
Battery overcharge
But often there is no “lowering” and “overcharging”. The electrolyte in the battery boils, and the battery also fails; there is nothing good about that.
The first sign will be a white coating on the top of the battery, which means the electrolyte is boiling and evaporating. This means the battery is charged, but the alternator still screws up charging it. Here, most likely, the voltage regulator has failed.
The check here is also elementary - you need to connect a multimeter or tester (whatever you call it) to a running machine and look at the load. If it is much higher than 14.5-14.8V and 15-15.2V, it means overcharging. Urgent replacement of the voltage regulator, otherwise you will constantly boil the battery, NOTHING good. Banal plates can fall apart.
What to do if there is no charger?
So, you have discovered that your car's alternator is not charging. It is immediately necessary to look for the root cause of this breakdown, because it can get to the point where the engine simply refuses to work, since it will not have enough electrical energy. Consequently, the battery capacity decreases, making it impossible to crank the starter while starting the engine. Please note that if your generator is fully operational and operating in ideal mode, the battery practically does not need to be charged. Even in cold weather, although the capacity of most batteries may drop, a working alternator will ensure that the charge level is always above 60%. But now we need to figure out why the generator does not charge and the battery runs out.
Purpose of a car electric generator
This device converts torque into electricity. This element feeds:
- car ignition system;
- automotive lighting;
- electronic equipment of the car (for example, on-board PC).
The power of the electric generator may not be enough when all consumers are turned on. This will cause the batteries to drain quickly. When the full load is turned on, the voltage of the generator of the VAZ 2110 car and other models of the manufacturer drops below the permissible value, which leads to battery discharge. .
Stator problems
Similar problems can arise in stator windings. In particular, if there is an interturn short circuit, the battery will not charge. Of course, the generator can work, but in emergency mode. Firstly, its power will drop significantly. Secondly, the batteries will not be charged. Thirdly, excessive heating of the generator housing occurs. The winding may also short-circuit to the housing. Excessive heating, humming, loss of power - all those signs that are inherent in rotor winding failures. The check is carried out in the same way as in the case of a rotor winding. To carry out repairs, it is necessary to replace all faulty coils. It even happens that in generators the positive terminal is closed to the housing. Consequently, a short circuit also occurs between the terminals of the battery. This poses the risk of a fire. Of course, the generator does not charge in this case.
Multimeter - what is it
A multimeter is a measuring device used to measure resistance, current or voltage. Also, using such a device you can check the wiring for breaks. Each of these measurements involves the use of separate measuring instruments, such as a voltmeter, ammeter or ohmmeter. Therefore, a multimeter is considered a universal tool (mulmeter = voltmeter + ammeter + ohmmeter). In practice, analog and digital multimeters are used.
What is a multimeter
Analog
This multimeter is equipped with a special hand, like on a watch, by the movement of which the measurements are read. The analog multimeter is also equipped with a measuring scale with resistance, current and voltage values. The device is inexpensive, so it is very popular. The disadvantages of an analog multimeter include measurement errors (this mainly applies to products made in China).
Analog multimeter
Digital
Unlike an analog multimeter, a digital multimeter has an LCD or LED screen that displays data. These devices are easier to use and also have high accuracy, which cannot be said about cheaper analogues.
Digital multimeter