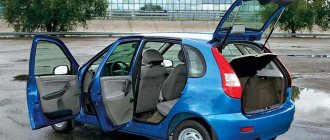
Removing the rear door trim on Kalina is quite simple. To do this you will need: a flat screwdriver, a small piece of rag, a knife or a super thin screwdriver. This work is not very difficult, you can easily do it without outside help, even if you have no experience in car repair.
And so, having obtained everything you need, you can begin to remove the casing. First, let's remove all the decorative trims - two on the handle and the cap on the lock lock. To remove the first ones, it is best to use a thin knife or flat-head screwdriver.
We gained access to the 2nd bolts - unscrew them. Now comes the fun part. You need to remove the window lowering/raising handle. It is secured with a plastic retaining ring. It's up to you to pull it out. This ring has a latch on the back. We insert a knife or screwdriver behind the locking ring, pull it towards you and pull it up.
Often, removing this handle causes difficulty for everyone. But, as you can see, it’s nothing complicated if you know the design.
Now all that’s left to do is to tear off the trim from the door. Wrap the screwdriver in a rag, insert it between the trim and the door itself and pull. The entire rear door trim on Kalina is attached using clips. So push on, don’t be afraid. It’s just advisable to have several of these clips in reserve, in case something goes wrong.
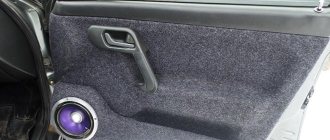
Once the rear door trim has been removed, you can perform basic repair work. This includes replacing the outside door handle.
Replacing the rear door handle Kalina
The handle is secured with one nut inside the door and one bolt outside.
We unscrew them. First, we pull out the part of the handle that is closer to the center of the door. Now we pull the entire handle towards the center of the door, lift it up a little, pull the bottom towards us and pull out the handle completely.
The new rear door handle and trim are installed in the reverse order.
The doors of any passenger car, including the Lada Kalina, are lined from the inside with special decorative panels. For various reasons, sometimes it becomes necessary to remove this trim, and here ignorant motorists are faced with a problem - there are no fastenings for the door card on the outside. In reality, the disassembly technology is not complicated, although it does include a couple of nuances that need to be taken into account.
Why is the door trim removed?
Most often, the trim of the rear or front doors is dismantled in order to get to the internal cavities where the window lift mechanisms are installed. Although during the entire period of operation of the car there are other situations when it is necessary to remove the trim:
- for installing acoustic speakers built into door cards;
- in case of failure of the electric window lift buttons;
- for dismantling glass for the purpose of tinting or replacement;
- to repair or lubricate window lift mechanisms;
- to replace facing panels that have become worn or scratched over the years of use of the machine.
Preparation for dismantling
To unscrew the fasteners and remove the door trim, you need to prepare a simple set of tools:
- screwdriver with cross slots;
- long flat screwdriver;
- a pointed tool, such as an awl.
Door disassembly tool
Since the door card of the Lada Kalina car is held on by plastic fasteners (otherwise known as clips, pistons), there is a warning regarding the working conditions. It is strictly not recommended to dismantle door trim in the cold, when the plastic becomes brittle and easily destroyed. Hence, there is a risk of breaking all the clips during the process of removing the decorative panel. Therefore, in winter, perform this operation in a heated garage or box.
In the summer, there are no requirements for premises; remove the casing even in the open air. There is only one recommendation: in windy weather it is better to drive the car into the garage, otherwise a lot of dust will be brought into the interior when the doors are open.
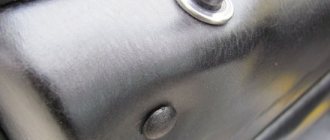
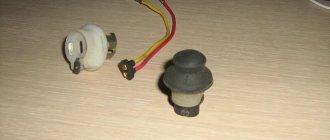
This is what the door card lock looks like
Advice. In cars that are 5 years old or more, the plastic from which the retainers are made dries out and becomes brittle. When separating the trim from the door of such a car, you will probably ruin some of the clips. So it’s worth buying new ones in advance, there are 8 pieces in the front door, and 10 pieces in the back door.
(055) CNIKESIN clips (analog VAG) for door cards
Good day to all!
Everything was due to the posts about replacing the door card clips, since the clips installed by AvtoVAZ in the cold season were terribly annoying with their rattling. Even comprehensive sound insulation did not completely solve the problem. He did everything he could and pushed the clips into the seats with bitoplast and inserted rubber bands into the slots to make the fastening rigid. The desired result was not achieved. In one of the entries I read about VAG clips, which the guys installed to replace the standard ones, and one day, flipping through the pages of the aliexpress website, I came across an analogue, read the reviews, many ordered them specifically for the Priora. The clips are equipped with O-rings made of foamed polyethylene. I decided to order.
The price suited me, for 50 pieces - 3.16!$ (217 rubles)
The goods received in 35 days. Link to the product:
Clips, fasteners
When replacing clips, the seats were sealed with Modelin
(anti-creaking).
In my opinion it is better than Bitoplast
.
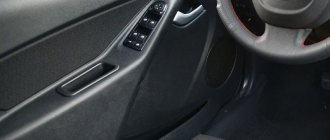
At the same time, I glued Modelin on everything that could make sounds: Places where the handles fit in the door panels, a block of buttons for power windows and mirror adjustments
The cards snapped into place clearly, and I heard the click of each clip as it was attached. This morning I was driving to work and enjoying the silence...
Thank you to everyone who read this entry. These clips can be safely recommended for installation.
Source
Instructions for removing the cladding on Kalina
The first three operations are performed the same way for all Lada Kalina doors. The exception is the trunk hatches of hatchback and station wagon cars, where the disassembly procedure is much simpler. Here's what to do:
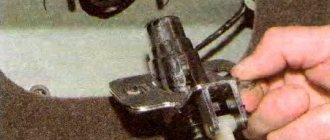
- By hand, unscrew and pull out the cap of the latch designed to lock the door lock from the inside.
- Using a Phillips screwdriver, remove the 4 screws holding the music system speaker.
- Remove the speaker and disconnect the wires from it.
Unscrewing the blocker and acoustics
Advice. The acoustics can be attached either to the door card itself or to the metal door frame. If, after removing the speaker, you observe the first option, then during assembly it is better to redo the fasteners by drilling holes for self-tapping screws. The acoustics should be mounted to the door, not to the upholstery.
Attaching the speaker to the casing is wrong
The further procedure of work differs depending on the location of the door that you are disassembling.
Front passenger door
Here the decorative panel is held on by 8 clips, 2 screws securing the internal handle and two self-tapping screws located under the plastic pocket. The algorithm for dismantling it is as follows:
- Using an awl, carefully pry the edge of the plastic plug hiding the screw in the door handle and remove it. Remove the second screw cover in the same way.
- Remove both handle screws.
- Pull the door opening handle towards you, unscrew the fastening screw and remove the lever. After which you will be able to remove the entire handle.
- Unscrew the 2 screws at the bottom of the door card, under the plastic pocket.
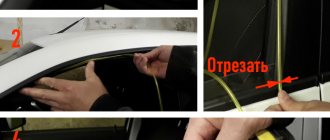
- Take a flat head screwdriver and pry the top right corner of the trim panel to disengage the first tab. Grab the casing with your fingers and release the remaining pistons manually.
- After separating the panel from the door, disconnect the wires coming from the power window button. To do this, pry the connector tab with a screwdriver and pull the block out of the button block. Dismantling of the cladding has been completed.
My day, Shumka and evil pistons
Another weekend has arrived. What to do. Well, isn't there enough to do? I stomped the noise of the doors in the swallow) I previously bought 8mm splen 4 meters with a thermal layer, 2mm vibration and 3mm sheet. And he began to study. Back in the winter I made this... demo version of the Shumka. It was cold, the car was quickly cooling down, and I decided to stick light foam rubber. It helped. But you still need to make a normal noise.
The window regulator also broke, so I decided to replace it at the same time. I got ready and went to the store. It cost 1004 rubles to assemble it. The old one glitched. As I understand it, water got into it and it overheated, jammed and burned out. I realized this in the standing water in the casing of the wires to it. how did she get there, idk... well, to hell with it. Changed it. I used to think it was complicated, I was afraid of such a showdown, but it turns out everything is simple. Just unscrew all the bolts and you can pull it out.)
I missed the lock, attached the rods to each other so that they would not dangle. but there's something rattling there, and I've already given up on that. because that's all. I can't do it anymore. I looked through everything, I don’t know what’s there.
I closed all the holes with a vibrator. I attached a 3mm vibrator inside to the outer metal. normal
I put everything on Priorov's shitty pistons and went for a walk. The next day, today, I helped a friend with his car and continued working on his own.) I decided that I needed to go buy normal caps. I know one store in the city that sells them. let's go. I arrived, looked through everything, chose 2 options. bought. it turned out expensive. 1200 for 40pcs. very expensive. I didn’t expect such a price, but I think ok, the main thing is that they hold it. yeah they kept... read on. At the same time I bought the left driver's soap box, mine was broken in all places. I disassembled the structure of the keys for the lifts and mirrors, lubricated all the buttons, otherwise they were working hard, and assembled everything into a new soap dish.
Assembled, connected, everything works fine. fire.) Next came the second passenger door. and then the fun began. I took it apart the same way, sealed it, everything was fine. I installed new caps in the casing and secured the casing.
At this time, my niece was distracting me, my dad was also always asking questions. I grinned, like I’m sticking a hunchback to the wall. Well, in short, I installed the casing. I screwed everything together and started screwing this soap dish on. and I look. Damn, I forgot to screw in the mount for it. to swear. here's a thing:
and all over again...(((((sadness, melancholy. hands, fingers, fucking caps, in the end it all got to me in the end. I got it, found it. it was tough. These are the types of caps. I replaced them with these in the winter. rare shit , and cheap, despite the design.
I bought these as the second ones, they are good pistons, unlike the Prior ones, but I need to be more careful with them. break.
but those beasts are stsuka, which if you put, then that’s it. it's tight. you will break yourself and the car faster, but these little bastards will be intact.
Well, I also finished the 3rd door. and the day came to an end.
You can also try these. but who knows how they will behave.
With 3 noisy doors, I got ready for a party and went straight to the lying cop on the street to try it out. And so I drive up, fly by, and oh that feeling... that this fucking rear shelf will never give me peace! I'll still get to her. I went for a walk and was immediately stopped by the cops. and with the song that we’re going to measure the tint right now, I answered them in my head, but I’m blowing you away, I made a window regulator!) and tore off the toner, showing, will it work like this? the upset cop handed over the documents and I drove on happy, because the second fine in a week is no longer fun.) I’m lost without toner.) I’ll have to order a net)) have a nice trip everyone)
Source
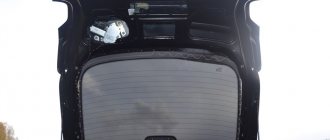
How to disassemble the trunk lid on a hatchback and station wagon
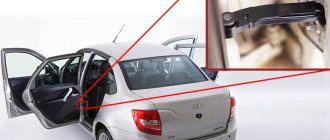
The interior lining of the Kalina rear hatch in hatchback and station wagon bodies is held on by 4 regular clips, 2 special black plastic fasteners (installed after installing the panel) and 2 screws securing the handle. In addition, the panel is hooked onto a metal protrusion by two brackets located in the lock area.
Handle screws
The procedure for removing the upholstery is as follows:
- Unscrew the 2 screws with a Phillips screwdriver and disconnect the handle.
- Place a flathead screwdriver under the glass side of the panel and unlock the lock. Release the remaining latches with your hands, pulling the panel along the contour.
- Remove the trim, lastly releasing the staples near the trunk lock.
The panel is detached from the glass side
Note. You need to start snapping the pistons away from the glass, because you won’t be able to remove the lining from the lock side without damaging the clips. This is prevented by 2 brackets hooked to the metal frame of the hatch.
The mounting brackets for the trunk hatch are located near the lock.
As practice shows, it takes no more than 10 minutes to remove the trim of one door of a Lada Kalina car. The operation is really simple, but if you lack experience, it is better not to rush, so as not to break all the fasteners and scratch the plastic facing panels. The door cards are installed in the reverse order: first, the clips are snapped on, then the handles are installed, and finally the plastic elements are attached. Don't forget to connect the connectors to the power window buttons.
Krutetsky pistons for sheathing
The recording will primarily be useful to pelvic producers
. Anyone who has removed a door trim has probably thought about which pistons to put it back on.
This is how I became last summer, when I plugged music into the car, I was thinking about how to put back the heavy, extra noisy trim.
I was scouring the Internet in search of the truth, I read that people are using VAG_pistons, I looked at their prices on the existential list and thought that they would go to hell)))) somewhere I briefly saw that Largus caps are good, so I decided to try them.
In short, all the previous Taz pistons are really nothing compared to the Largus ones, they hold perfectly and snap into place clearly.
They cost 6 rubles per piece, by the way, in the Renault store these same caps cost from 15 rubles per piece! When I asked why the seller simply shrugged his shoulders.
The other day the inner handle on the driver's side began to have difficulty opening the door, I took off the trim, I had to sweat a lot, the pistons gave in hard, I used a tool for such work.
The reason for the lousy opening was the plastic tip on the pull rod near the handle, the design doesn’t inspire confidence at all, they’re crap basins, fortunately in the store these same tips cost 15 rubles a pair.
I decided to check the condition of the lock, it was a little crazy, it was dry, apparently from the alcohol that I spray after washing in sub-zero temperatures, I lubricated the lock first with silicone, then generously with lithol, now the door opens with one finger, closes under its own weight, I’m very pleased with the result) Apparently the dry lock caused a greater load on the traction, so the plastic tip could not stand it, tomorrow I will do the same for all the other doors.
I haven’t tried VAG pistons, I won’t compare them, but Largus pistons hold up perfectly, I recommend them for choice)
PS Largus pistons to all basins)
Source