Dear car owners! The other day I encountered a seemingly simple, but not obvious to me, problem - the dimensions of the VAZ 2114 do not light up. The problem haunts me regularly, a year ago the size and feet stopped burning, I cleaned the contacts, the weight seemed to help for a while. Then it worsens again! Today only the turn lights are on, that's all. What could be the reason for this unpleasant problem for me?
Hello! I myself recently worked on side lights, it took a lot of work, but in the end I solved my problem. I'll help you too. First check the lamps, perhaps they are simply burnt out, so the side lights do not work (it’s corny, but this happens often!). Or the fuse has blown. If this happens, it must be replaced. You need to get to the mounting block and find F10 there. If it burns out, both side lights do not light up, as does the number illumination.
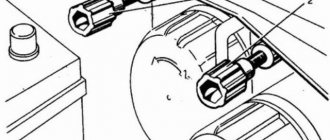
Nothing complicated, I hope you decide. Go ahead, continue. Contact control. They may oxidize, so the size is not appropriate. We carry out a visual inspection of all the pads, take them out and put them back in again. This is how I solved my problem. I cleaned the contacts and everything worked. If cleaning doesn't help, let's check the button itself. Maybe it won’t work, unscrew it and take a look. Has the thread fallen out? Does not work!
The most serious reason is a short circuit. But even here you can do it yourself. We take an ordinary light bulb, connect two wires to it - plus and minus. Then we take out the fuse, instead of its contacts we connect the wires from the lamp. If it starts to burn, it means it’s just not there for long. The only way to find the short is to turn off everything connected to the fuse in order.
Where does it short out most often?
I will try to make it a little easier for you to find the location of the short circuit, if, of course, this is appropriate in your case. But if all of the above methods do not lead to a positive result, this is the only option left. The wires going to the license plate lights, as well as to the trunk roof, most often fray and short out there. This wiring needs to be treated with electrical tape and nothing else.
Another problem area is the wiring from the rear of the fender under the carpet. There, too, you need to look carefully at everything and, if necessary, wrap it with electrical tape. Yes, there are cases when both bulbs burn out, but drivers refuse to believe this, checking everything, but not the headlights themselves. Start with them. That's all, good luck!
Tips for motorists
When driving a VAZ-2115, regardless of the time of day, the side lights and headlights must be turned on. This is a requirement of the Russian road code that every driver must comply with. Thus, the electrical circuits of the side lights and brake lights operate through the K4 lamp control relay, the task of which is to warn the driver with a light and sound signal that at least one of the lamps in the electrical circuit of which is not ignited. This will force the driver to exit the vehicle, determine which parking light is not illuminated, and begin troubleshooting.
On a VAZ-2115 car, the side lights in the rear lights often stop working. This is due to the appearance of a lack of tightness of the lamps, due to which moisture penetrates inside, which leads to oxidation of the plug of the unit or the track on the flexible circuit board through which voltage is supplied to the lamp contacts.
There are cases when, after moving the external lighting switch to the first position, even the side light does not turn on. The search for this fault must begin by checking the presence of voltage at pin 1 of this switch. It should be +12 volts even with the ignition off.
If this terminal is de-energized, you will need to check the voltage at terminal 6 of connector X8 and then at terminal 6 of connector X1 of the mounting block in sequence. If there is voltage at these pins, then the reason for the lack of power at pin 1 of the exterior light switch will be the pink wire connecting it to pin 6 of the X1 connector of the mounting block.
Well, if there is voltage at terminal 1 of the external lighting switch, the culprit for the fact that the side lights do not light up may be the switch itself or the K4 lamp control relay. To make sure that the switch has failed, you need to set it to the first position and check the voltage at its terminal 2. If there is no voltage at this terminal, you need to replace the exterior light switch.
When fuse F10 (7.5 A) burns out, the front and rear side lights on the left side of the VAZ-2115 do not light up, and when fuse F11 (7.5 A) fails, both side lights on the right side of this car light up. A blown fuse F10 can be identified instantly, without even looking into the mounting block, since the backlight lamps for switches, heater control levers, cigarette lighter, and ashtray are immediately turned off, since it also protects these electrical circuits.
Like all not new cars that have long been removed from the assembly line, second-generation Samaras are susceptible to minor failures over the years, which also affect the lighting fixtures. For this reason, many drivers are faced with the fact that the rear lights on their VAZ 2114 do not light up, which can lead to dangerous situations on the road if the problem is not solved in time.
The three-door Lada Samara VAZ-2113 was discontinued
October 1
In a series of messages about new and updated cars from Tolyatti, one event went unnoticed. It turns out that back in the summer AvtoVAZ stopped producing three-door Lada Samara hatchbacks, better known by the VAZ-2113 index. And in December of this year, the last five-door VAZ-2114 will roll off the assembly line. This will put an end to the long history of the first front-wheel drive VAZ model, since the VAZ-2115 sedan stopped being produced at the end of last year.
A fundamentally new model of the VAZ-2108 “Sputnik” began to be made in Tolyatti in 1984. Later, the three-door was joined by the five-door hatchback 2109 and sedan 21099. And at the end of the 1990s, the model underwent restyling: first the sedan was updated, then the five-door hatchback, and only in 2005 the three-door hatchback.
The vacated niche in the model range will be filled by the long-awaited five-door hatchback Lada Granta, which will be produced only in Izhevsk.
This news and much more interesting things can be found in our VKontakte community. be sure to subscribe.
Features of the operation of dimensions on the VAZ 2114
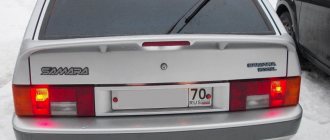
Being the ideological heir of the first generation, the fourteenth inherited from it many technological solutions, including outdoor lighting devices. So, the dimensions on the VAZ 2114 are located in the corner areas of the body at the front and rear, which, according to technical regulations, are included in the common blocks of lamps and headlights.
At the same time, there are several features that should be noted when describing the side lights on the VAZ 2114:
- switching on/off occurs using a button in the external lighting control module;
- when the dimensions are turned on, the switch is illuminated by a green indicator diode;
- The rear lights of the VAZ 2114, unlike the front ones, glow red in accordance with Russian road safety standards.
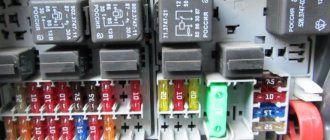
A special fuse box, which is located in the engine compartment next to the engine, is responsible for the correct operation of the side lights on this Lada. As a result, very often motorists who notice non-working dimensions on the left or right side of the car are faced with a blown fuse.
The easiest way to diagnose a fault is fuse F10, since it doubles as a warning light, and if the pair of sizes on the left side of the car do not work, then fuse F11 will most likely need to be replaced.
AvtoVAZ stopped producing Lada Samara
AvtoVAZ stopped producing Lada Samara
27 November, Wednesday,
Whatever you were, that's how you remain - this look is perfectly suited for the four-wheeled miracle of technology called Lada Samara from AvtoVAZ. The Russian automaker AvtoVAZ has finally announced the cessation of production of another outdated model of the car - Lada. “Fourteenth” will leave the assembly line in December. AvtoVAZ says nothing about the burial ceremony; may the old Lada Samara rest in peace.
“Instead of the Lada Samara hatchback, starting this year, the auto giant will begin producing the Lada Granta hatchback in Izhevsk,” the automaker’s press service reported about this event. Production of the Lada Samara will end with a five-door hatchback. Other versions of the car left the assembly line earlier.
Thus, production of the Lada Samara sedan (VAZ-2115) was discontinued at the end of the year. And production of the three-door hatchback Lada Samara (VAZ-2113) stopped in September of this year. Completion of the assembly of this model will be the next step towards a complete update of the model range of the domestic company. But on the roads in the regions, these iron “horses” will delight the eye of a passerby or a motorist passing by for a long time.
It should be noted that at the end of last year, sales of Lada Samara in Russia amounted to 67,971 cars. In October of this year, sales of the model fell by 15% compared to the same period last year, to 3,661 cars. In total, since the beginning of the year, Samara sales have decreased by 36%, to 35,143 cars, PRIME reports.
AvtoVAZ is one of the largest enterprises in the automotive industry in Eastern Europe. Production capacities allow the production of over 800 thousand cars per year. The automaker produced 718 thousand cars in a year. Lada sales decreased by 4.1% compared to the previous year - to 608.2 thousand units.
The updated Lada Priora should hit the market in the fall of this year. In September, budget versions of the new generation Lada Kalina went on sale. Next year, the Lada Granta is expected to appear in a hatchback body. Also, the Tolyatti Automobile Plant may release a crossover based on the Lada Kalina and a hybrid version of one of its models.
R93 – Auto portal of the Krasnodar region: Auto news
Causes of malfunctioning rear lights
Troubleshooting a situation with non-working side lights is the main task of the car owner, as this not only creates a dangerous situation on the road, but, ultimately, is fraught with a fine from the traffic police.
To find out why the dimensions of the VAZ 2114 do not light up, you need to focus on three main factors:
- Burnt out lamp.
- Poor power cord connection.
- Broken wiring leading to size.
The first case is the most common, and the problem can be solved by simply replacing the light bulb, since they are sold everywhere and are cheap.
The second reason can be confirmed without disassembling the device, simply by touching the size: when you press the contact, the lamp will turn on, and vice versa, in the free position it will turn off. If disassembling the device did not reveal any oxidation with carbon deposits, or a burnt-out lamp, or a loose contact, but the rear play of the VAZ 2114 still does not light up, we can talk about faulty wiring.
Replacing a broken light bulb
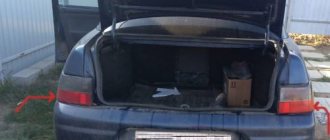
To secure the rear dimensions of the VAZ 2114, you need to follow a number of simple recommendations:
- turn off the power to the car;
- open the trunk, remove the decorative strip;
- tighten the clamps, remove the contact panel of the entire lamp;
- press down on the faulty bulb and turn it counterclockwise to remove it.
In addition, it is advisable to “ring” the lamp with a tester to make sure that the problem is caused by its malfunction, after which it should be replaced with a new analogue and proceed with installing the lamp in the reverse order.
Some Zhiguli owners, faced with the fact that the dimensions on their VAZ 2114 do not work, do not bother and change the entire lamp assembly, especially since they are not that expensive. This can be considered a convenient solution, since such a replacement for some time eliminates the possibility of failure of other lamps in the lantern, in addition to the general one.
In some situations, a break in size is not a complete lack of functionality of the lights, but simply a weaker glow, indicating a problem with the power supply to the contacts. To fix the problem, simply clean the entire contact group in the control unit under the hood, and if this does not help, you will need to check each group leading to the tail light separately.
What to do if the VAZ-2115 instrument panel does not work
As mentioned above, it is necessary to establish the cause of the instrument panel malfunction. If they are significant and cannot be repaired, then in this case it is necessary to install a new PCB. For a better outcome when installing the panel, you need to know and follow the following instructions:
- Replacement of the instrument panel is carried out strictly in accordance with the pinout.
- First you need to disconnect the cable going to the cigarette lighter.
- Dismantle the control panel. It is necessary to unscrew 2 screws located along the edges, top and bottom of the instrument panel.
- The next step will be to dismantle the lining. The difficulty is that it is held in place by clamps, so you need to swing it a little.
- After this, all wires going to the instrument panel are disconnected (light alarm connector, clock, speedometer, fuel level sensor).
- The very last step is to dismantle the control panel. All the bolts that secure it are unscrewed. At this stage, you should perform actions very carefully, as you can really damage the wiring.
After all the above steps, the process of dismantling the control panel can be called complete. If there is a need to change the light bulbs, you need to remove the sockets and install new ones. When dismantling the cartridges, they are turned counterclockwise. This should be done with extreme caution to avoid damage. Collection must be done in the opposite direction.
By following all the rules for installing the instrument panel, you can independently solve all the problems associated with its operation. If this fails, you will have to seek help from a car service to correct problems with the PP.
A week ago I bought myself two-pin LED bulbs and started checking how they work, they lit up well! one might even say excellent! they burned very brightly and with a white light at the same time., but not separately I decided to check why I checked it on my own head (I accidentally leaned the plus against the body of the light bulb in the chirkash, or you can say barely touched it, you can also say casually! in the end, probably got short or short circuit (short circuit)
After that the right side light stopped coming on completely.
I started looking for the reason, the first thing I did was check the fuses on the Mounting Block (MB) F11 - which is responsible for the right side marker, it turned out to be intact, in the end a couple more combinations and replacing it with a new fuse did not give anything. In the evening I went home to study the diagram of how it works dimensions this whole thing lasted for a couple of days with no results...and...After a couple of days the thought struck me: maybe it’s the alarm system itself? since my whitefish is set to dimensions! I dismantled the interior floor to get to the alarm control unit. I took out the unit and looked at the fuses, all intact! the next stage was the removal of M.B.
I thought that in M.B. the path burned down. the other day I came home from work early, parked the car and started filming M.B. right next to the house, before that I disconnected the mass, who knows what... I started to remove the block, by the end of removing the block it began to rain, it was not pleasant, but I had to go to the end.
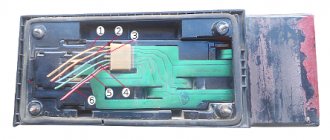
I came home and took the instrument and began to disassemble M.B.
Let's analyze M.B. here you will need a screwdriver, unscrew the 8 screws and remove the back part of the block
and then I discover oxidation of three contacts, unpleasant of course, but a fact is a fact
let's go further, I completely remove the entire board and observe a couple more troubles, the first trouble is oxidation where the light relays are inserted
Although the chip does not fit this contact, it’s like a backup one. I looked carefully at the boards, and it was decided to wash off the oxidation with alcohol. It’s like in the Anecdote: on the radio: Prapor - What are you doing? Row - I wipe the boards Prapor - Who wipes it like that Row - And aka it is necessary Prapor - Just like that, you drink a glass in one gulp and breathe =)), and you don’t translate the material with a brush =))
As a result, I washed all the boards and removed all oxidation from them
When I washed it, I let it dry a little, then I assembled the block. These are the brushes I had after washing the board
When I assembled the block, I went to install it. I assembled everything, I was already happy, I thought that I had solved the problem, but it wasn’t like the starboard side didn’t light up and didn’t light up at all. Again, upset, I went home. The next day I kept thinking about the reason I wanted to find a competent car first. electrician
I drove around with one eye for a couple more days, all these two days I was thinking about what and how this could be done, I wanted to throw the snot out, but I gave up on this idea, I bridged the left fuses + threw them on the right, still nothing worked as it didn’t burn and doesn’t burn.
And then at one point it dawned on me, shouldn’t I check the relay for monitoring the malfunction of the lamps?
disassembled the relay and looked at the board
It's all covered in diodes, but how can I check them? working or not? since I don’t have vertebrae. It was decided to install the old original one that screams at the LEDs
I installed the old one...what do you think?
YES, you were not mistaken, the right clearance has EARNED
the next day I went to the auto store and bought a new lamp fault monitoring relay
Who knew that you just had to change the lamp control relay? and not disassemble the floor of the car to eliminate the cause =))) Now I will know for the future where to start =))
PS Forgot to say or add about M.B.
Repair of the mounting block consists mainly of replacing printed circuit boards. It is allowed to solder wires to replace burnt-out current-carrying tracks on printed circuit boards, but only if this does not require disconnecting the printed circuit boards.
Additional Tips
Sometimes VAZ 2114 owners are faced with the opposite situation, when the rear lights work, but the indicator on the power button does not: this is almost always a sign of a faulty wiring in the interior panel. You can deal with the problem by removing the entire key lock and thoroughly cleaning its contacts.
In general, the side lights on this VAZ model should not often fail, since the contact pads for their fuses are specially increased in width to ensure a tight connection.
In addition, experts advise to see frequent failures in dimensions as the presence of a malfunction in the mounting block itself or in its electrical circuit. This problem must be corrected quickly to eliminate the risk of fire in the wiring.
Finally, it is worth paying attention to the tightness of the entire rear light unit and not allowing moisture to get inside, as a result of which the lamp contacts can easily become acidic.
Typical malfunctions of VAZ car lamps and their elimination
One of the most common problems is filament burnout. In this case, the electrical circuit is open, and the fuse sends a corresponding signal to the relay, which in turn outputs it to the dashboard. To fix this problem, you need to replace the light bulb.
The second problem is a violation of the electrical circuit itself. There may be several reasons for this.
- The contacts of the wires are broken (they have oxidized) leading to the fuses or relays. To eliminate this damage, you need to disconnect them and clean them well.
For other, more serious problems, it is better to turn to specialists who must conduct a serious diagnosis of the operation of the relay to control the car's lamps in order to avoid a strong short circuit in the car's electrical circuit and its subsequent fire. It is especially necessary to pay attention to the poor performance of devices after tuning a car, since in most cases the load on the network increases due to the addition of additional energy-consuming lighting equipment (diodes, more powerful high-beam lamps).