The car's transmission allows you to change the torque from the internal combustion engine before transmitting it to the drive wheels. This makes it possible to change the speed of the vehicle, maintain engine operation in the optimal speed range, etc.
Also, thanks to the gearbox, you can change the direction of movement, that is, the vehicle gets the opportunity to move not only forward, but also backward. At the same time, on cars for forward movement, step boxes have several gears, while there is only one reverse speed.
It should be noted that quite often drivers encounter a malfunction when reverse gear does not engage, and on different types of gearboxes (manual transmission, automatic transmission, manual transmission, etc.). Next, we will look at the main reasons why reverse gear does not engage in manual transmissions, as well as in automatic transmissions.
Causes
The reasons why reverse gear engagement is poor or difficult may be as follows:
- loosening of the fastening clamp of the rocker, due to which the length of the rod is not enough to fully engage the gear;
- jamming of the reverse speed lock;
- spring breakage and debris getting into the guide grooves of the gear selection mechanism;
- spontaneous loosening of the selection mechanism mounting bolts;
- the clamp bolt is cut off;
- wear of the clutch disc and release bearing;
- incorrect adjustment of the clutch and clutch pedal;
- low oil level in the box or the need to replace it.
Clutch
When the clutch discs wear out, the pedal moves up and its position becomes higher than the others. In this case, when turned on, a crunching sound may be heard and the lever does not move, as if it is resting against an obstacle. You should not force the assembly, as this can lead to more serious damage - the gears will fly.
It is typical for such wear that the clutch pedal falls to the floor and you can hear from drivers that the VAZ 2109 does not engage the gears. Usually this applies to all gears, but only first and reverse can fail.
You can check by removing the rubber plug. The destroyed disc leaves fibers that look like tangled strands of hair. If such a phenomenon occurs, then a new clutch disc should be installed.
Due to constant loads, the cable stretches and must be periodically adjusted and tightened. In this case, the VAZ 21093 does not engage the first and second gears, and the rear may also fail. To fix the breakdown, you need to drive into the pit and tighten the cable. If it is worn out, replace it immediately. You can do this yourself.
A similar breakdown can also manifest itself in the failure of the gears to engage while the engine is running. Sliding along the splines is limited and fixation does not occur.
Clutch faults
Simply put, the clutch is a mechanism that serves to transmit the torque of the internal combustion engine to the transmission, and also opens the engine and transmission so that gear can be changed. Failure of individual components of this unit may make it impossible to shift gears while the engine is running.
Brake fluid leaks
The design of many modern cars assumes that the working fluid for the clutch is brake fluid. If there is not enough fluid in the clutch drive hydraulic system, then the clutch will not engage fully.
In this case, the gears will engage slowly or not engage at all. For an initial check, you should look at the fluid level in the reservoir. If the level is low, it is necessary to check for leaks, eliminate defects and bleed the clutch.
If the fluid level is normal and no other reasons have been identified, you will need to remove the gearbox to inspect the clutch elements. Usually, when you try to turn on the speed and this mechanism breaks down, no loud grinding metallic sounds are heard from the gearbox itself.
Release bearing
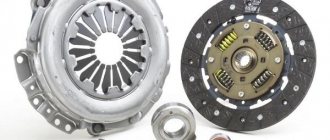
Gears may not engage or may not engage fully if the fault is related to the clutch basket. The release bearing may also be the cause. If the specified bearing does not move freely along the input shaft or is jammed, then replacement of the part is necessary.
It is necessary to separately add that the primary sign of problems with the release valve is the appearance of a rustling or distinct hum when the car is running. The noise appears only when the clutch pedal is pressed to the floor. Such extraneous sounds can be present both on a cold car and on a warm one. After releasing the clutch pedal, the noise should disappear. A jammed release lever will not allow the clutch to engage, which complicates gear shifting and can also lead to rapid wear and destruction of other elements of the clutch mechanism.
Clutch basket and disc
Basket malfunctions are often associated with critical wear of the petals. Wear means that the basket stops performing its functions as it heats up. An increase in temperature leads to the fact that the clutch basket cannot completely remove the pressure plate. The result is very difficult gear shifting after the engine has warmed up a little.
After removing the box, it is necessary to inspect the basket for deformation, signs of overheating and other defects. If found, the element must be replaced.
Another reason why the gears do not engage when the car is running or engages with effort may be a worn clutch disc.
After disassembly, it is necessary to inspect the friction linings on the disk. They should not be critically worn, burnt or damaged, and the disc should not be deformed. Additionally, during the clutch inspection process, a check of the diaphragm springs is required. After replacing failed clutch elements, the box must be well centered during subsequent assembly, and the clutch must be pumped.
How to adjust the link?
You should drive the car onto a lift, pit or overpass. It is not recommended to carry out the procedure alone; you will need an assistant to switch the lever. You must proceed as follows:
- Crawl under the bottom, loosen the clamp located on the gearbox rod and remove the drive from the rod.
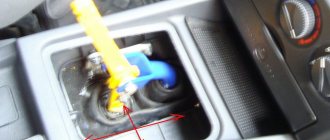
- Pull off the boot or remove this part altogether, unscrew the screw on the cardan.
- Use a hammer to carefully knock down the cardan shaft and remove the boot, if this was not done initially.
- If necessary, replace the oil seal.
- Installation is carried out similarly, but in reverse order.
After the above steps, you will need the help of a second person. He should sit behind the wheel, set the gearbox lever to neutral and tilt it slightly to the right. It should be held in this position until the universal joint clamp is properly tightened.
First gear does not engage when driving
Often, when you turn on first gear while the car is moving, it jams and does not work. There are no problems when starting to move from a place. Some “experts” even put forward the theory that you should only start moving from the first gear, and should not use it during maneuvers.
This problem occurs because the injectors do not have time to equalize the torque of the gears, and the driver forcibly tries to connect them. The flywheel spins much faster than the drive shaft and the teeth can fly if the force is large.
Don't rush to press the lever. Bring it to neutral, push it lightly into first gear, and wait for the synchronizers to do their job and the gear to engage.
For old boxes there are instructions for switching with re-gas. When downshifting while driving, move the handle to neutral, step on the gas, increase the speed, and then smoothly change gear. This method is used by owners of preserved vintage cars, the price of which has recently increased significantly.
Troubleshooting
Many transmission malfunctions that cause the reverse gear to disappear or fall out can be eliminated without removing the unit from the car.
If the cause is a loosening of the bolt securing the clamp on the rod, then to correct the defect it is necessary:
- Place the car on a lift.
- Completely loosen the clamp nut.
- Place the gearshift lever in the fully engaged reverse gear position.
- Fully engage reverse gear at the gearbox using the shift rod on the crankcase.
- Tighten the clamp mounting bolt.
Backstage adjustment
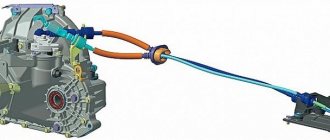
If tightening the clamp does not help get rid of the problem, then you need to check the condition of the shift drive parts. One of the reasons why the reverse gear does not engage may be a poorly adjusted rocker.
To make adjustments to the mechanism, you may need the following tools:
- two wrenches with a size of 13 mm, preferably a socket design;
- any wrench or 10 mm socket;
- small hammer;
- slotted screwdriver.
Since the cause of malfunction of the link can be wear of parts, spare parts may be needed:
- universal joint of the rocker;
- Sometimes the shift rod seal may need to be replaced.
Two people are required to adjust the rocker or replace parts of its drive. One person must change gears from the passenger compartment, and the second must adjust the travel of the shift rods.
The order of work is as follows:
- Provide access to the bottom of the car by placing it on a pit or a lift.
- Using a 13 mm wrench, loosen the clamp installed on the gear shift rod.
- Remove the rod from the box rod.
- Using a screwdriver, carefully remove the boot.
- Using a 10 mm wrench, unscrew the fixing bolt on the cardan shaft.
- Knock off the cardan shaft with light blows of a hammer. It is important not to damage the shaft.
- Remove the universal joint seal boot.
- If there is an oil leak, the sealing gland on the box rod must be replaced.
- Install a new boot (or leave the old one if it is intact) and install the universal joint on the shaft.
- Align the hole on the cardan with the notch on the shaft.
- Tighten the 10 mm clamp and install the boot completely in place.
- Install the rod on the cardan rod and adjust the gearshift lever travel.
- The second person should sit in the driver's seat, set the gear shift lever to neutral, move it slightly to the right and hold it in that position.
- After this, you need to tighten the 13 mm clamp nut.
Replacing and adjusting the gearbox driveshaft
So, if only reverse does not work, and all other modes do not fail, then you will need to replace the universal joint and adjust it. To do this, prepare a new spare part, a gear selector shaft seal, a set of keys, a hammer and several screwdrivers of different sizes.
Carry out the work according to the instructions:
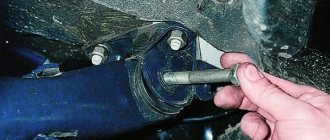
- Place the machine on an overpass or over a pit. Find the gearbox from below and loosen the clamp bolts on its drive rod. Remove the actuator completely from the stem.
- Using a screwdriver, pull the boot towards the unit. Often during this step the boot is completely damaged, in which case it can be removed and then a new one installed. Unscrew the fixing screw on the universal joint.
- Carefully tap the driveshaft off the assist shaft with a hammer. Remove the boot if you have not damaged it previously. Install a new oil seal on the speed shaft.
- Install a new boot, place the cardan on the shaft so that the position of the fixing screw coincides with the recess on the shaft.
- Tighten the retaining screw and place the rod on the rod, but do not tighten the clamp.
- To make the adjustment, ask an assistant to move the gearshift lever to the neutral position and a short distance to the right. He should hold it in this position while you tighten the clamp.
If the reason for the failure of the reverse gear was hidden in the cardan of the carriage, then you will no longer have problems after this repair.
Problems with reverse gear on automatic transmission
In practice, gearbox malfunctions associated with engaging reverse gear occur on both manual and automatic transmissions. "Automatic machines" have different designs. Robotic boxes are similar in design to “mechanics”. But the automatic transmission has its own list of breakdowns when it works hard or the reverse gear has disappeared.
- The fluid level is below normal, or it is contaminated and has lost its working qualities. The automatic transmission device is sensitive to the quality of the lubricant and its level. Therefore, it is better to start finding out the cause by checking the transmission fluid. An excessive oil level also contributes to improper operation of the unit. The service life of the fluid is limited to a mileage of 60 thousand km, but sometimes it is necessary to change it more often, as the lubricant becomes cloudy and contaminated.
- Wear of friction discs. The correct operation of reverse gear, as well as the “D” (drive) mode, depends on this. Worn clutches may prevent 3rd, 4th and reverse gears from engaging. In this case, eliminating the breakdown consists only of replacing the clutches.
- The splines on the drive drum are cut off. The car can move forward, but it will be impossible to go backward.
- Worn friction brake band. There is no reverse movement, but forward movement works.
- The brake band piston cuffs are torn or worn. This will only be noticeable when you engage reverse.
- Control solenoids or hydraulic units are jammed.
Sometimes the lack of communication between the torque converter and the oil pump gear also affects the reverse operation.
How to change gearbox oil
If you need to change your oil, then first of all, buy it.
A four-speed gearbox will require three liters of transmission fluid. You will need to pour 3.3 liters into a five-speed gearbox. If you are changing the oil for the first time, then buy 80W-85 class fluid. It is perfect for use in the VAZ-2109 gearbox. Car owners prefer to purchase Lukoil brand products. The work of changing the oil in the box is carried out as follows:
- Place the car on an overpass or over a pit, warm it up slightly so that the liquid is not viscous. Locate the oil drain plug on the bottom of the box.
- The unit has a rubber cap that needs to be cleaned along with the breather. After cleaning these parts from dirt, return them to their place.
- As soon as the preparatory work is completed, place the container, twist the plug with a wrench, and begin draining the transmission oil.
- The waste liquid will drain completely within half an hour.
- Screw on the plug, tighten it well, but do not strip the thread.
- Under the hood, find the transmission dipstick and remove it. In place of the probe, stretch a hose, at the other end of which a regular watering can or funnel is installed. Pour transmission oil into the box through the hose. On older units, the fill plug is located next to the drain plug.
After the work is completed, check the lubricant level with a dipstick and take a control measurement after 2-3 days. If necessary, add oil; if it becomes critically low, inspect the box for leaks.
Old gearbox oil or low level
If the car is not new, then who knows if the gearbox oil was changed and when? You need to change the oil and pray that something worse doesn't happen. If there is a leak, drop by drop a day and you may not notice how the oil leaks out of the box. As a rule, this happens through the gearbox gasket or shaft seals. Over time, the box reacts to this with increased noise, but you might not have noticed this either. Both changing the oil and replacing gaskets with seals is best done at a service station, or on your own if you have a “green” understanding of what you are doing.
Wear of the rocker bushing
This malfunction may be indicated by some looseness of the lever. However, if the wear proceeded evenly - it ran its course - you could get used to the free movements of the scenes and not notice the impending troubles. The problem is solved by replacing the bushing - remove the lever cover, then remove the rocker itself, replace the plastic bushing with a new one and put everything in place. The procedure is carried out in the car interior.
Extending the service life of gearboxes
You will be able to use your car for many years without going to car repair shops if you can follow basic recommendations. They will extend the service life of the gearbox, minimize possible problems, breakdowns and the need for repair work.
Transmission shaft assemblies
There are only two recommendations.
- Always try to monitor the oil level in the gearbox. If it drops, be sure to top it up immediately, do not delay the procedure until later. When the oil becomes unusable, change it completely, rather than fill in the missing amount.
- Avoid aggressive use, do not jerk the gears sharply, accelerate smoothly, and brake similarly. A simple caring attitude towards the gearbox will allow you to avoid wear and tear and numerous breakdowns.
As you can see, solving problems with checkpoints is not so easy. Therefore, the best option is to prevent their occurrence.
Big trouble
Sometimes the reason for poor gear shifting lies in a more serious problem than described above. We are talking about damage to the spring, which is present in any box. A piece of the spring gets stuck in the groove and prevents the gear from changing normally. In some cases, reverse gear disappears completely, and sometimes works intermittently.
The problem is quite serious, because you will have to go deep into the unit, and not every car owner can do this. It is better to contact a car service if the reverse gear on the VAZ 21099 is difficult to engage. The technician will conduct an inspection and decide on further actions. You can replace the spring or install a new gear shift mechanism assembly. The second option is more preferable, since a separate spring may soon break again.
There are several reasons why the reverse gear on a VAZ 21099 does not engage. The breakdown must be identified and repaired in a timely manner in order to prevent serious consequences.
Video
A video from the Garage channel demonstrates the removal of the switching mechanism on an already partially disassembled box.
The problem of incorrect activation of speeds in VAZ cars can be called spontaneous, since it is familiar to many car owners of Russian-made cars. Now you can find out why the reverse gear on the VAZ 2109 does not engage and how to fix this problem.
Box nuances
The VAZ 2114 uses a five-speed manual gearbox. It is quite simple in design, which allows you to independently carry out preventive and repair work.
Device diagram
Experts recommend identifying a malfunction at the initial stage of its occurrence, since delaying means wasting even more time, effort and money.
Tin packaging for gifts for car enthusiasts
Tin packaging for gifts for a car enthusiast can look very festive and attractive. Stylish and…
Next 06/28/2021
Sources:
https://tazovod.ru/raznoe-2/vaz-2115-ploxo-vklyuchaetsya-zadnyaya-peredacha-vaz-2115-inogda-ne-vklyuchaetsya-zadnyaya-skorost.html https://soloserv.ru/avto/ne -vklyuchaetsya-zadnyaya-peredacha-na-vaz-2114-ustranyaem-neispravnost
Features of replacing transmission fluid
Transmission oil must be changed at regular intervals, usually every 15-20 thousand kilometers. However, it may exhaust its resource earlier. This can be determined using a probe. Take a piece of white cloth and use a dipstick to transfer a drop of oil onto it. It is necessary to change the lubricant in cases where a drop of oil:
- colorless or has a black tint;
- contains metal particles or grains of dust;
- opaque and viscous;
- sticky to the touch;
- absorbs into fabric for a long time;
- cloudy or foamy.
Most often, reverse gear is difficult to engage if the oil has become cloudy. This is a sure sign that it has entered the engine. If the problem is not detected in a timely manner, you will soon need to carry out a complete gearbox repair or even an expensive transmission replacement.
Recommendations from experts
Sometimes the driver is forced to drive a car with a faulty gearbox in order to get to the repair site. But how to turn on the speed if the clutch is faulty or the synchronizer is worn out?
- If first gear does not work, you can carefully move away in second gear.
- If difficulties arise when turning on the engine while the engine is running, you can do this with the engine stopped and then start it. But this method can only be used by experienced drivers, as it can damage the transmission.
- Double squeezing and re-gasping. It is necessary to set the gearshift knob to the neutral position, then press the clutch pedal, and lightly press the gas (up to 2500 rpm according to the tachometer). After this, you need to slow down and disengage the clutch again, and then engage the gear. If this does not work, then you need to repeat all the operations again. While driving, experienced drivers know how to change gears without a clutch mechanism.
- When engaging reverse, the lever may not reach all the way. Then you need to slightly release the clutch pedal, the gear will turn, the teeth will engage, and the handle will reach the end.
- After pressing the pedal, it is recommended to wait 3 seconds and then engage reverse gear.
- You can try turning on the reverse by first setting the handle to 4th, then to the rear.
- Repeatedly squeezing the clutch and returning the gearshift lever to neutral sometimes also helps solve the problem.
What's the result?
So, the main reasons why gears are difficult to engage are problems with the clutch mechanism and gearbox. However, most of them can be eliminated yourself if you have tools, spare parts and certain skills.
Why may it be difficult to engage gears or why first gear, second, reverse, etc. may not engage? The main causes of gearbox malfunctions, recommendations.
Reasons for difficulty shifting gears with the engine running. Transmission oil and level in the gearbox, wear of synchronizers and gearbox gears, clutch.
How to change gears without a clutch: driving a manual car without a clutch in case of malfunction. Tips and tricks.
Manual transmission gears (speeds) do not engage after replacing the clutch: main reasons, settings and adjustments. Diagnosis of problems, useful tips.
Clutch: basket, release, clutch disc. Purpose and design, principle of operation of the clutch basket. How to increase clutch life.
The automatic transmission does not change gears: the car does not move forward or backward, the automatic transmission does not switch to individual gears, reasons.

