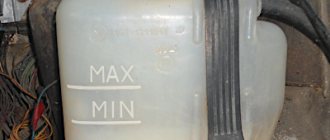
These crawling reptiles like it to be hot and humid, but we want it to be warm and dry. When the glued foam dripped onto the radiator once again, I decided to put an end to this problem completely: I decided to try installing the radiator and heater valve from the VAZ-2108 on the IZH-2126.
If you decide to do the same, you will need:
- Heater radiator (from VAZ-2108).
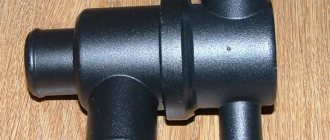
- Heater valve (from VAZ-2108).
- Two L-shaped pipes of a “classical” stove (there are two types, it is better to take longer ones).
- Straight pipe (from the VAZ-2110 stove).
- L-shaped pipe from the expansion tank (VAZ-2108).
- S-shaped pipe from the stove (VAZ-2108).
- Six 1/2 (half inch) or smaller clips, eight larger clips.
- Four scrapers (adapters) from 1/2" to 3/8" for water pipes.
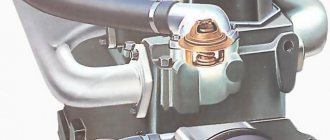
Let me explain the last point: I bought a copper heater radiator from a VAZ-2108, which I bought (at the Za Rulem store). VAZ 2106 (on my Izha) also has two pipes of the same “small” diameter, and between them there is a heating element valve from a VAZ-2108 with inlet-outlet pipes with a diameter of 1/2 inch (19 mm, below the “large” one), so I had to reduce these diameters before and after the tap.
I took hydraulic "squeegees", but you can find or make "adapters", for example, in the garage I found some kind of bushing or guide with the outer diameter for "large" pipes, and the inner one is small enough to grind half of this bushing down to "small" » diameter as possible. Or even install a faucet from AZLK-2141 so that there are fewer problems. Yes, it seems that the aluminum stove from the VAZ-2108 has a pipe with a “large” diameter at the outlet, so set 3 shifts and you need to look at the circumstances.
Further in the text: hoses - flexible rubber, hoses - hard metal or plastic.
We connect the heater radiator from the VAZ-2108 to the IZH-2126 with our own hands
it is necessary to remove the “torpedo”, while the control handles (“emergency group”, “fog lights”, hood release handle, etc.) are not removed, i.e. they are located to the left of the steering wheel. Because if you move the seats back, you disassemble and release the "glove box" and all the "lower" plastic, so you can simply open it up to the driver's door, with all the necessary interior space available, and the "lower" plastic with the "glove box" will lie down in the driver's seat. After this, the stove itself is removed (assembled), to avoid problems with antifreeze, you can take a hose and connect the pipes on the engine with its “wrap” (for convenience, it is better to remove the stove fan), and carefully drain the antifreeze from the stove.
Remove the stove and place it on the table. We take out the heater radiator. We disassemble the body itself, for which we remove the fasteners along the seams. On the left side we cut through the back, against which the heater radiator rested, so that the new radiator fits into the hole (I recommend not cutting “under the root”, but leaving a small section). Having placed the L-shaped classic pipes on the radiator outlet pipes and pulled them with clamps, carefully insert the radiator into the resulting hole with the pipes up and mark on the plastic the points of the holes where the pipes will pass. Since the upper damper is located here, the pipes must be moved to the left of the heater itself.
On the right side (where the upper flap control lever is located and the heater valve was located), we inserted the heater valve from the VAZ-2108; to do this, it is necessary to cut off all the “extra” plastic from it, so that it is located between the hole for the radiator (bottom) , upper edge (top), stop for attaching the rod (left, end view), control handle of the upper edge (right). Having positioned the treated faucet as close as possible to the stop for the traction device (do not forget that the pipes are located on the inlet-outlet pipes), mark on the plastic the points of the holes for the inlet-outlet pipes and the screws for fixing the valve (remember also the upper damper). The crane control “flag” should “look” down into the radiator hole (therefore it is accessible to the standard Izhevsk traction rod).
We make holes in the plastic in the designated places. Then we install the heating element tap and attach it to the plastic. We take a straight hose from a VAZ-2110 and cut it in half, put both parts on the holes for the mixer, the ones that go into the body, and fasten them with clamps. We connect both parts of the stove body. Having previously glued the foam rubber to the heater radiator, we insert it into the body. We mark and cut the rubber tubes so that they rest against each other. Since it is better to cut pipes on a table, straight pipes should not be fixed with clamps at first, but after marking, remove and cut them on the table, then place and secure with clamps.
We insert “squeegees” between the tubes and wrap the tubes with clamps. We assemble (secure with latches) the stove body, not forgetting the upper and lower ribs. Personally, my fin control knob and the new heater valve are so tightly pressed together that I had to sacrifice that flapper and secure it in a position that directs all the incoming air to the radiator. But you can come up with a way out of this situation, for example, turning the shock absorber 180 degrees so that its control knob is on the left (driver's side), but then this will require a separate control or other options.
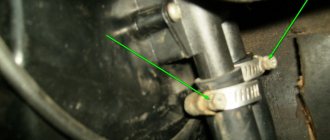
We place the assembled stove on its side and put hoses on the external pipes of the faucet and secure them with clamps. L-shape for the pipe closest to the wall separating the passenger compartment and engine compartment (hereinafter simply the wall), S-shape for the pipe closest to the passengers (S-shape is longer than L-shape). In this case, it is advisable to trim the edges that fit on the faucet so that the pipes protrude as little as possible. We install the assembled stove in place. To simplify this procedure, you can put the nut on the right (where the tap is located) 2-3 turns in advance, then, placing the stove body on the right screw, screw on the left nut.
Screwing the stove into place, we insert the pipes into the usual holes in the wall; to do this, these holes need to be drilled a little so that thicker pipes pass through them along with the gaskets (standard gaskets will need to be cut and extended). L-shaped in the nearest upper hole, S-shaped in the lower one. Let's take “thin” pipes from an old stove. We install a “squeegee” in them and fix the pipes with clamps. We select the required length so that these “thin” tubes connect the tubes and the “thick” tubes coming out of the engine without bending. After measuring, cut the “thin” pipes and connect them with the “thick” ones, securing the latter with clamps.
We remove the tube that “wraps” the antifreeze, and put the “thin” tubes on the freed engine tubes and secure them with clamps. Let's fix the stove fan. We install control rods for the blinds and the stove tap. In this case, the left rod, which controls the lower flap, is located as before, the right rod is also put in its place, only a bend is formed at the end of the wire and its end is inserted into the hole of the “flag” tap; The length of the end of the thread is selected as necessary (the length of the curl should be enough, I only have one “loop” and behind it a thread hook).
Fold the rest of the “torpedo” structure. When installing the glove box, we observe how the rubber pipes and the edges of the plastic box come into contact; it is better to lay a piece of rubber pipe at the points of contact (cut along the edge and put plastic on the edge). By the way, the side wall, which is located inside the “glove compartment,” rests against the pipes and is not installed; in its place you can put a metal grill or something else.
This design, when connecting the heater radiator from a VAZ-2108 to an IZH-2126, was assembled in October 2001 and tested. The temperature was controlled with great efficiency (from completely cold air to hot air). No antifreeze leaks were detected. True, the efficiency of the central deflectors has decreased, in particular, when the tap is open, cold air does not come out of them, but this problem can be solved in principle, as I said earlier.
Heater radiator VAZ-2108 heater radiator VAZ-2108: 1102.8101.100 Applicability: VAZ-2108, VAZ-2109 Technical characteristics: Version: copper-brass Row: 2 rows Nozzle diameter: inlet / outlet 16 mm Heat transfer, kW: - 7 Consumption coolant, l/min: - 17 Weight, kg: - 2 Manufacturer: Orenburg radiator
We will send your luggage
* Price and characteristics are for informational purposes only and are not a public offer. Opinions and recommendations reflect our views only and are not official.
1102.8101.100 heater radiator VAZ-2108, VAZ-2109, Tavria copper-brass, tubular tape using traditional technology Analogue: economy version 2108-801060 Wonderful - drawing of the VAZ-2108 heater radiator with dimensions
Radiator of the VAZ-2108 stove, radiator of the VAZ-2109 stove: [email protected] Radiator Orenburg, Radiator Wonderful, Radiator Luzar, Cooling radiator Luzar
What is a car radiator and what is it used for?
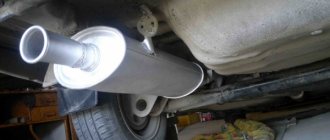
A radiator is a part that cools all engine components that heat up during its operation.
The radiator is designed to change the temperature of the heated coolant by air flow. After all, we know well that if the engine does not operate at an optimal temperature, it will simply overheat, boil and fail. Then you will have a lot of trouble on your head. Let's briefly explore the principle of its operation, for a clearer picture.
Heated liquid (antifreeze) passes through the radiator tubes, which is cooled by air flow. Therefore, this important cooling part is installed in its intended place, which is located in the front of the car body, immediately behind the radiator grille, from where the air flow appears when driving. Thus, this very liquid passes through the “honeycomb” of the radiator and cools the heart of the car to its optimal temperature.
Description
HEATER RADIATOR 2108 (COMFORT BRAZED)
CODE LUZAR LRh 0108b
OEM NUMBER: 2108-8101060 2108-8101060-51P
DESIGN: COMFORT, aluminum tubular belt disassembled (soldered
Radiators for stoves
Brand – LRh – Luzar Heater radiator
Heating radiators (also known as radiators, also known as heater cores) are heat exchangers that use the heat generated by the engine to heat the vehicle's interior. They allow you to maintain a comfortable temperature and prevent the windows in your car from fogging up.
For reference, different names of this site have the same right of use. For example, “heating radiator” and “stove” arise from the function of this heat exchanger, “heating radiator” and “stove radiator” - from the installation location.
LUZAR produces hundreds of heater radiators for a wide range of vehicles on the Russian market. They can be purchased at partner stores throughout Russia or online.
Many models of heating radiators are supplied to automobile factories in Russia and Ukraine for both cars, trucks and buses.
The range of manufactured stoves is constantly increasing; New types of vehicles are being mastered for the most popular cars in Russia.
Strong research and development efforts enable research into improved heat exchangers and the creation of new designs that provide improved performance for heater cores. Main areas of research:
- use of different types of pipes
- pipe transfer
- changing the “filling” of the kernel
- use of turbulent turbulators
- use of various aluminum alloys
- testing welds with different characteristics
- improve the corrosion properties of metal
- . and many other areas of research and development.
Design of LUZAR heating radiators
LUZAR heating radiators are available in three types:
- Tubular-plate, prefabricated, made of aluminum. It consists of aluminum plates through which aluminum tubes pass through which coolant flows. The tanks of these radiators are made of plastic. Heating radiators of this type are used to heat small rooms due to limited heat transfer; have the best rigidity and lightness, as well as the lowest price.
- Tubular tape, disassembled (soldered), aluminum. The corrugated aluminum tape in such a radiator is located between flat oval aluminum tubes. Radiator tanks of this type can be made of either plastic or metal. The design of devices made of aluminum in disassembled (soldered) form is the most universal, which allows you to create heat exchangers with any characteristics. Aluminum stove radiators are lightweight, relatively rigid and inexpensive.
- Disassembled tubular tape (soldered) copper-brass. The design is very close to type 2: between the flat-oval copper tubes there are copper strips bent in the shape of an accordion. At the same time, the tanks on such heating radiators are made of brass to increase the overall rigidity of the structure. Copper heating radiators, due to the high specific heat capacity of copper, have excellent heat transfer performance. However, due to the high softness of copper, heating radiators made from this metal are forced to have a narrow pipe and a large gap (step) between the pipes, which imposes strict restrictions on maximum efficiency. In addition, copper stove radiators have the highest cost and torsional rigidity, fracture resistance and the lowest internal pressure. In this regard, copper heating radiators are “outdated” and are gradually being phased out.
LUZAR: CONTROL OF TIME AND STREETS
LUZAR radiators have repeatedly received the “Radiator of the Year” award
Examples of prices for a part and its installation
Let's look at examples of prices for the part itself and for its installation.
As is already known earlier, a car radiator for a VAZ 2109 costs from 1,500 to 3,000 rubles . The installation itself can cost 200-600 rubles , it depends on the service where you have your car repaired and on the services provided by the service.
Obviously, the price of a radiator for a “higher class” car will itself be higher.
For example, a radiator on a Mercedes-Benz A-class will no longer cost 1,500-3,000 rubles, but 4,000-10,000 rubles , and its installation will be a more fragile task and will require more time and effort; accordingly, it will take money to install, perhaps even 2 times more than “nine”.
Analogs for LRh 0108b LUZAR
| 21080810106000 | DAAZ (DZR) |
| LRH 0108 | LUZA |
| KT 104005 | Craft |
| 1102.8101.100 | Orenburg radiator |
| LR2108-8101060 | Pramo |
| RO0004C3 | FENOX |
| LRH 0108B | LUZA |
| RO0004O7 | FENOX |
| RAIN018430 | TRIALLY |
| 21080-801060-00 | DAAZ |
| RAIN014484 | FINORD |
| 2108-8101060-PCS-MS | MASTER SPORT |
| 21088101060 | Pramo |
Here are the main ones. Let's start with the simplest ones:
- the bolt that attaches the plastic fan to the pulley has come loose;
- the radiator is not inserted into the socket and just lies on the suspension;
- part of the impeller blade broke off, resulting in an imbalance;
- there is dirt on the impeller, there is also an imbalance (it needs to be cleaned);
- due to the fact that the cushions are pressed, the motor does not hold up and there is vibration (you need to change the cushions, install special rubber gaskets);
- no lubrication, the fan is humming (the electric motor needs to be lubricated);
- broken bearing (it needs to be replaced).
Applicability *
* shows the applicability of analogues LRh 0108b LUZAR |
| “IT’S RAINING” Auto parts and goods in the hands of experts Wholesale and retail From warehouse and to order | Moscow, 1st passage, no.4. [email protected] | +7 |
Repair using chemicals
Minor damage can be repaired using special products, namely radiator restoration fluid, powder restorers or sealant. The principle of their operation is approximately the same: the product must be poured into the engine cooling system. The resulting mixture clogs cracks if it comes into contact with air.
Of course, not all chemistry is the same, therefore, in general, it is not possible to answer for the quality. For example, a low-quality reducing agent can cause harm. It will clog the entire cooling system. Thus, the stove will stop heating and, as a result, it will be necessary to flush the system or replace the stove radiator. Thus, for repairs, chemistry is only a temporary solution to the problems that have arisen.
Design of the VAZ-21099 heater
And here everything is simple: the created flow passes through the radiator honeycombs, where heat exchange occurs, therefore, heat is transferred to the air, which then blows through the air ducts to the desired areas.
The design of the VAZ-21099 stove includes several main components:
- stove body made of plastic;
- heating system radiator (connected to the cooling system);
- electric fan;
- air channel;
- heater control mechanism.
This car used heaters of two modifications (old and new), which differed slightly in design, but their components are completely identical.
Housing, radiator, dampers
The shroud provides the necessary heat reorientation because the movement generated by the fan motor is directly introduced into the fan motor rather than being dissipated. The body of the VAZ 2109 stove itself consists of two halves connected to each other by special brackets. To reduce flow losses, a gasket is placed between its halves. Partitions are made inside both halves to ensure correct direction.
In addition, inside this case there is a niche in which the radiator is installed. The radiator was originally made of brass, but is now almost always made of aluminum. The design of the stove radiator 2109 is identical to the main one (consists of two tanks, pipes through which the coolant circulates and plates forming a honeycomb), but much smaller in size.
Video: The stove in the VAZ 2108, 2109, 21099, 2110, 2111, 2112, 2113, 2114, 2115 HEATS poorly
Air is blown out thanks to the stove shock absorbers, which are also installed inside the housing. These elements are movable, making it possible to close some air ducts and open others. There are three of them in total: the main one (heating control), an air duct that redirects between the foot area and the power source into the cabin, and a flow damper to the windshield.
Additional shock absorbers are installed on the side and central deflectors. It turns out that by default, air from the body constantly blows onto the deflectors and this is done so that the flow always has an exit. Thanks to the presence of blinds, it is possible to supply hot air to several zones simultaneously (interior space and windshield or windshield and foot area).
The main heater damper supplies air flow to the radiator or bypasses it. This is because the heater also plays the role of a cabin ventilation system. This allows for fresh air to be provided in summer. And to do this, you only need to redirect the movement around the heat exchanger, and the heated coolant will stop supplying the radiator itself. To disconnect the heat exchanger from the cooling system, use the stove valve, which is located on the supply pipe in front of the radiator.
Fan
The air flow is created by a squirrel-cage fan driven by an electric motor. These two elements are enclosed in a separate housing mounted above the heater body. In addition, it is designed to provide the easiest access to the electric motor, since it is considered one of the weakest components of the system.
There are three fan operating modes. This allows you to select optimal air supply conditions (cold or hot).
Control mechanism
Video: Useful tips for cars. Why does the VAZ stove not work?
To control the heater and redirect air flow and open and close the coolant supply valve, a control mechanism displayed on the center console is used. This is a three-movement mechanism and a fan operating mode switch.
The lower slider is the main one, as it changes the operating mode of the system (heating or ventilation). Control two elements simultaneously: the main damper and the tap. When this slider is switched to the “ventilation” mode, the valve and damper close simultaneously, which ensures air movement bypasses the heat exchanger. And everything is exactly the opposite: when switching to the “heating” mode.
The other two sliders control the other two flaps: windshield power and footwell power. For example, when you move them to the center (left slider all the way to the right and right slider all the way to the left), the footwell duct will close and the duct leading to the windshield will be open. When these sliders are moved apart at the edges, hot air blows into the legs (and its supply to the central dampers will also be blocked).
The carriage is connected to the shock absorbers and the crane by cables. In addition, the main slider accommodates two cables at the same time as it opens and closes the damper and faucet at the same time.
To balance the impeller, you must:
Option 1 . By winding the wire around the blades, we check the imbalance. We gradually level it out until there is silence.
Option 2 . It is necessary to insert into the hole a part that is suitable in diameter (drill). Place the impeller with its axis on two horizontal supports. If there is an imbalance in this situation and the impeller tends to take an unclear position in space, this malfunction should be eliminated by grinding the blades. You can also glue a weight inside the impeller.
If, after the above reasons, vibrations and noise remain, then you should change the fan impeller, which will have eight blades (four blades come from the factory). Or finally make soundproofing. After replacement, the fan will definitely not work any worse. Most often, after replacing the fan with an eight-blade one, the vibrations and noise disappear, and driving in the car will now be very comfortable.