Published:
14.02.2017
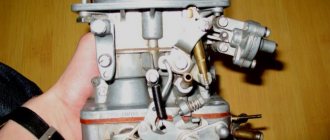
On all cars of the “ninth” family, the engines were equipped with domestically produced Solex carburetors. The only exceptions are later modifications, on which the manufacturer installed injection power units. Although far from being the most technically advanced vehicle, the Nine is still popular among car enthusiasts. This is largely due to the car’s maintainability and the relatively low cost of spare parts. In addition, a significant part of the restoration and adjustment work can be carried out by the owner himself, including adjusting the VAZ-2109 and 21099 carburetor, tuning it and cleaning it.
This article will consider only those operations that every car enthusiast can perform with his own hands. Don’t be intimidated by the large number of manipulations - follow the instructions, be careful, and setting up the VAZ carburetor will go no worse than in a service station. This way you can save time and reduce machine maintenance costs.
You can clean and adjust the carburetor for the VAZ nine yourself, in the garage
Idle speed adjustment
The second setting of the VAZ-2109 carburetor is idle speed, it can be partial or full. The first is for minor speed adjustments, the second is for adjusting the amount of air (setting CO emissions in the exhaust gases).
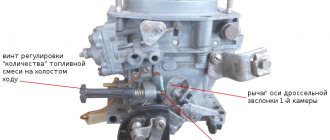
Partial adjustment is performed using the air-fuel mixture “amount” screw. This screw sets the opening angle of the throttle valves, which ensures that the air-fuel mixture enters the cylinders when the accelerator pedal is released. The “quantity” screw rests on the throttle valve control lever and when screwed in, it pushes the lever, causing the valves to open slightly.
Partial idle adjustment is performed with a warm engine and creating a load on the vehicle's on-board network by turning on the high beam headlights and the interior heater at full power. The adjustment is carried out with the engine running by screwing in/unscrewing the “quantity” screw until the optimal idle speed is established, which for the VAZ-2109 is 800-900 rpm (this can be tracked using a standard or plug-in tachometer).
If it is not possible to set the required speed or the motor operates unstably at it, a complete adjustment is made, which is made by two screws - “quantity” and “quality”.
The algorithm for this adjustment consists of the following stages:
- Warm up the engine and then turn it off;
- We find the quality screw (it may be closed with a plug that will have to be removed), screw it in until it stops, and then unscrew it 3-4 full turns;
- We start the engine, turn on electrical consumers (lighting and stove) to create a load in the on-board network;
- By rotating the “quantity” screw, we achieve 700-800 rpm on the tachometer;
- By turning the “quality” screw, we set the maximum possible speed (they will increase to a certain level, and then stop. The moment the speed increase stops is considered the maximum);
- We set the “quantity” screw to 900 rpm;
- Using the “quality” screw we lower them to 800 rpm;
- We slowly tighten the “quality” screw until interruptions appear in the operation of the power plant, after which we unscrew it back 1 turn;
- We adjust the speed with the “quantity” screw, bringing it to a normal value - 800-900 rpm;
After the adjustment operations, we check that they were carried out correctly. This is done by sharply pressing the gas pedal and then quickly releasing it. With a properly configured carburetor, the engine should respond quickly to pressure, without any failures or hesitations. And after releasing the pedal, the speed will drop to the idle level, without sags or instability of the engine.
Video: HOW TO CORRECTLY ADJUST THE FUEL LEVEL
https://youtube.com/watch?v=WHV9b9HfvEk
Adjusting the VAZ 2109 carburetor is the most common car maintenance procedure. Due to the complexity of the unit, it is considered the most subtle and sensitive setting of the car. It's time to find out how to adjust the VAZ 2109 carburetor and repair it.
Before cleaning and adjusting the carb, you need to study the carburetor data. This is a table that has content in the form of technical characteristics.
No spark
The climate of our region, as well as the imperfection of the technical part of the VAZ 2109, leads to the fact that the spark disappears. Because of this, the engine cannot start.
There may be several reasons for this:
- The functionality of the switch is broken;
- The ignition coil is broken;
- Hall sensor does not work correctly;
- The contacts have oxidized or dirt has formed on them;
- The high-voltage wire has a fault;
- The ignition switch does not work and needs repair;
- Soot has formed on the candles;
- The ignition timing on the carburetor is incorrectly set.
Preliminary work
Although our primary task is to adjust the VAZ 2109 carburetor, we need to start cleaning the unit from carbon deposits and dirt. Often plaque is the cause of the problem, so you will need a good cleaning agent. In the auto supply store you can find various chemicals for such needs; You need to ask specifically for the carburetor. WD 40 is not suitable for cleaning due to the abundance of oil in the composition.
In addition to chemistry, the following items will also be useful to you:
- Small stiff brush. In extreme cases, a toothbrush or even toothpicks will do.
- Rubber and fabric gloves. You can take two pairs of rubber ones - just in case, because cleaning products are very aggressive.
- Set of keys and screwdrivers.
- User manual for VAZ 2109 with Solex circuit.
- A can of compressed air for blowing parts.
What is the spray can for? The fact is that the nozzle channels are very narrow, which is why mechanical cleaning using narrow tools will be useless, but a powerful directed air stream is suitable for such a task.
You need to carefully clean both the outside and inside of the carburetor. Fastenings - screws and bolts, put them in separate boxes, they should also be processed and blown out at the end.
Be sure to remove all rubber parts from the assembly, otherwise the chemical will simply dissolve them. The same should be done with plastic. Only metal parts need to be treated with the cleaner. This is done in two stages:
- The chemical is applied, after which you need to wait 10 minutes.
- When the coating has partially dissolved, you need to rinse the parts and housings under running water.
If any deposits remain, they can be easily removed with a toothpick, stick or brush. The last stage of cleaning is drying.
How to flush a carburetor assembly without disassembling it
Flushing the Solex carburetor is recommended by the manufacturer in cases where there are clearly any problems with its operation: increased gasoline consumption, jerks and jolts when driving, unstable idle speed, problems with starting.
The traditional method of washing carburetors is to completely disassemble them into individual components, which is not always possible for an inexperienced VAZ owner to do. To simplify the procedure, a technique was created for washing and cleaning the carburetor without disassembling it into components. This technique is based on the use of special aerosols in cans. The most affordable carburetor cleaners are considered to be aerosols produced by ABRO and Mannol - they can be bought at any auto store for 100–150 rubles.
These cleaners do an excellent job of cleaning carburetor mechanisms, and they are also very easy to use. To flush the Solex carburetor, it is recommended to turn off the engine, let it cool and begin the procedure:
- Remove the air filter box from the car and place it to the side.
- Unscrew the solenoid valve from the carburetor body.
- Place a special narrow nozzle on the aerosol can and spray the liquid on the nozzle channels, the first and second chambers, dampers and all visible elements of the carburetor.
- After this, spray the aerosol on the external parts of the mechanism.
- Wait 5–8 minutes (depending on the aerosol manufacturer’s recommendations). During this time, the liquid will be able to corrode accumulations of soot and dirt.
- Next, you can start the engine so that it removes all remaining dirt.
- If during one procedure the carburetor did not have time to be properly cleaned, then you can treat it again with the same aerosol.
After such cleaning, the VAZ 2108/2109 will significantly increase its dynamic characteristics, since the accumulation of dirt will not interfere with the normal operation of all parts of the carburetor.
How to replace carburetor parts
Replacing the float, accelerator pump diaphragm, and seals is not particularly difficult. Most often, during repairs, repair kits selected for the type of carburetor are used, which include everything necessary to replace the elements.
The replacement procedure is not regulated in any way: it is enough to remove the damaged part and install a new one in its place. The main criterion: the identity of the elements when replaced.
Adjusting the starter
The starting device can be adjusted when removed. Before adjustment, it is necessary to check the condition of the diaphragm. The part often fails, so it must be replaced with a new one immediately after detecting deformations. Setting up the starter occurs in five stages:
- Closing the air damper. To do this, you need to turn the drive lever.
- Changing the location of the rod. Using a screwdriver or other object, the starter rod is retracted while adjustment work is carried out.
- Measuring gaps. After the rod is recessed, the valve opens slightly. You need to measure the distance between the damper and the chamber wall. The indicators are checked against the parameters declared by the manufacturer and, if necessary, adjustments are made.
- Setting up the trigger mechanism. If a discrepancy between the gap sizes is detected, adjustments are made. To do this, turn the screw using a screwdriver. When the screw is unscrewed, the gap increases, and when screwed in, it decreases.
- Throttle chamber clearance measurement. The air damper must be tightly closed. The gap dimensions are indicated in the manual, which simplifies the process of adjusting the position of the throttle chamber. Adjustment is also done using hardware.
Setting up the carburetor on a VAZ 2109
During long-term operation, the carburetor does not need regular washing from the outside. The need arises only in case of severe contamination of the moving mechanisms, and then only if, as a result of contamination, the freedom of movement of parts is impaired; the carburetor must also be cleaned before tuning or repair.
When cleaning internally, do not use brushes or rags, as threads, bristles and fibers may get into the jets. It is advisable to use special products and liquids for cleaning and carburetor care. Once the carburetor is cleaned, you can begin adjusting.
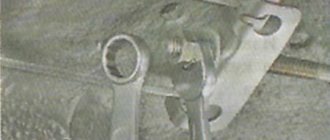
Let's start adjusting the throttle valve drive; first of all, you need to check the cable tension.
The cable should not sag, but it should not be too tight either, because an over-tensioned cable does not allow it to close completely. To tighten or loosen the tension, you need to adjust the drive.
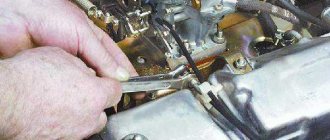
Using a key set to “13”, you should hold the tip nut on the cable sheath, and with the second key, slowly unscrew the lock nut a couple of turns.
Afterwards, you can begin to set the required distance from the tip of the adjusting nut and the carburetor.
The gas pedal must be released - when the pedal is fully pressed, the throttle is fully open.
Now the previously unscrewed locknut needs to be tightened.
In order to adjust the air damper drive, you need to remove the cover from the air filter. Then we begin to check the progress of the thrust in the shell. If the drive is correctly adjusted, then with the drive handle “recessed” the air damper should open completely.
If something is wrong with you, you need to adjust it. The lever must be turned completely so that the damper opens completely.
The damper drive handle needs to be “recessed”.
We take pliers, use them to pull the cable out of the “shirt”, after which the bolt needs to be tightened back.
We begin to adjust the starting device; fine adjustment can only be made with the carburetor removed, using the adjustment of the gaps. To adjust the carburetor without removing it, you will need a tachometer.
Let's start, the first thing to do is remove the air filter housing, then pull out the air damper drive handle all the way. Let's start the engine. The damper itself needs to be opened with a screwdriver to about 1/3 of its full stroke. We turn the adjusting bolt, we need to achieve 3200-3400 rpm, then release the damper.
Now, with the locknut loosened, turn the screw with a screwdriver: you need the rotation speed to be 2800-3000 rpm. Well, that’s all, now you should tighten the nut and put the filter housing in place.
To adjust the idle speed, the engine needs to be warmed up to operating temperature, you also need to turn on powerful electricity consumers, you can turn on the headlights or the stove. We take a screwdriver and use it to turn the “quality” screw to set the maximum speed.
Now, using the “quantity” screw, you need to reduce the speed to a point that is 50-100 more than it should be at idle.
Again, using the “quality” screw, we lower it to the normal value.
You can also look through the book on Solex carburetors - it covers troubleshooting, adjustment and modification of the carburetor.
Video on setting up the carburetor VAZ 2109 Solex
If the carburetor is filled with oil, it is necessary to check the condition of the oil separating mesh, which is installed in the cylinder head covers. The Solex carburetor is connected to two supply hoses from the gas ventilation system in the engine crankcase. One of them is routed to the bottom of the housing, and the second pipe goes to the air filter. To avoid oil escaping from all crevices, experts recommend installing a carburetor fuel filter in the pipe.
Increased speed XX. If the fuel mixture is constantly enriched, while the choke handle is unstable and sometimes does not reach the stop, you should first check the position of the adjusting bolt. You will find it by its large head. Very often the bolt unscrews spontaneously, which leads to a skew of the lever during movement. Accordingly, in this situation it is impossible to correctly adjust the level of enrichment of the fuel mixture. Therefore, the XX speed will be increased.
If after tightening the adjusting bolt the problem is not resolved, you need to check the position of the air damper in the fuel filter. To do this, open the filter cover and look at how the damper is positioned. If it is not installed in a vertical position, you should remove the spring, which is designed to create additional resistance when closing the damper. After removing the spring, the damper will close completely.
Reassembling the Solex in reverse order
Installation of the carburetor mechanism on the intake manifold is possible after washing and repair, as well as some adjustment steps. It is important to connect all fuel and other hoses correctly so that there are no problems with engine operation. The DAAZ 2108–1107–10 carburetor is assembled in the following order:
- A gasket is applied to the installation site. It serves to reliably connect two units - the carburetor and the intake manifold.
- After this, the carburetor itself is threaded onto the studs and secured with four nuts.
- After the assembly has been carefully attached, hoses can be connected. The first step is to connect the vacuum and ventilation hoses.
- Next, the heating block is screwed to the carburetor.
- On one side, the fuel supply pipe is connected, on the other, the return hose for supplying excess fuel.
- The EPHH drive wire is connected to the corresponding screw.
- To complete the work, you can screw two wires (air and throttle valves) to the screws.
The strict connection sequence is due to the design features of the carburetor
After installing the carburetor, it is recommended to turn on the ignition and check the performance of the engine unit. If oil or fuel leaks occur at the hose connections, turn off the ignition and carefully check all connections.
All work that a car owner performs to maintain his car must be conscious. There is no need to disassemble the carburetor and replace its parts unless there are obvious signs of malfunction. In addition, when self-adjusting, it is necessary to adhere to clear rules of action. Both poor-quality repairs and incorrect adjustments can seriously affect the performance of the carburetor.
Idle speed adjustment
The most common problem with a Solex carburetor is the disappearance of normal idle speed; the engine begins to operate intermittently at low speeds. Very often, the cause of such a malfunction is either a clogged EMG jet or the solenoid valve itself. It is very easy to check this - while the engine is running at idle, we disconnect the wiring from the EMG; if the nature of the internal combustion engine does not change at all, and when the valve is unscrewed, the speed increases noticeably, then the defect is present.
You can try to restore normal operation of the XX without removing the entire assembly, and this procedure is quite simple:
- With the engine off, remove the air filter with housing:
- disconnect the EMG wire, unscrew the valve itself;
- we start the engine, plugging the “idle” channel with a finger, “accelerate” several times;
- we stop the engine, do not forget to blow out the EMG and its nozzle using a compressor or hand pump, separating these parts from each other;
- we put the parts in place, do a test start of the internal combustion engine: if the idle speed has stabilized, and when the wiring was removed, the speed changed, it means that the reason was precisely the blockage, and now the idle speed has “returned to normal.”
But it is not always possible to clean the channel in this way; specks may get stuck in the area of the quality screw. Here you already need to remove and disassemble the carburetor, dismantle the screw, which in general is not very difficult, since it is located deep in the channel and is held there by a rubber sealing ring.
Carburetor VAZ 21099 - cleaning and adjustment
If the consumption of a VAZ 21099 suddenly increases, power drops, shots appear in the intake or exhaust manifold, it is time to adjust and clean the carburetor. Since such a misfortune can befall any owner and, moreover, far from civilization, anyone should know the VAZ 21099 carburetor by heart. The principle of its operation is quite simple, and for repairs most often you just need to blow out the jets.
Mostly the VAZ 21099 is equipped with a Solex carburetor, in some cases it can be a VAZ 2107 carburetor. But don’t be alarmed, according to the principle of operation, these carburetors are identical, there are just some nuances in the design. So, for example, in the Solex carburetor for the VAZ 21099 there are as many as two float chambers. Such a device may create some difficulties in setting the fuel level; you may even need a special template.
The most important thing when disassembling and cleaning a carburetor is cleanliness, so cleaning the internal elements with a rag or even a brush is strictly not recommended. The thing is that a thread or bristle can get into the nozzle, which will lead to problems.
If you decide to unscrew the jets, that is, disassemble the carburetor completely, you need to screw them back clearly into their original places. All this is because the ratings of the jets in different chambers are different.
Disassembling the carburetor
First, when disassembling the carburetor, you can unscrew the solenoid valve; it is not recommended to do this with your hands, since the valve can easily be “turned off.” The easiest and safest way to do this is with a key. When removing, the valve jet must be carefully inspected to ensure it is clean. You can also apply a positive signal to the valve terminal from the battery and place it on the bare metal of the car, the valve should click.
Next, you can remove the upper half of the carburetor by unscrewing the 5 bolts with a screwdriver. Now the fuel and air jets and the float chamber will become visible.
To thoroughly clean the carburetor, you need to unscrew the air jets, they are located on top, and then remove the emulsion tubes from the fuel wells. Dirt should be looked for inside emulsion tubes and wells. It is best to throw the jets and tubes into a box of gasoline and rinse them that way. As for the fuel wells, you can unscrew the fuel jets and then blow them out with a compressor.
The accelerator pump also deserves attention; to disassemble it, you need to unscrew 4 screws and remove the membrane. Garbage also likes to accumulate in this place. The accelerator pump nozzle also needs to be removed and blown in the opposite direction.
Setting up VAZ 21099
There is no need to rush to assemble the carburetor, since the main settings for its operation take place here. The most important thing to do is to set the correct fuel level in the float chamber. It is installed by bending the float tongue.
Experienced carburetor specialists believe that the optimal value is 4-5 mm from the float to the carburetor gasket. With such a gap, the mixture is formed of just the quality required for the VAZ 21099. The manufacturer recommends leaving a gap of only 2 mm, but this may result in fuel overflow, which will increase consumption.
After adjusting the fuel level, you can assemble the carburetor; after that, all that remains is to connect the upper damper control cable and set the idle speed correctly.
The idle speed on Solex carburetors is installed using two screws. One screw controls the quality, and the other controls the quantity. It is better not to touch the quality screw, but if it has been turned out, then it must be screwed in all the way and then turned out 2-3 turns.
Having set the quantity screw to the required number of engine revolutions, the quality screw begins to be turned in, making the mixture leaner. You need to turn it until the engine starts to “sausage”. After this, it is best to turn the quality screw 30 degrees.
That, in fact, is all you need to know about the carburetor installed on the VAZ 21099. If suddenly the car refuses to move, you just need to check whether anything has gotten into the jets or whether the float is jammed.
“Likes” on social media networks:
Home | About us | Feedback
How to set up a VAZ-2109 and 21099 carburetor in a garage
According to the recommendations of experts, adjustment of the VAZ-21099 carburetor should begin with the float chamber. Using this procedure, it is possible to check and establish the optimal fuel level. You need to configure it by following the steps below step by step:
Start the engine and turn it off after 2-3 minutes; After the air filter has been removed and the fuel hose has been disconnected, remove the carburetor cover (to do this, you need to unscrew five bolts)
Place the lid on a clean surface with the floats facing up, being careful. After removing the air filter, disconnect the fuel supply and remove the carburetor cap
After removing the air filter, disconnect the fuel supply and remove the carburetor cap
Using a caliper, determine the fuel level in the float chambers: the distance between the edge of the housing and the upper level should be 25.5 mm. If it turns out that the measurements do not comply with the standard, you will have to make an adjustment by bending the tongue of the float bracket and re-measuring the fuel level;
- Loosen the bolt that secures the rod to the lever. After this, you need to recess the drive handle and fully open the air damper, acting on its lever;
- Using pliers, pull the cable out of the sheath and tighten the fixing bolt;
- Next, you need to check how the damper closes when the handle of its drive is extended. Closing must occur completely, otherwise the adjustment operations will have to be repeated.
- The adjustment should be made until you achieve complete opening and closing of the damper in the extreme positions of the drive handle. Make sure that the lever does not come into contact with the cable jacket in any position.
So, at this stage, you have learned how to adjust the carburetor on a VAZ-2109 by setting the optimal operating position of its throttle and air dampers. Now let's move on to adjusting the starting device and idle speed.
Self-adjustment of the starting device
The most precise adjustment of the starting device by setting the values of the starting gaps requires removing the carburetor from the car. But first you need to make sure the integrity of the trigger device diaphragm. To do this, unscrew the four bolts, remove the cover and inspect the diaphragm. If it is suitable for further use, you can continue to make adjustments, otherwise the part will have to be replaced.
Below is a list of operations performed one by one, which describes how to adjust the VAZ-21099 carburetor by adjusting the starting device:
- First you need to close the air damper by turning its lever;
- Using a screwdriver, press down the starter rod;
- The gap formed between the chamber wall and the damper must be measured, and then its value must be compared with the calibration data (indicated by the manufacturer individually for each carburetor model and car);
- If the received data does not correspond to the nominal value, adjustment should be made. The locknut, which is located on the accelerator pump housing, should be loosened and the adjusting screw should be turned with a screwdriver until the required clearance is established;
- Now, having closed the air damper, it is necessary to measure the clearance of the throttle valve of the first chamber. Check the obtained data with the calibration table. If necessary, set the desired gap value by turning the damper adjusting screw.
It is likely that at this stage the adjustment of the VAZ-2109 carburetor can be completed. If you need to adjust idle speed or improve fuel consumption, you can read the relevant guide below.
Recommended Method
Level control technology includes a number of stages:
- We dismantle the housing of the air filter element. To do this, unscrew the fastening nut of the housing cover, unclip the latches, remove the cover, take out the filter and tighten the 4 nuts that secure the housing to the carburetor.
- Raise the body and disconnect the rubber pipes. We move the body to the side.
- Loosen the clamps securing the fuel pipes going to the carburetor and disconnect them.
- Remove the wire suitable for the idle speed solenoid valve;
- Disconnect the drive cable of the air damper (the “choke” handle);
- Unscrew the 5 screws securing the carburetor cover;
- Having removed the cover, we immediately determine the fuel level in the chambers by lowering a ruler or caliper into one of them until it stops (using its depth gauge). If the measurement shows a level of 25-26 mm, it corresponds to the norm and no adjustment is required;
If the amount of fuel in the chamber is lower or higher than normal, we perform a visual inspection and a series of measurements on the floats, and if necessary, we correct their position.
To carry out adjustment work, place the removed carburetor cover on a flat horizontal surface with the floats facing up.
First, we look at the position of the elements from above. The outer side surfaces of the floats are parallel to the special imprints on the gasket. Deviations can cause the floats to touch adjacent elements and surfaces, causing the fuel level to be incorrect. If necessary, adjust the position of the floats by bending their mounting arms. The next step is to measure the gap between the floats and the gasket. A rod with a diameter of 2 mm is useful here - this is how much the specified gap should be.
If it does not correspond, we bend the tongue of the floats, with which they act on the locking needle. After this adjustment, we check the total height of the floats, which is normally 34 mm. If this is not the case, check the gap again, adjust it if necessary and measure the height again.
The last stage of setup is determining the working stroke of the floats. To do this, place a caliper near the float, mark the distance from its lower corner to the surface of the cover, then lift the float with your hand and mark where the lower corner is.
A working stroke of 15 mm is considered normal; if it differs, it is adjusted by bending the tongue.
Reasons why candles flood
This question worries owners of carburetor cars much more often than owners of injection cars. This happens especially often in winter. There are several reasons for this malfunction:
- In order to mix the working mixture in the winter, much more effort is required than in the summer. To avoid this problem, it is necessary to fill the engine with high-quality oil, keep the battery fully charged, and also monitor the serviceability of the starter;
- the engine is very worn out;
- Poor quality spark plugs or spark plug wires.
Preparation for setting up the VAZ 2109 carburetor
To figure out how to adjust the carburetor on your VAZ 2109, you should start with preparatory measures. They include:
- Preparing a room for regulation, where there is constant access to fresh air;
- The machine must be horizontal and as level as possible;
- Do not use ordinary rags while working, as they produce lint that can damage the car;
- You should always have a flathead screwdriver on hand;
- Prepare cleaning products or gasoline. Compressed air cleans the system best.
Carburetor cleaning
You cannot adjust the carburetor on a VAZ 2109 with your own hands until you clean it.
Regular gasoline or compressed air, detergents and cleaners are suitable for this. Adjust the ignition pre-ignition. If it is early or late, then adjusting the carburetor will do absolutely nothing.
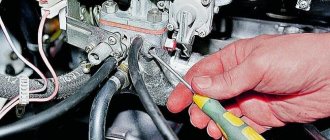
Carry out work only after the engine has reached operating temperatures. To do this, you need to start the car and keep it idling. You need to remove the linkage from the gas pedal, unscrew the crankcase ventilation, and check that there is no vacuum regulator in the tube. If there is a vacuum, then you did something wrong. Be sure to adjust the quality screws.
Step by step adjustment
You can make the adjustment yourself, but to do this you should follow a clear sequence of your actions.
Step 1: Adjust the throttle
- Check the cable tension level. It may be too tight or too tight.
- Use a 13 key to adjust the tension.
- Check your work. By pressing the pedal all the way, the damper should open completely, and by releasing the pedal, it should be completely closed.
- Using the same 13mm wrench, adjust the position of the locknut to achieve the ideal result.
Step 2: Adjusting the air damper
Air damper
- Remove the cap from the filter and replace it if necessary.
- Check its functionality. Recess the choke handle completely, and then the damper should be completely open and located under the dashboard.
- Pull the damper lever to fully open it.
- Push the lever all the way in.
- Remove the cable from the insulation and press the traction adjustment bolt.
- Check the functionality of the damper again.
- Having achieved the desired result, fix the bolt on the lever and close the air filter cover.
Step 3: Starter
Adjustment is carried out by removing or not removing the carburetor. If you can't remove it, then use a tachometer. The air filter housing is removed, and the air damper lever is removed. Start the engine and watch what happens.
The air damper is opened a third with a flat screwdriver, and the adjustment bolt is adjusted with a 7 key. The tachometer should show 3100-3400 rpm. If the desired result is achieved, you can release the shutter.
Step 4: Adjusting the idle speed
- Charge the battery as fully as possible.
- Warm up the engine until it reaches its operating temperature.
- Turn on your lights, audio system, and other equipment that uses electricity. It is required to achieve maximum utilization of battery charge.
- Idle at maximum speed.
- By rotating the quality screw, reduce the speed by about 50-150.
Video
https://youtube.com/watch?v=-iYxxRFBWUo
Do not forget that constant adjustment of the carburetor, its proper cleaning and tuning will significantly extend the life of the device and avoid complex and expensive repairs. Plus, this has a positive effect on fuel consumption, which is reduced as a result of such procedures.
Now you know what to do if the carburetor on your VAZ 2109 malfunctions, failures during acceleration, inability to maintain idle speed and other troubles.
Of course, if the problem turns out to be serious and the carburetor needs repair, then it is better to entrust it to professionals. It is not recommended to undertake such a task on your own.
Loading …
How to set up the carburetor correctly on a VAZ 2109?
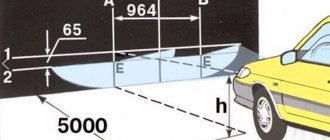
The nominal speed of the VAZ 2109 engine must correspond to
750-800 rpm. Adjusting the XX carburetor is necessary to economically maintain engine operation while parked and to warm up as quickly as possible before driving. Without this, the device will not work. Table from those. carburetor characteristics does not have such data. This must be done according to the following instructions, which contain the XX norm. The results and adjustment scheme are stable speeds.
This procedure is carried out if there are problems with the engine or once every six months in accordance with the regulations on technical maintenance of the VAZ 2109. You only need to spend 3-4 minutes on it. The engine warms up to operating temperature using choke or using the accelerator pedal. Next, remove the choke and fully tighten the quality screw. Most likely, the engine will stall. Now the screw is unscrewed exactly three turns and the engine starts again.
Using the quantity adjusting screw, sets the speed
650-700 rpm. Now turn the quality screw until you get the highest possible idle speed. Again we set the number of revolutions equal to the nominal one. Now we need to rotate the quality again until we get maximum speed. You can regulate this way for a long time.
Now roll up the quantity to
800 rpm This adjustment is considered correct. If this was not achieved the first time, you need to repeat the procedure again. It is worth recalling that the entire procedure is performed with the headlights on low beam and the stove operating at maximum mode. This is due to the fact that when the voltage drops, the speed drops, so when using these consumers, the speed should be nominal, and when turned off it should increase slightly.
The quality and quantity screw on the carburetor of the Lada 2109 car is located at the rear of the unit. In this regard, adjustment becomes more complicated. Although, it becomes more difficult to regulate, but not as often as on a Zhiguli.
Quality screw removal method
With Solex carburetors, the XX channel in the body itself often becomes clogged, and in order to clear it thoroughly, it is necessary to remove the quality screw. But this screw, as mentioned above, has a very tight fit and is not easy to get out. There are several methods for dismantling a part; we will consider only one option.
We take a piece of an old antenna from any radio receiver, select the outer diameter so that the tube fits into the channel of the carburetor body, usually the outer thickness of the “puller” is about 4 mm. We cut off a small piece, make a cut at one end (about 1 cm deep), use another quality screw (a spare one, or you can buy it specially in a store), and check how tightly the tube fits onto the head of the screw.
Now you can unscrew the screw and use a homemade puller to remove it from the KU body.
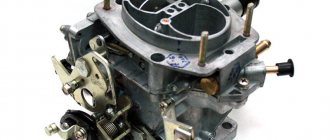
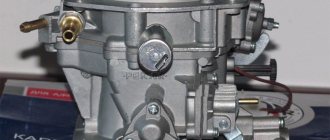
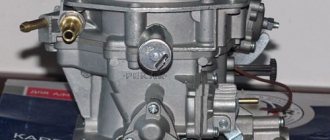
Adjusting carburetors is a delicate process and requires some caution. In order to obtain the desired result, the idle speed is usually adjusted. So, here is a standard carburetor for a VAZ 2109:
The “quantity” and “quality” screws with which the carburetor is calibrated are clearly visible here.
Fine adjustments are not made with the engine running. This is important - don't forget. What to do:
- Warm up the engine and turn it off.
- Take the mixture quality screw. First you need to tighten it to the limit. Then unscrew it four or five turns. As a result, we get a completely enriched mixture.
- Next, we do the same with the quantity screw, but unscrew it three turns.
- The preheated engine can now be started.
- Using the quantity screw you need to adjust the idle speed. The limit is 800 rpm.
- Now, slowly tighten the mixture quality screw. An important point is that the gas distribution mechanism, ignition and the carburetor itself must be in good working order!
- We adjust the speed further. They will grow a little at first. Then they will become less stable. As you continue to tighten the screw, they will become smaller. As soon as you notice that the speed is unstable, you can unscrew the screw half a turn.
- Next, we correct the speed using the quantity screw. Don't forget to check the number of revolutions under increased loads - with the oven on, for example. In winter, even from the usual 850 rpm, you should raise it to 1000.
Carburetor adjustment
Tip: When doing work with your own hands, do not use open fire or smoke.
Adjusting the fuel level in the float chamber
The most complex and important adjustment work in a carburetor is the regulation of the fuel level in the float chamber. Before starting work, disconnect the “-” terminal of the battery and remove the air filter
To accurately and correctly adjust the device, it is best to make a template that is installed on the carburetor cover. The lid is placed in a horizontal position with the floats facing up. If the gap along the contour between the template and the floats is more than one millimeter, then it is necessary to adjust it by bending the tongue and the float levers. Work order:
- The carburetor cover is removed.
- The gap between the gasket and the protrusions located on the bottom of the floats is measured. It should be the same for two floats, and its value should not exceed one millimeter.
- If the gaps are different or larger than the permissible value, and the mold connectors relative to the carburetor cover are not parallel, it is necessary to adjust them by bending the floats and the tongue that rests on the valve shank.
- The fuel level is visually checked. The cover is installed and secured to the carburetor, the fuel supply and drain hoses are connected, the engine of the VAZ 21099 is started. The engine idles for one or two minutes, then it is turned off, the hoses are disconnected, and the cover is removed. The distance between the plane of the housing and the fuel level is measured. It should be 25.5 millimeters. If there is a deviation, the adjustment is repeated.
Adjusting the air damper drive
Work order:
- The bolt connecting the rod to the air damper drive lever is loosened.
- The lever rotates until the air damper is completely open.
- The air damper drive handle is completely recessed on the dashboard.
Recessed air flap knob on instrument panel
- The rod is fully extended and the bolt securing the rod to the air damper drive lever is tightened.
- The air damper drive handle is pulled out all the way, which should ensure the damper closes.
The air damper is completely closed
If this is not the case, it is necessary to disconnect the rod casing, and by moving it, ensure that the throttle valve is completely closed and secure it with a bolt.
What is the difference between modifications 21081 and 21083
If you compare the two main modifications of Solex carburetors (21081 and 21083), used on front-wheel drive Sputniks and Samaras, then visually you will not find any differences between them. The difference exists only in the operating parameters of some of their elements.
Table: comparison of basic calibration data for Solex carburetors 21081 and 21083
| 21081 | 21083 | |||
| For 1st camera | For 2nd camera | For 1st camera | For 2nd camera | |
| Mixing chamber diameter, mm | 32 | 32 | ||
| Diffuser diameter, mm | 21 | 23 | 21 | 23 |
| Air jet of the main dosing system | 165 | 135 | 155 | 125 |
| Fuel jet of the main metering system | 95 | 97,5 | 95 | 97,5 |
| Idle air jet | 170 | 170 | ||
| Idle fuel jet | 39–44 | 39–44 | ||
| Air jet of the second chamber transition system | 120 | 120 | ||
| Fuel nozzle of the second chamber transition system | 50 | 50 | ||
| Economizer fuel jet | 40 | 40 | ||
| Accelerator pump cam number (size) | 4 | 7 | ||
| Throttle valve starting gap, mm | 1,0 | 1,1 | ||
| Air damper starting gap, mm | 2,7±0,2 | 2,5±0,2 | ||
| Needle valve hole diameter, mm | 1,8 | 1,8 | ||
| Vacuum regulator hole diameter, mm | 1,2 | 1,2 | ||