Lubricating the Lada Kalina steering rack without removing it - step-by-step instructions
Hi all. Today at VAZ Repair we’ll talk about the steering rack, or more precisely, about how to lubricate the steering rack on Kalina without removing it .
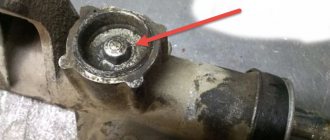
The work is not difficult, so it, like many other works, can be safely done at home. The steering rack on the Lada Kalina is the same as in the “ten” and, just like on the VAZ 2110, it is not resistant to malfunctions, so from time to time you have to “tinker” with it. I already wrote about the signs of a faulty steering rack in the article: “Signs of a faulty steering rack. Diagnosis of gur with your own hands,” so I won’t focus too much on this at this stage. The need to lubricate the steering rack arises in the event of poor or difficult operation of the latter. To understand whether the steering rack needs to be lubricated, just look under the boots, which are attached to clamps at the ends of the rack. In my case, the rack rod was dry and looked like this (see photo):
Of course, it would be better to completely remove the steering rack and inspect all its parts, but this work takes much more time and is necessary only in extreme cases, when the rack not only needs lubrication, but is completely faulty. By the way, how to replace the steering rack is written in this article.
What will you need for the job?
For work you will need: several plastic clamps; lubricant (“Litol” or “Fiol” or some alternative); a syringe and a piece of tubing from a medical “system” (preferably); side cutters or knife (for cutting off the old clamp).
Recommendations
Comments 103
Hello! Tell me, is it possible to lubricate it without removing it? Racks, meshing space? If yes, then how to create it?
Great. At a theoretical level, it is possible if you remove the iron clamps that strengthen the central boot-corrugation and move the boot to the center. I haven't tried it in practice. It would be easier with plastic clamps.
Tell me how to center the rack in the crankcase
This has been the case for a long time. I exposed it to the eye.
Is there a plate in the repair kit? Reluctant to take separately
as annoying as it may sound, it is not in the repair kit
The only problem with these racks is usually a needle bearing and a plastic guide sleeve and not a lot of lubrication. There is simply nothing more to knock there. If, naturally, the shaft did not rust and was not eaten dry into trash. The neighbor himself had 2 slats and gave one for pennies for the spare part, it seems. And just like almost everything, immediately take the newest one. I made both mine and his. Cases for 300 rubles and what time. It's enough like the one bought from the store. Moreover, on our roads there are 30-40 thousand and again (a neighbor bought the newest rack 1.5 years ago... he already brought it to build). So, without analysis and inspection, you shouldn’t run and pay 5500 rubles for a new one (although almost everyone buys a lottery and unknown restored ones) when the repairs are cheap, maybe... it will be sad
Tell me what this part is called, I can’t find it anywhere.
It turns out that there is practically no point in lubricating the ends. It is necessary to sort out and lubricate, or insert into the center of the rack without removing it.
And so, on September 13, 2017, in the town of Kazan, I bought a “PLATE” SYSY20 at the car market for 150 rubles.
does it make sense to sort out the control rack on the Prior?
if we have a lot of money, we buy the newest one; if we don’t have enough, we sort through
How to tighten it correctly so that it doesn’t bite
I'm not a mechanic, just an experimental method
Super report! Naturally, the disassembly itself was omitted, but there seems to be nothing bad there, the main thing is that the studs cannot be broken... And as for the bushings in the steering rack on Kalina, many copies have been broken, but no one seems to do anything better than “The World of Bushings”. Below I see they have been mentioned more than once. I won’t advertise, but a search simply finds them. By the way, they don’t sharpen to order, but factory production is coordinated, which is important. The property is serial on the machine, not like “Uncle Vasin” from the machine manually.
does it make sense to sort out the control rack on the Prior?
Super report! Naturally, the disassembly itself was omitted, but there seems to be nothing bad there, the main thing is that the studs cannot be broken... And as for the bushings in the steering rack on Kalina, many copies have been broken, but no one seems to do anything better than “The World of Bushings”. Below I see they have been mentioned more than once. I won’t advertise, but a search simply finds them. By the way, they don’t sharpen to order, but factory production is coordinated, which is important. The property is serial on the machine, not like “Uncle Vasin” from the machine manually.
the most important thing in the process is lost, this is disassembly and where the plastic bushings are located...
How did you remove the rasp from the lath yourself? I have an ancient rack lying around and decided to take it all apart, maybe later I’ll buy a repair kit and make it, but I can’t figure out how to get it out with a rasp!
Source: www.drive2.com
How to lubricate the steering rack without removing it - step-by-step instructions
1. So, first of all, we get to the anthers and bite off with side cutters or cut off with a knife the old clamps that secure the steering rack anthers.
2. Next, we evaluate the condition of the lubricant and its presence; as you saw in the photo above, my rack was completely dry. Also inspect the rack boot; if it is damaged or cracked, it needs to be replaced.
3. Turn the steering wheel as far as possible to the left or right (depending on which side you are working on) so that the rod goes inside the rack and does not interfere with filling the lubricant, then take a syringe with an extension (a piece of tube from a medical “system”), if you have one, of course, fill it lubricant there and squeeze the contents of the syringe into the cavity of the steering rack. If there is no syringe, fill it manually using a screwdriver or something similar to a spatula.
4. When the grease is full, take the boot and put it in place, after which we fix it with a plastic clamp.
5. Now we repeat all the above steps on the other side, remove the boot, turn the steering wheel in the opposite direction and fill the rack with lubricant.
6. We put on the boot and secure it with ties.
7. For greater reliability, you can turn the steering wheel left/right, thereby pumping the lubricant, as it were, and then repeat the procedure again. However, if you turned the steering wheel all the way and used a syringe with an extension, then I think there is no need for re-lubrication.
After lubrication of the Lada Kalina steering rack is completed, we assemble all the tools, wash our hands and check the work. The steering wheel should become smoother and softer. If lubrication does not lead to anything, you will have to look for the problem elsewhere. Perhaps it lies in critical wear of the rack parts or is associated with steering tips that need to be replaced.
Causes of steering malfunctions
| Cause of malfunction | Remedy |
| Increased free play of the steering wheel | |
| Loosening the nuts securing the ball pins of the rods | Check the presence of the cotter pin, tighten the nuts and secure them |
| Increased clearance in ball joints of rods | |
| Wear of rubber-metal joints of rods | Replace the rods |
| Increased clearance between rack stop and nut | Replace worn parts and adjust the steering mechanism |
| Noise (knocking) in the steering | |
| Loosening the nuts of the ball joints of the rods | Check and tighten the nuts |
| Increased clearance between rack stop and nut | Replace worn parts, adjust the steering mechanism |
| Loose steering gear | Tighten the steering gear nuts |
| Stiff steering wheel rotation | |
| Damage to the upper suspension strut bearing | Replace the support |
| Damage to the support sleeve or rack stop | Replace damaged parts, apply lubricant |
| Low pressure in front tires | Set normal pressure |
| Damage to parts of ball joints of rods | Replace damaged parts |
| Damage to parts of the suspension shock absorber strut | Replace or repair the suspension strut |
| The bearings of the upper steering column shaft are damaged | Replace bearings |
| Electric power steering is faulty | Replace the electric booster and shaft assembly |
- How to diagnose LADA electric power steering without a scanner
- How to get rid of a knocking steering shaft
- Do you need steering rod plugs?
Keywords: Lada Priora steering wheel | Lada Kalina steering wheel | Lada Granta steering wheel | steering mechanism Lada Priora | steering mechanism Lada Kalina | Lada Granta steering gear
4
Found an error? Select it and press Ctrl+Enter..
Do I need to lubricate the steering rack?
To understand why a lubricant is used, it is worth understanding the structure of the mechanism. It consists of a rack and pinion. Thanks to these elements, the rotational motion is transmitted to the wheels. When the driver turns the steering wheel, the toothed gear moves in the specified direction. She clings to the teeth of the rack and pushes it.
The rack transmits movement to the steering rods rigidly fixed at its ends. They begin to move, and as they count, the wheels turn at the desired angle. The rods are connected to the steering tips; they transmit the steering movement to the axles of the front wheels.
According to the type of drive, racks are divided into three types:
- The most modern ones are electric.
- Hydraulic, like the previous version, are designed to reduce the driver’s effort when turning the steering wheel.
- Mechanical ones are widespread.
This part converts the rotation of the steering wheel into a deflection of the front wheels relative to the horizontal plane. Driving a car requires constant maneuvering, so the mechanism used to control it must be in good working order. Applying lubricant makes the steering wheel easier to rotate and therefore simplifies the driving process.
The steering rack transmits and transforms the movement of the steering wheel to the wheels. But when traveling, due to friction, the metal elements of this unit heat up and are subject to wear. Lubrication increases the service life of parts and extends the service life of the entire mechanism.
Alarming symptoms
No matter how often you change the steering rack lubricant, unfortunately, it cannot extend the life of all parts of the mechanism indefinitely. Therefore, if the following factors are detected, it is recommended to immediately stop using the vehicle and contact a service center.
- Increased steering play.
- Turning the steering wheel requires more effort than before.
- Traces of steering rack lubricant leakage were found.
How to lubricate the steering rack
The exact parameters must be indicated in the instructions supplied by the automaker; you must follow them. But external factors are also taken into account, including climatic conditions.
For example, some lubricants are not suitable for cold climates with sub-zero temperatures. To improve properties, additives are added - they increase frost resistance, oxidation resistance, moisture resistance and other characteristics.
Among the various types of lubricants, those made on a lithium basis are considered suitable for the steering rack. They can last for a long time and do not dry out much when exposed to oxygen. They are not afraid of water; if moisture gets in, the composition retains its original properties.
A viscous substance is produced by thickening petroleum oils with lithium soap. Lubricants are distinguished by their degree of viscosity, and they also come in different colors. The most commonly used types of lubricants are:
- Fiol - available in varying degrees of viscosity.
- Cyatim 201 is a domestic development and is in wide demand due to its affordable cost. It has an operating temperature range from -60 to 90 degrees.
- Severol is frost-resistant, designed for regions with cold climates.
- Litol-24 - at a temperature of -20 degrees, the viscosity of this product is halved.
It is better to choose the level of frost resistance with a margin, otherwise the mixture designed for -25 degrees will freeze in a sudden frost of thirty degrees. But first of all, it is important to follow the recommendations of the car manufacturer. As a last resort, the recommended product is replaced with an analogue of similar composition.
The service life of the mechanism is affected by operating conditions. The hinge must remain sealed to prevent dust and moisture from entering it. When the seals are damaged and do not fit tightly, even an ideal lubricant cannot improve the safety of the parts. The lubricant mixture mixed with dirt particles only increases wear.
When to and when not to lubricate the rack
You can determine the malfunction of this unit with 100% accuracy by contacting the nearest service station. But it is also possible to independently identify the need for lubrication. To do this, you need to listen to the car while driving and pay attention to extraneous sounds.
If there are knocking noises in the steering gear area, one of the most likely causes is a lack of lubrication. Often the sound appears only when driving on rough roads outside the city. But using this method does not provide a complete guarantee, because the reason may not be in the rack at all.
When the steering wheel stops turning, this indicates that the steering mechanism has become jammed. Such a breakdown is possible, for example, when the teeth bite due to insufficient lubrication. You cannot ignore it, since the car’s controllability and road safety depend on the serviceability of the steering wheel.
Teeth on the steering rack
Often drivers decide to lubricate the rack if the manufacturer used little lubricant. After purchasing a new car, it is recommended to check this unit, even if there are no visible problems. This measure is simply necessary if the steering wheel has to be turned with force. But you shouldn’t lubricate the rack when you don’t have a suitable product at hand.
When applying lubricant, it is important to completely fill the gaps and turn the steering wheel so that the mixture is evenly distributed. For this reason, a syringe is used for injection, which can be purchased at a pharmacy. It allows you to pump a lubricating substance into hard-to-reach places.
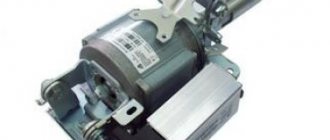
Dismantling and disassembling the electric amplifier
Before removing the amplifier, you need to remove all the steering column switches. Remove the steering rack cover and dismantle the devices, remembering to disconnect the connectors from the power supply.
How to remove the EUR with your own hands:
- After removing the switches, you will need to dismantle the lower cross member of the dashboard. To do this, you need to press the fasteners that secure the connector with wires, and then disconnect the wiring from the control module. Once these steps are completed, you can disconnect the connector from the switches.
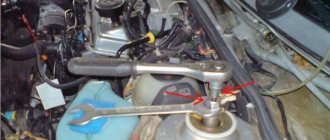
- The system bracket is secured with nuts; you will need to unscrew them with a wrench.
- After this, the steering rack will need to be carefully lowered down. To do this, you will need to find the bolt that secures the driveshaft to the booster shaft. This bolt must be unscrewed, but when unscrewing, you will need to fix the nut, this will prevent it from turning. When the bolt is removed, the fastening will need to be loosened, after which the intermediate shaft will be carefully removed. At this stage, we recommend marking the position of the shaft and gears; you can use a marker for this. This step is very important because doing it will prevent possible installation problems in the future. If the marks on the shafts do not match, this may cause problems with the amplifier. When dismantling, be careful not to damage the wiring, as this will also lead to the inoperability of the ESD.
- When the unit is dismantled, it will need to be disassembled and the failed elements replaced. Further editing is done in reverse order (the author of the video is Murzik Bely).
How to lubricate the steering rack
The longer a given unit is in use, the more attention must be paid to maintenance. If there are serious problems, it is better to completely disassemble the mechanism. Only with complete disassembly can you lubricate the rack as efficiently as possible. To carry out the work you will need the following tools:
- set with keys and sockets;
- nail polish or marker;
- syringe;
- hose connected to the syringe;
- WD-40 product.
First, the steering wheel is placed in the middle position and the position of the shaft is marked with nail polish or a marker. If this is not done, during subsequent assembly it will be difficult to understand what position the shaft was in. To get to the steering rack, you need to remove the interfering parts in the engine compartment.
If the mechanism is equipped with power steering, you will first need to pump out the fluid from it. This operation can be performed using a syringe with a hose connected to it. Next you need to install the jack and remove the front wheel.
Then you need to unscrew the stabilizer link and the lateral stability arm.
Now you can remove the protective boots and steering rods. After this, the locking nut and bolt are unscrewed, which holds the steering shaft.
The shaft is knocked up using a hammer, having first removed the retaining ring.
Now you can remove the seals, it is important to remember that the top one is secured with a locking pin. This pin can be knocked out with a hammer.
Next, you need to twist the locking ring plug, disconnect the hoses and pipes attached to the rack, and then drain the oil. To dismantle it, you will have to remove the propeller shaft bolt. The spare part must be placed on the table and disassembled.
The removed parts are washed with a special engine cleaning agent or regular gasoline. The old lubricant should not remain on the surface and mix with the new one. First of all, remove the boot and oil seal. Then the anthers located on the tips are dismantled and twisted. To remove the shaft, unscrew the nut. The removed parts are also washed.
The rack needs to be lubricated; you will have to apply a lubricant to the outer surface. Now you need to carefully put on the boot, it is important to ensure that it does not twist. Then the bolts and tie rods are put back. To tighten the bolts correctly, you cannot turn the steering wheel, otherwise the marks will get lost. Next, assembly is performed in the reverse order of disassembly.
Causes of backlash and detection methods
There are four main reasons for the appearance of play in the steering. They arise as a result of wear and tear of parts during long-term use of the vehicle. For example, over time, gaps form and increase in the steering rod joints of the front wheels. Their presence and size can be determined visually or tactilely by probing with your fingers the parts that are connected by these hinges. In this case, someone must turn the steering wheel sharply, either left or right. Both parts must move synchronously. Check alone by moving the steering rod in the longitudinal direction with your hands. There is no play if it moves with the bipod. If there is even a small gap, the hinge must be replaced.
The second reason is increased wear or misalignment of the engagement of the roller and the “worm”. When turning the steering wheel sharply, a knock is heard in the steering mechanism. The defect is also detected when shaking the steering gear bipod with your hands. Action: adjust or replace parts.
Knocks and squeaks when turning the wheels, as well as when rocking the pendulum arm up and down, indicate wear on the bushings or the axle of this very pendulum arm. Try tightening the nut on the axle. Worn parts require replacement.
Finally, the fourth reason is that the fastening of the pendulum arm bracket or crankcase has become loose. You just need to tighten the appropriate nuts and bolts.
It remains to add that with proper operation of the car and care for the steering elements: periodic lubrication, timely detection of defects and elimination of emerging play, all mechanisms will last a long time and will not require unexpected costs for their replacement.
Steering is an integral part of any car. Thanks to this unit, the vehicle can change the direction of its trajectory. The system consists of many elements. The main component is the steering rack. Its backlash is unacceptable. About malfunctions and signs of breakdown of this mechanism - further in our article.
How to lubricate the steering rack without removing it
Since removing the entire assembly is difficult, many people refuse such a complex method. But the rail can be lubricated without removing it. First you need to remove the protective casing from the motor cover. Now you need to find the steering rack boot and cut off the casing on which it rests with side cutters.
You need to check the condition of the boot and rod. If there is little or no lubricant on the surface, then you need to apply it. For this purpose, it is convenient to use a syringe or a rod bent in the shape of the letter “L”.
The viscous mass must be packed between the body and the rod. Next, the boot is installed; to secure the parts, you need to use ties of the appropriate size. Then you need to turn the steering wheel to the right and lift the car with a jack to get to the rack. All that remains is to check the boot on the wheel side.
The process of pumping lubricant is discussed in detail in the video:
Even without lubrication, the car will be able to drive, but the mechanism will wear out quickly, and at sub-zero temperatures the steering wheel will not turn. Therefore, you should regularly check that there is sufficient lubricant. The main thing is to know the temperature range at which the car will be operated. It is not necessary to contact a specialist, because any motorist can lubricate the mechanism if desired.
Diagnostics
Error codes
c1044 - incorrect sequence of the rotor position sensor (RPS)
c1621 - incorrect voltage 5V
c1622 - speed signal circuit failure
c1011 - car engine speed signal circuit, no signal - the signal from the idle sensor (or the standard tachometer through a voltage limiter) is divided by 4 and applied to the tachometer input,
c1022 - error, voltage of the main output of the torque sensor - it is possible that the shaft cover has rubbed the insulation and the middle, green wire shorts to ground
Steering rack Lada Kalina
Steering rack lubrication without removal on site Lada Kalina
I did a little maintenance on the steering rack. Removing the entire steering rack from the car is a little problematic, and after installation you need to do the wheel alignment adjustment... I can’t do it on my own. I settled on lubricating it without removing the rack itself, I’ll just open the anthers and take a look
Is it true that everything is so sad with lubrication?
1. For convenience, remove the decorative casing from the engine cover. On the left (right) side, where the washer reservoir is located, we find the steering rack boot...
Use pliers to cut off the tie on which the boot is attached
2. The inside of the boot is clean
3. The rack rod is also clean
4. It’s dry inside and doesn’t smell like grease.
5. And now, after a little manipulation, it “smells” of lubricant) You need to stuff lubricants inside between the body and the rack rod.
You need to lubricate more carefully, don’t skimp on the lubricant
6. Photo of a factory used one. screeds. "Eight" logo
Steering rack casing fastener
7. And here is a comparison of the factory and used ties.
8. Put the boot in place. We fasten with ties. I had zip ties that were slightly smaller in size and width. Therefore, I attached the tie to the tie to increase the length.
9. Let's proceed to the boot from the other side. Turn the wheel (steering wheel) to the right. We jack up the car so that it is higher, and, from the wheel side, we carry out all the manipulations.
10. We look under the boot, there is no lubricant either.
11. Fill with lubricant. We turn the steering wheel from left to right and back... As if we were pumping the lubricant.
12. The boot is in place, zip ties will help it
I'll be removing the rail by summer.
Lubricating the rack on the right side will not have any special effect, because... in that place there is a plastic (or whatever else it’s made of) bushing; you can’t get grease through this bushing into the rack. If we're going to lubricate it, it'll be on the left side and in the middle, where it's not very easy to get to.
Steering rack from Kalina Sport. Lubrication and replacement of the disc spring
More than a month ago I purchased a steering rack from Kalina Sport with a speed of 3.1 instead of 4.02 for a regular rack.
The steering rack is supplied assembled, the photo shows the rack and markings:
By the way, now a short rail is installed on all new viburnums except the standard version.
Additionally, an SS-20 intermediate steering shaft was purchased, you can read about it here: autosystem.ru/index.php?id=379
I plan to install the rack in the near future, I’ll probably combine it with changing the tires to summer ones, but for now I decided to lubricate it and change the disc spring to a SS-20 spring (autosystem.ru/index.php?id=368)
When lubricating the steering rack at the factory, a special lubricant, RENOLIT JP 1619, is used. Finding one is problematic, but I managed) Usually it is replaced with FIOL, sometimes with Litol (I would not recommend it).
RENOLIT JP 1619
Here is a short description of this lubricant:
RENOLIT JP 1619 is a special grease based on lithium soap and synthetic base oil with an effective additive package to provide excellent anti-wear and extreme pressure properties and load-bearing capacity, as well as to improve boundary friction parameters. It also contains corrosion inhibitors and additives to improve aging resistance and maintain the desired consistency.
The use of carefully selected base oils gives RENOLIT JP 1619 excellent lubricity and good pumpability at low temperatures.
RENOLIT JP 1619 is recommended in cases where good lubricity and minimum starting torque at low temperatures are required. RENOLIT JP 1619 is used for lubrication of fan shafts, steering gears and high-speed spindle bearings, as well as loaded lubrication units of mining equipment, incl. through centralized systems.
Temperature range -50/+120 C
I didn’t disassemble the entire rack; I cut off the ties and lubricated what was visible; by the way, there wasn’t much grease in the rack; it was normal in the steering tips.
I also immediately changed the disc spring, the photo shows how this is done, you need a very high-quality hexagon 6:
Remove the top part and turn it over:
Then we pry it with a screwdriver and remove the top plate, under it there is that same disc spring:
Lubricating the rack (at the request of readers)
For a long time I didn’t have the opportunity to write a continuation of the article about adjusting the steering rack (you can read it in the BZ).
And so, I myself did not dare to turn the adjusting bolt on the rail, although I had already hung up the front end, removed the protection, and at the last moment I changed my mind. I went to two service stations, they checked everything possible (from the suspension and steering), everything was fine, everything was within the tolerances. I was shaking my mustache all right. (maybe just a slight, barely noticeable play, maybe it seemed like there was nothing to compare it with) In the end, I decided to just lubricate the rack without removing it from the car. I’ve had Mobil xhp 222 blue plastic heat- and frost-resistant lubricant lying around in the garage for a long time, well, I think I won’t buy another one to lubricate the rack, I’ll take this one.
I read somewhere the official answer from an AvtoVAZ employee www.drive2.ru/b/468404/ about lubrication of the rack, they say, the toothed part of the rack is lubricated with a layer of 1 mm of FIOL-1 lubricant, and the cylindrical part with a layer of 0.5 mm, and if you find that there is not enough lubricant, you can add using a syringe; excess lubricant will not prolong the service life of the rack. But we know that you can’t spoil porridge with oil, especially not with grease. Let's smear thoroughly))) Let's start!
The rail has two rubber caps on both sides, stretched over the base of the rail and tightened with ties. In order to remove this cap, you need to cut off the tie and simply pull the cap off.
As you can see in the photo, it’s not that there is no lubricant, or maybe 0.5 mm at the end of the cylindrical part there should be). In general, we smear
turn the steering wheel one way, then the other, add lubricant, and so on several times.
We fill the cap with grease and put it in its rightful place.
Tighten with a tie and cut off the rest of the tie.
On the other hand, it’s a little inconvenient, but you can crawl up. I removed the battery and cut off the tie on top from the engine compartment (I put on a new tie, by the way, from the same place). You can also remove the wheel for normal access from the arch side.
I don’t recommend removing the elastic completely; putting it back on, I think, won’t be comme il faut.
We fill the lubricant a little more than on the opposite edge of the rack, because... here is the gear part, where the worm mechanism works. Turn the steering wheel in different directions several times and add lubricant. We put the cap back on in the same way as on the other side.
The ties were large in thickness, similar to the factory ones.
I didn’t really understand how it felt, it seemed like it became easier to spin, although with the electric booster it was already easy to spin. The most important thing is that the knocking went away, maybe, of course, we didn’t encounter a rough road, but it still got better. Don't be too hard on me for the photo, I took it on my phone. Well, dress warmly or do this work in a warm room, preferably in the summer.
Good luck to everyone on the roads, subscribe and like)
How to disassemble and repair a rack when jammed?
The repair procedure, like replacing the steering rack, begins with disassembling the unit. To perform a set of actions, we purchase a repair kit.
- To disassemble the rack, unscrew the adjusting nut and then remove the thrust bushing. If at the moment we are experiencing difficulties, then we use a mallet, with which we apply gentle blows to the rack body.
- We dismantle the side plugs along with the boot. First cut off the plastic fasteners.
- We must replace the boot with a new product.
- We also use a mallet to remove the shaft from the rack body.
- Inside the freed crankcase we find a plastic sleeve, which we remove using a screwdriver. We also replace this component with a new analogue (present in the repair kit).
- We clean the internal cavity of the rack housing from old grease. Wash and dry.
- Apply new grease. We lubricate the gear pair with special care.
- We inspect all other components of the rack and pinion mechanism and, if wear is suspected, we replace them. Removing the steering wheel in Lada Kalina works like this.
1. Disconnect the battery.
2. Turn off the airbags. Loosen the clamps and move them to the side.
3. Disconnect the two-wire horn connector.
4. We move on to the steering shaft and in the area where the arrow is present, we outline the location (until removal).
5. Loosen the steering wheel nut, but do not completely unscrew it.
6. We take the steering wheel and, using rocking movements to the sides, move it close to the indicated nut.
7. Now we align the wheels and place the steering wheel in a strictly straight position.
8. We take out the pin, and then insert it into the switch block located directly under the steering wheel. At this moment, the steering wheel rim should be clearly fixed.
9. After removing the wires, we proceed to removing the steering wheel itself.
10. We check the integrity of all elements.
11. Assembly is carried out using the reverse algorithm.
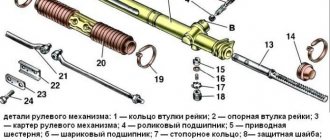
Disassembling the steering mechanism
We disassemble the steering mechanism when repairing it. Remove the steering mechanism (see “Removing the steering mechanism”). Remove the steering gear boot (see “Replacing the steering gear boot”).
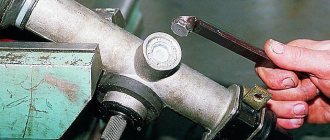
Remove the steering rod support. We insert the bit into the groove of the crankcase pipe mounting nut.
We unscrew the nut, striking the beard (right-hand thread)…
...and remove the crankcase pipe.
Use a screwdriver to press out the two clamps of the bushing located inside the pipe...
...and remove the bushing.
Remove the two rubber rings from the bushing (arrows indicate the bushing clamps).
If it is necessary to replace the nut, use pliers to remove the locking rings... ...and remove the locking ring... Remove the pipe securing nut.
Remove the rubber plug from the rack stop adjusting nut. Using a scraper, remove the jammed metal in the locking areas of the stop adjusting nut.
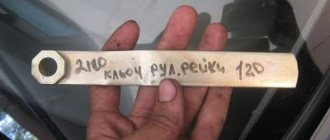
Using a special 24mm wrench with an external octagonal head, unscrew the stop nut.
We take out the stop spring. Using a screwdriver...
...remove the O-ring.
By hitting the crankcase against a wooden block, we knock out the rack stop. Using a screwdriver...
...remove the liner from the stop. A rubber ring is installed in the groove of the stop.
Remove the rubber ring from the crankcase that seals the hole for the steering mechanism on the front panel.
Remove the boot from the gear shaft. Use a 6mm hexagon to unscrew the two screws (shown by arrows)…
...and remove the crankcase cover.
Remove the separator with the thrust bearing rollers.
Remove the sealing ring of the cover.
We remove the rack from the crankcase.
We press out the gear shaft by holding the shaft in a vice with soft metal jaw linings and pressing the crankcase upward with the mounting blade.
We remove the gear shaft with bearing from the crankcase. We pry it off with a screwdriver...
...and remove the bushing retaining ring.
We take out the gear shaft bushing assembled with the support plate.
If it is necessary to replace the needle bearing, use a drill with a diameter of 4 mm to drill two diametrically located holes in the crankcase so that they extend to the end of the outer ring of the needle bearing. Through the drilled holes, using a rod of the appropriate diameter, we knock out the outer ring of the bearing from the crankcase.
Using a puller, we press the ball bearing of the gear shaft with the inner ring of the roller thrust bearing.
Use a puller to press the inner ring of the needle bearing off the shaft.
Using a screwdriver, pry and remove the gear shaft oil seal from the crankcase cover. If the outer race of the roller thrust bearing needs to be replaced...
... use a scraper to remove the extruded metal in four places and take out the ring. We generously lubricate the bearings, rack and gear teeth, and the plastic rack bushing with Fiol-1 lubricant. We assemble the steering mechanism in the reverse order. We press the outer ring of the needle bearing into the crankcase using a mandrel of suitable diameter. To seal holes in the crankcase, you can use “fast steel” or “cold welding”. We press the gear shaft with the ball bearing into the crankcase using a piece of pipe of a suitable diameter or a high head, applying force to the outer ring of the bearing. You can press the gear shaft into the crankcase, resting the outer ring of the bearing on the jaws of a vice. Then we put the crankcase on the bearing...
...and press the crankcase with light blows of a hammer through a wooden block.
We press the gear shaft seal into the cover through a mandrel or head flush with the end of the cover. We insert the rack into the steering gear housing. We install the pipe.
After tightening the pipe fastening nut, tighten the nut.
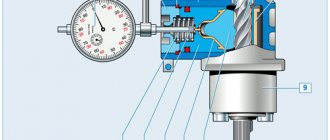
Scheme for monitoring the gap in the engagement of the rack and pinion shaft:
1 – dial indicator; 2 – indicator mounting bracket; 3 – nut; 4 – sealing ring; 5 – steering gear housing; 6 – needle bearing; 7 – gear shaft; 8 – bushing; 9 – crankcase cover; 10 – rack; 11 – liner; 12 – rack stop; 13 – indicator leg; 14 – spring
We rotate the gear shaft so that the flat on it is located on the right side. We move the rack so that the steering rod support mounted on the rack is located in the middle of the pipe groove. We insert the rack stop, the stop spring and tighten the stop nut. It is recommended to replace the stop nut with a new one. We adjust the gap in the engagement of the gear with the rack. To do this, set the rail in the middle position and block it from moving. Insert the leg of the dial indicator into the hole of the adjusting nut of the stop until the tip of the leg touches the stop of the rack. The diameter of the tip of the indicator leg must be at least 3.5 mm...
...so that the leg rests against the end surface 1 of the stop, and does not fall into its hole 2 (for clarity, shown on the dismantled stop). We apply a torque of 15 N m (1.5 kgf m) to the gear shaft, while the gear pushes the rack and stop. Based on the indicator readings, we determine the amount of movement of the stop, which corresponds to the actual value of the gap in the engagement. If it exceeds 0.05 mm, tighten the adjusting nut, achieving the specified amount of movement of the stop. After this, having unlocked the rack, we check the ease of rotation of the drive gear throughout the entire range of travel of the rack.
How does the control system work in Kalina?
In the model of the domestic automobile industry we are considering today, the steering rack, if disassembled from a technical point of view, is a mechanism that structurally looks like a gear, which in turn is installed on a shaft and is associated with special rods and a rack. Thanks to these elements, the car turns when moving the steering wheel in a certain direction allows the front wheels to move in the same direction.
Modern cars have 3 variations of the rack and pinion mechanism:
- Electric steering mechanism;
- Hydraulic modern mechanism;
- Mechanical mechanism.
So, the car control system is an electric drive. This is what helps reduce the load on the driver. In this case, the increase in turning force is carried out due to a special electric motor built into the column, so to speak. This device is used exclusively on premium and, accordingly, luxury cars. For example, in our Lada Kalina, the electric mechanism can be obtained as an additional option for an additional payment for the TOP configuration.
The next option is a hydraulic mechanism. Viburnums of the first and second generation are equipped with this mechanism. Owners of such cars receive sharpness and lightness of the steering wheel. And not only Russian cars, but also many modern foreign models are equipped with the popular and most convenient hydraulic drive.
The mechanical mechanism is the simplest in its design and is also found on many machines. In this case, as you understand, the rods will be turned only through the use of the driver’s physical force. It is clear that such a car is extremely difficult to drive.
In addition to the above mechanisms, there is also a mixed version - electrohydromechanical. It combines all the best qualities of an electric and hydraulic amplifier. You can find it on the Kalina Sport model.
Let us note that each of the systems we have listed has its own advantages, and to some extent disadvantages, but they all break down with the same frequency. If a breakdown of a mechanical control rack will lead to insignificant costs for repair work, then electrical and hydraulic breakdowns will force you to spend a fair amount of money on repairs. It follows that it would be nice to know how to tighten the steering rack on the car we are considering with your own hands.
Causes of EUR failure
Why does the electric power steering on the Lada Kalina not work, turns off and refuses to work, what are the signs of a steering wheel with power steering knocking, jamming, biting or squeaking? To repair the system yourself, you need to know how diagnostics are carried out and what causes precede the breakdown. Most often, the failure of the amplifier is caused by a breakdown of the unit itself and the amplifier fails. Problems of this type are resolved by thoroughly checking the system to identify the exact problem.
As practice shows, often the inoperability of the electric amplifier (failure) is associated with a breakdown of the speed controller.
Consequences:
- the steering wheel is jammed,
- jams
- becomes tight
- and others
Because the speed controller sensor ensures activation and deactivation of the electric power steering under different driving modes. The amplifier on Kalina works if the car is moving at low speed. When the speed begins to increase, the booster automatically turns off, allowing for safer machine control when driving at high speeds.
So, briefly about the reasons for the inoperability of the EUR:
- The speed controller has failed or the control unit does not receive or disappears a signal from it. In this case, the reason may lie in either a breakdown of the sensor, damaged wiring, or poor contact of the controller with the on-board network.
- The voltage in the vehicle's electrical network has decreased. The reasons can be different, ranging from a dead battery and an inoperative generator to the use of inappropriate electrical equipment in the car.
- The permissible crankshaft speed has been exceeded.
- Incorrect operation or failure of the control module. Depending on the cause, the control unit may need to be repaired; more detailed diagnostics need to be done.