Removing the gearbox on a VAZ 2109 is necessary, first of all, when replacing the clutch, repairing the gearbox, eliminating a leak in the rear engine oil seal or the front gearbox oil seal. Also, removal is not necessary when replacing the release bearing and replacing the front starter bushing (if it is impossible to do the work directly on the car).
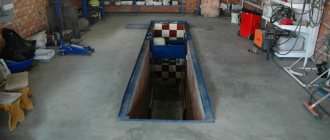
Although the weight of the box is relatively small (about 27 kg - without oil), it is still recommended to use the help of an assistant. Removal must be done on a “pit” or a lift.
Removing the VAZ 2109 gearbox
First of all, you need to remove the mudguard and engine crankcase protection (if installed).
drain the oil from the box, remove the drive nuts and wheels. If removal takes place in a pit, it is necessary to jack up and hang the front part of the car on trestles or other reliable stands. Be sure to disconnect the battery terminals. The next order is:
- remove the clutch cable
disconnect the speedometer cable;
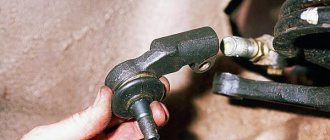
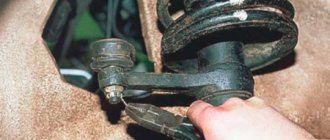
— with the car raised, unscrew the ball joints (it is recommended to unscrew the two bolts securing the ball joint to the “knuckle”);
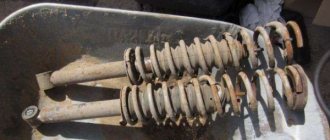
— tear off and remove the left longitudinal brace;
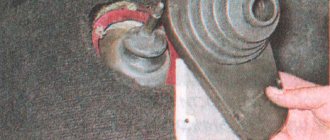
- with the help of an assistant, pull the drive out of the box - one pulls the inner grenade with a pry bar
(to prevent disassembly of the drive in another place), the second one sharply pulls the wheel, pulling the drive out of the box (after removing one drive, in order to avoid turning and scattering of the differential, it is necessary to insert a special stopper or an old grenade into the box);
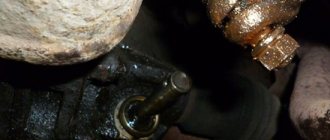
— unscrew the central nuts of the drives and remove them;
- remove the starter,
disconnect the ground wire
and reverse speed sensor connector
from the box, flywheel protective cover from below
and disconnect the gearshift link (having previously marked the position);
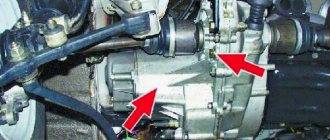
— then unscrew one by one the four mounting points of the gearbox to the engine;
— it is imperative to fix the engine by supporting it through a hydraulic jack from below, or by hanging it, resting it on the spar cups;
— holding the box, unscrew and remove all the supports (“pillows”) securing the gearbox to the body;
— together with an assistant, slightly shaking, try to move the box away from the engine; it needs about 10 cm for the input shaft to come out of the clutch disc and basket;
- When removing, be careful not to damage the clutch basket petals with the input shaft.
Malfunctions and their elimination
Gearbox repair largely depends on the nature and type of fault. There are several options for the breakdown of this unit, in each of which appropriate actions should be taken to eliminate them.
| Malfunction | Possible reasons | What do we have to do |
| There is noise in the gearbox |
|
|
| Gears are difficult to shift |
|
|
| Spontaneous gear disengagement occurs |
|
|
| Gears are switched on with noise and crackling |
|
|
| There is an oil leak from the gearbox |
|
|
In most cases, problems with the gearbox are eliminated by dismantling and disassembling it. Do not take on this type of work without the proper skills and experience.
Installation
The VAZ 2109 manual transmission is installed after all problems and defects have been eliminated.
It is necessary to make sure that all components and parts are in good condition (clutch disc, basket, release bearing, etc.), check the alignment of the clutch kit, and lubricate the splined connection of the input shaft and the release bearing flange. When installing the gearbox, you must use the help of an assistant and perform the following steps:
- lower the engine, fixed with a jack or brace, by 10-15 degrees;
- lift and insert the box as far as it will go (it is unacceptable to tighten the box and the engine with bolts; you must manually achieve a tight fit of the gearbox close to the engine);
- tighten the four main fastening points and install the gearbox support;
- put on and adjust the clutch cable (the clutch pedal should be 1 centimeter above the brake pedal);
- install and connect the starter and reverse speed sensor;
- install flywheel protection, speedometer cable and ground wire;
- connect and adjust the gear shift mechanism (put it on the mark or put the gear selection lever in “neutral”, to first speed);
- assemble the chassis (insert the drive, screw on the ball joints, install braces);
- lower the car onto the wheels, tighten them and the central drive nuts (force 23 -25 kg/m, approximately 1-1.5 m lever length);
- Fill the oil up to the level.
Useful tips
It is extremely important to monitor the serviceability of the gearbox, and if signs of breakdown are detected, fix them immediately. Do it yourself or with the help of a car service - this is your personal decision.
When operating a car in city conditions, you have to change gears more often. Therefore, it is recommended to use motor oil here. This ensures that the synchronizers remain effective longer. Transmission oil is better suited for highways, increasing the life of bearings and gears, although the synchronizer lasts less.
Internal structure of the box
Disassembly
Having removed the gearbox, you can proceed directly to the main thing - disassembly. This will allow you to change damaged elements as you work, identify existing faults and solve problems on your own.
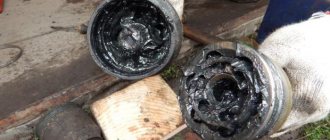
- Clean and thoroughly wash all external surfaces of the gearbox.
- Place the box in a vertical position and remove the back cover.
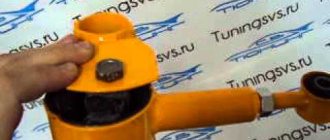
- Remove the clutch cable bracket, then use a rubber hammer to knock the rear cover off the gearbox.
- Remove the old gasket. She will be replaced.
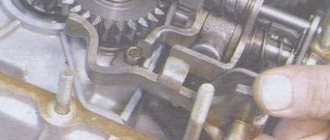
- Engage any of the two gears - 3 or 4.
- Unscrew the bolt that holds 5th gear, then turn it on.
- Simultaneously turning on the indicated speeds will allow you to fix the shaft and prevent it from turning.
- Unscrew the nut on the secondary shaft, and then on the primary one.
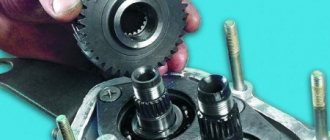
- Remove the 5th speed synchronizer along with the fork.
- Remove the fork from the coupling. Remove the synchronizer as carefully as possible. If you allow the clutch to move away from the hub, the spring-loaded balls that secure the synchronizer will simply fall apart.
- Remove the 5th speed synchronizer locking ring.
- Remove the 5th speed driven gear from the output shaft.
- Remove the thrust ring located on the needle bearing.
- Remove the needle bearing itself from the 5th speed gear.
- Remove the drive gear from the drive shaft and remove the bearing plate.
- Now the needle bearing bushings should be removed from the secondary shaft, and the thrust washer should also be removed.
Jewelry work
- Take out the ring that secures the input shaft bearing, and then a similar ring for the secondary shaft.
- Unscrew the locking plug and remove the ball and locking spring. Next you can get a couple more clamps.
- Remove the rear engine mount.
- Unscrew the reverse gear lock plug, tilt the box and thus remove the lock ball and spring.
- Remove the clutch housing and gearbox housing mounting bolts.
- Acting as carefully as possible, separate the two units. To do this, there are grooves in the crankcases into which the ends of a screwdriver are inserted. By shaking, you can disconnect the elements without any problems.
- Remove the gearbox housing.
- Unscrew the bolt securing the 1st and 2nd speed shift fork.
- Remove the fork and stem.
- Unscrew the bolt securing the 3rd and 4th speed forks.
- Separate the rod head from engagement with the lever, remove it along with the fork from your gearbox.
When disassembling the box into parts, be sure to pay attention to the condition of the elements. If you detect faults in time and replace gearbox components, you can get by with inexpensive but very effective DIY repairs.
Disassembled gearbox
What to pay attention to
So, following the instructions, we disassemble the gearbox of your VAZ 2109. Along the way, pay attention to the following points:
- Bearings. When they wear out, a noise from the box occurs. Plus, worn bearings negatively affect the condition of other gearbox elements;
- Synchronizers and sealing washers. If their condition leaves much to be desired, then the gears shifted poorly precisely because of them. Replace them;
- Clutch system, cotters, coupling hub clamps. All this must be replaced separately if there are signs of wear or defects;
- Blocking rings, synchronizers. If there are chips or nicks, don’t even think about alternative solutions, replace them immediately;
- Bearing tracks. Over time they wear out. If signs of wear are found, perform a complete replacement. In this state, they were only a short time away from breaking;
- Gap between gears and locking rings. Normally it is no less than 0.6 mm. In case of deviations, there is only one solution - replacing the rings;
- Retaining rings. If elasticity is lost, these elements must be changed, since they will no longer be able to perform their functions.
Device
To understand the essence of repairing, disassembling and assembling a gearbox, first of all you need to get acquainted with its structure. In the case of the VAZ 2109, the box structure is as follows:
- On the input shaft there is a block of drive gears that are in constant mesh with the driven gears of the gears when moving forward;
- The second shaft has driven gears with needle bearings. There is also a pair of synchronizers located there;
- The secondary shaft is created together with the drive gear of the main transmission;
- The driven gear of the main gear is attached to the flange of the two-pinion differential box;
- Differential bearings are always mounted with interference, which is adjusted by selecting rings of different thicknesses.
Checkpoint diagram