How to remove the instrument panel on a VAZ-2114 yourself
The instrument panel is not only dozens of various measuring instruments and switches, but also the most important decorative element. A damaged shield can seriously ruin the entire appearance of the interior. But sometimes VAZ-2114 owners still have to disassemble it in order to eliminate any problems: replacing light bulbs, wiring, dismantling the heater radiator, etc.
It is important to know that VAZ installs very fragile fasteners on its cars. Therefore, they are very easy to break, which means that when disconnecting the shield from them, you need to be doubly careful. Today we’ll talk about how to remove and disassemble the instrument panel on a VAZ -2114, and what should be taken into account during the work.
Where to begin
Before starting work, we recommend that you carefully study the dashboard structure. If you understand what and how, then it will be much easier for you to remove the torpedo. If you have already become familiar with the structure of the shield, you can begin work. You should start by dismantling the screens. This is done as follows.
- We take a positive screwdriver and carefully remove the three screws that secure the left screen. If you have a tool with a short tip, it is better to use it, it will be more convenient.
- We remove the lower part of the lining from the mounting on the body.
- We do the same with the screen on the right side. The only difference is that it is fixed with 5 screws. While working, carefully hold the pad with your hand.
Now that all the fasteners have been removed, you can remove the screen. But be careful that it doesn't get caught on the wires underneath it. Otherwise, you may simply break the cables.
Removing the instrument panel and replacing the light bulb on a VAZ 2115 (2113, 2114)
Removing the instrument
and replacing a light bulb in it on a
VAZ
2115 (2113,
2114
). I installed the light bulbs without a base...
Replacing light bulbs on the dashboard of a VAZ 2114
Removing the instrument
Our VKontakte group vk.com/ch116 Contact number 89061111189.
Next, you should disconnect the ground from the battery. This is done by disconnecting the pads. If a radio is installed in the car, it must be disconnected from the wiring. If you do not have any audio devices installed, you can simply remove the wires (they are closed with a plug). Then the cigarette lighter and the socket that illuminates the ashtray are turned off.
So, the first stage of work has been completed. You can proceed to the next steps.
Installing the dashboard trim
The cover will be installed after complete disassembly - it’s easier and more convenient. The instructions say that the trim must be cut around the perimeter. Now you can assemble the case: we place in it the accessories and instrument connectors that came in the kit. Carefully lay out the wiring from the base of the cover. All joints of the new VAZ 2110 panel must be glued with anti-creak.
We attach additional harnesses to the standard wires and tighten them with zip ties. Please note that there are additional buttons on the cover - standard connectors must be connected to them. The cover is attached to the original panel using self-tapping screws. Now you can carry out the installation in reverse order.
What's next
After all devices are disconnected from the car, you need to remove the handles from the heater switches. This can be difficult to do, because they are fixed quite firmly. To install the handles, special latches are used, which are installed inside. There is a small protrusion on each handle that will help us remove them. You just need to get into this hole with the tip of a minus screwdriver, then pick up the latch and lift it up.
The further procedure is as follows:
- The handle of the stove motor is removed. It is enough just to slightly pull it towards you;
- The torpedo is fastened to the instrument block using several self-tapping screws. They are removed using a “plus” screwdriver;
- Next, you need to remove the plug. It is fixed with a single self-tapping screw that needs to be removed;
- The cover is held in place by two fasteners. And again the screwdriver comes to our aid;
- Let's move on to the cables that are connected to the switches. They must be carefully removed, having previously marked each of them;
- Next, remove the steering mount bracket bolts;
- remove the fasteners from the bottom of the bracket. The key to 8 will help us here;
- remove the light guide;
- Next in line is the heating system control unit. Unscrew the fasteners and remove the cartridges;
- in front of us is a decorative insert. We also don’t need it, so we temporarily get rid of it;
- remove the hydraulic corrector;
- The last step is to dismantle the upper and lower fasteners.
Removal procedure:
Let's figure out how to remove the dashboard on a VAZ 2114. Using a Phillips-head screwdriver, carefully unscrew the 3 screws (top, middle and bottom) that secure the left console screen.
Next, remove the trim itself and the protrusion located at the bottom, then remove it from the body bracket.
Using a Phillips screwdriver, unscrew the next five screws, which are located in the right panel of the console, then remove the screen itself.
Then disconnect the negative cable terminal from the battery. If a radio is installed in the car, then remove it, also disconnect the connector of its harness with a wire or remove the plug container from the shield. Next, the wiring harness block must be disconnected from the cigarette lighter. You also need to remove the ashtray light bulb socket. Then remove the handle from the levers by carefully prying it off with a narrow screwdriver.
The next step is to remove the heater fan switch handle. To do this, you need to pull it towards you or pry it with a screwdriver.
Using a Phillips screwdriver, unscrew the two self-tapping screws located above the instrument cluster, as well as the two self-tapping screws located under it.
Prying off the plug, remove it and unscrew the self-tapping screw located under it.
Next, unscrew the two screws of the lowermost fastening of the lining.
Then remove the dashboard trim.
Now we mark the order in which the wiring harness blocks are connected to the switches, and disconnect them.
We place the already completely removed instrument panel and unscrew the bolts securing the steering column. Using the same screwdriver, unscrew the two screws, as shown in the photo.
Using an 8 mm wrench, we also unscrew the 2 screws of the lowest mounting of the bracket to the dashboard.
Next, unscrew the self-tapping screw securing the light guide using a Phillips screwdriver and remove the light guide.
Then we unscrew the screws that held the heating control unit, and also remove the lamp sockets from its reverse side.
Then we remove the decorative insert, but only after we have removed all its external parts.
We unscrew the nuts numbered one and two with a wrench or pliers (21 cm).
Then you need to remove the lamp responsible for illuminating the hydraulic corrector.
Carefully unscrew the screws for the lower and upper fastenings of the instrument panel, as well as the fastenings to the left cross member, using a Phillips screwdriver.
Now all that remains is to remove the instrument panel. That's it, now you know how to remove the instrument panel on a VAZ 2114 (VAZ 2115).
What is included in the design?
To make it easier to remove the entire dashboard or its individual elements, you need to know what the structure consists of. In a VAZ 2114 car, the dashboard includes 11 main elements, which are shown below:
Dashboard base. It contains controls for interior systems.
- Overlays. This part is needed to securely fasten the base.
- Bracket.
- The sealing element is a plug.
- Ashtray.
- Crossbar, there are two of them. The number “6” shows the right one.
- Right dashboard screen.
- A shield that blocks access to the wiring.
- Central bracket.
- Left screen of the instrument panel.
- Left cross member.
In VAZ cars, you can improve the appearance of the dashboard. To do this, you need to unload the dashboard from the dials. More stylish and modern information devices are usually installed to replace them. The same applies to the backlight; if you wish, you can update it yourself and install modern original LEDs.
By dismantling these elements one by one, you can completely disassemble the dashboard. Below you will find detailed instructions with which the motorist can completely remove the dashboard elements from the car.
Tools
In order to completely remove the housing, you will need:
- a set of keys and screwdrivers;
- marker;
- adhesive based labels.
The main work will involve a 10 mm wrench and a Phillips screwdriver. You will also need a water-based marker, since it washes off easily, it is necessary so as not to mix up the removed parts. This also applies to adhesive labels. There are too many parts and wires, so you shouldn't rely on memory. Stickers and bullet points will help you remember the starting place of all the components.
Step-by-step instructions for disassembly
- The first step is to remove the left screen. To do this, you need to unscrew 3 screws, as shown in the photo. Once the fasteners are removed, the left dash screen can be removed.
Now the console can be completely removed if replacement is planned. When performing other repair work, it is recommended to navigate by access to the parts of interest. For example, to access the heater stove, it is enough to remove only the lower part of the dashboard.
If disassembly is needed
Let us immediately note that if you have to replace the lining with a new one (the one you choose), then a complete disassembly may not be necessary for this.
1. The pad itself
2. Inserts for buttons, air ducts, instrument panel trim
But if noise insulation is planned due to the fact that the dashboard rattles when driving, then this cannot be avoided.
Disassembly work requires a lot of time and special scrupulousness. After all, if some fastening is spoiled or broken, then the new or tuned torpedo will not work as it should, it will creak and rattle unhappily while driving, spoiling the mood of the careless disassembler.
This material will help you quickly and accurately dismantle the dashboard:
COMPONENTS OF THE INSTRUMENT PANEL VAZ 2114
Before proceeding to the practical part, it is necessary to understand what the instrument panel of the fourteenth is.
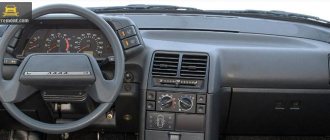
The VAZ 2114 belongs to the second generation Samara line of cars, which the Tolyatti Automobile Plant has been producing since 2004. All cars of this family are equipped with a “torpedo” of the Europanel type, for the development of which foreign designers were involved.
Europanel is distinguished by a high level of ergonomics - all its components are located in a freely accessible area, their use does not complicate the driver’s process of driving. Considerable attention is also paid to the comfort of the front passenger.
Dashboard tuning
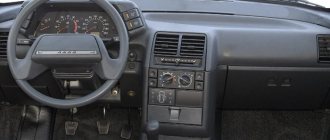
The main information element of the VAZ 2114 “torpedo” is the dashboard of sensors and indicators, which is located directly behind the steering wheel.
This panel includes the following elements:
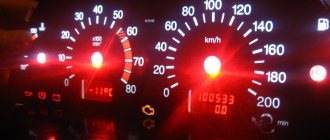
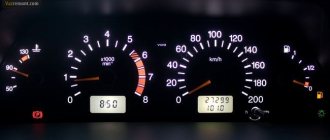
- Pointer instruments – tachometer and speedometer. Through the tachometer, the driver receives information about the engine operating mode - the arrow indicates how many revolutions the power unit produces at a given time. The speedometer displays data on the current speed of the fourteenth. The maximum mark on the speedometer is 200 km;
- Electronic screens are located at the bottom of the tachometer and speedometer needles: the screen under the speedometer displays the total mileage of the car and mileage data from the last control point, which can be set by the driver himself. The screen under the tachometer shows the time and ambient temperature;
- There is a rotation sensor between the dial instruments - when the turn signals are turned on, flashing green arrows are displayed on the dashboard;
- In the center of the dashboard there is a “Check Engine” indicator - which lights up when the on-board computer of the fourteenth detects any malfunction in the engine. Next to it is a brake light indicator;
- On the left side of the instrument panel there is a fluid temperature sensor in the cooling system of the power unit, on the right side of the panel there is a fuel level sensor in the gas tank. When the engine temperature exceeds a critical value or the tank is empty, orange lights above the sensors light up;
- There is also a series of indicators on the dashboard that indicate the following information: oil level, doors not closed, seat belts not fastened, amount of water in the window washer reservoir and brake pad wear.
The VAZ 2114 torpedo also includes the car’s on-board computer screen, which is located in its central part. Using the on-board computer, the driver receives detailed information about the operating modes and problems that arise in the systems and communications of the fourteenth. Also, recommendations on the timing of the next technical inspection are displayed on the BC screen.
In addition to information devices, there are also functional elements on the dashboard: turn signal levers, control buttons for headlights and heater, and window heating system.
Prerequisites
The car constantly throws up problems that have to be solved either using independent knowledge, ingenuity and tips from experienced car owners, or by contacting a service center. In the latter case, the result will be more expensive, but not always of better quality.
Even if you are not going to do this right now, it still doesn’t hurt to know how to properly disassemble the panel on a VAZ 2110, and even more so if you are one step away from this work.
Instrument panel VAZ 2110
Vibrant variety of colors
Today, the fashion for changing the dashboard lighting is gaining fantastic momentum. Almost everywhere cars have neon lighting or internal LED illumination. However, all these innovations are not a cheap pleasure, which not everyone can afford. The situation is different when replacing the factory backlight with a multi-colored one.
You can, no doubt, use ready-made tuning options, but this will also cost a lot. It is best to do it yourself. In this situation, the main thing is to have the necessary materials and patience. First you have to disassemble the “tidy”. The protective glass must be removed. Next we remove the arrows. To do this, you need to use a screwdriver and hard cardboard.
It should be placed under the arrow, and then pry it off with a screwdriver. Then you need to carefully and slowly lift it to the top. Next, remove the backing. A utility knife will be useful for this. It must be inserted between the panel and the substrate and a layer of sealant must be cut in a circle. Then remove the backing. Let's disassemble the panel and get started.
1. Remove the filter layer using a utility knife. A filter is a colored layer of paint. It is applied from the back of the substrate and gives color illumination to the speedometer numbers and other sensors. To completely get rid of the filter, you can use acetone or another liquid that contains alcohol.
2. Next, change the backlight color. First, you can change the odometer backlight. To do this, you will need to dismantle the odometer screen, and then remove the blue film and remove the backlight bulb. It should be replaced with a multi-color universal LED. He can change colors. We connect the LED to the socket of a standard light bulb. Reinstall the odometer screen.
3. Now you can start completely replacing the backlight. We attach the LEDs to the “tidy” frame. Such LEDs can be purchased complete with a color switch. We install them in place and attach them to the standard dashboard backlight contacts.
4. Let's move on. Now we need to make sure that the arrows have the ability to change the backlight. To do this, remove the layer of red paint from the arrows. For this operation, you can use a stationery knife and acetone. Once the arrow is clean, it can be painted using white nail polish. The main thing is that the arrow is white, since this color conveys the color scheme of the LEDs.
5. Before the final stage, you need to attach the LED color switch to the panel. Such a switch can be installed, for example, in the lower right corner of the dashboard. After this, you can install everything in place. First, the substrate is installed. For greater reliability, you can use a sealant. After this, we put the arrows in place. We insert the protective glass. After that we admire the result.
We remove the VAZ 2110 torpedo and install the trim: detailed instructions with photos
In the interior of the VAZ 2110, the dashboard is the most noticeable part. Every driver wants to sit in a stylish and well-maintained interior. But the standard panel looks angular and gray. This is especially noticeable after long-term use, when abrasions, scratches and cracks appear on the panel. Motorists solve this problem in different ways - some install another standard dashboard from a VAZ 2110, other drivers prefer to install a Europanel - this is the name of the trim from a third-party manufacturer. The trim allows you to transform the interior and turn the “ten” into a foreign car, at least on the inside. Whatever you choose, removing the panel is a must. In this material we will tell you how to properly dismantle the standard panel and install the Euro version.
Source
Replacing backlight bulbs
1. Take the plastic rim of the lamp and turn it to the left. When turning, you will feel that the lamp has become free.
2. Take a new lamp, insert it, and turn it to the right until it locks.
If you don’t understand anything about removing the shield or replacing lamps, watch the video below.
Video lesson
Source