Winter has come and you, anticipating a comfortable and warm ride in your car, start its engine and wait for it to warm up. And now, the moment to turn on the stove has come! You redirect the airflow towards you, and what happens? Absolutely nothing! It's all because of the VAZ 2114 stove cables.
The side and central deflectors give out a portion of barely warm air, and blowing the glass does not melt the ice as quickly as we would like. Many car owners put up with such injustice, the quirks of the domestic automobile industry. But you and I are not one of them and are going to radically move the situation forward!
The principle of operation of the heater cables on the VAZ 2114
The operation of a car's heating system is to transfer and redirect the heat that is released as a result of engine operation. Heat is removed by the cooling system and supplied, among other things, to the heater radiator. Then, when the switch is turned on (turned on), the heating system starts a motor that blows out hot air and passes it through the car panel deflectors. Air redirection to a particular area is carried out directly by the driver by switching the airflow positions.
When clicked, the picture enlarges
Most cases of stove malfunctions are associated with just one reason and this is the VAZ 2114 stove cable. The fact is that over time the tension of the cable weakens. This occurs as a result of its constant tension, weakening when moving the lever for adjusting the heating mode (cold and hot). There are also cases when the cable completely flies off the stove tap. As a result, the stove valve does not open completely, thereby you do not receive significant portions of hot air from the heating system.
What to do? To change or not to change? Here are the most common questions from car enthusiasts. Let's answer this: before replacing anything, you should find the cause of the malfunction and try to eliminate it.
But first, check
However, before you start disassembling the stove and making technological changes to its operation, find out that other components of the system are working correctly. Improvements will not yield results if the problems lie elsewhere.
- Make sure the pump is working properly. Breaking off the impeller impairs heat transfer. If the car begins to overheat frequently in the summer, and the heater does not work well in winter, this may indicate this problem.
- Make sure the thermostat is working properly. If it is stuck closed, the stove does not heat up at all. Antifreeze does not go into a large circle. If it is stuck open, the car (and with it the stove) heats up very slowly, the air comes out only slightly warm.
- Make sure the stove fan is working. It should work in all speed modes.
- Make sure your cabin filter is not clogged. Where is it? This is probably your problem. Open the hood, you will find it in the part between the engine compartment and the passenger compartment, approximately in the center.
- Make sure your heater core is not clogged. It is recommended to wash it periodically (every 2-3 years) using special products.
And only after making sure that modernization is necessary and everything else works, proceed to disassembling the VAZ 2114 stove and modifying it. This is quite possible and even necessary to do it yourself. Car service centers are unlikely to undertake such work.
A good stove heater is installed in the interior of front-wheel drive VAZ cars - in winter it is quite warm in the Zhiguli. But sometimes various problems arise - the stove blows cold air (VAZ 2110, VAZ 2114, other Samara models).
- why doesn't the heater heat up?
- what needs to be done to ensure that warm air enters the cabin.
Diagnostics of the operation of the VAZ 2114 stove cables
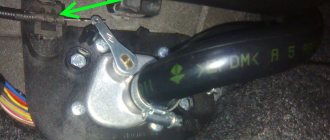
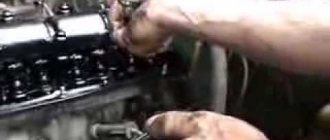
In order to inspect the valve cable of the VAZ 2114 stove, you need to dismantle the side panel trim on the driver's side (to the right of the gas pedal). Further details:
- Start and warm up the car engine thoroughly.
- Unscrew the three side trim mounting bolts.
- Turn your gaze towards the heater valve.
- Check to see if the cable has come loose from the faucet.
- Move the heater lever on the instrument panel to maximum heating mode.
- Pull the cable towards you and hold it in this position
- Check if hot air is coming from the deflectors.
Now that the source of the problem has been identified. It is required to fix, give constant tension and thereby ensure good operation and correct throughput.
One of the options for increasing the tension is a method in which a part (0.5-1 centimeter) of the cable is bent at the point of direct connection to the heater lever. To do this you will need:
- Remove the second trim, only from the passenger seat side.
- Take pliers and pull the cable towards you (at this moment, the temperature switch should be at maximum heating mode).
- Bend the additional amount of cable formed (its amount is selected experimentally, and in each specific case it differs and, as a rule, amounts to 0.5 centimeters).
- We hook it up to the temperature switch of the stove.
Attention! To avoid damage, perform all tension-related actions carefully and do not use excessive force. If you overdo it with tension, you can damage the system and the functionality of the heating system.
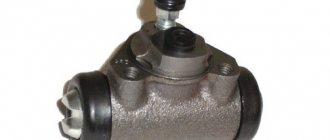
Which heater tap is better?
Arriving at an auto parts store. On the shelf you will see 3 options for heater taps:
- Factory standard.
- Ball.
- Ceramic.
Let's figure out how they differ, and which stove faucet is better.
The first option is a standard factory one, which costs 80-100 rubles. Its operating principle is based on a rubber membrane. In practice, it is very unreliable, susceptible to acidification, and its installation is not recommended.
Moving on, the second option is a ball valve. The principle of its operation is based on a ball with holes instead of a rubber membrane, as in the first option. In fact, this specimen is also susceptible to oxidation, but it is much more reliable than a standard factory faucet.
The third option is a ceramic heater tap. The body of this faucet is ordinary plastic, but the shut-off element already consists of two ceramic shut-off plates.
Of all those listed, the ceramic faucet is the most reliable, and it is recommended to install only it. But it is worth noting that the coolant capacity of a ceramic faucet is less than that of a ball valve, therefore the heat transfer is also less. In other words, the most reliable faucet is a ceramic faucet, but it will heat less efficiently than a ball faucet.
Replacing heater cables on a VAZ 2114
Sometimes situations occur when, for one reason or another, the product becomes bent or even breaks off. Such cases require removing the device and replacing it with a new one. Recommendations for analysis are as follows:
- The metal clips that hold the cable in place must be disconnected.
- One end of the cable is connected to the tap, the other side to the lever for adjusting the air temperature in the cabin. Any sequence of disconnection can be followed. But it will be most convenient to first disconnect the end from the stove tap, unfasten all the clips and, last of all, disconnect it from the lever.
- Now the product should be carefully removed from the case.
- When reinstalling the new part, start by attaching it to the tap.
There are a lot of different models on the auto goods market that differ in length, thickness, various types, and shapes of both ends. In order not to make a mistake when purchasing a new product, we advise you to take it with you to the store. Usually cables are sold in one set of several pieces at once.
So we learned how to change the heater cables on a VAZ 2114. The most important thing when carrying out work is not to rush, to understand the principle of operation of the hot and cold air supply mechanism. We wish you warm heaters!)
Heating system modification
One of the controversial decisions is to move the heating tap under the hood and replace it with a regular household one. Before you dare to use this know-how, you should weigh the pros and cons. One of the advantages of this action is that you do not have to worry about leakage into the cabin . In general, the service life of the parts increases, but in order to open and close the tap, you need to run to the hood or reach into your feet and turn the valve. Or in the summer, drive with the air flow damper closed.
And yet, perhaps you are one of those for whom this will be the optimal solution that will help you not bother with repairing the stove tap. For clarity of removal and upgrading, watch the video instructions:
How to remove the heater valve VAZ
Replacing the tap with a water tap and moving it under the hood
As you can see, despite the certain efforts required to repair or replace the valve of the VAZ 2114 stove, it is still better to do this before the interior is flooded with antifreeze. At the moment, heating taps are presented on the markets in three main types: standard, ball and ceramic. But in fact, of all those available, there are no normal ones that you can install once and forget about the problem. Plastic ones etch, ceramics melt and run, the ball one is also not without its drawbacks, but is still more reliable compared to others. Remember that preventative repairs of parts of your car, in particular the heater valve, can prevent other, significant problems.
Winter has come and you, anticipating a comfortable and warm ride in your car, start its engine and wait for it to warm up. And now, the moment to turn on the stove has come! You redirect the airflow towards you, and what happens? Absolutely nothing! It's all because of the VAZ 2114 stove cables.
The side and central deflectors give out a portion of barely warm air, and blowing the glass does not melt the ice as quickly as we would like. Many car owners put up with such injustice, the quirks of the domestic automobile industry. But you and I are not one of them and are going to radically move the situation forward!
Causes of stove malfunction
There are as many reasons for stove malfunctions as there are drivers. The forums are full of requests for help: first one reason, then another, then a third. As a result, there is no consensus on how to eliminate similar faults.
This article is devoted to only a few, the most important problems of repairing your favorite iron horse with your own hands. Don't judge harshly if you didn't find a solution here that would help you.
You should not forget that you are just a car enthusiast, and not a professional master from a large service center that services equally cool cars. You shouldn’t consider yourself a woodpecker or complain that your hands are growing from the wrong place, you just need to start small.
This video shows how to repair a VAZ stove, and you can decide for yourself whether this adjustment method is right for you:
Some car owners solved the problem immediately. Suitable for the case when warm air blows directly in the center or on the legs, and only a stream of cold or slightly warm air flows on the sides or on the windshield.
For winter, such a malfunction is simply a disaster: you suffer so much that it doesn’t seem like much. After watching this video and adjusting the heater, you can at least temporarily make sure that hot air hits the windshield. The cabin will also become warmer. But don’t overdo it: there is an unpleasant trick: with “headless efforts” you can break off the plastic to which the cable is attached.
You can move the damper to the “hot” position: just secure it tightly, covering it with a sealed mass. In this case, send the ill-fated drive cable to the place where your spare parts are stored. You will feel the positive effect immediately, although the positive temperature of the cabin is now regulated exclusively by the “stove” tap.
The heat will increase so much that you can forget about earflaps and sheepskin coats: you, as a driver, will feel comfortable behind the wheel even in forty-degree frost. The cold air is now tightly sealed and has nowhere to penetrate. But the air on the right will still be somewhat colder. Depends on the deformation of the flap during operation of the car: on the opposite side of the cable, the lid will no longer close tightly.
Purpose and location of the parking brake
The location of the handbrake is known to every VAZ 2110 driver - there is a lever installed between the front row seats, when pressed, braking occurs. The metal cable is a mechanical drive in this unit. By lowering the lever, the driver provides tension on the cable, which presses the rear brake pads to the wheel discs. Breakage of the lever is extremely rare, since the main load falls on the metal cable, as a result, after some time it loses the required tension.
The operation and maintenance manual for the VAZ 2110 states that at least once every six months it is necessary to carry out diagnostics of the brake system, including the parking brake. The traffic regulations have requirements for this unit - it must hold the car at a slope of 25 degrees. If the metal cable is not damaged, and the adjustment does not bring results, then the problem is in the rear brakes - this requires a full diagnosis from specialists.
Step-by-step replacement of the VAZ-2114 stove
For those for whom this method is not suitable, you can completely remove the stove and adjust it. This is done in stages.
Before you remove the heater (1), do not forget to disconnect the ground wire, otherwise the battery will play a trick on you. At the same time, drain the coolant from the system.
Now remove the instrument panel. as well as lining the floor tunnel. Now carefully disconnect the air duct (under No. 19) to heat the interior.
Start a new round of work:
Carry out the same manipulations with the electrical wires from the resistor (No. 18), the electric motor (No. 2) of the fan, the inlet (No. 12) and outlet (No. 13) faucet hoses.
- Sequentially unscrew the 2 nuts securing the faucet directly to the front panel.
- Remove the seal from the faucet pipes.
- It's time to unscrew the 4 nuts securing the stove to the body.
- You can easily remove the heater of your vase with control assembly.
- Once you finish the adjustment process, carry out the installation in strict reverse order.
Characteristics and device
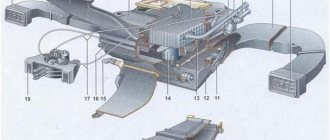
The main purpose of this system is to maintain optimal temperature in the cabin during the winter season. In addition to comfort, the stove is needed to prevent the windows, especially the windshield, from sweating. To prevent condensation from forming on it, special nozzles are provided at the top of the panel. However, first things first. Below is a diagram of the interior heating system:
- Water deflector shield.
- Windshield heating nozzle assembled with air ducts.
- Side nozzle designed for heating and ventilation of the interior.
- Central deflector.
- The heater is assembled with an electric motor.
- Interior ventilation nozzle.
- Stove tap seal.
- Rear heater pipe of VAZ-2114.
- Stove supply pipe.
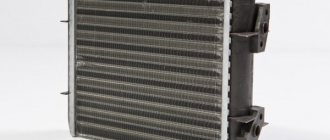
How to replace the radiator of a VAZ 2114 stove
In this section you will learn how to replace a stove radiator yourself. Start by draining the coolant that is in the system. After you have completed this work, you can remove the instrument panel. Now let's go through the points:
- In your cabin, directly under the instrument panel, disconnect the pair of hoses that go to the heater tap pipes.
- To perform these manipulations without problems, loosen the clamps.
- Do the same steps in the space under the hood: disconnect the hoses from the valve nozzles themselves, unscrew the nuts that secure the radiator, remove the valve from the shield.
- Remove the faucet rod holder.
- Disconnect the rod from the lever.
- Go to the interior, remove the cover from the gear shift knob.
- Remove the plastic trim: it is located under the brake (manual).
- Unscrew and remove the floor trim (rear): it is located between the seats. For convenience, slide it back.
- Disconnect the air vent (cabin) from the heater body and remove it.
- Disconnect the connector from the motor and resistor.
- To the right and left of the heater, unscrew 2 pairs of nuts.
- Remove the radiator with the control panel.
- Make a replacement.
- Start the assembly process in reverse order.
In addition to what has been said, you can watch a video with the repair of the radiator frame, also more about the stove radiator and its replacement here and here
and one more small story:
The heater blows poorly into the legs and side windows
The heating system of the VAZ-2114 is not reliable. Over time, the stove stops heating the legs and side windows normally. Moreover, the problem is not in the temperature of the air (on the contrary, it can be hot), but in the strength of the flow with which it comes from the nozzles. In this case, you will have to modify the air flow channels. To do this, remove the front panel so that there is access to the nozzles.
The VAZ 2114 stove does not heat well
Oh, those stoves! Let's try to figure it out.
Situation. The car owner's interior is poorly heated by the stove, although warm air is supplied, and the engine temperature remains within 90 degrees. According to external signs, the radiator of the heating system is also hot and the pipes are in normal condition.
Question. What to do?
Answer. Unscrew the side of the passenger torpedo (the brains) yourself and inspect in the area of the engine shield there are 2 hoses that go to the heater. Feel how hot they are. If there is no heat there, then they are clogged. Clean it and everything will be as it should! Now check the engine using the sensor or on-board indicator.
Heater modification: 3 comments
Hello! Same problem on my car! I want to make repairs according to your scheme. Please tell me what is outdated in the article, can the materials be replaced with more modern ones? I’d be grateful if we could chat by email! Thank you
I think silicone sealant and screws are still in use, 13 years later.