The ignition switch on any car, including the VAZ 2107, is designed to start the engine. A breakdown of this mechanism will make it impossible to drive the car, so the driver needs to periodically diagnose its condition. This material will tell you in detail about malfunctions and replacements of the device.
Mechanism clogged
Basically, lock clogging occurs due to prolonged use of the car in dusty areas. Or simply after a long period of time has passed. Various materials that are used to lubricate the lock secretion can serve as a magnet for collecting dust and other foreign parts. Repairing the ignition switch in this case is quite simple and does not require the process of removal and additional disassembly of the mechanism. You just need to clean the lock with a product such as WD-40.
Color gradation
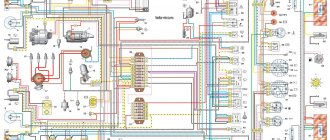
To correctly connect the contacts on the back side, you need to know the colors of the wires. Each of the chips comes with a cable with insulation of a personal shade. We recommend focusing on the diagram:
- pin 50 – contacts the red wire connected to the starter;
- pin 30 – pink contact;
- pin 30/1 – brown cable;
- pin 15 – blue with a dark stripe is in contact with the heater, ignition, etc.;
- INT pin – black cable, responsible for starting the head optics and operating the dimensions.
After all the wiring is connected, we can reconnect the battery terminals and check the functionality. We start the ignition in each position one by one, testing the performance of the devices.
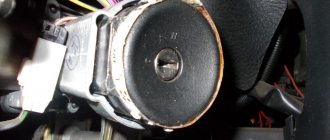
Lock key and keyhole
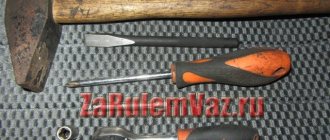
A bent key can also cause this type of failure. Opening frozen door locks and the trunk of a car (if all the locks are opened with one ignition key) and using the key for other purposes will certainly lead to its bending and deformation of the working area over time. After this, the key does not turn in the ignition or even cannot enter the keyhole at all. This factor is eliminated by leveling the key blade with the usual tapping of a hammer.
If the problem lies in the secret of the lock, namely in excessive wear of its lamellas, then you cannot do without dismantling and disassembling the mechanism. As a rule, repairing a secretion is very difficult and troublesome; most often it is completely replaced. But what to do when the ignition switch is jammed somewhere far from home, and it is not possible to replace unsuitable parts? In this case, you can remove the secret from the lock body and remove all the springs and lamellas from it. This process will allow you to start the car even with a regular screwdriver, which is quite enough to get to the nearest spare parts store or repair service.
Castle freezing. Advice from experienced motorists
This is a rare problem, but we will look at it anyway. When using the machine in winter, condensation may accumulate in the lock. And when the car cools down in the parking lot, it freezes, immobilizing the moving elements.
And if the key does not turn in the ignition, there is no need to worry again and immediately disassemble it. Experienced drivers advise first to carry out several “resuscitation” operations. Turn on the standard cigarette lighter to warm up, and when it gets hot, bring its end part to the lock hole - this may help. Another method is to heat the working plate of the key from an open flame source (matches, lighter) and insert it into the lock. After waiting a few seconds, you can try turning the key. If nothing happens the first time, the warm-up operation should be repeated. When there is a source of electricity, you can use a regular household hair dryer to warm up.
In no case is it recommended to warm the keyhole using liquids that freeze quickly, as this will only make the problem worse.
To lubricate the elements of the locking mechanism, you can use brake fluid, silicone lubricants, spindle and motor oils, for example a regular WD oil. In the future, this will reduce friction and wear of the secretion, and also prevent freezing of the secretion lamellas.
Step-by-step removal process
The first step is to de-energize the car's electrical equipment by removing the negative terminal from the battery.
After this, you can remove the front panel of the lock. Before removing the ignition switch, disconnect the plug with power wires and the safety relay plug from it.
Next, you can begin to remove the lock itself.
If the reason for removal was that the key does not turn in the ignition switch, then you can try to repair and replace its damaged sections or completely replace it with a new device.
The lock should be installed in the reverse order of removal.
How to install electronic (contactless) ignition
The backlight on the dashboard of the VAZ 2114 disappeared
To avoid a short circuit during the installation of electronic ignition, it is necessary to disconnect the ground wire from the battery.
The sequence of installation of electronic ignition components is not particularly important. We can advise you to start by replacing the distributor:
- disconnect high-voltage wires;
- remove the distributor cover;
- rotating the crankshaft, set the slider perpendicular to the engine axis so that it is easy to repeat when installing a new distributor and mark the position of the middle mark of the distributor scale (these actions will facilitate subsequent adjustment of the electronic ignition);
- unscrew the nut securing the distributor and dismantle it;
- install a non-contact sensor-distributor instead of the old distributor, placing the slider and housing in positions corresponding to the previously applied marks;
- put on the distributor cover;
- install high-voltage wires.
Then the coil should be replaced. The operation is simple, but you need to take into account the position of contacts “B” and “K”. If it is different on the new coil, you need to rotate it relative to the fasteners so that the contacts are positioned similarly to the old one.
The last thing to install is the switch. It is better to place it between the headlight and the washer reservoir. You can secure the switch using self-tapping screws, under one of which you can bring out the “zero” wire. The radiator of the device must be leaning against the body.
After installing the kit, you must carefully check the quality of the electrical connections and compliance of the connections with the circuit diagram.
After completing the installation of the ignition units, you can connect the ground wire to the battery and start the engine.
Price issue
If it is still impossible to repair a broken lock, you need to purchase and install a new one.
If you are planning to do this yourself, then first you need to purchase a lock that matches the make of the car from a spare parts store. Depending on this, the cost of the device will vary. As a rule, parts from imported manufacturers have a higher cost (from 2 thousand rubles) than from domestic ones (up to 1 thousand). As for the same VAZ, the price of the product can range from 300 to 700 rubles.
To prevent damage to the ignition switch in the future and increase its service life, it is advisable to periodically lubricate the moving elements and parts of the lock. It is enough just to apply a few drops of motor oil into the lock bore using a medical syringe, and problems with it will not bother you for a long time.
So, we have found out the main reasons why the key gets stuck in the lock. And they told me how to fix this problem with my own hands.
During the life of the car, the owner has to deal with many minor problems. They are fairly easy to fix and are a bit of a hassle. But sometimes unpleasant breakdowns occur, putting the car owner in a very uncomfortable position. For example, the key is stuck in the ignition and will not turn. The malfunction is not serious, but it is quite capable of ruining your plans for the coming day. Try to get out of the situation yourself and resolve the issue using one of the proven methods.
Briefly about the operation of the lock
This switching unit is designed to turn on electrical equipment, ignition and engine starter using a key. For the convenience of the driver and the anti-theft (locking) function, the element is integrated into the design of the steering column on the right side.
In old Soviet cars, the keyhole was located to the left of the steering wheel.
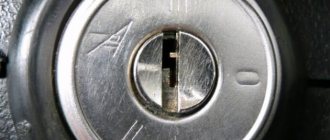
The castle consists of the following elements:
- Cylindrical steel body.
- A secret key mechanism is installed inside the case - the larva.
- Contact group connecting to the larva with a leash.
- A locking rod connected to the lock mechanism protrudes from a side slot in the housing.
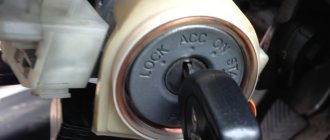
Simultaneously with turning the key, the cylinder rotates the shaft of the contact group. Depending on the selected position (usually there are 4), voltage is supplied to different consumers - electrical equipment, ignition system and starter. The locking rod locks the steering wheel only in the first position (Lock). In the same position, the key is removed from the well.
Causes of the problem
Car ignition switches are quite reliable devices. Before the first problems associated with wear arise, the car manages to travel from 100 to 300 thousand km, depending on the brand and country of manufacture. In order to avoid getting into an unpleasant situation, the car owner must clearly grasp the moment when the key gets stuck in any position and take measures to correct the problem.
There are 5 main reasons why the ignition switch of a modern passenger car jams:
- the locking of the shaft connecting the steering wheel to the rack is triggered and does not disengage;
- the moving parts of the secret mechanism are heavily clogged;
- working wear of elements (on cars with high mileage);
- condensate freezing;
- deformation or mechanical damage to the key.
Note. The listed problems have been successfully eliminated on new cars with keyless entry and push-button engine start.
The purpose of the locking system is to mechanically lock the steering shaft in one position and simultaneously disable the starter. If an attacker manages to break the locking rod and turn the steering wheel, it will still not be possible to start the engine. This nuance should be taken into account when troubleshooting a broken lock. A characteristic sign of a malfunction is the key jamming in the Lock position.
Clogging of the cylinder with dirt is a consequence of lubricating parts with conventional automobile oils, including motor oils. These liquids strongly attract dust, which accumulates inside the mechanism over time. At a certain point, the key jams and jams in any position except Start. Accordingly, it becomes difficult to remove it.
Similar symptoms are observed as a result of natural wear and tear of the locking mechanism on cars with a mileage of 200 thousand km. Over a long period of use, the grooves of the secret part of the key are also damaged, which does not allow them to clearly interact with the cylinder. Sometimes car enthusiasts themselves damage the working side of the key by using it as a lever (for example, to open traffic jams). The soft alloy bends and cracks easily from such exercises.
What if the key is chipped?
Almost all modern cars have electronic control units in their electrical equipment systems that control the units and components of the machine, including locking. A failure of the control system results in the steering wheel being locked, making it impossible to move the car or start the engine. Again the rather boring question arises about what to do in such a situation.
When traditional rocking and cranking are not successful, try disconnecting the battery for a while. It will take from a few minutes to half an hour. Usually this helps and the car can be restored to working order. If the steering wheel is locked, this happens through mechanical devices, and smart electronics will not allow the power unit to start.
In most cases, problems can be prevented, or even prevented from occurring. No special techniques or methods are required; you just need to be careful with your car keys and avoid damage. Periodically clean the device from penetrating dust and dirt using carburetor cleaning fluid. Do not allow moisture to get inside the device; freezing may occur in winter. If, nevertheless, a problem “looms”, do not despair, but thoughtfully approach its solution.
What to do with blocking?
When the ignition switch is stuck in the Lock position, the operation of the mechanical lock depends on the angle of rotation of the wheels. If the steering wheel gets into the sector of action of the locking rod, the latter will lock the shaft in a certain position. As a result, it will be possible to deliver the car to the repair site only with the help of a tow truck - it will not be possible to tow it.
What actions can a driver take in such a situation:
- overcome a jammed mechanism with patience and hard work;
- break off the locking rod, start the engine and move to the garage;
- remove the ignition switch by pulling the rod out of its socket.
The first method involves numerous attempts to turn the key in order to “catch” the position when the mechanism opens. Be patient, exhale and try to rotate the key head while moving the steering wheel. An aerosol lubricant like WD-40 sometimes helps to disengage jammed parts of the cylinder - blow it through the tube into the keyhole.
The first option is the only one that allows the car owner to get by with “little loss” and get to a garage or service station.
Try the method before taking drastic measures .
Let your wife twist the key - maybe she will succeed the first time. On cars where electronic starter locking is not provided, you can break off the rod by sharply turning the steering wheel, applying medium force. Then the car starts by shorting the wires or turning the released key. What are the consequences of such a barbaric method:
- the broken rod will remain inside the steering column, where it will begin to rub, jam and wedge the shaft;
- from excessive force, the shaft may bend and during the repair of the lock it will have to be replaced with a new one;
- if the larva remains motionless, you will need to remove the casing, get to the contacts and find the necessary wires to start the power unit.
The complete disassembly option is suitable for all situations where the lock is jammed. The task is not an easy one - you need a tool and an understanding of how to dismantle the unit in a certain car model. The task is to get rid of the blockage and get to the contact group, whose shaft can be turned manually or with a screwdriver.
In any case, unscrew the plastic lining of the steering column and examine the fastening of the lock: you may be able to remove it. After unscrewing the nuts or screws, disconnect the housing and at the same time move the steering wheel to release the locking rod. If things go wrong, the only thing left to do is call a tow truck.
What is he like?
Here is a unit used on GAZ, ZIL, Moskvich, Volga cars and other models produced in the USSR.
The ignition switch is used to connect consumers of electrical energy to the vehicle’s on-board network; it turned on the starter to crank the crankshaft and start the power unit. The design of the device did not have any means of protection against car theft. In case of failure, it is enough to remove the wires from the contact plates, to continue movement, just short them together.
If you can’t turn the starter, don’t despair too much. This can happen due to deformation of the key itself or jamming of the larvae. Before disassembling the switch, try resuscitation. WD fluid is well suited for this purpose; it should be injected into the cavity of the faulty ignition switch. Sometimes lightly tapping the body restores the switch's functionality. Difficulties in turning the key may be caused by natural wear and tear on the lock slats. If there is a second copy of the key, compare them and make sure the products are identical. If noticeable wear is detected, order a duplicate of the product.
The appearance of the first VAZ models showed drivers a completely new design of the device. He had a vehicle anti-theft device. After pulling out the key, the steering wheel locked, making it impossible to continue driving. In the era of fuel shortages at gas stations, drivers turned off the ignition while driving to save gasoline; as a result, the steering was blocked, leading to emergency situations.
The photo shows a representative of the VAZ 2101-2107 family of switches.
This model is not a problem-free product; breakdowns occur in such units. Moreover, problems occur in the contact group, the locking mechanism, jamming occurs, and the lock cylinder falls apart. Contact group problems are easily solved. The wires are removed, and consumer circuits are switched manually. You can continue driving for a long time; the car’s protection against theft becomes practically zero.
To prevent the steering wheel from jamming, you should remove the inoperative device from its seat. This operation will require several Phillips and flat blade screwdrivers. First of all, you should remove the plastic steering column cover and disconnect the wiring. The switch is fixed with screws, they should also be unscrewed. Next, use a thin screwdriver with a flat blade to press the latch in and remove the product out.
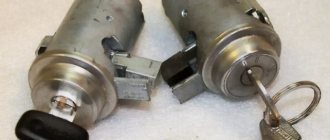
To replace the larva you need to disassemble it, you will need:
- Drills with a diameter of 2 and 4 mm;
- An awl with a strong tip, 30-40 mm long;
- Small side cutters, knife.
Procedure for replacing the larva:
- The chrome cover is rolled in three places; it needs to be bent and removed;
- A locking pin is found under the cover; it should be removed;
- A hole is drilled next to it with a 4 mm drill approximately 2 mm deep;
- In this recess, a hole is drilled with a smaller drill, but at an angle to the pin;
- When the drill reaches it, drilling is stopped;
- Now an awl comes into play, they push the pin out;
- Use the sharp tip of a knife to remove the faulty larva.
Reassembly must be done in reverse order.
Clogging and freezing of the larva
Due to dirt accumulated inside the lock, the key jams and jams in various positions. If the jam occurs in the intermediate position indicated by the letters ON and ACC, it cannot be removed. What to do:
- purchase WD-40 lubricant in an aerosol can from your local auto parts store and blow it into the mechanism through the keyhole slots;
- make attempts to turn the key by rotating it in different directions and swinging it in the lock;
- periodically add lubricants to dissolve the dirt inside the larva;
- Gently tap the key head and lock with a light hammer or similar object.
Recommendation. During the manipulations, keep the car on the hand brake. By focusing on the stuck mechanism, you may not notice the car rolling away.
Usually the blockage can be cleared using these methods and the key is turned at least once. This is enough to get to the nearest car service center or garage. If attempts are unsuccessful, it is necessary to dismantle the lock or get to the contact group in another way. Without disconnecting the wires, turn the shaft with a screwdriver and start the motor. Do not touch the key - you may accidentally engage the mechanical lock.
A frozen mechanism is “treated” by warming it up . Pouring hot water is not allowed: just heat the key with a lighter, insert it into the well and try to turn it. The second option is to fill the mechanism with warm WD-40 lubricant from a heated can.
The steering wheel is locked, what should I do?
This can happen if the ignition switch is working properly, when the steering wheel jams the anti-theft device pin after the key is removed. When I try to turn on the ignition and start the engine, the key does not turn. Try simultaneously turning on the ignition with your left hand and turning the steering wheel with your right hand. After several attempts, the key will turn and the steering wheel will be unlocked. It should be noted that on foreign cars the hands need to be changed; the ignition switch is located on the right side of the steering column.
But what to do if such actions did not lead to success, but it is necessary to continue moving? We will have to look for other ways to solve the problem. Some owners, in a fit of indignation, simply break the anti-theft pin, but it is better to try another method if you have time. To do this, you will have to disassemble this unit to unlock the steering wheel. Remove the plastic steering column cover as described earlier.
After this, the larva should be removed, in some cases it can be removed freely, and if difficulties arise, a drill or drill bits are used. The removed cylinder provides access to the anti-theft pin drive. In the depths you can see a cross-shaped cut into which you should insert a powerful slotted screwdriver and turn the pin to the open position to unlock the steering wheel.
Important! Do not try to use auxiliary tools to turn the key; it may break, which will further aggravate the problem.
Wear and deformation of the key
In a situation where a worn ignition switch is jammed, it is necessary to perform all the manipulations described above. The goal is to start the engine and deliver the car to the repair site. Use a similar approach: swing and turn the key, lubricate the cylinder with aerosol.
If you are on the road away from any shops, use motor oil for lubrication. Remove the dipstick from the engine and drip lubricant onto the working part of the key, then insert it into the well several times. If there is no result, disassemble the lock - there is no other way out.
Often the cause of a jammed lock is a bent key. Having discovered deformation, bend the splined part on a flat area with light and careful blows of a hammer. A cracked or broken key cannot be used - a piece of metal may remain in the lock the next time you try to start the engine.
The key itself is damaged
With prolonged use, the key may simply break and wear out. Contacts are erased and deformed.
A spare key, which almost everyone always has, will help you here. If you don't have a spare one, you can try restoring the old one. But this is relevant in a situation where it has been bent and deformed. It is impossible to build up erased contacts with your own hands.
It is usually recommended to insert worn keys and try to turn them in different positions and with different forces. There is a chance that you will be able to hit the secret key and the engine will start. But the key needs to be replaced soon.
Possible causes of ignition switch failure
Before we talk about how to connect and remove the ignition switch on the "seven", let's look at the main malfunctions of the unit. The device itself in these cars consists of two parts - a mechanical one, that is, the one where the key is installed, and a contact one, to which the wires are connected. As practice shows, replacing the ignition switch on a VAZ 2107 is carried out in the event of a jammed unit or during an attempt to steal it. If the lock is jammed, you won't be able to start the engine anyway, at least not with the key. It is also necessary to change the node if the keys are lost.
Also, the reason for replacement may be the contact group - it fails as a result of a short circuit or oxidation of the contacts; insulation failures occur much less frequently. Therefore, in order to change the unit with your own hands, you need to understand its structure. In general, the procedure for replacing a node is not particularly complicated, we will talk about this below (the author of the video is Region 4253).
“Classics”, as well as the “Ninth” family
Ignition system VAZ 2110 2111 2112: ignition switch, spark plugs, ignition coil
Fiat engineers, when developing the ignition switch for their model “124”, used two supply lines (“30” and “30/1”). The ignition line was the only one.
Another ignition circuit containing contact “15/2” was added during the transition to the “2109” family. It, in turn, is switched using a relay. In different families, only the diagram differs, but not the “behavior” of the car when the key is installed opposite the marks:
- Position 0: everything is off;
- Label 1: ignition and engine operation;
- Mark 2: starting the starter;
- Label 3: “Parking” mode.
To turn off the engine, turn the key to position “0”. The spark plugs lose spark and the engine stops.
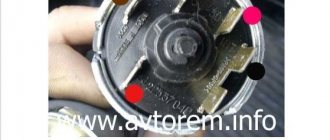
The ignition switch module, if we talk about the “classic family”, is equipped with 5 terminals (see Fig. 2). Starting from the “2109” family, this solution is not used. Several wires come out of the lock cylinder and are connected to a remote connector.
The connector layout can be easily identified using the color coding (see diagram above). When carrying out any installation work, remember the following: you must turn off the engine, open the hood and disconnect one of the battery terminals. Usually the negative one is turned off.
In what cases should it be changed?
Replacing the ignition switch of a VAZ 2107 should be done when faults are identified, which are not difficult to determine. To begin with, we recommend performing a visual diagnosis of the mechanism - if there are signs of deformation and cracks, the device must be replaced. It is also necessary to change the unit if jamming is felt when turning the key. To check the mechanism, you need a control device - a multimeter, with which you can determine the voltage level.
If a multimeter is not available, then a regular test light with two wires is also suitable for checking. If the light does not light up when you turn the key, this indicates the absence of an impulse and the inoperability of the contact group. For proper replacement, we recommend purchasing a complete set of the mechanism immediately, since depending on the manufacturer, the connecting components may vary.
How to install and connect a new/repaired lock
Installation goes like this:
The key is inserted into position “0”. Next, you need to press the latch and insert the part into the guide housing. The wires are installed using a connector or plug (pay attention to the color of the insulation). The mounting screws are now put back into place. The protective casing is installed. And finally, a terminal is put on the battery.
All that remains is to test the functioning of the lock.
Note: in a VAZ-2107 car the electrical diagram must be strictly followed. If an error occurs, a short circuit will occur and, as a result, electrical equipment will be damaged.
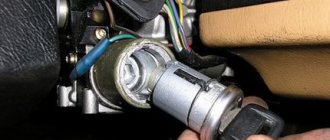
Replacement instructions
So, how to remove the ignition switch on a VAZ 2107 and replace it with a new one?
To do everything right, follow these steps:
- First of all, don’t forget to remove the terminals from the battery!
- De-energize the car's electrical circuit; to do this, disconnect the battery, so you can prevent a possible short circuit in the wiring during operation.
- Place the key in the 3Z and turn it 90 degrees. In this position, the system shaft will automatically be locked and will not interfere with the removal of the mechanism.
- To remove the plastic trim from the steering column, you need to unscrew the five fixing screws connecting the upper and lower parts. Both parts of the cover must be removed; do this carefully so as not to damage the casing.
- Then you need to unscrew two more bolts - with their help the ZZ itself is fixed. These screws are located on different sides of the switch.
- After these steps, you need to disconnect the cables from the contact group of the node. Use an awl to remove the fastener by reaching into the flat hole with the tool and pressing the latch. At this point, using a flat-tip screwdriver, pry up the assembly and remove it from the bracket. When all the screws are removed and the fasteners are bent, the mechanism can be dismantled without any problems. In the event that you only need to replace the group itself, using the same flat-tip screwdriver you will need to move the ring away - and the element can be removed without any problems. When installing a new contact group, you need to install a pass on the secret part, this way you can make a small engagement. Then the entire structure must be clamped with a spring ring.
- To install a new switch, first insert the key into it and turn it to position 0. Then tighten the fastener and simultaneously install the switch into the bracket.
- After this, you need to connect the wires of the replaced ZZ in accordance with the diagram below. The diagram is very important, because if the connection of the contacts is broken, it can lead to a short circuit in the wiring in the network. Accordingly, electrical appliances and devices may eventually fail.
- Finally, you need to install both parts of the plastic cover and secure them with screws.
What other devices are there?
You are presented with a switch for the next stage of modernization; it was installed on cars with front-wheel drive made in Russia
The ignition switch of this design began to be installed on the left side, as on foreign-made cars. It has a steering wheel locking system. The electrical system received an additional relay. If the engine suddenly stops arbitrarily, you need to turn off the ignition, then turn it on again, and start the engine.
The lock can break at the most inopportune moment. The manufacturing quality of individual devices is low, which can cause the larvae in it to break. In such cases, they replace the device with a new one, and someone changes the core. The ignition switch of these models is covered with a plastic casing; it must be removed before replacement or repair.
To replace the cylinders, you need to get to the switch itself; it is convenient to perform this operation with the device completely removed. Tool you will need:
- Thin screwdrivers with slotted and Phillips blades;
- A sharpened small chisel;
- Drill with a diameter of 2 mm;
- Hammer and pliers.
Important! Before starting work, disconnect the battery ground.
The steering column lock can be attached in two ways, with two or four shear-head screws. To dismantle the ignition switch, the screws are pulled out of place with a chisel and then turned out with pliers, as shown in the photo.
Attaching the ignition switch to the steering column.
If you cannot remove it this way, the screws should be carefully drilled out. A wiring harness extends from the ignition switch, it ends with a connector, it is disconnected. Now you have access to the locking pin of the cylinder, you need to get it out. A thin screwdriver is used, they lightly tap it and try to pull it out. If it is impossible to remove the larva with its help, you need to drill it out with a thin drill. The new part is installed in the reverse order of removal.
Drastic measures to disassemble the switch and replace the internals are resorted to in extreme cases, when all methods of “treatment” have been exhausted. You should try to clear the key channel of foreign particles. A hand jigsaw file is ideal for this procedure. With its help, solid particles trapped in the ignition switch channel are easily removed. It is helpful to flush the cavity with carburetor cleaning fluid.
Remember! Lubricant that gets inside the lock actively collects dust and dirt, which subsequently impedes the operation of the device.
In some cases, problems can be caused by deformation of the key, or more precisely, its bending. There are enough reasons for this: falling, careless handling, opening beer bottles and other, sometimes completely unexpected factors. Place the key blade on a flat, flat surface and check their condition. If a bend is detected, it is eliminated. To do this, it is advisable to use objects made of soft alloys so as not to further deform the key.