Modern automotive industry is developing rapidly, therefore, such an important branch as automotive optics does not stand still. And the most important aspect of its development is that, despite the design difficulties of certain parts, their independent repair and installation will not cause any particular difficulties to the car owner.
Lada Granta is a budget car with front-wheel drive, this model was developed at the Volzhsky Automobile Plant in 2011. Granta optics do not have any significant differences from previous models of the specified manufacturer.
This fully applies to the types of devices used, the features of their design, and the methods of regulation.
Naturally, it would be useful for any owner of such a car to know about the nuances of installing headlights themselves, because this will make the operation of the car more correct and longer. Note that the average price of headlights for a Lada Granta is currently from 500 to 2500 rubles or more (sometimes reaching 5000-7000 rubles).
Removing the headlight yourself does not cause any particular difficulties even for a novice car enthusiast. The most important aspect that guarantees the correct dismantling and subsequent installation of the part is the machine owner’s knowledge of the technology and sequence of this process, which we will discuss in more detail below.
Operations for removing headlights from a Lada Granta car
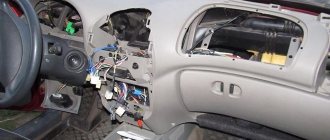
1. Disconnect the wire from the negative terminal of the battery. 2. Remove the front bumper (see “Removing and installing the front bumper of the Lada Granta”).
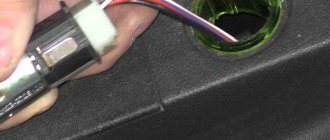
3. Press the latch and disconnect the wiring harness block from the turn signal lamp socket.
4. Press the latch and disconnect the wiring harness block from the daytime running light lamp socket.
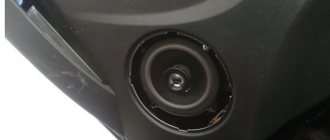
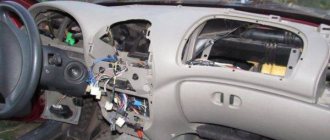
5. Turn the headlight unit cover located in the engine compartment counterclockwise.
6. Disconnect the wire block from the lamps
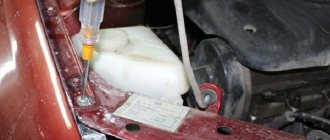
7. Turn and pull out the hydraulic corrector working cylinder. It is impossible to cut off the hydraulic corrector supply tube to the hydraulic cylinder. More details about the operation of the hydrocorrector can be found in the article “Hydraulic corrector for Lada Granta”
8. Unscrew the three bolts holding the headlight unit by the mounting loops. The fourth bolt, which holds the headlight, is unscrewed when the bumper is removed, that is, earlier.
Suspension
This unit has not undergone any changes; the suspension is completely identical to what it was before. The suspension elements last a long time and do not cause any special problems. Structurally, the suspension on the Grant is made very simply, but it copes with all tasks.
It is energy-intensive, provides the car with a good ride and stability on the road. Regarding simplicity, in essence it is still the same suspension that was installed on the V8. It was produced back in the 80s of the last century. The same levers from the VAZ-2108 are still installed without changes or upgrades.
During its entire existence, the suspension has not changed, but only been modernized. We changed the thickness of the bar and stabilizer link. The strut supports were modernized, the shape of the springs and the damping characteristics of the shock absorbers were changed. Ball joints are set from “ten”. The suspension is simple, but reliable, durable on our roads. Repairing it won't cost a lot of money. If desired, you can repair it yourself in half a day.
2279-18-10-11
We install the new W21/5W lamp in the reverse order.
The modern world of automotive manufacturing has stepped far forward. Thus, the development of automotive optics, which is being improved every year, does not stand still. But many manufacturers understand that the complexity of the design also means easy dismantling of the part. Removing a Lada Granta headlight is quite easy, even with your own hands. This is what domestic car owners do. But the question arises: how to remove the headlight of a Lada Grant? – the answer to which we will give in this article.
conclusions
As you can see, the technological process of removing a Lada Granta headlight is quite simple and almost every motorist who does not have experience and skills can dismantle this element with his own hands and without unnecessary labor.
Granta and Kalina headlights are considered non-separable. If a crack appears on the glass, the headlight unit is replaced as an assembly. However, with a strong desire, it is still possible to disassemble it. Let's look at how to remove the glass and headlight mask with your own hands. The process is shown using the example of a Lada Granta headlight. On the Lada Kalina 2 headlight, all actions are performed in the same way.
Required
: remove the headlight, prepare a Dremel (disc diameter 20 mm), sharp knife.
Headlight glass mounting diagram:
The sealant that holds the original headlight glass in place is heat resistant. That is, you won’t be able to loosen its “grip” by heating it with a hairdryer or in the oven. In addition, there are four fastening brackets on the edge:
How to replace headlight glass
:
- Seal the glass with masking tape to prevent damage during work.
- We cut off about 7 mm of the U-shaped fastening (using a Dremel), and then remove the remaining sealant (photo No. 1).
- We cut off about 2 mm of the sealant between the glass and the plastic using a Dremel (photo No. 2, color green).
- We remove the remaining sealant using an L-shaped blade (you can bend an ordinary knife after heating), photo No. 3.
When reassembling, we use a transparent glass sealant (for example, ABRO).
What it looks like in practice:
The process is also shown in the video:
How to remove a mask from a headlight
:
- The inner mask is attached using a spring mechanism, which is connected to a hydraulic corrector.
- The outer mask is held in place by 4 Torx screws.
Now it becomes possible to install powerful LED or flexible DRLs. Have you ever had to disassemble the headlights on a Grant or Kalina yourself? How did you manage to do this?
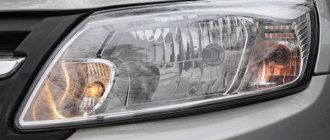
Purpose of headlights
A car headlight is designed to illuminate the cavity of the front and side parts of the road surface. It provides the necessary visibility and also performs road safety functions.
Lada Granta headlights, in accordance with international automotive legislation, have passed all the necessary tests and received certificates and licenses that make it possible to carry out international traffic in any country in the world.
Reasons why headlight removal may be necessary
The reasons for removing the headlight on a Lada Grant can be many factors, namely:
Replacing head lamps
Each lamp has its own resource, the value of which depends on many factors. Over time, devices break down and require replacement. And then the question arises: how to disassemble the headlight?
The replacement procedure is simple, but before that you need to choose the right lighting devices from the mass of products offered on today's market. Although sometimes all you need is to replace the headlight glass.
Catalog articles for lighting lamps in Granta Liftback rear lights
| Name | OEM number / index / article |
| Turn signals | PY21W |
| Brake/side light | P21 |
| Anti-fog headlight | P21W |
| Reverse | P21W |
| License plate | С5W |
| Luggage compartment | С5W |
| Salon | С10W |
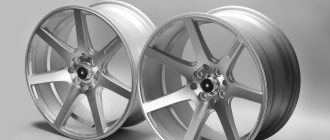
What does the market offer?
Below are some options for halogen lamps of different price categories that can be installed on the Grant:
And these are just a few types of halogen lamps. In general, the range of such lighting equipment is very extensive and allows any car owner to find a suitable option both in terms of price and quality of work.
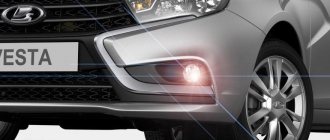
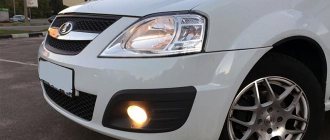
Features of PTF operation
These lighting fixtures differ in the light they emit. They can glow with yellow or white light, their main feature is that they do not illuminate the fog ahead, resting the beam on it, but create a flat, wide beam that spreads along the road.
Road lighting
To ensure good visibility in bad weather conditions, the following two rules must be observed:
- Adjust precisely the boundary of the light beam emitted by the optics. The beam should not shine above the specified horizontal plane.
- The lamp must be at a minimum distance from the road surface. Under such conditions, it is easier to precisely adjust the boundary of the light beam.
Adjusting fog lights on a car
It becomes clear that these lighting sources are necessary to ensure good visibility on the road under difficult weather conditions.
Gearboxes
This is a sore subject, as for a long time there were a huge number of complaints about noise from the gearbox. The howl was really pronounced and annoying. The main responsibility for gearbox noise lies with the final drive. It works constantly, and the largest gear is in its mesh.
The new Lada Granta has a main gear with a gear ratio of 3.9; the old model had 3.7. This made it possible to improve the dynamics of the car to some extent and reduce noise from the gearbox. Now there are significantly fewer complaints from car owners about noise from the gearbox.
What gearbox defects have been eliminated?
At one time there was a common defect - a crunching sound when shifting gears from 1 to 2. The culprits were the synchronizer rings, namely their coating, which burned out. When AvtoVAZ released a new cable-driven gearbox, things weren’t going smoothly with it at first either.
There were frequent complaints about strong vibrations transmitted to the shift lever when driving in 3-4 gears. This problem has been dealt with for a long time; there have been a number of ineffective methods for eliminating the defect.
As a result, the situation was resolved by installing three modernized components:
- Gear shift cables.
- Switching mechanism.
- Brackets for fastening cables.
A separate story was with the bearings of the primary and secondary shafts of the gearbox. They hummed and made a small knock when the transmission was operating. At that time, domestic bearings were installed, which did not have a long service life. The percentage of defects for them was high. As in the case of oil seals, the situation changed dramatically for the better when we switched from domestic bearings to imported SKF ones.
Self-recovery methods
To get to the reflector, the headlight removed from the car must be disassembled. The first option involves repeatedly passing the hot air of a hair dryer over the seam. The second option involves leaving the headlight in an oven preheated to 100°C for 20 minutes. After opening, all parts are cleaned of sealant residues, washed without using alcohol-containing liquids and dried.
Using metallic tape
Let's start with how to restore the reflector on a headlight using tape foil. All you need is metallized tape, purchased at a hardware store for about 30 rubles. Its adhesive base copes well with high and low temperatures, and the aluminum film is very wear-resistant.
In order to obtain a smooth surface with a minimum of seams after gluing the tape on the reflector, first, pieces of the most suitable shape are formed from several strips. Then remove the protective film and carefully stick it on. The whole procedure takes about half an hour.
Advantages of the method: durability, low cost, ease of implementation.
Disadvantages: when gluing, irregularities and seams remain, which impair the properties of the reflector.
Using metal foil
Aluminum foil is highly reflective, which allows it to be used in the restoration of headlight reflectors. You will also need some epoxy resin. To maintain a perfectly smooth surface of the foil, the entire pattern is made from plain paper. Then the parts are duplicated from aluminum sheet, a thin layer of resin is applied to the reflector and glued, removing excess resin.
Advantages: withstands any temperature changes.
Disadvantages: being between the metal foil and the plastic base, epoxy glue lacks air and takes a very long time to dry. It is almost impossible to remove dried glue. Therefore, such a reflector is not suitable for repeated restoration. With the advent of tape foil, this method is practically not used.
Using chrome paint
Headlight reflector repair using chrome paint is the most popular. No need to cut and glue anything. Paint is sprayed onto the degreased surface of the reflector from a can of white chrome until a uniform, uniform layer is obtained. After painting, the headlight is dried according to the instructions on the can.
Benefits: Provides a smooth surface. You can even spray paint onto metal tape, thus increasing the reflective effect.
Disadvantages: does not tolerate high temperatures. You should try to find heat-resistant chrome paint.
Oil seals
A separate story was with the seals. On old Grants, all the oil seals that were installed on the car leaked.
Here are some of them:
- On wheel drives.
- On the gearbox input shaft.
- Front and rear crankshaft oil seals.
- Camshaft seals.
- On the gear selection rod on 12 gearboxes with a traction drive shift.
It was a rare case that the engine and gearbox remained dry. Basically there was always an oil leak somewhere. The situation changed dramatically for the better when Freudenberg Teflon oil seals began to be installed. The defect rate for these seals is almost zero. Therefore, at the moment, leakage defects on new Grants are an extremely rare case.
➤ How to remove the rear and front bumper of a grant liftback
Long-term operation of the vehicle over rough terrain, extreme temperature conditions, and aggressive driving style contribute to premature wear of the paintwork and peeling.
Ultimately, cosmetic repairs and a number of restorative procedures are required. Obviously, we are not talking about deformation, damage after an accident, collision, or traffic accident. In practice, based on the results of an inspection by a service station technician, a decision is made to replace the plastic “protection.” The cost of purchasing a new one is approximately comparable to partial repairs.
Characteristic differences between sedan and liftback bumpers
The front/rear “plastic” of both modifications is completely identical in terms of the mounting method. The main difference is in the exterior, color, and shape of the radiator grille. You can visually distinguish the first generation from the second by the color of the front grille of the cooling system.
In the first generation, she is in her original color - the natural color of plastic. In the second - to match the main color of the car. This rule also applies to the Grant liftback model, the so-called “bolt on” landing. This is such slang among motorists.
Typical bumper mounting locations:
- front: four bolts in the upper perimeter, two in the middle, four at the bottom, on each side;
- rear: two side fasteners, four upper and the same number of lower.
What is needed for a successful renovation
To remove the Grant liftback bumper you will need: a set of automotive tools, a Phillips-head screwdriver, rags, rust remover WD-40, restoration components.
The decision on the type of repair is made by the workshop specialist based on the results of a comprehensive diagnostic. If the impact occurred “head-on” at a speed of over 60 km/h, then replacement with a new one is guaranteed. When the scale of the damage is not large, the structure of the plastic fasteners is not damaged - restoration of the standard element is allowed.
Do-it-yourself front bumper removal
- We install the car on a flat platform, an inspection channel. In this case, it is not at all necessary to use an electric lifting mechanism;
- open the hood;
Unscrew the top row of mounting bolts (4 in total), two in the middle, four at the bottom.
First turn the steering wheel to the side for ease of work. We remove the front bumper of the Grant liftback, the dismantling process is completed. Subsequently, the master (car owner) carries out preventive maintenance, replaces the plastic product, and installs additional equipment as necessary.
Algorithm for step-by-step installation of the front bumper
- after diagnostics, prevention of fastening points, we install a new “plastic”, it must be painted in the original color of the car;
- we hang the upper perimeter, then the lower one, followed by snapping the plastic clips;
- Having made sure that the fit is tight, we proceed to fastening it with bolts.
DIY installation is complete.
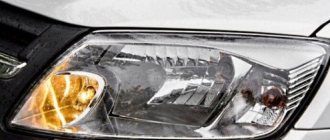
Reasons for reflector damage
First of all, damage to the mirror layer occurs due to physical wear of the reflector. Its service life is not infinite. Even if you take good care of your car, it is impossible to avoid temperature changes in winter. Therefore, the possibility of encountering this problem cannot be excluded. Often the cause of damage to the reflector is a leak in the seal. Small particles of dust and moisture get inside, which lead to loss of shine of the reflector. As a result, the quality of the light flux gradually decreases. Loss of reflective properties can also be caused by installing non-standard lamps of higher wattage. The temperature inside the headlight reaches a critical value, after which a burnt-out spot forms on the surface of the reflector. Whatever the reason, the reflector must either be replaced or restored. The cost of restoring one reflector in a car repair shop is at least 1 thousand rubles, which is not acceptable for every car enthusiast. Therefore, we suggest considering several simple ways to restore a headlight reflector with your own hands.
Tuning options
In order to change the appearance of optical instruments, they are tuned. The following types of interventions are considered the most common:
Installation of LEDs. In order to get rid of the unpleasant yellow color of headlights, LEDs are used
It is extremely important not to reverse the polarity, as this will blow the fuse. Connecting new lamps depends on their type
In some cases, it is necessary to tear the base off the diode and move its antennae towards the holes. Headlight tinting. This can be done in two common ways. The first one is to use black tint film. Just one layer of this material is enough. Black spray paint is also used. In order to create a really good tint effect, you will need to apply several layers. In some cases, the color used is not black, but a shade that is directly similar to the car body. After such tuning, the visibility of the road surface at night deteriorates. Cilia. A special film is used for this. Oracal 970 is most often used. This material is publicly available, so it can be purchased not only in highly specialized stores, but also in many others. Eyelashes can be either rectangular or curved. First, make a stencil out of cardboard and try it on the body of the car. After this, you can cut the elements directly from the film. In order to stick them on later, a soap solution or special products are used.
Tuning of optical devices of Lada Granta is done both with your own hands and at a service station. Additionally, you can install bi-xenon or other types of headlights on your car that differ from the standard ones. No special skills are required to install the lens. It is enough just to correctly remove the optics without damaging its elements.
Grant's optical devices differ significantly from many other vehicle headlights of this brand. This applies to the design itself, the lamps used and many other features. That is why it is necessary to understand not only how to operate these devices, but also what possible malfunctions may occur with them. In this case, the use of flashlights will be correct, long-lasting and safe.