The low beam does not light up on the Lada Kalina. The left light went out immediately, and after a while the right light went out. What could it be?
- The low beam on the left headlight does not light - 1 answer
- Condensation inside the headlight on Kalina - 3 answers
- Is it possible to polish the glass on the headlights? – 2 answers
- Malfunctions of the stove, headlights and radio - 2 answers
- What kind of light bulbs are used in the Kalina dashboard? – 1 answer
First you need to look at fuses F12 (right headlight) and F13 (left headlight). For reliability, even if the previous ones appear to be intact, it is better to exchange them for ones that are known to be good. Well, check the masses.
Next, check the light bulbs , maybe they are burnt out. And see if the wires have jumped out of the connectors.
Subscribe
to our channel in
Index.Zen
Even more useful tips in a convenient format
It’s paradoxical, but true: every third car owner encounters a situation where the low beam headlights are not on, but the high beam is on. Straightforward logic on the topic that if the optics are covered, then there should be no light at all does not work here.
This also happens, for example, to many VAZ owners: on Tolyatti models, for some reason, the right headlight is susceptible to the disease described, even on almost new cars; with the left, this incident happens much less often.
However, you should not blame exclusively domestic, so much-maligned, manufacturers: optics can sooner or later start to act up on any car. And here the point is no longer about the reliability of this or that brand, but rather about the deterioration or fatigue of some parts.
Content
The easiest way, without a doubt, is to entrust everything to the reliable hands of a trusted auto electrician, but it is not too difficult to cope with some problems on your own - if you have the smallest amount of free time and a primitive acquaintance with the basics of electrical circuits.
The low beam of the headlights does not light up, but the high beam is on - this phenomenon can be due to several reasons. And most of them are quite easy to fix. Moreover, this can happen to your car at a completely inopportune moment: on the highway, for example, when you need to switch to low beam so as not to blind oncoming drivers with headlights
Let's try to deal with all the flaws one by one, and consider: what may be the most common options for repairing and troubleshooting such an important segment as low beam
Recommendations for use
To prevent big problems from arising and fix minor problems when it's easiest to do so, you need to follow a few simple rules:
| Periodic inspection | It is necessary to check the functionality of the lighting devices before each departure, in addition, at least once a month inspect the engine compartment and pay special attention to the reliable fastening of the wiring harnesses and all connections; very often problems arise due to the fact that the car’s wiring dangles and rubs against moving parts. elements |
| Monitoring the status of devices | If you hear extraneous sounds when you turn on the lights (relay clicks), or a button or steering column switch begins to work poorly, then it is better to immediately deal with the problem, without waiting for the moment when the unit fails. |
Also, you should not drive with damaged headlight lenses, as this will allow moisture to get inside and the internal elements will deteriorate.
You shouldn’t skimp on quality either - a low price is most often an indication of low reliability, and in the end you will still overpay due to frequent replacements
Advice! When choosing a paw or any other element from the electrical equipment system, you must be guided not only by the seller’s advice, but also by information from the Internet, for example, on our portal there are descriptions of most manufacturers, which is very convenient.
The low beam bulb on the Grant must be of high quality, this is the only way to guarantee its durability
Other reasons why one low beam headlight does not light up
Sometimes the abnormal operation of headlights lies in very unusual reasons. Thus, there is a known case when the owner of a Niva turned off the low beam after he dismantled the headlight cleaners, which had long ceased to function. As a result, for a long time he could not understand why the low beam on both headlights turned off. Only through experimentation did he manage to discover that for the headlights to work normally, the presence of any motor, be it left or right, is necessary. Ultimately, it was necessary to create an imitation of the presence of these elements by closing the contacts going to them.
This example illustrates that if, after checking all electrical circuits and the functioning of all elements, the malfunction cannot be eliminated, you should remember whether any changes or improvements have been made to the design of the car in the foreseeable past. After all, it cannot be ruled out that in the process of making changes, some brilliant idea of an engineer at the car plant was violated, which provoked the disappearance of the light.
In cases where all of the above measures were taken, but it was not possible to achieve normal operation of the low beam lamp, you should contact specialists at a service station. Otherwise, further searching for the reason why one low beam headlight is not on may take a lot of time without achieving the desired result.
Finding out the reasons that caused the low beam to fail and gaining experience in eliminating them will also help if the opposite problem occurs - the high beam stops lighting while the low beam is working normally. As a rule, the causes of the malfunction in this case are the same as those described above, only they are also supplemented by inadequate operation of the steering column switch. By the way, it can also be the reason why one low beam headlight does not light up. And in this case, it is best to simply replace it.
Fuse burned out
For this reason, one low beam headlight often does not light up. To eliminate it you need to do the following:
- open the block that contains all the fuses of the automobile electrical circuits;
- Using the diagram, the fuse that is needed is determined. As a rule, if it has burned out, it is immediately visible;
- replace the faulty element with a working one.
By the way, if blown fuses become a frequent occurrence, then you should look for a breakdown in the wiring. To determine it, you need to ring all the elements of the electrical circuit, or seek help from specialists. Moreover, this must be done without fail, since the presence of a short circuit can cause a fire.
Tail lights and lamps
The following elements are used as brake light lamps in Kalina-2: lamps with a P21W socket and a transparent bulb. Replacing such an element will not be difficult.
Brake light bulb, VAZ-2192/2194
The rear turn signals are equipped with the same bulbs as discussed above. Their bulb is colored yellow (type PY21W).
Reversing light in a hatchback
is provided by a lamp of the following standard size - R10W.
If we talk about the station wagon,
they use lamps of a different type - W16W. They do not have a metal base.
These are the reversing lamps
In conclusion, we note the following: the light of the side and fog lights in the rear lights is provided by a combination lamp. Its standard size is P21/4W. Good luck with your choice!
One lamp illuminates the fog lamps and parking lights
It is important to know! When performing any actions with electrical equipment, you must first disconnect the negative terminal of the battery. The terminal fastening is unscrewed with a 10 mm wrench.
In the daytime, every car enthusiast relies on daylight, his vision and reaction. However, when darkness falls, everything changes. At this time, you need to be especially careful, since often accidents due to negligence occur precisely when visibility is poor. To prevent this from happening, the headlights must be in good working order. If they do not work, then no movement can be carried out. Even if you want, you won’t be able to, because visibility will be zero. Therefore, it is very important to keep your flashlights clean and shining brightly.
Why the car's low beam light doesn't light up: 4 reasons!
Firstly, if the low beam bulb does not light up when the high beam is working, you need to check whether it has burnt out. In this case, the lamp may have two separate filaments, one of which lights the high beam, and the other lights the low beam. Therefore, there is nothing surprising in the fact that they can turn on autonomously from each other.
Replacing a halogen lamp on a headlight is not difficult, even if you are not an auto electrician. Let's consider a simple algorithm for this procedure:
- the hood of the car must be opened and secured;
- the protective cover must be removed from both sides of the headlight;
- disable contact group;
- remove the spring clips;
- remove the burnt out light bulb;
- put a new one in its place;
- return all removed elements to their place.
It is important to know a few rules for working with lamps:
- it is necessary to degrease the surface of the bulb before installation, otherwise there is a high risk that the lamp will immediately burn out due to contamination;
- It is not recommended to work with a glass flask with bare hands. This may leave traces of grease on it that cannot be removed and the lamp will be damaged. The best option is to use cotton gloves, and if you don’t have them on hand, you can wrap the flask in a cloth or napkin.
The fuse is broken
This is the second common reason why the low beam light of one of the car headlights does not light up. Let's look at how to fix it yourself:
- the fuse box for electrical circuits must be opened;
- if one of the fuses has blown, it needs to be identified (usually this is not difficult) using a diagram;
- The faulty fuse must be replaced with a new one.
Let us clarify that if fuses on your car often burn out, you need to look for a breakdown in the wiring. Then, using a special device, it is necessary to ring the wires to determine where their integrity is compromised. If it is impossible to do this yourself, you need to contact an electrician who can find the cause of frequent breakdowns. In fact, this is a rather serious problem, in which repairs cannot be put off for a long time, since breakdowns in the wiring can lead to a short circuit and fire of the machine.
Wiring is damaged
What if the low beam light doesn't come on because of a wiring problem? Then you need to check the blocks through which the relay and fuse box are connected. The reason may be a poor connection, or the contacts may oxidize, which leads to increased current, overheating of the wiring and failure of the lamp. To repair this damage, you need to tighten all the pad fastenings, but before doing this, do not forget to clean all contacts with an abrasive material.
In addition to the pads, you need to check the headlight switch, since the contacts on it may also be oxidized, or there may be a poor connection in this place. Any experienced technician will start searching for the cause of non-working headlights from the button to turn them on, and only after making sure that it works properly will he continue to search for the answer to the question: “Why don’t the low beam lights light up?”
Non-standard reasons
Sometimes the headlights don't come on for very unusual reasons. For example, one car enthusiast’s Niva car stopped turning on its low beam after dismantling faulty headlight cleaners. Of course, he was not immediately able to determine that the breakdown was caused by his actions. But, as it turned out, the low beam went out due to the lack of motors that were necessary for the normal operation of the headlights. To solve the problem, the car owner created an imitation of the presence of motors, shorting the wires in the places where they should have been, only after that the problem was solved.
The example given above shows that if you have checked both the wires and contacts, but the low beam lights do not light up, remember what manipulations you recently carried out with your car. Perhaps after the last “pumping” of the car the problem appeared. After all, by making any changes to the design of the car, you can automatically disrupt the operation of the complex system of its functioning, designed at the manufacturer.
If you are sure that nothing has been changed in the car, you need to contact a service station for help in repairing headlights. After all, you can spend an indefinite amount of time and effort searching for the cause of a breakdown.
Knowledge of how to find the cause of the low beam not working and fix this breakdown yourself will also help in the opposite situation, when the high beam does not light up, but the low beam turns on without difficulty. In this case, in addition to the problems listed above, there is a malfunction of the steering column switch, due to which, by the way, only one of the headlights may be on. The best solution in case of such a breakdown is to replace it.
Useful materials about cars
here:
Source
Lamp burned out
Naturally, if any light source does not turn on, the first thing that comes to mind is that the light bulb has burned out. The design of car lamps is such that the low beam may indeed be absent, but the high beam remains available. Halogen lamps have two filaments. It is quite possible for one of them to rupture - in this case, the light for which it is responsible will be absent.
To replace the bulb, the services of an auto electrician are not required. It is enough to open the hood with the ignition off, remove the protective box on both sides of the headlight, pull out the contact group, disconnect the spring clips, remove the burnt out bulb and install a new one.
A little subtlety:
The flask should be wiped with alcohol before installation, otherwise it will burn instantly. It is also not recommended to handle the bulb with unprotected hands: there is always some greasy and damp secretions on them, which can damage the light bulb. The best way to do this (replace the lighting) is with a dry cloth or rag.
Called to come in to adjust the headlights) ► — Lada Kalina Sedan, 1.6 l., 2007 on DRIVE2
This evening I went to the service center to adjust the headlights, but not everything went so smoothly. Having checked the left headlight, they said that it shines well, but as soon as they took hold of the right one, they said: alas, it cannot be adjusted. In general, the adjusting screw apparently broke or flew out of its socket in the headlight itself. Like you have to remove the headlight and disassemble it, and the price tag accordingly will no longer be 300, but 1500 wooden ones. Well, I agreed, because... You need to pass a technical inspection before the end of August. But they say, come tomorrow and leave your car, that we’re kind of closing now. Well, I went home upset. And then I think - maybe it will make their task easier? — and decided to remove the headlight myself. Damn - why is everything in Kalina through the ass? Why, one might ask, did they make the headlight in such a way that it could be removed by first unscrewing the front bumper and the bumper reinforcement beam?! THE FUCK?! In other cars, the headlight can be removed in 3 minutes. In general, I have not encountered this yet - I prepared the necessary screwdrivers and keys and began to remove the radiator grilles and bumper. It took exactly an hour to remove the grilles, bumper, bumper reinforcement beam and the headlight itself, and he did it almost in the dark. I did not disassemble the headlight, because... It's plastic - there's no particular desire to heat it in the oven. I think tomorrow I’ll try to take only the headlight to the service center without the car and leave it for repair and adjustment, because... The car itself will be needed during the day. I immediately apologize for the quality of the photo - I took it on my phone in the twilight and darkness. Below is a photo of hemorrhoids on removing the “headlight.” In Kalina everything is done somehow strangely. I wouldn’t be surprised if they told me that if you want to remove the battery, you need to unscrew the rear right wheel.) In general, I hope that in the new restyled Viburnum the design will be more practical and easier to remove than the current Viburnum)
www.drive2.ru
How to remove the headlight on Kalina 2: adjusting, tuning and replacing the low beam lamp
Checking and adjusting the headlights, replacing the low beam lamp on the Lada Kalina-2
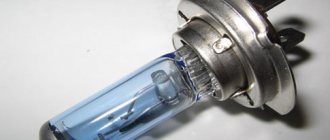
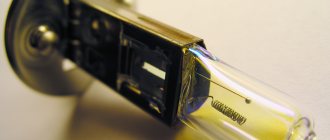
In head optics, low beam lamps most often have to be replaced. For a Lada Kalina car, the low beam lamp is a halogen lamp with an “H7” socket, the power of which is 55 watts (no more). Osram bulbs may come from the factory, but others will do. After replacement, the filament will occupy a new position, and the headlight adjustment may be lost. So, checking the settings, and, if necessary, adjusting the headlights is carried out immediately after replacing the lamps, which on the Lada Kalina is done without dismantling the headlight unit.
Step-by-step replacement instructions
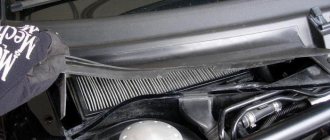
Each H7 standard bulb has an iron base, which is pressed to the headlamp with a wire clamp. To bend this bracket, just get close to the plane of the headlight from behind. Let's open the hood and see what exactly will bother us.
Behind the headlight on the right is a washer reservoir. It is dismantled like this: disconnect the electric motor terminals, tighten the plug harder, find one nut and one fastening bolt. The fastening elements are unscrewed with a 10mm wrench, then the tank is placed on the engine. Next we could look at how to remove the headlight on Kalina-2, but in this case this is not required.
Before performing any manipulations with electrical equipment, always disconnect the negative terminal of the battery. It is better to connect this terminal last (before closing the hood). Be careful.
Replacement sequence:
- Remove the rubber cover covering the low beam lamp compartment;
- Disconnect both terminals from the lamp contacts;
- The fastening bracket is removed from the grooves by first pressing on it, then the bracket is moved to the side;
- They take out the lamp, install a new one in its place, and return the bracket to its place.
Next, perform steps “2” and “1” in reverse order. The connection diagram is not important - there are only two contacts, and both go to the filament. Now, if we connected LEDs. then everything would look more complicated.
When installing a halogen light source, you must remember: the surface of the lamp glass must be perfectly clean. Do not allow grease marks to remain on the flask. Installation is carried out using only cotton gloves. The glass of the flask is cleaned with industrial alcohol or Secunda.
Adjusting the headlight beam
Correctly adjusting headlights can only be done in a service station. However, let's look at how this operation is performed by experienced craftsmen.
There are two adjustment screws on the back wall of the unit called the headlight unit. The first of them, located closer to the radiator, allows you to deflect the light beam “up and down”, and the “horizontal” direction is adjusted with the second screw. Ideally, this should happen: when the car is 5 meters from the screen, the border of the light spot touches line “2” (see figure). Line “1” is spaced from the ground at a distance equal to the height of the centers of the headlights. The second line is drawn 65 mm lower.
When making adjustments, the corrector switch is moved to position “0”. Of course, you only need to turn on the low beam. We also note that the headlights are adjusted one by one (the “excess” light source is covered with a cloth).
Here are a couple more tips that will be useful:
- The centers of the beams should be on lines AE, BE;
- Line “0” has the following meaning: it intersects with line “1” at one point, so the border of the spot should pass exactly through this point;
- The caps of the plastic adjustment screws are compatible with a hex screwdriver. However, a Phillips screwdriver will also work.
So, we have fully examined how to adjust the headlights on Kalina-2. Of course, replacing lamps with subsequent adjustment is a less labor-intensive operation than connecting a radio. However, accuracy is important here. And the special equipment used to perform the settings is only available at service stations.
Question and answer: what should not be allowed under any circumstances
Q: What happens if you buy lamps with a base other than “H7”?
A: It will not be possible to install lamps in a standard headlight.
Q: If I use more than 55 watts of power, will this cause overheating?
A: Excessive power leads to the fact that the fuse in the low beam lamp circuit burns out. A separate fuse is used for each of the lamps, so it will not be possible to “deceive” the automation.
Q: Are halogens afraid of power surges?
A: For incandescent lamps, excess voltage is a harmful factor. In the case of using halogen lamps, there will be two harmful factors: overheating, underheating. Actually, this is why MTBF can be considered a relative rather than an absolute value. This value depends, and depends strongly, on the stability of the voltage.
Review of work features
First, let's look at the simplest case and figure out how to replace a low-beam lamp on a Grant, then we'll tell you how to troubleshoot some problems, and we'll describe how to adjust the light yourself; the instructions are so simple that anyone can handle it.
Replacing light bulbs
The low beam lamp of the Lada on Granta is universal, that is, it serves both high and low beam. The 60/55 Watt option is used (that is, the power of the high beam spiral is 60, and the low beam is 55), the lamp type is H4. This is the option you need to purchase before starting work.
The process itself is quite simple, and replacing the low beam bulb on a Lada Granta is done very quickly:
- First, remove the terminal from the battery and fix the hood in the open position.
- Next, press the latch of the plastic plug on the headlight and open it.
The lid latch is located on top, it is clearly visible.
Under the lid you will see a block with wires; it must be carefully disconnected and moved to the side.
Important! Do not pull on the wires as you may break the connections. Always grip the pad body
- Next, remove the rubber plug, which protects the case from moisture and dust. The rubber plug is very easy to remove
- The low beam lamp on the Grant is held in the reflector by a spring lock; to release it, you need to press the antennae and disengage them from the hooks of the housing.
- After this, you can remove the used unit, but we recommend that before changing the low beam lamp on Grant, you carefully examine it; it is possible that it is working, and the reason for the lack of light is not at all in it.
- When installing a new unit, do not touch the glass part under any circumstances, as this can cause it to fail very quickly; do everything carefully. Assembly is carried out in reverse order. (See also the article Installing fog lights on Kalina: features.)
Replacing the low beam lamp on a Lada Granta is done very carefully so as not to touch the glass bulb
Shutdown problems
Very often you can come across this question: the low beam headlights on the Lada Granta do not turn off, what should I do?
In fact, there may be several reasons, we will look at them:
The low beam relay on the Grant is located in a common block, the diagram below shows its location, you can try to hit it lightly, this often solves the problem, but you still need to change this unit, especially since its price is low. This is the most common option, but far from the only one.
The main reason why the low beam on the Lada Granta does not turn off is interruptions in the operation of the relay indicated in Figure K4
- The second option is a malfunction of the steering column switch; you can check it very simply: remove the trim from the steering column and disconnect the block of wires that go to the switch unit. If after this the light does not go out, then everything is fine with it; if it goes out, this unit needs to be changed.
- Finally, the third option is a short circuit, which can occur due to wear and tear of the elements or the use of too powerful light bulbs. To check, move the chip on the headlight. If the light blinks, then this is the reason, you need to unscrew two screws to disassemble the housing, most often the low and high beam contacts are closed, just disconnect them and put them back as they should be.
Adjustment
Let's look at how to adjust the low beam headlights on a Grant yourself:
First, you need to carry out preparatory measures - refuel to a full tank, check that there is a spare tire in the trunk, and put a load weighing 75 kilograms on the driver’s seat. Also, check the tire pressure, it should be correct.
Tire pressure is an important parameter; if it is different, the car will not be level and it will not be possible to make the correct adjustment.
- You will also need a 6 mm hexagon with which the adjustment will be made.
- You need to find a flat area in front of which there is a wall or a flat high fence and place the car at a distance of three meters from the surface.
- Apply markings on the wall - two vertical stripes should go along the width of the light bulbs in the headlights, a horizontal line should be located along the height of the installation of the lighting elements, and also draw an axial vertical line in the middle.
- When adjusting one of the headlights, cover the other with opaque material, then set the corrector to position “0”. Next, use a hexagon to direct the light flux so that its center is at the intersection of the vertical and horizontal lines opposite the headlight. Work is also carried out on the second side.
Tips for motorists
The most common malfunction associated with the cessation of operation of one or both low beam headlights of a Lada Kalina passenger car is the failure of halogen lamps, brand H7. Moreover, on some cars, this happens quite often, the light bulbs last for literally a couple of months. There are several possible reasons for lamp burnout. One of them is associated with the headlight not being sealed, as a result of which dust gets inside it. Dust settling on the bulb of a halogen lamp causes it to overheat and fail.
The second reason for low beam lamps burning out may be due to increased voltage in the vehicle's on-board network. To find out what voltage the generator produces, you will need a tester. It is desirable that the voltage at its terminals, with the engine running, does not exceed 14.4 volts. If the voltage is higher, you can try to replace the relay regulator, but when purchasing it, no one guarantees that its parameters will be within normal limits.
Changing burnt-out lamps in the headlights of a Lada Kalina car is not very convenient, since access to them is difficult due to the closely located windshield washer reservoir (right headlight) and the expansion tank of the engine cooling system (left headlight). If you do not remove them from their mounting points, then all operations to replace the low beam lamp will have to be done by touch. At the same time, you must remember that the halogen lamp should only be grasped by the base; touching the glass bulb with your fingers will lead to its rapid failure.
Even a working low beam lamp will not light if the fuse blows. You can find them in the mounting block located in the front panel to the left of the steering column. The electrical circuits of the right and left low beam lamps are protected by two different fuses (right lamp, fuse F12, left lamp, fuse F13), rated for a current of seven and a half amperes.
Sometimes, it can be difficult to visually determine whether a fuse has blown or not. In this case, using a test lamp, you need to check whether voltage is supplied to its terminals, but you must remember that voltage appears there only when the ignition is turned on and the low beam headlights are turned on in the light control module (LCM). If there is no voltage, then you will have to ring the wire coming from fuse F13 to terminal No. 56 of the light control unit. Well, if everything is fine with it, then you will have to look for a fault in the ICC or replace it with a new one.
Another, sometimes encountered, malfunction that leads to failure of low beam lamps is oxidation or burning of contacts in the plug blocks.
Installing a new one: sequential instructions
The procedure for removing and installing a headlight, which is located on the right or left side, is not particularly different from each other. It is only important to act strictly according to the instructions. When installing a new light bulb, you must only hold it by the base and do not touch it with your hands. When removed, you can completely hold it in your hands.
Note that for the Lada Kalina (16-valve engine) a lamp with an H7 socket is required. Install the new one as follows:
- Determine the seat so that the protrusion in the base coincides with the groove on the headlight. It must be firmly fixed. Only then will it be clear that the protrusion has fallen into the groove;
- press the latch against the lamp so that the center of the base is between the antennae of the latch;
- snap the latch into place;
- connect both wires to the clamp and close the lid tightly.
After completing this procedure, you need to turn on the headlights at close range and check their operation. If everything is fine, then the installation was completed correctly. Otherwise, you will have to take the car to a car service center and pay money for it. Lamps should only be purchased in special stores. It is advisable to give preference to well-known manufacturers and models with a guarantee. Osram H7 12V 55W headlights for the Lada Kalina Cross are very popular today.
At night, visibility, and, consequently, the safety of driving a car, primarily depends on the condition of the headlights. If during the day the driver only needs vision to monitor the road situation, then at night or when driving through tunnels it is impossible to do without artificial lighting of the road. Driving at night with non-functioning lamps or missing headlights is prohibited by traffic rules. In many countries, regulations require that lights be turned on even when driving during the day. Knowing how to change a low beam light bulb on a Kalina allows the driver to fix the problem right on the road, without wasting time on a trip to the service station.
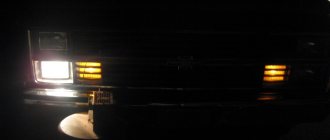
Lada Kalina Hatchback “Ice Cart” › Logbook › Kalina 1 VS Kalina 2 \\ Battle of light rays //
Many strongly doubted... And who shouted that the light of the new Kalina is worse?
Congratulations - you are right!
We look carefully at the photo. Let's make the correction that in the photo is my ex-Kalina1 (glass headlights) with mileage about 55 thousand more than Kalina2 (plastic headlights). Equipment used: 7-8 year old soap dish, but with manual mode.
So, near: Kalina 1 has a wider light distribution. It shines a little further (adjusted it myself) than Kalina2 (adjusted by the dealer at pre-sale). We’ll raise this for once, but there’s nothing we can do about the width - I’ll start blinding those I meet. But Kalina2 has brighter light.
<low beam
High beam: Here Kalina1 outperformed its heiress by 100500%. It was not for nothing that everyone looked with caution at such a modest-sized reflector of Kalina2.
High beam
Near + Far: I think you will be more confident on Kalina1. But Kalina2’s left side turned out to be “blind”
Low and high beam
Finally, I’ll give you a photo of a light beam on a light wall.
Light beam
Here we see that 55 thousand kilometers have not done any good to Kalina’s headlights1 - the glass also succumbs to stones and sand flying from under cars. The border of a 3-year-old woman is already fuzzy, the light transmittance of the glass is probably lower, and by the time of shooting the lamps had traveled at least 7 thousand for one and at least 20 for the second.
The conclusion is obvious - the new glass headlight of Kalina1 puts the new plastic headlight of Kalina2 on the shoulder blades.
Mileage: 360 km
www.drive2.ru
Tips for motorists
The most common malfunction associated with the cessation of operation of one or both low beam headlights of a Lada Kalina passenger car is the failure of halogen lamps, brand H7. Moreover, on some cars, this happens quite often, the light bulbs last for literally a couple of months. There are several possible reasons for lamp burnout.
The second reason for low beam lamps burning out may be due to increased voltage in the vehicle's on-board network. To find out what voltage the generator produces, you will need a tester. It is desirable that the voltage at its terminals, with the engine running, does not exceed 14.4 volts. If the voltage is higher, you can try to replace the relay regulator, but when purchasing it, no one guarantees that its parameters will be within normal limits.
Changing burnt-out lamps in the headlights of a Lada Kalina car is not very convenient, since access to them is difficult due to the closely located windshield washer reservoir (right headlight) and the expansion tank of the engine cooling system (left headlight). If you do not remove them from their mounting points, then all operations to replace the low beam lamp will have to be done by touch.
Even a working low beam lamp will not light if the fuse blows. You can find them in the mounting block located in the front panel to the left of the steering column. The electrical circuits of the right and left low beam lamps are protected by two different fuses (right lamp, fuse F12, left lamp, fuse F13), rated for a current of seven and a half amperes.
Sometimes, it can be difficult to visually determine whether a fuse has blown or not. In this case, using a test lamp, you need to check whether voltage is supplied to its terminals, but you must remember that voltage appears there only when the ignition is turned on and the low beam headlights are turned on in the light control module (LCM).
Identical problem on Priora
Physical damage, short circuit and wear of headlight elements are only a small part of the reasons for loss of light output. If the low and high beam headlights on the Priora do not light up, you need to arm yourself with a key at “10” and a Phillips screwdriver to perform the following steps:
- Remove the negative terminal from the battery and the front bumper;
- Disconnect the bundle of wires;
- Unscrew the screw for the side fastening of the headlight and remove the clamps (there are 4 in total);
- Remove the bolts that hold the casing in place.
New lighting fixtures are installed in reverse order. In some cases, it is necessary to replace one of the parts of the lighting element, for example, simply replacing a light bulb in a headlight. To do this you need:
- At a distance of 3-4 cm, apply heat treatment with an industrial hair dryer for approximately 30 seconds. Along the circumference of the surface of the top cover. As a result, the sealant will melt. This will allow you to remove the lighting fixture.
- If the headlight does not work due to a short circuit, you will have to use a cutter to remove the glass from it. Carefully pry it off, remove the sealant and separate both parts.
- We replace the failed element and restore the headlight. To make sure that everything is done correctly, turn on the lighting device and check it.
If the low or high beam headlights do not light, check whether the wires are connected correctly.
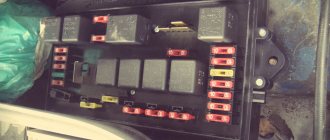
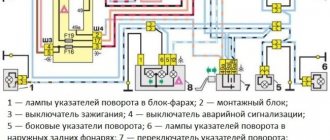
Circuit breakers:
F1 (5 A) - license plate lamps, instrument panel lamps, indicator light on the dashboard, engine compartment lamp, additional brake light lamp, left side marker lamps.
If any of the listed lamps do not work, check this fuse and the lamps themselves, their connectors and wiring.
F2 (7.5 A) - low beam in the left headlight. Similar to relay K4.
F3 (10 A) - high beam in the left headlight, indicator lamp for turning on the high beam headlights on the dashboard. Similar to relay K5.
F4 (10 A) - backup fuse.
F5 (30 A) - front door electric windows and their relays. If, when operating the power window, the window goes down but not up (or vice versa), check the button on the door. When lowering and raising, the polarity and direction of rotation of the motor are different. It could also be a problem with the window lift mechanism.
To get to it, you need to remove the door trim. Check that the mechanism does not bite anywhere and that the gears are intact, without broken teeth. If there are problems, you can replace the entire power window drive with a new one.
F6 (15 A) - door lock control unit. If one or more doors stop opening, check this fuse. The issue may be in the central locking, control unit, as well as the mechanisms themselves, rods and door locks. If you have no experience, it is better to contact a car service.
F7 (20 A) - sound signal and its relay, cigarette lighter. If the horn does not work, check this fuse, the steering column contacts and the wiring; the contacts may have oxidized and the wiring may have become frayed. Also check the horn itself, you can replace it with another one, for example, a two-tone one from Volga.
If the cigarette lighter does not work, check the wiring and its contacts. The white wire is responsible for the backlight, the red and black wires go to the cigarette lighter contacts.
Do not insert non-standard connectors into the cigarette lighter, they may cause a short circuit. If the connector in the cigarette lighter moves to the sides, it is better to use a splitter and insert this connector there.
F8 (20 A) - rear window heating element and relay (contacts).
Similar to relay K7.
F9 (20 A) - rear window heating relay winding, additional relay, rear window wiper motor, windshield wiper and washer switch.
F10 (20 A) - backup fuse.
F11 (5 A) - right side lamps.
F12 (7.5 A) - low beam in the right headlight, gear motors for headlight range control. Similar to relay K4.
F13 (10 A) - high beam in the right headlight. Similar to relay K5.
F14 (10 A) - backup fuse. F15 (20 A) - backup fuse
F16 (10 A) - turn signal and hazard warning light switch (in emergency mode). Similar to relay K3.
F17 (7.5 A) - interior lighting, individual backlight lamp, brake lamps, check lamp for malfunction of the engine management system. If the brake lights do not work, check this fuse, the lamps themselves, their connectors, usually the problem is bad or oxidized contacts. Also check the operation of the brake light switch located near the brake pedal.
F18 (25 A) - heater electric motor and its switch. If the stove blows cold air, the problem may be in the hot air damper, the cable to which comes from the regulator under the casing not far from the gas pedal. The coolant level must be within acceptable limits.
If the heater doesn't work or blow at all, it could be the heater motor. Also check the heater switch and its contacts.
F19 (10 A) - turn signal and hazard warning light switch (in turning mode), indicator light in the light switch, turn signal lamps, turn signal indicator lamps on the dashboard, differential indicator lamp. If the turn signals or hazard lights do not work, read the information about relay K3.
F20 (7.5 A) - reserve.
Relay location
The relays are in the same block as the fuses.
K1 - headlight washer . If the washers stop working and this relay is working properly, check their nozzles. Sometimes they become clogged or damaged.
K2 - electric windows . Check this relay together with fuse F2. See F2 for troubleshooting.
Short circuit - starter relay . If you turn the ignition key and the starter does not turn, it may be the relay. Check its contacts and clean them if necessary. Next, you need to check the battery terminals so that there is reliable contact between them, and if necessary, clean them. Also check the contact group of the ignition switch, there may be no contact there.
K4 - additional relay, rear window defroster, heater switch, wiper and washer switch .
K5 - relay-breaker for turn signals and hazard warning lights . If the direction indicators or hazard lights do not work, check this relay together with fuses F1 and F3.
K6 - windshield wiper relay . Check together with fuse F4.
K7 - high beam relay . Check together with fuses F14 and F15.
K8 - sound signal . Check together with fuse F6.
K9 - fog lights . Check together with fuses F16 and F17.
K10 - heated rear window . Also check relay K4 and fuses F4 and F8.
K11 - heated seats . Also check fuse F18.
K12 - reserve.
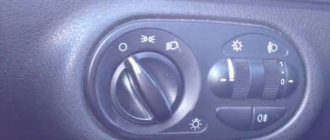
How to turn on the dimensions, low and high beam headlights on the Lada Kalina
Hello everyone, today I want to show you how to turn on the dimensions, low and high beam headlights on a Lada Kalina car. The headlight control unit on Kalina is located under the left air duct.
In order to turn on the dimensions, you need to switch the lever to the middle position. The lights will light up regardless of whether your ignition is on or not.
If the switch is moved to the extreme right position, the low beam headlights turn on. The low beam only turns on when the ignition is on. If you turn off the ignition, only the side lights will remain on.
In order to turn on the high beam headlights, you need to press the steering switch on the left, as if pushing away from you. To blink the high beams, you need to pull the lever towards you.
Well, that's all, we learned how to control the headlights on a Lada Kalina car. It is worth noting that this article is intended for beginners or for those who have just bought this car.
Headlight range control: device and malfunctions
A device that monitors and regulates the position of a car's lighting devices is called a headlight range control. It is possible to adjust the headlights on Kalina using:
- Kalina manual headlight leveler;
- electric headlight corrector.
The principle of operation in both cases is similar, the difference is one. The first option involves making the correction using a regulator installed inside the car. The driver himself changes the tilt of the car lighting. The electric corrector works automatically: depending on the location of the machine, the device changes the angle of inclination of the optics.
- Sensor inaccuracy. Failure of the bracket leads to a failure of the tracking element synchronizer performance.
- Souring of contacts. Due to the reduced conductivity of the electrical wire, the device begins to malfunction.
- Factory defect. The regulating element falls out of the electric corrector.
Power fuses
The main power fuses and the diagnostic connector are located under the cover next to the cigarette lighter.
I hope this article will help solve your electrical problem. Just in case, take with you spare fuses and, if possible, relays, then you won’t have to look for them at the most inopportune moment or during auto shop hours.
You can also read about Lada Granta fuses, if you have such a model in your fleet.
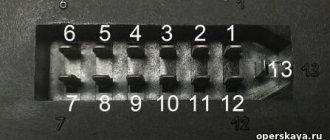
Hello, check fuses F12, F13, F9 and F10 (diagram below) in the mounting block in the cabin, on the left side, under the cover where the light control switches are located.
F10 - Side lights (left) F11 - Immobilizer control unit F12 - Low beam (right) F13 - Low beam (left) F27 - Electric power steering control unit (large red 50 A) F28 - ABS system control unit (in this case an empty space , since ABS is not installed) F14 - High beam (right)
F15 — High beam (left) F16, F17 — Fog lights F18 — heated seats F19 — ABS F20 — cigarette lighter F21 — Reverse lock F22 — Electrical package control unit F23, F24, F25 — reserve F26 — ABS Purpose of the relays installed in the block: K1 — headlight washer K2 — power window circuit activation K3 — starter activation K4 — additional (ignition relay)
Good driver vision is a fundamental aspect of safe vehicle operation. But only in the daytime can a person completely rely on his eyes; at night, the headlights help the driver keep the car on the road. Loss of low beam makes it impossible to drive a car in the dark.
Low beam does not work on one headlight
If for no apparent reason one low beam bulb stops working, then the reason may be directly in it. The filament coil often burns out.
In such cases, the only solution is to replace this optical element. Therefore, it is better to always carry spare lamps with you.
Another reason that should always be taken into account could be a blown fuse, which simply needs to be replaced. In addition, it is often enough to wiggle the fuse box and everything will start working. This is due to the fact that the contacts can oxidize over time, become loose, and their connection quality is impaired. To correct this problem, you need to carefully clean all contacts using fine-grit sandpaper or a file.
Due to poor contact quality, the switch button may also function poorly, so you should also pay close attention to its performance. To identify them, you need to check all the electrical blocks through which the connection occurs.
If poor-quality connections are identified, the deficiencies should be corrected immediately
To identify them, you need to check all the electrical blocks through which the connection occurs. If poor-quality connections are identified, the deficiencies should be corrected immediately.
The malfunction may be caused by a lack of contact with the light bulb itself, when the negative pole is poorly attached to ground. Incorrect headlight adjustment can cause these symptoms. For example, if the voltage regulator setting is weak, the beam of light will be almost invisible.
Non-standard reasons
Sometimes the abnormal operation of headlights is caused by completely unusual factors. There was an indescribable incident when the owner removed the headlight cleaners from his Niva because they had not functioned for a long time. As a result, he lost low beam on both headlights. And it took me a while to guess the reason! During the experiments, the owner found out that to obtain low beam, the presence of at least one of the motors is required, and it does not matter which one - left or right.
In the end, he simply short-circuited the connector, as if simulating the presence of a headlight cleaner. There were no further problems with light. So if you tapped all the links of the chain, but have not established the reason for the headlights, try to remember if you recently made any improvements to the design of your car. Perhaps in the process of these changes some engineering design was violated, which is the reason for the disappearance of light.
However, if such simple, although usually effective, measures do not produce the desired effect, you will still have to remember the phone number of a familiar auto electrician. Otherwise, you can spend a lot of time looking for reasons and never find them.
Having found out why the low beam of the headlights does not light up, but the high beam is on, and having learned to deal with this phenomenon, one day you may encounter the opposite problem, when there is a low beam, but no high beam. The reasons for these vagaries are, in principle, the same as in the previous case, only supplemented by a possible breakdown of the steering column switch. So if the reason for the strange behavior of the headlights has not been identified, and the low beam is still missing, it is likely that you will have to replace it.