Hydrocorrector of headlights: how it works and how to use it
The headlight leveler is an inconspicuous and rarely used device.
But sometimes without its work it is impossible to move at night on busy roads. A typical situation that requires the use of this device: a combination of a heavily loaded trunk and a trip in the dark.
When the trunk is overloaded, the rear part of the car lowers, and the front part “lifts up”. In this case, the “low beam” from a certain distance from the car automatically becomes “high beam”.
At first, the driver is perplexed why all oncoming drivers begin to “blink” and demand to switch the lights. If the driver guesses what happened, then he has to reload bags of potatoes into the cabin and onto the front seat in the dark. If the seats are occupied by passengers, then you have to either turn off the low beams and drive on the lights, or create an emergency situation on the road.
But there is a third way out: use a corrector and adjust the tilt of the light beam, lowering it down.
The opposite situation may also occur: if the hydraulic corrector is adjusted to the maximum load, and the machine is empty, then, on the contrary, it is necessary to raise the beam of light upward. In this case, the driver no longer blinds others, but illuminates the road “in front of his nose,” which is also fraught. Figure 1 illustrates these situations. The normal position of the light beam is shown in yellow.
Headlight lenses are faded - solves the problem by polishing or replacing
Dull headlight lenses are one of the serious problems for motorists. Yellow glass or a dark inner side are troubles that indicate a malfunction of the optics mechanism itself or a too long service life. Yellowed and scratched glass can be polished if it is smooth using the following options:
- buy a special polish for car glass, do not skimp on this product, otherwise it will not help remove microcracks and various other minor problems;
- prepare the headlight in a garage or other dry place for polishing, wash it and wipe it dry (it is not necessary to remove the optical device);
- Next, apply the required amount of polishing paste to the glass and rub it with a soft cloth over the entire surface; you can first polish a small area;
- then rub the polish into the glass surface with quick circular movements and watch for changes in the appearance of the headlight; the procedure can take quite a long time.
It is often recommended to use expensive toothpaste as a polishing material. In fact, this does not always work, so it is better to buy special products for such cases. Moreover, you can significantly delay the very expensive replacement of headlights by carrying out this operation correctly. Cloudy glass is one of the first causes of reduced light intensity in your car.
What to do if the headlight lenses are constantly sweating?
The issue of headlight glass fogging is also quite complicated. It often happens that the optics sweat, and this greatly reduces the penetration of light during the trip. It is best to check the tightness of all elements of the headlight unit, look for the presence of rubber seals and tightly closed covers. If you cannot find the reason on your own, take the car to a mechanic. Most likely, the headlight will have to be changed (it is better to perform this process in pairs for two optical elements).
How to use the corrector?
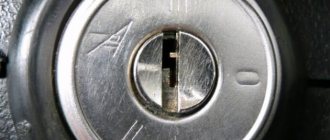
The corrector has knob A on the dashboard of the VAZ 2107 to the right of the steering wheel, next to knob B for adjusting the brightness of the dashboard lighting. If you rotate knob B counterclockwise, the brightness of the light decreases.
As they say, the control knob of the device has an “intuitive interface.” To change the direction of the light flow, with the trunk loaded and the headlights on low beam, you need to align the mark shown on the regulator with one of the marks marked on the unit body so that the beam of light does not blind oncoming drivers.
The VAZ 2107 hydraulic corrector has four switching options (in order from large point to small point):
I - minimum load, the front of the car is slightly lowered: one driver, or there is a passenger in front;
II - driver and four passengers, the body sags evenly downwards;
III - the same as II, with an additional load of up to 75 kg in the trunk:
IV - driver and maximum trunk load: the “nose up” the most.
In order to see how the angle of inclination of the light beam changes during operation of the corrector, it is better to place the car perpendicular to the wall. Let us recall the standard requirements for the location of the low beam.
Emergency situations determined by the dashboard indicator
The VAZ 2107 instrument panel allows you to detect most malfunctions in vehicle systems without leaving the driver's seat.
- The low oil pressure light comes on. You should immediately turn off the engine, stop and check the oil level in the crankcase. If necessary, add oil and then start the engine. If the oil level is sufficient and the lamp is on, you cannot continue driving. The car needs to be towed to the repair site. Otherwise, the bearings (crankshaft bearings) will wear out or rotate and the engine will knock or jam, which will require expensive overhauls.
- The battery warning light comes on. In this situation, you can continue driving, but you should take into account that you won’t be able to travel far, especially at night, as the battery will quickly discharge. You need to start by checking the condition of the terminals. If they are oxidized, clean them. If the terminals are in order, it is necessary to check the functionality of the generator or voltage regulator relay (often the reason for the lack of charge lies precisely in the latter).
- If the brake fluid level warning light comes on, you should stop immediately. It is unacceptable to continue driving with faulty brakes. After stopping, it is necessary to add brake fluid and check the functionality of the brake system. If the brakes work, you can drive to the repair site yourself. Otherwise, you need to fix the breakdown on site or call a tow truck.
If the coolant temperature gauge needle is in the red zone of the scale, you need to stop to let the engine cool down. When the temperature drops, you can check the condition of the pipes and the coolant level. If the level is normal, then you can try to go to a service station to find out the cause of the breakdown. Most often this is a malfunction of the thermostat or radiator fan. The VAZ 2107 panel is not equipped with an alarm or an additional lamp that lights up when the engine overheats. Therefore, inexperienced drivers often do not notice this problem, which can lead to antifreeze boiling away or even jamming the engine.
Important: do not open the expansion tank or climb into the pipes when the engine is not cooled down. Otherwise, you may get burns. If the fuel level needle is at zero or the yellow “reserve” lamp lights up, you need to refuel
Power reserve on “reserve” - about 50 km
If the fuel level needle is at zero or the yellow “reserve” light comes on, you need to refuel. The “reserve” range is about 50 km.
Also, the front panel of the VAZ 2107 has a tachometer, the readings of which should be paid attention to when driving. Driving at high speeds (over 5000 rpm) can lead to engine damage
If you keep the tachometer needle in the green zone of the scale, you can extend the service life and achieve minimal fuel consumption.
How does the headlight hydrocorrector work?
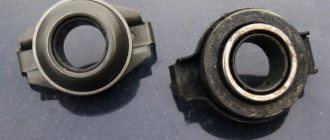
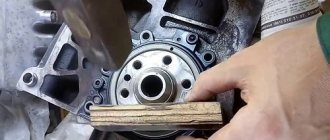
Below is shown the headlight hydraulic corrector without a control knob on a VAZ 2107.
The corrector structurally includes:
- adjustment knob and master cylinder (on the dashboard);
- two pipelines and clamps (to each block - headlight);
- two actuator cylinders, installed on the VAZ 2107 headlight block;
- frost-resistant working fluid (brake) in a closed circuit.
For VAZ 2107 models, a hydraulic corrector model “2105-3718010” is used.
How does headlight range control work?
The cylinder system is manufactured hermetically, with:
- The highest (basic) fluid pressure corresponds to switch position I;
- when switching sequentially to positions II, III and IV, a vacuum is created in the system;
- pistons are retracted in the actuating cylinders and the optics are turned down;
- when returning to position I, the pressure in the system increases to the base one, the pistons protrude and turn the optics upward.
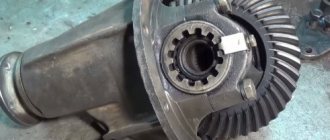
Since the system is under pressure almost all the time, except when the trunk is heavily loaded, seals often leak. The reason may be the fragility of domestic rubber on the VAZ 2107 during winter temperature changes. Due to a leak of working fluid, the piston in the working cylinder becomes stuck in one position.
A working hydraulic corrector must ensure free play of the piston and must be at least 7 mm.
Due to the manufacturing features (tightness), the hydraulic headlight angle correction on the “classic” in general, and on the VAZ 2107 in particular, is non-removable and cannot be repaired. Its cost is low, so it is advisable to replace the entire set if it fails.
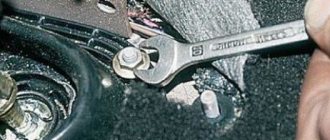
Let us remind you that before removing the old cylinders from the headlight housings, the main thing is not to forget to tighten the clamps on the working cylinders and turn them counterclockwise
In conclusion, let us remind you that there are no trifles on the road, and the topic of the corrector is a vivid example of this. Drivers who do not monitor the condition of this small but important device sometimes argue that they do not drive with a full trunk, especially at night. But according to traffic rules, outside populated areas you need to drive with your low beams on, even during daylight hours. And then an incorrectly adjusted corrector can blind road users even during the day and cause an accident.
Problem solving
When the low beam lamps are turned on, all four filament elements must be activated
If one of them is found to be weak or does not light up at all, you should pay attention to whether the fuse is intact. You can check it from inside the car
When driving fast, pebbles hit the car, so there is a risk of damaging the surface of the product.
If the check shows that the fuses are intact, you will need to inspect the lamps themselves. To do this, open the hood, remove the rear casing, and then remove the coil of wires. The spring is removed from it, as well as the light bulb holder itself. Having taken it out, a new light bulb is inserted there.
There are times when replacement does not bring the desired result. In this case, you need to check the two relays, which are marked accordingly on the surface of the low beam lamp. The problem is usually oxidation of the contacts. It can be eliminated by simple cleaning. In some cases, you will have to completely replace the relay.
Replacing light elements
When carrying out a test that does not give the desired result, you should reconsider the mounting of the block, its reliability and performance
Likewise, it is important to test the wires responsible for the operation of the headlights. First, the easiest way to check the fasteners located next to the battery and air intake
After this, we find the second element, which is located near the adsorber.
If this does not help, you should pay attention to the headlight control unit - its switch may break. Need to check contacts
When the car is exposed to rain and the low-beam headlights are of poor quality, fogging occurs.
Adjusting the headlights of VAZ 2107, VAZ 2105, VAZ 2104, Lada Zhiguli, Classic
The direction of the light beams of the headlights should be such that the road in front of the VAZ 2104 is well lit, and oncoming drivers are not blinded when the low beam is turned on.
View of the headlight from the engine compartment: 1 - screw for adjusting the light beam in the horizontal direction; 2 — headlight casing; 3 — plug block; 4 - setscrew; 5 — screw for adjusting the light beam in the vertical direction
The headlights of the VAZ 2104, VAZ 2105, and VAZ 2107 are adjusted by rotating screws 1, 5, which rotate the optical element in the vertical and horizontal planes. It is most convenient to adjust the headlights using mobile optical devices. If they are not there, then adjustments can be made using the screen. Place a fully fueled and equipped VAZ 2105 car, with a load of 735 N (75 kgf) on the driver’s seat, on a flat horizontal platform 5 m from a smooth wall or any screen (plywood panel measuring about 2 × 1 m, etc. ) so that the axis of the car is perpendicular to it. Before marking the screen, make sure that the air pressure in the tires is normal, and then rock the car sideways to install the suspension springs.
Headlight adjustment diagram
Draw vertical lines on the screen: center line 0 and lines A and B passing through points E, corresponding to the centers of the headlights. These lines must be symmetrical relative to the center line of the VAZ 2104, VAZ 2105, VAZ 2107. At a height h corresponding to the distance of the centers of the headlights from the floor, draw line 1 and 75 mm below it - line 2 of the centers of light spots. Set the headlight hydraulic adjustment knob on the instrument panel to a position that corresponds to the vehicle load of one driver. If the car does not have a VAZ 2107 headlight hydraulic corrector, then turn the set screws 4 inserted into the headlights instead of the hydraulic corrector working cylinders to the extreme left position. Turn on low beam headlights. Sequentially, first for the right headlight (the left one is covered with a piece of cardboard or dark matter or is turned off), and then for the left one (the right one is closed), adjust the light beams of the headlights of the VAZ 2104, VAZ 2105, VAZ 2107 with screws 1 and 5. Correctly adjusted headlights have the upper limit of the light The spots should coincide with line 2, and the intersection points of the horizontal and inclined sections of the light spots should coincide with points E.
When do you need to do this kind of work?
All cars leave the factory with the headlights already adjusted. And if the car is operated in normal mode, then no intervention in the position of the headlights is required.
However, it should be borne in mind that the factory adjustment is made with an average vehicle load.
If the car is often used with maximum load, which usually falls on the rear axle, then the front of the car naturally lifts up, changing the direction of the light - it begins to shine upward.
Replacing a burnt-out main light bulb can also affect the position of the light beam.
This applies even more to the headlight itself - replacing the glass or the light fixture itself if the standard ones were damaged.
In general, not only damage to the headlight, but even overloading the car leads to the need to adjust the headlights.
These works boil down to changing the position of the optical element of the headlight, including a lamp and a reflector, in the horizontal and vertical directions.
Additional lighting devices are not included in the optical element, so adjustment does not affect them in any way.
At specialized service stations, the position of the headlights is adjusted using special mobile optical devices.
This operation is not particularly expensive, but not all service stations have such devices available.
How to independently adjust the headlights on a VAZ 2107
Driving at night in a car with unadjusted headlights is just as dangerous as driving a car without lights. When driving at night, the driver must have a clear view of the road, since not only his life, but also the safety of other road users depends on this. To increase the safety of movement at night, you need to adjust the headlights on the VAZ 2107, and every owner of this vehicle can do this.
Battery drains quickly
One of the problems of the Seven is that the battery discharges to such a level that it does not turn on the starter. This is caused by an insufficiently charged battery or a large loss of current. This may indicate poor contact on the relay regulator.
When the battery on the device lights up on a VAZ 2107
, which means the battery is not charged. The indicator showing the battery charge should go out when the engine is turned on. If the battery light on a VAZ 2107 is on
, and the battery is discharged, then the reasons may be the following:
- malfunctions on the relay regulator;
- worn or stuck brushes in the brush holder;
- One of the diodes in the generator is not working.
Good battery for VAZ 2107
serves from 5 to 7 years. Since the batteries of most “Sevens” quickly go out of working order, the battery model deserves your attention - Autopower. It is considered the best in quality, in addition, a 3-year warranty period is provided by the Czech Manufacturer AUTOPOWER.
| Characteristics | Car battery Autopower A60-L2X 12V 60Ah 540A | Car battery Berga BB-H5R 60 12V 60Ah 540A | Battery for car AKOM 6ST-55.1 pp 12V 55Ah 460A |
| Manufacturer | AUTOPOWER | Berga | AKOM |
| State | Czech | Germany | Russia |
| Warranty period from the manufacturer | 3 years up to 100 Ah / 1 year over 100 Ah | 4 years up to 100 Ah / 1 year over 100 Ah | 3 years up to 100 Ah / 1 year over 100 Ah |
| Service | — | not serviced | not serviced |
| Capacity | 60 Ah | 60 Ah | 55 Ah |
| Polarity type | Straight | Straight | Straight |
| Cold crank current (-18): | 540 A | 540 A | 460 A |
| Length Width Height: | 242mm*175mm*190mm | 242mm*175mm*190mm | 242mm*175mm*190mm |
| Current output | To terminals | To terminals | Terminals |
| Characteristics | Battery for car Tyumen Standard 6ST-60 L+ 12V 60Ah 520A | Car battery SMART ELEMENT 6CT-60.1 VL3 12V 60Ah 480A |
| Manufacturer | Tyumen | SMART ELEMENT |
| State | Russian Federation | Russian Federation |
| Warranty period from the manufacturer | 24 months up to 100 Ah / 12 months over 100 Ah | 6 months |
| Serviceability | — | not serviced |
| Capacity | 60 Ah | 60 Ah |
| Polarity type | Straight | Straight |
| Cold cranking current (at -18): | 520A | 480A |
| Length Width Height: | 242mm*175mm*190mm | 242mm*175mm*190mm |
| Current output | To terminals | To terminals |
Of the two battery models presented, the Smart Element is the better because it consumes less electricity to turn the car's starter. The battery life is longer on average by 2-3 years.
On the website of our company the price for the battery for VAZ 2107
accessible to any car owner, as well as high product quality standards. All models have official warranties, and each one contains the necessary details of the manufacturer.
The cost of a battery is affected by its quality, capacity and other characteristics. Buy a more expensive battery model and you will be sure that there will be no problems with turning on the car for the next 7-10 years. It is possible to save money and buy a battery for a VAZ 2107 cheaper
. It will also be of high quality and with a guarantee from the manufacturer.
Common headlight problems
Not only on the 7, but also on other car models, various malfunctions related to optics occur. If breakdowns occur, you should try to fix them as quickly as possible. One of the simplest breakdowns is the burnout of lamps, as a result of which visibility of the road decreases or disappears altogether. Continuing to drive with faulty headlights is strictly contraindicated, so let’s look at what other types of faults occur with headlights:
- Glass damage is most often caused by a pebble that flies out from under the wheels of oncoming or overtaking vehicles. The glass must be replaced, as water can get inside through the crack, which will cause the light bulb to burn out.
- Failure of the lamp, or rather the burnout of the filament on it. If a light bulb burns out, it should be replaced. The seven is equipped with lamps with two filaments, which are responsible for the operation of high and low beam. As a rule, lamps burn out one at a time, so it is always possible to get home with one working headlight.
- Malfunction of windshield wipers - on some sevens, a mechanism for cleaning the headlight glasses (wipers) may be installed. These cleaners allow you to always keep your windows clear, which has a positive effect on the light of your headlights.
If both headlights on a VAZ 2107 do not light up, then you should not rush to disassemble them. First you need to check the serviceability of the fuses, as well as relays and wiring.
Features of the optics unit
The front optics on the VAZ 2107 are presented in the form of a plastic case, inside which there is a reflector and glass. Glass not only serves as a protective option, but also ensures proper light reflection on the road surface. The front side has a rectangular shape, and on top of the glass, some owners of sevens install plastic covers.
The difference between plastic and glass is significant, but both have their advantages and disadvantages. For example, there are no scratches on glass like plastic, which affects the quality of light reflection. Plastic, in turn, is more resistant to mechanical stress, so if a stone hits, it does not collapse and protects the glass from impact. The headlight units contain low and high beam lamps of type AKG 12-60+55 with H4 socket. In addition to the main light, the headlight unit also contains lamps for side lights and turn signals.
The illustrations show the following elements:
- Adjustment screw for horizontal luminous flux.
- Headlight cover.
- Block for connecting power wires.
- Set screw.
- Vertical direction adjustment screw.
The headlight units on the sevens have a mechanism for adjusting the direction of the light beam. The mechanism is activated by a special hydraulic corrector regulator, which is located inside the car. This regulator has 4 positions, which allows you to control the direction of the light flux depending on the vehicle load. There is a cover on the inside of the headlight unit, which is designed to quickly replace burnt out lamps.
Adjusting headlights on a VAZ 2107
In addition to adjusting the headlights using a regulator in the cabin, VAZ 2107 owners must adjust them depending on the types of lamps used for lighting. To correctly adjust the headlights on a VAZ 2107 with your own hands, you will need to adhere to the following algorithm of actions:
- First you need to place the car on a flat horizontal surface. Moreover, the car must be installed strictly at a distance of 5 meters from the vertical plane. Before carrying out adjustment work, you need to make sure that the pressure in all tires is correct.
- Load the car. To do this, you need to fill the tank full, and also seat 2-3 people in the cabin, so that the load is at least 120-150 kg. Instead of passengers, you can use heavy objects.
- A special marking must be applied to the surface of the vertical plane, according to which the regulation procedure is carried out. A diagram of such markup is shown below.
- First you need to draw vertical lines - the centerline and lines A and B. These lines must be symmetrical with the centerline. Next, you need to find the height h, which corresponds to the distance from the ground to the center of the headlight. A horizontal line is drawn, and then parallel to it, located 75 mm lower.
When performing adjustment work, it is necessary to take into account an important nuance - the adjustment of each headlight should be carried out separately. To implement this, you will need to cover one headlight with material. In addition, the adjustment should be performed mainly in the dark, when the light beam is clearly visible.
In conclusion, it should be noted that this type of setup is performed exclusively for yourself, and if you are going for a technical inspection, it is better to contact a specialized service station.
What will be required to complete the work?
It is also possible to independently adjust the position of the light, and no special equipment is required. It is enough to place the car on a flat area in front of the wall - the so-called screen adjustment.
The peculiarity of this adjustment comes down to proper preparation of the machine and adherence to a certain technology.
It is not so difficult to prepare a car for this operation - you just need to provide the workload on the axles of the latter.
It needs to be refilled, and the tank should be more than half full.
You should also check the tire pressure - it should be the same in all wheels and correspond to the norm.
If the car is loaded most of the time, then you need to provide additional weight in the trunk.
It is also necessary to have someone behind the wheel, or to ensure that the weight in the driver's seat is approximately equal to the weight of the driver himself.
As for the platform on which the adjustment will be made, it must be level.
You can check this in the simplest way - put the car on a platform, and then measure the height from the floor to the lower edge of the headlights - if there is no significant difference, the platform will do.
The wall in front of the car must be strictly vertical. If the unevenness of the wall is very obvious, then you can put a sheet of plywood on it.
In our case, no special tool is required.
But there are exceptions, for example, on the Grant fret, a 6-point hex wrench is used to adjust the headlights.
On other models, a smaller screwdriver may be needed.
Such troubles can occur frequently, so please read the instruction manual first.
Replacing and adjusting lamps and headlights of a VAZ-2107 car
The VAZ-2107 is equipped with two block headlights (the headlight and turn signal are made in a single housing).
The headlight contains a side light lamp and a halogen two-filament low and high beam lamp.
The electrical circuits of the headlamp are protected by fuses, and voltage is supplied to the lamp filaments through a relay.
On some vehicles, the headlight units are equipped with a hydraulic corrector.
It allows you to change the angle of the headlight beam depending on the vehicle load, so as not to dazzle oncoming drivers.
The right and left headlight units are not interchangeable.
The connection diagram for headlights and fog lights of a VAZ-2107 car can be seen in Figure 1.
Granta, Priora
In modern domestic cars VAZ Granta and VAZ Priora, the procedure for adjusting headlights is no different. One of the nuances to note is the distance between the horizontal lines; for these cars it is 75 mm.
Also, the adjusting screws of the Grant can be reached through special holes, and the screws themselves are located at an angle.
Adjustment is carried out using a 6mm hex key.
In Priora, the screws are located at the top of the headlight.
In general, headlight adjustment for all cars is done in the same way; only certain dimensional characteristics of the model itself and the location of the adjustment screws should be taken into account.