Do-it-yourself soundproofing of a VAZ is a fairly common topic of conversation among drivers. This is a process by which a reduction in external noise and noise during operation of car components is achieved. By adhering to certain rules, the owner of any car will be able to provide vibration and sound insulation at the proper level.
The technology for eliminating excess noise in Lada involves working with a complex of noise-insulating, noise-absorbing, vibration-absorbing materials and anti-creaking materials. Only by using the entire range of materials can maximum quality and best results be achieved, in which the sound insulation of the VAZ will be noticeable.
The topic of automobile sound insulation is huge and has many subtleties for each element of the body.
Soundproofing floor Priora
| Soundproofing a car consists of a number of measures that are aimed at different elements of the interior. Floor soundproofing is considered one of the most significant, the effect of which is immediately noticeable. Let's consider how difficult it is to soundproof the floor of a VAZ 2170 yourself. |
soundproofing technology is the same for all brands and types of cars, however, specific cases have their own characteristics.
In the case of Lada Priora, the whole process begins with dismantling the front and rear seats. Next, remove the central tunnel. We unscrew the plastic covers and remove the carpet and the standard Priora sound insulation. To avoid problems during assembly in the future, it is recommended to put all the bolts in separate jars or bags, labeling them. Assembly after soundproofing . On top of the second layer we lay standard Priora sound insulation and carpet. The thicker the additional sound insulation, the higher the floor will rise. Therefore, getting the seats into place may not be as easy, and the bolts may not reach the threads (you may want to use longer bolts).
As a result, such do-it-yourself soundproofing of the Priora will require about 2-3 days of free time. Quantity of materials required:
There is certainly an effect from the soundproofing of the Lada Priora floor: noise from the road and wheels is reduced, the sounds of the suspension become more muffled, and there are no creaks in the central tunnel.
Remember that the best sound insulation is when a set of works has been carried out aimed not only at insulating from external noise (noise from wheels, engine, wind, etc.), but also eliminating creaks and crickets inside the car.
Source
Sound insulation of LADA Priora doors
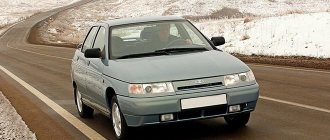
Soundproofing or soundproofing of the VAZ 2170 is often done for one simple reason: since the car is Russian-assembled, it is not famous for its quiet interior and silent ride. In addition, one of the main sources of noise is the noise from the wheels when driving, so the issue of sound insulation of Priora doors is currently the most pressing. The technological process of sound insulation is almost the same regardless of the make and type of car. But each individual case has its own subtleties and nuances.
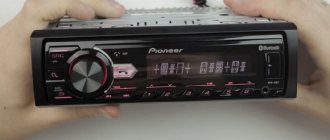
ATTENTION! Now you can buy a completely new Pioneer MVH X580BT processor radio for only 2990 rubles! Don't believe me? Then follow the link and see for yourself! Read more"
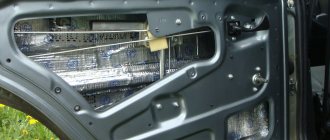
Soundproofing Priora doors begins, first of all, with removing the upholstery material from the doors. Under the upholstery there is standard sound insulation, which must be carefully removed. After this, you should thoroughly wipe the metal door frame, for example, with White Spirit, degreasing and cleaning the surface. It is worth noting that the anticorrosive agent located at the bottom of the doors must under no circumstances be removed!
The most optimal and simplest option for installing sound insulation is considered to be the option in which sound insulation is made using layers. Soundproofing Priora doors with your own hands of this type will take you no more than 10 hours of work. You will also need about 7 sheets of vibration-absorbing material, 4 sheets of Splen, 3 sheets of bitoplast and the same amount of modelin.
The first layer of sound insulation of Priora front doors is the installation of vibration-proofing material inside them:
- First, you need to cut out several sheets of suitable shape and size from the vibrating material (the larger the sheets, the better).
- Next, using a technical hair dryer, you need to heat the bitumen side of the resulting sheets.
- Then heated pieces of vibration insulation should be glued to the inside of each door and rolled out with a hard iron or plastic roller over its entire area.
- Then the next sheet is taken and overlapped over the first one according to the algorithm described above.
The coverage of vibration-proofing material on the inside of the doors depends on the material itself, so its percentage (percentage of coverage) can vary from 55 to 100%.
The next layer of sound insulation for Priora doors means sticking sound-absorbing and heat-insulating materials onto the vibration-proofing layer. Experts recommend using materials such as Splen or Accent at this stage. They have a self-adhesive base, so their installation does not require any specific skills or a lot of time. In this case, the entire surface (100%) of the inside of the doors is covered.
A third layer of sound insulation can be installed upon request. The essence of this layer is to cover all technological holes in the doors with vibration-isolating material or the like. If you make a third soundproofing layer, then in case of repair of the window regulators it will need to be dismantled. As practice shows, sound insulation of doors made in three layers is considered the most effective.
Discomfort inside the car when driving also occurs due to squeaks. Therefore, an equally important step in soundproofing doors is soundproofing the door skins. To do this, the upholstery material is first made heavier with vibration material, so it will vibrate less and make fewer squeaks. And then bitoplast (sound-absorbing material) or modelin is glued on top of the vibration material in the places of their contact.
The rear doors of the Priora are soundproofed in the same way . Then the door is assembled in the opposite sequence. It is recommended to use new clips for door trim.
It is worth paying attention to the fact that high-quality sound insulation implies a set of measures that are aimed not only at eliminating external noise from the wind, wheels and road, but also at minimizing crickets and squeaks inside the car dealership. Only in this case will the driver be able to achieve absolute silence and comfort when moving in the car.
Processor radio Pioneer MVH X580BT for 2990 rubles!
One of the best radios in its segment. It is a diskless receiver that rationally uses the manufacturer’s developments in the field of digital audio processing. This is a full-fledged processor device, designed taking into account the needs of modern car enthusiasts. More details at the link.
- Matrix LCD display with wide viewing angle;
- Working with a USB drive;
- Built-in microphone, Bluetooth and wireless voice communication system (can connect up to 2 phones);
- Compatible with Android, iPod/iPhone;
- Maximum output power: MOSFET 50W x 4.
Find out details
Tags: tuning, interior soundproofing, Priora, car audio
Comments 19
How much and what material is needed for a Shumka Priora Hatch? My goal is: noise-heat-vibration insulation, the music installation is planned to be average, with a not powerful subwoofer. I will make noise on all doors, floor, ceiling, trunk and trunk lid. Thank you in advance. PS I'm thinking of doing STP
What are the reviews of the VM vibration isolation? Is it worth taking?
What about noisebuster? Good material, vibration iso-7. 10 sheets needed
It took 10 just for the trunk of a sedan, I don’t know how you glue 10 sheets on the whole car
You can use comfort instead of P4, but the price will increase, but the efficiency will also increase)
the price will almost double))
comfort 6 costs 460 rubles per 0.5 sq m, comfort 3-360 rubles, P4-110 rubles per 0.42 sq m
Shumoff 110 sheets of choice (11 sq m), and 25 P4 sheets.
Instead of splen I would only recommend Accent. Spleen is generally such a mess, I regret that I made a fuss about them. Doesn't dampen noise at all and retains heat questionably.
I agree about splen, wasted money...
What can you say about Bibra VM?
Yes, there is quite decent noise as standard, you can’t hear the road at all! like in a Mercedes. Why transfer money?
Source
Soundproofing Priors - Floor and Engine Shield
Reassembly of the machine is finally completed
this time I want to talk about the final part of the soundproofing of my car))
here's what I needed:
1) Vibro-plast STP Gold - 12 sheets 2) BiMast Super - 2 sheets 2) Splen 8mm - 8 sheets
Sound insulation of floor and dashboard
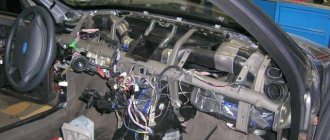
Well, firstly, in order to perform sound insulation, you need to disassemble the entire interior:
1) First of all, remove the front and rear seats. there were no difficulties) 2) We disassemble the central tunnel - everything is quite simple there too
Soundproofing without removing the panel
Unlike the first case, gluing the dashboard panel without removing it will take a couple of hours. Using modelin and bitoplast we weight the torpedo. To do this, you need to completely remove all the plastic from the panel. Next, you should weigh down all the plastic parts present in the interior of the car by gluing vibration materials to them. The main thing is to pay attention to the edges.
The wires located under the torpedoes also cause a lot of squeaks. You should wrap them in the same anti-squeaks. After this, reassemble in reverse order.
Soundproofing the dashboard without removal is suitable for those who have little free time.
Correct soundproofing of a car floor with your own hands
The main source of extraneous noise in the car interior is the wheels, so special attention should be paid to soundproofing the floor. Currently, there are several schemes for its installation. Let's look at the most popular installation methods and determine which scheme is better.
Is floor soundproofing necessary? This modification will reduce the noise level from the wheels, transmission, engine and suspension. Efficiency directly depends on the chosen installation scheme and materials.
Second layer of sound insulation
The second layer is splen.
The second soundproofing layer is necessary to suppress unnecessary sounds and retain heat, depending on the material. At this stage of work, the main principle of work comes down to gluing sound-absorbing materials such as Accent and heat-insulating materials such as Splen onto vibration-proofing sheets. Both materials have a self-adhesive backing, so installing them does not require any special effort or knowledge in the field of sound insulation.
The surface must be covered 100 percent with soundproofing material. The exception is technological openings, namely ventilation ones. This is the only way you can achieve the highest efficiency.
Manufacturers' recommendations (different methods)
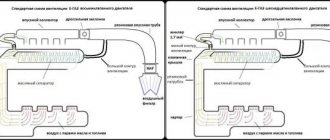
Floor soundproofing installation diagrams with materials:
Bimast Bomb Premium (4.2mm)
Shumoff Mix F (6.2mm)
Accent Premium (8-10mm)
Barrier (10 mm) or Splen (10 mm)
| Shvi layer | Material | STP (thickness, mm) | Shumoff (thickness, mm) |
| 1 | Vibration isolation (vibration damper) | ||
| 3 (optional) | Soundproofing (soundproofing membrane) | NoiseBlock (2mm) | Germeton A30 (3mm) |
Vibration isolation
You can independently select the appropriate vibration-proofing material, for example, using this table:
Degrease the surface. Stick vibration dampers 2-3 mm thick (thicker only with a powerful audio system) onto a flat surface inside the door. To achieve maximum effectiveness, it is enough to cover 70-80% of a flat surface. We do not cover the drain holes, stiffening ribs and the end of the door. Heat the material with a hairdryer and roll it with a hard roller (roll in one direction), expelling the air.
It is recommended to cover the technological holes in the door with a single sheet, cutting out holes for rods, fasteners, etc.
Reviews after soundproofing the floor
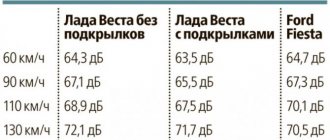
Results before and after soundproofing the floor on a Lada Vesta:
Recently, the results of complete sound insulation of the Lada Vesta sedan were published. As a result of the work done, the noise in the car interior was reduced by 1.5 dB (according to material manufacturers, the difference is 2-4 dB ). You can imagine what the effect will be just from treating the floor.
What reviews can you leave about floor soundproofing? What scheme is best to follow when performing work?
Source
Instructions
After the car dashboard has been removed:
- Degrease the internal plastic surfaces (White Spirit).
- We glue vibration-absorbing material (up to 2 mm thick). This will make the panel heavier and reduce vibrations. It is advisable to heat the material and smooth it with a hard roller.
- We glue sound-absorbing material (for example, STP biplast or Shumoff Germeton). It will ensure a tight fit of the panel, eliminating the possibility of squeaks and rattles.
Similarly, we glue the removable parts of the panel (glove compartment lid, steering shaft casing):
Lada Vesta has good standard sound insulation of the engine shield on the passenger compartment side. This part of the body is covered with a thick layer of vibration-proofing material, as well as a dense mat with felt (which is also used on the floor). In this case, it will be sufficient to stick sound-absorbing material on the top of the heater and air ducts.
We stick anti-creak (for example, madeleine) on all panel mounting points (this will eliminate squeaks), and we also wrap the wire harnesses with the same material (this will eliminate rattling). Also pay attention to the external elements of the dashboard (air duct deflectors, center console and radio frame, instrument cluster, etc.)
Soundproofing
The stages of sound insulation are divided into several types: double and triple.
Classification:
Immediately before soundproofing the floor, it is necessary to dismantle all interior elements that will interfere with the process. In this case, these are: seats, center console and carpet. The exception is the panel (torpedo) and its components.
Soundproofing and thermal insulation
STP recommends gluing a sound-absorbing material, for example, an accent, on top of the vibration insulation material on the “street” panel (joint to joint, it should cover the maximum area of this surface).
We cover the entire surface area of the door trim, cutting out holes for fasteners and other necessary elements. The recommended material from the Shumoff company is sound-heat-insulating material P4, from STP - Biplast.
The entire soundproofing process is shown in the video:
We cover all wires, rods, places of contact between the door trim and the body with anti-squeak: