Like any part, the generator sooner or later becomes unusable. However, the breakdown of some parts does not interfere with the operation of the car, provided that the broken element is promptly replaced and repaired. And a failed car generator will not allow you to drive even 50-400 kilometers (depending on the battery and working devices) - the car will no longer drive. An injection engine will immediately start to malfunction and eventually stall; with carburetor cars, things are a little easier. Monitor the condition of the generator and, as necessary, either replace it with a new one or repair the installed one.
Note! You will need the following tools: a good set of wrenches, including wrenches, sockets, etc., two types of screwdrivers, a multimeter with an ohmmeter function, a special puller to remove the bearing from the shaft, a hammer and tubular mandrels (socket heads are suitable).
When to repair a generator?
A generator that has become unusable begins to supply current poorly and incorrectly to the vehicle’s on-board network, which causes problems with the electronics:
- at low speeds, the car's headlights shine dimly;
- Increasing speeds bring the light back to normal.
These symptoms indicate a malfunction of the generator or voltage regulator.
Another sign is that the generator is making noise: the generator bearings are out of order, they are not very difficult to replace and are inexpensive. We recommend disassembling and replacing the bearings as quickly as possible, otherwise it is possible that other parts will have to be changed due to bearings, for example, the stator suffers.
When should you replace the generator?
The service life of the generator is quite long, as is its cost. Therefore, if suddenly this part fails on your car, you should not run to the store and buy a new one. It is enough to simply remove the old generator and try to determine the breakdown. Signs that it is time to pay attention to the operation of the generator are unstable operation of the headlights. So, for example, if you notice that at one point the headlights begin to glow brighter or, conversely, dimmer, it’s time to look for the place where the generator is hidden. A similar action must be taken if your car’s battery begins to discharge too often, and without any apparent reason.
Required spare parts
To work, you will need to purchase new brushes. In the store you can select goods according to article number 2101-3708340, 9402/9412 or EG51A. The markings can also be found in the vehicle's operating instructions. It is better to purchase a kit so that you always have spare parts with you. This will guarantee that if a breakdown occurs you will not have to call a tow truck.
How to remove the generator
If you have at least a rough idea of how exactly the generator works, you can try to fix it yourself.
- In order to remove the generator, you will need to drive the car into a pit or lift it on a lift. For ease of operation, it is necessary to remove the crankcase protection. The next step is to remove the terminal from the car battery.
- Moving the rubber boot to the side, you can see the nut that attaches the positive terminal to the generator. It should be unscrewed and the wire block disconnected. This may require some force.
- Using a socket wrench or wrench, unscrew the adjusting bolt.
- Find the nut of the bolt located on top. It is thanks to him that the generator is held on the bar. Both the nut and bolt should be removed while simultaneously removing the tension bar that holds the bolt.
- Finally, you need to unscrew the nut of the bolt located below. Directly behind this nut there is a spacer sleeve that will also need to be removed.
- Next, using milk, you should knock out the bolt from the generator, but at the same time the latter must be held suspended.
Note. Once the bottom nut of the alternator bolt is loosened a little, you will need to remove the alternator belt. To do this, move the generator closer to the engine itself, and with the other hand remove the belt from the generator roller.
It should remain hanging until the generator is put in place or a new one is installed.
Installation of a new generator occurs in exactly the same way, only in reverse order. After installing the generator in place and installing the belt roller, the voltage should be adjusted to the required level.
Important! It is best to replace the generator with a similar one. It often happens that, having purchased a slightly different generator, it is simply not possible to install it on a VAZ-2115. This is directly influenced by several reasons. For example, the mounting may be arranged differently, or the dimensions of the generator may not correspond to those prescribed by the factory. In any case, before purchasing a new generator, it is best to consult a specialist.
Source
Cleaning contacts
I cleaned all the contacts that I could clean))
1) Cleaned all the contacts on the generator 2) Cleaned the generator fasteners to the engine block (As I was told, this is “ground”) 3) Cleaned the places on the engine block where the generator fasteners are pressed (As I was told, this is “ground”) 4 ) Stripped contact “D” (wire in the car) 5) Stripped the power wires that connect to the generator. 6) I also cleaned the terminals on the battery
Now some photos
You can read about how to assemble and install a generator in a car in the previous blog about removing the generator and disassembling the generator, only now we do everything in the reverse order.
RESULT OF THE WORK:
I connected everything, started the car, the BC gave a reading of 14.2v. I drove around the yard a bit (about 200 meters, since all the docks on the car were left at home, I decided not to risk it =)) I turned on the music, as usual, quietly, so for myself and the BC showed 14.1 - 14.2v Turned on the dimensions - 14.1 Turned on the low beam, and lo and behold! — 13.9
Previously it was 13.3v - Cleaning the contacts was successful and helped a lot! The work was not done in vain, it makes me happy!
I didn't change the brushes!
ALeX-71 suggested not changing the brushes for now in order to see whether cleaning would help or not, it seemed to help. Let's ride, watch, write a blog post.
What's left behind the scenes:
As you remember, I wrote that the length of my brushes was 11 and 12 mm. I was very interested in how long the new brushes were, but I couldn’t find it.
ALeX-71 said that his brushes are 15mm long, so mine haven’t worn out much yet. The critical minimum is 5mm!
Well, there was also a photo showing a small output on the generator armatures, in principle the output is not large)
Maybe I missed something, if I remember anything, I’ll add it. If you have any questions, don’t hesitate to ask))
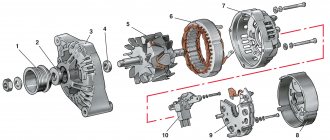
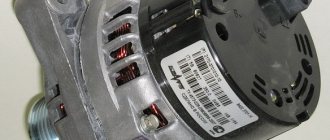
How does the generator work on a VAZ?
- Brush holder with voltage regulator.
- Stator.
- Rotor.
- Fan with pulley.
- Distance ring.
- Bushings.
- Bearings.
With the help of the stator and the generating part, a 3-phase alternating current is generated, which 6 large diodes change to direct current, and the battery is charged.
The generator operates by rotating the crankshaft. The device is located under the hood, on VAZ cars - in the front part. Therefore, it is not difficult to remove the VAZ-2114 and other models generator.
Reasons for changing brushes
In a car generator, most parts are constantly in motion, which causes friction and wear. The reasons for changing brushes may seem very varied, but this should be done during routine vehicle maintenance. On VAZ 2114 it is advisable to change them after 50 thousand kilometers traveled. But as a rule, few people remember about this event, and this breakdown comes as a big surprise to them. There are also markers that signal an imminent breakdown; we will arrange them in order of the most frequent possibility of occurrence:
- Inexplicable chaotic shutdown of various electrical equipment in the car.
- A noticeable decrease in the brightness of headlights and other lamps both inside the car and on the body.
- Battery that discharges too quickly and problems with voltage levels.
To check the functionality of the brushes, it is not even necessary to remove the entire generator from the car. To carry out diagnostics, it is enough to remove the negative terminal from the battery, remove the voltage regulator from it and visually evaluate how much the brushes protrude from their seat. If their size is less than five millimeters, then they must be urgently replaced with new ones, otherwise unforeseen consequences can be expected at any time.
Types of mechanical failures
Failure in the technical part of the generator - wear of the bearings, bending of the pulley (if it is not bent too much, the device will work with a whistling belt), failure of the fasteners.
Attention! Mechanical breakdowns appear after an accident; they rarely occur during operation.
- Unnatural noises when the generator is running.
- Voltage drop.
- The car drives faster, then slows down sharply when you press the gas pedal with the same amount of force.
Required spare parts
To work, you will need to purchase new brushes. In the store you can select goods according to article number 2101-3708340, 9402/9412 or EG51A. The markings can also be found in the vehicle's operating instructions. It is better to purchase a kit so that you always have spare parts with you. This will guarantee that if a breakdown occurs you will not have to call a tow truck.
Types of electrical faults
The problem with the generator is that it stops producing current. The indicator on the dashboard lights up. Electrical faults lead to breakdown:
- The fuse or contacts have blown. Making a replacement is a matter of minutes. With contacts things are different.
- The brushes are worn out. You can change it yourself; you don’t need to buy a new device.
- The regulator relay has failed. You can repair it yourself or contact a professional.
- Diode bridge failure. Cannot be repaired, only replaced. To do this, you need to disassemble the generator; without experience, it is better not to carry out such work; it should be left to the experts.
- An open circuit in the stator or rotor due to a short circuit. Repairing is more expensive than purchasing a new electrical unit.
Signs to help detect an electrical problem:
- The battery indicator on the dashboard does not go out after starting the power unit or blinks.
- Burnt wire smell coming from under the hood (a serious problem that may not be related to the alternator).
- The appearance of sparks in the housing.
- Voltage drop.
- Constantly recharging the battery.
- The headlights are adjusted, they shine dimly, and when other sources of power consumption are turned on, they almost do not light up.
Main problems
Signs by which you can understand that the VAZ 2115, 2113 or 2114 generator brushes need to be replaced are:
- the battery does not charge or runs out of power quickly;
- warning lights on the dashboard are flashing;
- voltage failures;
- on-board electronics turn off or there is not enough power for its operation;
- the headlights begin to flicker or their light has become dim.
All these signs indicate brush wear. The following message appears on the instrument panel.
How to remove a generator on a VAZ
On front-wheel drive Lada cars with an injector engine (with the exception of Vesta and Largus), the location of the device is the same. The fastenings are identical.
Removing the generator using the example of a VAZ-2115 with an 8-valve engine
- Keys for 8, 10, 13, 17, 19.
- Puller for convenience.
- Adjustable wrench.
- The head is 27 elongated.
- Remove the terminal (−) from the battery (must be done before starting any work).
- Unscrew the fastening bolt located below.
- Move the terminal protective cover (on the side) and unscrew the fixing element.
- Remove the top mounting bolt.
- Remove the belt from the pulley.
- Dismantle the device.
On a car with an 8-valve engine, you can do without a pit. The knot is taken from above. If the engine has 16 valves, it will be more difficult to remove.
On classic models (2101, 2105, 2106, 2107 and others), the generator is located under the hood; dismantling differs from front-wheel drive cars. The engine of the “classic” has a different location, which is why some peculiarities arise.
Removing the generator on a VAZ-2107
The same tool is needed. The process is as follows:
- For convenience, drive the car onto the overpass.
- Unscrew the terminal (−) from the battery.
- Remove the battery (you will need a 10mm key).
- Unscrew the top bolt with a 13 or 17 key (it differs on different models).
- Remove the protection from the bottom.
- Remove the belt.
- Remove the wires from the device.
- Bend the terminal protective cover (+) and unscrew it with a 10mm head.
- Using a wrench (19), unscrew the nut securing the stator and the unit mount.
- Remove the nut and remove the device from below.
After removal, you can begin repairing the generator. If key elements of the device fail, it is more economical to purchase a new one.
Fastening design
The design of fastening elements for electric generators on AvtoVAZ vehicles varies. Differences in fasteners are caused by the peculiarities of the structure and location of the power unit. For cars of the VAZ classic and Niva family, with a longitudinal engine, the autogenerator is typically located longitudinally, along the block, near the first cylinder. The generator is driven through a belt from the crankshaft pulley. On front-wheel drive models with a transverse engine, the electric generator is located opposite the front right side member in the direction of travel.
The compatibility of the installation grooves on classic and front-wheel drive models differs, but depending on the specific model. The installation locations of the electric generator on classics and the first front-wheel drive cars (08, 09 and 99 families) are the same. However, to install an electric generator from a tens or Chevrolet Niva to a classic, you will need to purchase pulleys, a special strip and a mounting bolt for installing the generator. In other cases, the installation and fastening of generators from 21214 and other Nivas to rear-wheel drive VAZ models does not require additional work.
To install powerful devices from Kalina or Priora, the generator mount for other VAZ models will need to be changed. It is very important to select the appropriate components. For installation on the 08, 09 and 99 family, we select all generator mounts from VAZ (2110, etc.) for an 8-valve head, and not for a 16-valve one.
The fastener itself is a metal L-shaped structure made of durable steel. The design provides special holes for its combination with the autogenerator itself. In addition, the mounting strip is equipped with a technological cutout into which a screw is inserted to align the device relative to the cylinder block.
The lower mount of the generator is presented in the form of a special metal bracket with technological holes (in the bracket itself and in the counter part of the generator). A bolt passes through these fasteners, which rigidly connects the elements together. This is necessary in order to avoid vibrations and belt slippage during engine operation.
When replacing the autogenerator on VAZ cars of the classic and front-wheel drive (08, 09, 99) families, as well as Niv models 21213 and 21214 with carburetor engines, with more powerful ones, several points must be taken into account:
- The pulley sizes differ (you need to buy a pulley for an 8-valve engine).
- For Niva cars, you can choose a special U-shaped bar to move the generator to the top. With this modification, less moisture and dirt enter the device, which has a positive effect on service life.
- The installation frames are different (for an old or new type of generator).
- To install powerful electric generators on carburetor cars, the excitation wire (terminal L) should be connected through a resistance (330 Ohm 5V), this is necessary to excite the device when starting the engine.
Procedure for replacing the generator
If the electrical unit fails and repair is impractical, you must first find a replacement. It is recommended to buy a factory version that will fit the fasteners and terminals. Otherwise, the repair will be accompanied by changing the wires.
Replacement process for VAZ 2109-2115:
- Drive the car onto the overpass.
- Remove engine protection.
- Remove the (−) terminal from the battery.
- Move the protective cover away from the positive one, unscrew the fixing bolt and remove the terminal.
- Remove the wires (secured with a block).
- Remove the upper fastening element.
- Dismantle the device.
- Install a new unit so that the fasteners match.
- Secure with the lower and upper bolts.
- Install the belt (preferably a new one).
- Place the terminal, secure it, and return the protective cover.
Attention! If you overtighten when adjusting the belt, the bearings will quickly fail. If the tension is weak, there will be no proper grip and the battery will not be able to charge.
To tighten, you need to turn the adjusting screw, which, when moving clockwise, is tightened, and when moved counterclockwise, it is loosened. It's easy to check - you need to gently press the belt so that it bends no more than 15 mm.
Main problems
Signs by which you can understand that the VAZ 2115, 2113 or 2114 generator brushes need to be replaced are:
- the battery does not charge or runs out of power quickly;
- warning lights on the dashboard are flashing;
- voltage failures;
- on-board electronics turn off or there is not enough power for its operation;
- the headlights begin to flicker or their light has become dim.
All these signs indicate brush wear. The following message appears on the instrument panel.
Replacing the generator on a VAZ 2113, VAZ 2114, VAZ 2115
Welcome! A generator is needed to generate current while the car’s engine is running and the stronger the engine runs (the more revolutions), the stronger the generator and produces current, but at the same time into the on-board network of the car (the on-board network includes various types of devices in a car) and it releases a current of a certain strength into the battery (it releases 13.2-14.6± volts), although it can produce much more (Any generator has a voltage regulator installed, so it prevents more current from breaking into the on-board network so as not to burn it, and also if the engine is running in tension, for example, you have engaged 5th gear and are driving 30-40 kilometers, then the current in the generator will be generated less than 13 volts, but the voltage regulator will correct this current and also level it to the desired value, but this is only if the current does not drop too little, if it even drops to 2 volts, for example, then the regulator simply will not be able to compensate for this and the battery will still work), this is why you need a generator, by the way, thanks to it, if you You don’t know yet, the battery is recharged when it produces current and therefore when the engine is running and the music is playing in the car, the battery’s charge is practically not wasted (It also depends on how the music will work, if the car is equipped with good acoustics, then even with the engine running the battery will start working, since the generator simply will not cope with the load).
Note! To carry out the operation of replacing a generator on a car, you will need to take from the tools: A set of wrenches, as well as a wrench with socket heads (They are simply convenient for unscrewing some hard-to-reach nuts, if you don’t have it, you can use other wrenches instead), Well, take a rag so that you can remove moisture from the generator belt if it is present on it (It’s just because of the moisture that the belt makes a very unpleasant whistle, which almost every person has heard in their entire life)!
Summary:
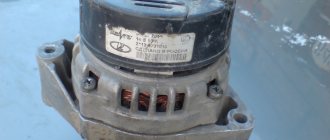
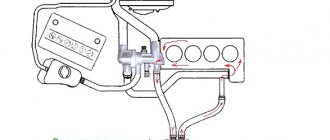
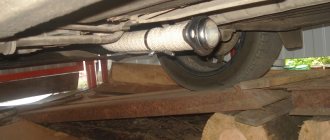
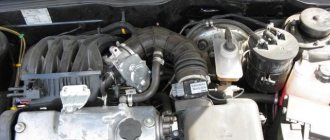
Where is the generator located? If you open the hood and look deep into the left side of the car while standing in front of the car, you will immediately see the generator, it itself is large and for clarity, we have indicated it with an arrow in the photo just below; by the way, the generator has this location on all front-wheel drive cars that are produced in AvtoVAZ, so take this into account for yourself and if you also change it with a friend in his car (If he has front-wheel drive), then immediately point your finger at its location.
When should the generator be replaced? The generator lasts quite a long life, but over time, like any other part, it becomes unusable, it is not necessary to immediately go to the car store and buy a new generator and install it (It’s just not affordable for everyone, since the generator costs quite a lot of money ), or you can sort out the old one so that it starts working again (Read about how to do this in the article entitled: “Repairing a generator on a car”), so let’s talk about malfunctions, if you began to notice that the instruments in your car began to shine brighter then dimmer (Depending on the speed, this could be, for example, you gave gas, the engine spun up and the headlights were bright, but as soon as the speed dropped, the light became dim again, this indicates that the voltage regulator in the generator is faulty ), and also if the battery begins to discharge frequently, then the generator is clearly under repair, or if you have money, you can immediately go to the auto store and change it for a new one.
Electric generator device
The internal structure of a self-generator is very similar to a typical electric motor, but with certain differences. Moreover, differences in detail are present both external and internal. So, in the circuit of a self-oscillator there are such elements as:
- special voltage regulator;
- rectifier assembly (diode bridge).
In conventional electric motors, the above elements are rarely present, and their presence depends on the industry and the specific application of electric motors. But in autogenerators, the presence of such electronic components is simply necessary, since without them voltage surges can occur, as well as exceeding the maximum permissible voltage. Severely over or undervoltage in the on-board network negatively affects the condition of the on-board network, up to the fire of electrical appliances in the cabin (radio, subwoofer, alarm, etc.).
The self-generator is based on a rotor on which the primary winding with parts forming the poles is located. During operation, a magnetic field appears on the winding as a result of the supply of electrical voltage from the battery. The rotor is installed in the housing on special bearings, and a pulley for the belt and an impeller with blades for cooling are also attached to the rotor.
The second main element of the autogenerator is the stator; it is a round metal part (core) with special grooves through which the secondary winding (copper thread) is passed. The design also contains graphite brushes, which are responsible for transmitting voltage to the winding.
To regulate and output the resulting voltage, a diode bridge (converts alternating current to direct current) and a voltage regulator (does not allow overvoltage or undervoltage) are used. The external component of the autogenerator is a ventilated metal case, reinforced with stiffening ribs and having special fasteners for installation in the engine compartment.