The cleanliness and timeliness of oxygen entering the fuel equipment is extremely important to ensure the performance of the vehicle and the power unit as a whole. The completeness of combustion of the fuel mixture determines throttle response, acceleration dynamics, and power indicators. Lack of air leads to depletion of the combustible mixture, engine detonation, and reduced power.
In order to maintain the functionality of the technical product, the manufacturer recommends replacing the fuel filter of the Lada Granta liftback every 30,000 km. mileage In this case, maintenance is carried out every 15,000 km. In practice, this interval is not maintained. Car enthusiasts who care about their vehicles update cleaning elements every 10,000 km.
The replacement process is not at all complicated; every car owner can do it. Specialists are rarely called to the workshop in case of detection of a large-scale breakdown or other malfunction that requires prompt intervention by a professional.
What tool will you need?
After the final decision has been made on self-prevention with subsequent replacement of worn-out elements, we check the availability of the following tools:
- set of heads;
- flathead and Phillips head screwdrivers;
- rags;
- new filter, according to the catalog article;
- empty container for storing waste.
Where is the fuel filter installed?
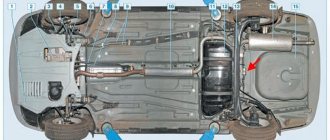
As standard, the purifier is mounted above the fuel tank, on the right side, closer to the threshold of the body. Some car tuning enthusiasts practice moving the filter to the engine compartment, having previously lengthened the fuel supply lines.
However, such a configuration is not entirely correct, at least from a security point of view.
The location of the source in an area of elevated temperature conditions is unsafe. Related link:
How to select and adjust locks on the trunk and doors of the Lada Granta Liftback
How to choose the right fuel filter
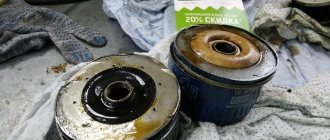
The standard cleaner on the Lada Granta liftback, like on the sedan, is black and opaque. Inside there is paper filling in the form of an accordion. This design does not allow for full and timely detection of cell blockage or foreign objects getting inside.
A good solution was provided by third-party manufacturers, including foreign ones. They made the structure transparent. Which is convenient and practical to use. The driver can open the hood at any time and assess the degree of clogging, replace the Lada Granta Liftback fuel filter with a new one as necessary.
The issue of quality and originality remains important. Lack of information from owners, fraud by sellers, and a wide range of products mislead an inexperienced driver. To minimize the possible risk of buying a counterfeit, always check the catalog part numbers with the actual data in the operating instructions for your car. However, the manufacturer cannot list all verified suppliers, so the list will be limited.
In this case, use the services of official representative offices and dealers. Do not purchase parts or components at unusually low prices, since cheapness is a sign of low quality.
| Article/index/EOM | Price, rub.) |
| LADA 2123-1117-211 | from 250 |
| LYNXauto LF-1122 | from 300 |
| WEEN 140-2167 | from 350 |
| PURFLUX EP180 | from 350 |
| MULLER FILTER FB229 | from 400 |
The above list is not exhaustive and is presented for informational purposes only. May be supplemented with new catalog items as new products are released.
Important points
The procedure outlined above seems quite simple, but, nevertheless, there are a couple of nuances that should be mentioned.
Firstly, gasoline. When the gas lines are unscrewed, it begins to flow directly onto the cap (this happens especially often if the car owner forgot to relieve the pressure in the gas line using the breather, as mentioned above). Yes, a little gasoline leaks out, but the smell of gasoline in the cabin is not what a car owner needs, right? Therefore, before removing the fuel lines, you should put a cloth on the pump cover and carefully insert it with a screwdriver into all the cracks. The rag will absorb the leaked gasoline, then you can throw it away, which will help get rid of the smell in the cabin.
Secondly, the fuel pump retaining plate. As practice shows, this is a fragile thing, and breaking it by carelessly prying it with a screwdriver is not just easy, but very easy. But it’s difficult to find this part on sale; it is only sold complete with a complete fuel pump, and this is a waste of money. The matter is further complicated by the fact that it is not always possible to move this plate out of place with just a flat screwdriver (especially if the car owner is trying to disassemble the pump for the first time), so sometimes you have to resort to using a hammer and chisel, and this, in turn, increases the risk many times over plate breakage.
As you can see, there are no difficulties with independently replacing the pump grid on the Lada Kalina, and if you strictly follow the above instructions, even those who are doing it for the first time will not have any problems. The main thing is to be patient and follow safety precautions. It is imperative to remove the terminal from the battery! Otherwise, a banal mesh replacement can turn into a fire.
Replacing the fuel pump mesh on Grant
I think there is no need to explain once again that the design of the fuel pump on Kalina and Grant cars is not at all different. That is why the entire process of replacing the components of the fuel pump on the above cars will be the same. Also, it is worth noting that when compared with the models of the 10th VAZ family, there are some points that differ.
Typical signs of filter contamination
- unstable operation of the power unit at idle;
- reduction in power, including without load;
- the engine “requires” a shift to lower gears before an ascent or hill;
- starting the engine is complicated, both “hot” and “cold”;
- Gases and exhaust periodically shoot out from the exhaust pipe, which indicates that the combustible mixture is unbalanced, depleted, or enriched.
- A burning smell can be heard near the car, which indicates incomplete combustion of the mixture inside the chamber and the formation of an excessive amount of soot.
Related link:
Crash test Lada Granta Liftback
Recommended fuel filter replacement interval
The manufacturer in the operating instructions prescribes replacement every 30,000 km. In practice, the specified interval is irrelevant for a domestic car, given the quality of the fuel.
Car enthusiasts recommend carrying out preventive maintenance followed by replacement every 10,000 km. In this case, you can count on the longevity of the technical device. Premature replacement of the cleaning element is also justified in the case of systematic filling of the tank by 40 - 60%. The likelihood of sediment formation increases several times.
Every 10,000 km (or once a year)
Mileage is not the only indicator that it is time to take action. If you haven’t made ten in one year, then it’s time to use the memo in the same way. Simply put, you should service your car once a year or every 10,000 km. We list all the necessary maintenance procedures corresponding to a given mileage (time):
The most important procedure is changing the oil. If it is not changed in a timely manner, there is a high probability of a significant reduction in the service life of your car’s internal combustion engine. If the car is “aged”, then it is advisable to use flushing oil. It is necessary to change the oil filter along with the oil, otherwise the replacement procedure will be useless
Buy filters only from trusted manufacturers
If the car is “aged”, then it is advisable to use flushing oil. It is imperative to change the oil filter along with the oil, otherwise the replacement procedure will be useless. Buy filters only from trusted manufacturers.
The air filter also needs to be changed promptly. If you do not replace it in a timely manner, then, at best, the power of the car will noticeably decrease. In the worst case, the filter may rupture, which will lead to wear on the working surfaces of the cylinders and valve seats - and this is already halfway to an expensive overhaul.
Cabin filter - untimely replacement is unlikely to have any effect on the performance of other components of the car, but your lungs probably won’t like it, especially if you live in a dirty city or often drive along dusty roads.
Suspension diagnostics
Don't expect an unpleasant knock while driving - after all, the chassis is an important component of your safety. In addition, a consequence of a worn-out chassis may be a violation of the wheel alignment angles, which will undoubtedly lead to tire wear
Diagnostics of the brake system. Another important element of security is that you probably don’t need to explain to anyone that this system simply needs to be maintained in working order. Check the brake fluid level and any leaks all the way from the reservoir to the brake calipers.
Diagnostics of lighting devices. As a rule, low and high beam headlights make themselves known immediately. The turn signal relay also indicates a malfunction when it accelerates the blinking frequency (this is due to a decrease in resistance). But as for the side lights, brake lights, as well as reversing lights, you may simply not notice their malfunction. In order to diagnose the latter without outside help, it is enough to park the car near the wall in the dark and check the functionality of the light bulbs in the reflection.
Checking the coolant level. Modern cars are equipped with systems that can warn you about an antifreeze leak, but this does not guarantee that it will not be too late. A lack of even a small amount of coolant can lead to overheating of individual engine elements, which will lead to very unpleasant consequences.
The most expensive of all the above will be changing the oil. Filters, as a rule, are not expensive and replacing them is not difficult. To be sure, the last 4 points can be done more often, since self-diagnosis does not require financial costs and can increase the likelihood of timely detection of faults.
Procedure for replacing the fuel filter Lada Granta liftback
Before replacement, we carry out comprehensive diagnostics in order to study the general technical condition of the car and identify possible breakdowns. Based on the data obtained, we make a decision on the advisability of replacement. Often, inexperienced drivers take the obvious for what they want. When, instead of installing a new purifier, a high-voltage wire needs to be replaced due to insulation damage.
The fuel in the line is under pressure, you can’t just take it out and replace it, you must first release the atmosphere.
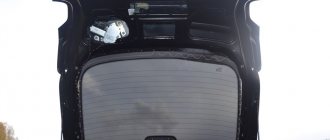
- We place the car within the perimeter of the repair area, turn off the engine, squeeze the handbrake, open the luggage compartment lid;
- On the left side of the steering wheel, on the dashboard, remove the fuse responsible for supplying power to the unit;
- We start the engine, let it idle until it stops completely, until the fuel runs out;
- Leave the starter on for 4 - 5 seconds to completely relieve pressure;
- The work in the cabin is completed, then we squeeze the tip - the retainer on the filter fitting, and remove it;
- There are fuel residues inside the filter, carefully lower it into a plastic container;
- We insert the fuel filter of the Lada Granta liftback and reassemble the structure.
It is important not to confuse the direction of the fittings. Pointer “from the tank towards the engine”. If installed the other way around, the engine will not start due to lack of pressure and fuel supply. Finally, we start the engine and check the tightness of the system. If necessary, tighten the fasteners. The work on independently replacing the fuel filter on the Lada Granta liftback has been completed.
Related link:
Tuning Grants Liftback
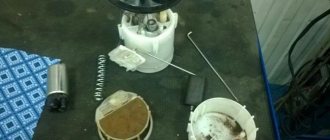
Fuel pump mesh
The mesh is a coarse fuel filter and serves to protect the fuel pump from large particles of debris entering the fuel pump, which can damage it.
The mesh is located in the fuel pump glass and to replace it you need to dismantle it.
Replacing the Granta fuel pump mesh
Relieve the fuel pressure from the fuel line. We dismantle the gas pump glass and take out the pump itself, replacing the mesh in it and assembling the structure in the reverse order.
Reviews from Lada Granta liftback owners
Vladimir (09.14.18): I recently bought a used Granta, the second owner, the master carried out an inspection and recommended replacing the mesh in the gas tank and the fuel filter. Since I don’t understand spare parts, I entrusted the choice to a service station specialist, and they installed LYNXauto LF-1122. I am pleased with the choice, I recommend LYNXauto to car owners to replace the Granta liftback 8 valve fuel filter.
Valery (09/14/18): I am leaving my positive review of the fuel filter from the PURFLUX EP180 company. Good quality, affordable price, originality of products. The engine runs stably, acceleration dynamics are good, consumption is within normal limits.
Vyacheslav (09/14/18): the other day I carried out maintenance on the Lada Granta liftback and replaced all the filters. I didn’t look for anything foreign, I bought something domestic. No worse than analogues, I recommend it.
Why is it needed?
There is a coarse filter that comes first from the gas tank. After all, first the lid where the fuel tank is located is opened, a gun is inserted there, the magic button is pressed and the fuel flows. Yes, it takes a lot of your money along the way, but what can you do? The location of the tank can be on the left or right, but this does not play a special role. Coarse cleaning, which is a mesh that traps large particles of debris.
This is followed by a fine filter. This is exactly what we will talk about. This element is called a fuel filter. With its help, small particles are retained. But even they can penetrate your diesel engine or gasoline injector.
Dust, dirt, debris, rust elements. All this can penetrate the system, causing a clogged pipe, tube, valve, fuel hose, or fuel pump components. Nothing good will come of this if timely replacement is not made.
To understand how to replace the filter, which element to choose and how to choose an analogue for the device you are going to change, you need to have at least a basic understanding of such an important component of the car.
I suggest starting with varieties.
Modern fuel filters installed on Ford Focus, Nissan Almera, Hyundai Solaris, Nexia, Mazda, Opel, BMW e60, Renault Logan and Megane, Kia Rio and many others have at least two degrees of purification.
- First degree. This is a rough cleansing that allows you to get rid of large contaminants. Not to be confused with a regular mesh in the tank, which is not available everywhere.
- Second degree. Fine cleaning. This is the main task that falls on the shoulders of the filter.
And here you probably have the main question - where is the filter device located? I don't know. No, I can answer, but if you tell me specifically what make of your car or what year of manufacture. After all, on the same Chevrolet Niva, different Opel, Toyota, Mazda models, on the Volkswagen Passat B3, as well as on the domestic VAZ 2114, 2112 and 2110, the location may differ.
However, they are always located somewhere between the engine and the gas tank, since the filter's job is to prevent contaminants from entering the engine while the fuel moves from the tank to the engine. What's in the gas tank itself? That's right, a coarse cleaning device. This is an additional filter element so that any unscrupulous gas stations do not spoil your car.
Now let’s talk about the types of filters themselves. What element will be on the car? It depends on the type of engine. There are three of them, as you know. Except for electric motors. Well, there is no need for a fuel filter, as you understand.
Therefore, there are three types of filters:
Location
So you bought yourself a brand new sedan and you think it’s time to change the filter for this engine. Want to choose the best? Well then, take a closer look at Cummins devices. Mann, Hertz. They have proven themselves well, and they cost quite a bit.
You probably know whether your engine is diesel, injection or carburetor
This is important to understand the location of the fine filter, that is, our today's hero
- Carburetor. In these engines, the TF (fuel filter) is placed in front of the carburetor itself, and is often in a transparent housing to control contamination. These are the most basic devices, because the carburetor is the least demanding on the quality of fuel.
- Injector. It uses nozzles and therefore requires high-quality filtration. And the fuel is supplied under high pressure. Therefore, the filters are enclosed in durable metal housings. The TF has to be regularly maintained, cleaned and monitored for its condition. They are placed mainly under the bottom of the car to make it easier to dismantle and replace.
- Diesel. A diesel engine also needs high-quality purified fuel, since the system is quite sensitive. Diesel fuel has a higher moisture content than gasoline. The TF is designed to filter debris and remove accumulated moisture. A separator is provided for this purpose. The location is quite simple - between the engine and the pump that pumps fuel.
Any fuel system must include a TF. They are replaced assembled, that is, there is no point in removing the filter elements themselves (usually special paper), leaving plastic or metal. Be sure to look at the number and article number of the filter that is installed on your machine, and check the operating manual from the factory. This is the only source of truthful information regarding the maintenance of your particular vehicle in this configuration and with this type of engine.